Loading...
Loading...
Loading...
Loading...
Loading...
Loading...
Loading...
Loading...
Loading...
Loading...
Loading...
Loading...
Loading...
Loading...
Loading...
Loading...
Loading...
Loading...
Loading...
Loading...
Loading...
Loading...
Loading...
Loading...
Loading...
Loading...
Loading...
Loading...
Loading...
Loading...
Loading...
Loading...
Loading...
Loading...
Loading...
Loading...
Loading...
Loading...
Loading...
Loading...
Loading...
Loading...
Loading...
Loading...
Loading...
Loading...
Loading...
Loading...
Loading...
Loading...
Loading...
Loading...
Loading...
Loading...
Loading...
Loading...
Loading...
Loading...
Loading...
Loading...
Loading...
This guide describes all the screens of the WorkflowGen Administration Module and provides a complete list of related operating rules. It also describes the built-in workflow applications and how to use them. It is an important resource that will assist you in understanding how the software behaves under various situations.
The guide also includes a list of possible errors along with their explanations.
The WorkflowGen Administration Module is a web application whose main functions are:
Managing directories, groups, and users
Defining processes and global information
Defining security relating to users and processes
Since these operations are highly sensitive, access to and management of the Administration Module should be considered carefully.
The Administration Module can be accessed through the following URL: http://yourwebsite/wfgen/admin/default.aspx.
Depending on the authentication method chosen by the WorkflowGen Administrator, you may have to enter a username and a password when you want to log in to WorkflowGen. These login credentials can also correspond to the ones used when you open a Windows session.
You can choose a language from the home page of the Administration Module. If the list is not displayed, the application has been configured to use a specific language. The country beside the language allows the system to use the correct regional settings in the application (mainly in displaying dates or numeric values).
For example, English (United Kingdom) corresponds to an English GUI with the regional settings of the United Kingdom (date format: dd/mm/yyyy), while English (United States) corresponds to an English GUI with the regional settings of the United States (date format: m/d/yyyy).
Currently, you can choose from the following languages:
English (Australia)
English (Canada)
English (United Kingdom)
English (United States)
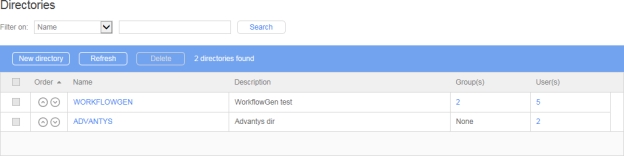
Click Directories in the banner menu to access the Directories screen.
Click Directories to open the Directories list.
Click Processes in the banner menu to open the Process folders list.
Click Participants in the banner menu to open the Participants list.
Click Applications in the banner menu to open the Applications list.
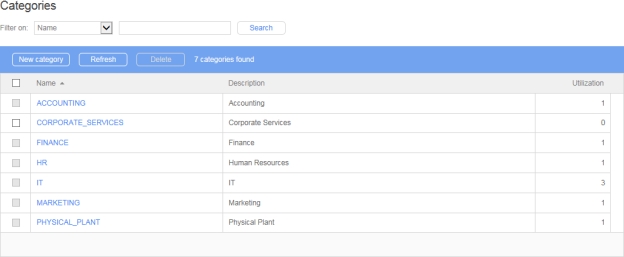
Click Categories in the banner menu to open the Categories list.
Click Global Lists in the banner menu to open the Global Lists list.
Click Portal in the banner menu to access the User Portal.
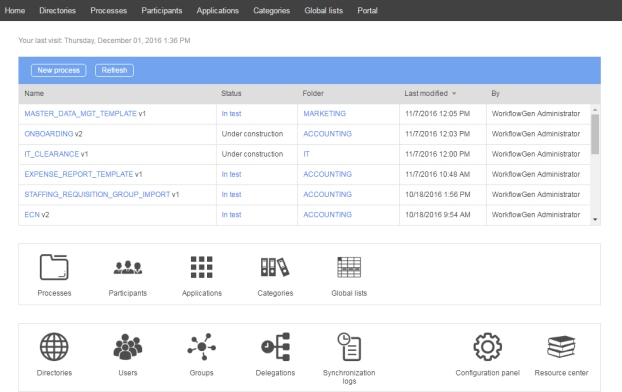
On the Administration Module home page, click an entry in the process list to access the Process workflow, which includes the following tabs:
Information
Participants
Data
Form
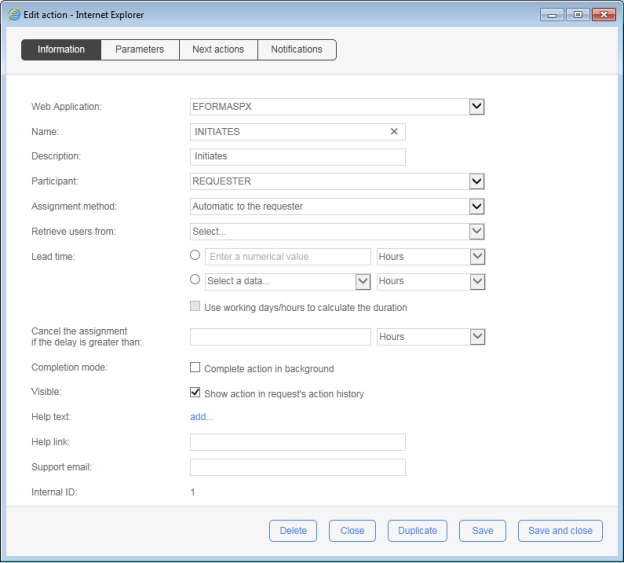
Double-click an action in Graphical view or click an entry in List view to open the Edit action form, which includes the following tabs:
Information
Parameters
Next actions
Notifications
The Process workflow screen also includes the following links:
Full screen
Report
Test
In the process management section on the Administration Module home page, click:
Processes to access the Process folder list and subsequently the Process list and Process form.
Participants to access the Participants list and subsequently the Participants form.
Applications to access the Applications list and subsequently the Application form.
In the user management section on the Administration Module home page, click:
Directories to access the Directories list and subsequently the Directory form (see ).
Users to access the Users list and subsequently the User form (see ).
Groups to access the Groups list and subsequently the Group form (see ).
See for information on how to use these features.
The Configuration Panel includes the following tabs:
General
Portal
Administration
Directory synchronization
See for information on these settings.
Click Resource center to access the WorkflowGen Resource center website.
Most of the information that is kept in the WorkflowGen database is identified through a combination internal ID name.
For technical reasons and legibility, these names must contain only characters: alphanumeric combinations, hyphen (-), and underscore (_) characters (no spaces).
Administrators can limit the characters to the ANSI table or allow the use of the entire range of alphanumeric characters, including double-byte characters (Unicode).
On the Administration tab in the Configuration Panel, select the Name encoding restriction checkbox. In most cases, the name must not be longer than 30 characters.
Access to the Administration Module is limited to users with an administrator profile and users that are participants designated as process managers. However, during the software installation, access control may be deactivated temporarily.
Once authentication is activated, the following restrictions apply:
Administrators have no access restrictions except for the Configuration Panel, which requires specific access rights (see the for more information).
Process managers have access to the process definition and the statistics of their folders; however, they have no control over directories, groups, user management, delegations, global participants, or application management.
Process supervisors can access the statistics of their processes from the User Portal, but cannot log in to the Administration Module.
To maintain the integrity of completed requests, information cannot be deleted if it relates to the process definition or to global data. Similarly, information used in real (active) requests made by users cannot be deleted.
The GETPROCESSDATA workflow application lets you retrieve process data values for a specified request. It is very useful for inter-process communications.
As an initial sub-process action, GETPROCESSDATA provides a flexible alternative to the sub-process parameters, since it involves no versioning management constraints with the parent process.
The required parameter is REQUEST_ID: IN parameter, numeric value. This parameter must contain a valid request ID.
The optional parameters are the process data to update (the parameter name in the processing data name). You must define those parameters on the corresponding action parameters.
To create a workflow action using UPDATEPROCESSDATA, use the following parameters:
REQUEST_ID send value of:
Data: REQUEST_ID _UPDATE
AMOUNT send value of:
Data: AMOUNT_UPDATE
If you want to update AMOUNT with the value of the AMOUNT_UPDATE process data, the request ID to update is stored in a REQUEST_ID_UPDATE process data.
The required parameter request is REQUEST_ID (IN, numeric): the request ID that contains the process data to retrieve.
The other parameters are defined in the workflow action according to your needs.
Parameter name: The name of the remote process data to retrieve
Receive value into: The process data to update
To retrieve the value of the COMPANY process data into the CUSTOMER_COMPANY process data:
Parameter name: COMPANY
Receive value into: CUSTOMER_COMPANY
The process data types must be the same. You can add an exception management to handle possible errors (e.g. invalid request ID).
The required parameter is REQUEST_ID (IN, numeric), which is the request ID that contains the process data to retrieve.
The optional parameter is FORM_DATA_NAME (IN, text), which is the process data name that contains the form data to query. By default, GETFORMDATA uses the FORM_DATA process data name.
The other parameters are defined in the workflow action according to your needs:
Parameter name: The form field full ID (e.g. REQUEST_AMOUNT)
Receive value into: The process data to update
To retrieve the value of the REQUEST_COMPANY form field into the CUSTOMER_COMPANY process data , the process data and the field data types must be the same. You may have to add an exception management to handle possible errors (e.g. invalid request ID).
Applications are the definitions of workflow applications called by WorkflowGen to execute human or system actions.
Categories are keywords associated with processes for search and sort purposes in the User Portal only.
Global Lists allows authorized users to manage data lists to be used with web forms.
Global information can only be managed by users with a WorkflowGen administrator profile.
To participate in a process or manage processes, the user must be identified as a user in WorkflowGen and have an account (username and password) in the company directory that WorkflowGen will use for authentication.
Users can be members of one or more directory groups; however, a directory group cannot belong to another directory group.
A user may have an active or inactive status. If a user’s status is set to inactive, they cannot access the application.
A user can only be truly deleted from the WorkflowGen database if they are not referenced anywhere in WorkflowGen. If they are referenced, then the user will be archived. Archiving means that the username will be renamed and will be set to archived status, and the user will no longer be able to access the application.
Several directories can be managed in WorkflowGen. This is particularly useful when the synchronization module is used. For example, one directory can be managed manually in WorkflowGen while another can be synchronized based on an existing directory (e.g. Active Directory). Even if many directories are being used, each username must be unique across the entire system. If multiple directories are being used to synchronize several Active Directory domains, domain names can be prefixed to the user name to eliminate the unique user issue (in the event that user names are identical across domains).
User management can only be performed by users with an administrator profile.
By default, WorkflowGen is installed with the WORKFLOWGEN directory and one administrative user, neither of which can be deleted.
Français (Canada)
Français (France)
Français (Suisse)
Deutsch (Deutschland)
Deutsch (Schweiz)
Italiano (Italia)
Português (Portugal)
Español (España)
Workflow (in Graphical or List view)
Global Lists to access Global Lists (see Global Lists).
Delegations to access the Delegations list and subsequently the Delegation form (see Delegations).
Synchronization logs to access the Synchronizations logs list and subsequently the View log (see Directory Synchronization).
Remote Approval
Diagnostic
Product information
The Form Designer creates a web form (ASPX and code-behind) that's based mainly on both ASP.NET Framework and WorkflowGen.My libraries.
This gives you the advantage of many possibilities for customizing and integrating the web form to your specific needs, especially in an advanced and integrated development environment such as Visual Studio.
A first version is created, which is done quickly and easily using the built-in form designer. The end-users will then test the first version as proof of concept.
Later, the process can be deployed for production if it meets the business's and end-users' expectations.
If there are custom or advanced functionalities required in a new version that aren't available in the built-in form designer, then the process can be migrated to the web form development.
In order to migrate a process with a built-in form to a process web form, follow these steps:
Create a new version of or duplicate the process.
Uncheck the Built-in form designer option in the New process information tab.
In Visual Studio, open the web form website with the folder path (\wfgen\wfapps\webforms[process name]\V[version number]) and start your development.
All connection strings in \wwwroot\wfgen\web.config are available for use in the Form Designer and Global Lists except for the master database connection string. While the application tries to verify that user-supplied SQL queries used in these contexts are secure and contain only SELECT statements, you should also make sure that exposed connection strings are secured at the database level. This means that if you don’t want a process manager or a Global List manager to be able to update or modify a certain database, the connection string should have read-only access to your database.
Keep in mind that process designers can also use any connection string that they have access to from the Form designer’s code-behind editor. If you want to restrict a Global List manager’s access to a connection string, while still allowing the process designer to use it, you should add the connection string to the web form application’s web.config (\wwwroot\wfgen\WfApps\WebForms\web.config).
Connection strings in web forms'web.config files are not exposed in the WorkflowGen UI, so for process designers to be able to use them, they must know the name of the connection string. This is also a convenient way to give different process managers access to specific connection strings.
You can choose to leave your web form folder ([process name]\V[version number]) as a sub-folder within the web forms web application (\wfgen\wfapps\webforms) or transform this folder into a web application in IIS.
The former case will make your web form dependent and uses the web form's web application resources (e.g. \bin, \App_Data, \App_Resource, \App_Themes, etc.) as it did prior to migration.
The latter case will make your web form as an independent web application. In this case, you'll need to copy the web form's \bin sub-folder to your web form’s folder and refresh the opened project in Visual Studio, if needed.
License error
This operation is not allowed with your license.
Error
Cause
You are not authorized to view this page
The user must be a WorkflowGen user or administrator to access the application.
You are not authorized to access this file
If downloading is secured, only an administrator, a process manager, or a participant with sufficient read rights may access the request files.
Error
Cause
Your license has expired
Your trial period has expired. You must enter a valid serial number to activate your version.
A valid license cannot be found
The license file doesn’t match your serial number.
An XML file to convert
An XSLT file to convert the XML file to any kind of output
A RESULT parameter to receive the output
A RESULT_FILEEXT parameter to know the extension of the output
A RESULT_MIMETYPE parameter to know the MIME type of the output
After XMLTRANS gathers this information, it’s ready to make the transformation, and then returns the context to WorkflowGen so that the workflow can continue.
The following errors can occur during the execution of the transactions:
Code
Description
1
The XML required field is missing
2
The RESULT required field is missing
3
The XSLT required field is missing
4
The XML file is not a valid XML document
5
The XSLT file was not found
6
The XML file was not found
7
Cannot write the output to the RESULT parameter. Verify that the folder security settings are correct.
8
Cannot read the XML file. Verify that the folder security settings are correct.
9
The XSLT file is not a valid XSLT transformation style sheet
10
The received context was not valid
11
If RESULT_FILEEXT or RESULT_MIMETYPE is given, the other one must be given too
Parameter
Type
Direction
Description
REQUEST_ID
Numeric
IN
Request ID of the action to be completed
Parameter
Type
Direction
Description
ACTION_NAME
Text
IN
Name of the action to be completed (the first instance found will be completed)
ACTION_ID
Numeric
IN
Action instance ID of the action to be completed
IMPERSONATE_USERNAME
The optional parameters are the parameters of the action to be completed. You will have to define these parameters in the corresponding action parameters.
If you want to complete an asynchronous web procedure action called MYASYNCACTION, which has the following parameter:
AMOUNT: receive data into TOTAL (you have to create this process data)
Then, in your process, you have to add an action using the COMPLETEACTION application with the following parameters:
Parameter
Type
Direction
Description
REQUEST_ID
Numeric
IN
Send value of MY_REQUEST_ID (a numeric process data containing the request ID of the action to complete, e.g. 1320)
ACTION_NAME
Text
IN
Send value of the name of the action to complete (e.g. MYSYNCACTION)
AMOUNT
Parameter
Type
Direction
Description
DATA_DATETIME1
Date/Time
INOUT
DATETIME type data to copy
DATA_FILE1
File
INOUT
FILE type data to copy
DATA_NUMERIC1
Parameter
Type
Direction
Description
DATA_FILE1
File
INOUT
Send value of FORM_DATA
Retrieve value into FORM_ACTION_ACTION1
MY_PARAMETER_NAME
Text
INOUT
Send value of TEXT_DATA
Retrieve value into OTHER_TEXT_DATA
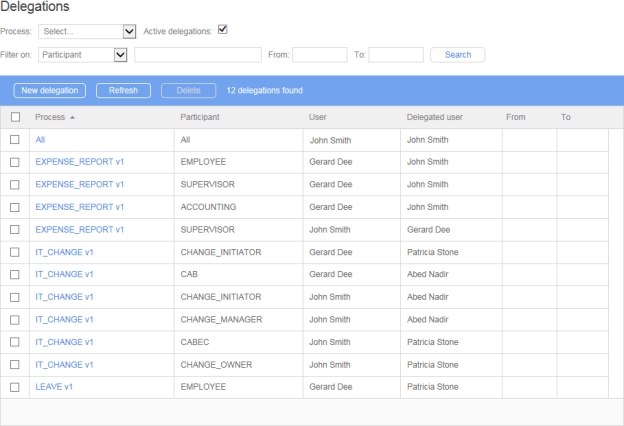
When adding a new delegation, you can decide whether or not to send a notification email to the delegated user via the displayed message box.
A delegation is unique based on the process, the participant, the delegator, the delegatee, the begin date, and the end date. This means that you cannot define multiple time periods for a given delegation.
Deleting a delegation does not delete the associated user.
Delegations are process version-specific:
New versions of a process copy all existing delegations where possible, based on matching participant names.
Since delegations can only be created for active processes, delegations are only carried forward when a versioned process is activated.
A delegatee can only see the delegator’s actions and requests from the version at which they were delegated the role, and going forward if copied by creating a new version and not changed subsequently.
The YOUSIGNCHECK workflow application lets you verify the status of an agreement and download its associated file, which is a concatenation of attached files.
You can verify the status of an agreement and download the file from Yousign based on your status criteria.
Application logs are available. These can be specified by setting the value of the YousignCheckLogLevel parameter in the web.config file to 0 to deactivate logs, 1 for error logs, 2 for information logs, or 3 for debug logs; the default value is 0.
For instructions on how to configure the the Yousign API, see the section in the chapter.
In the following example, the YOUSIGNSEND action is directly followed by the YOUSIGNCHECK action. This action will loop back onto itself until the status changes to done, canceled, expired, deleted, or rejected.
If the status returned meets the condition, the document will be downloaded from Yousign.
With the system loop action function, the YOUSIGNCHECK action will be executed every x seconds until the OUT condition is met.
The DOCAPOSTECHECK workflow application lets you check the status of a transaction and download the associated files.
You can check the status of a transaction and download the file from Docaposte.
Application logs are available. These can be specified by setting the value of the DocaposteCheckLogLevel parameter in the web.config file to 0 to disable logging, 1 for error logs, 2 for information logs, or 3 for debug logs; The default value is 0.
In the following example, the DOCAPOSTESEND action is directly followed by the DOCAPOSTCHECK action. This action will loop back onto itself until the status is other than OPEN.
If the returned status meets the condition, the document will be downloaded from Docaposte.
With the system loop action function, the DOCAPOSTECHECK action will be executed every x seconds until the OUT condition is met.
On the Administration Module home page, click Directories to display the Directories list.
Links
Remarks
To edit a directory, click its name in the Directory list.
The WORKFLOWGEN directory cannot be deleted.
A directory containing users or groups cannot be deleted.
A directory can only be deleted if it is empty.
The SENDMESSAGE workflow application lets users send SMS notifications using the Twilio SMS platform; to use this application, you’ll need to set up an account on the Twilio website at https://www.twilio.com/sms.
The SENDMESSAGE application requires two parameters (BODY and TO) and associating these with their corresponding IDs.
The values that correspond to the ACCOUNT_SID, AUTH_TOKEN, and FROM parameters are required to connect to Twilio, but these are generally configured in the Instant messaging section on the General tab in the Configuration Panel. However, if they have been configured in the SENDMESSAGE action in the process, these values will override any corresponding values set in the Configuration Panel.
* These parameters must be associated to a Twilio account.
Text
IN
Username of the user who will be associated with completing the action
Numeric
IN
Send value of MY_AMOUNT (a numeric process data containing a value for the amount, e.g. 1234.56)
Numeric
INOUT
NUMERIC type data to copy
DATA_TEXT1
Text
INOUT
TEXT type data to copy
Delegation end date (included); if not defined, the delegation is unlimited.
If prior version actions and requests also need to be delegated, an administrator must use the administrator delegation screen to add the prior versions' delegations.
Links
Remarks
New delegation
Displays a blank delegation form to add a new delegation
Refresh
Refreshes the delegations list
External filters
Remarks
Process
Displays the delegations of the selected process (only active or archived processes are listed)
Filter on
Remarks
Participant
Filter by participant
User
Filter by user (delegator)
Delegated user
Filter by delegated user
Column
Remarks
Process
Process name
Participant
Participant name
User
User name (delegator)
Delegated user
Delegated user name
From ...
Delegation start date (included); if not defined, the delegation is unlimited.
To ...
Agreement status
Parameter
Type
Direction
Description
YOUSIGN_SIGNATURE_ID
TEXT
IN
ID of the Yousign signature to verify
Parameters
Type
Direction
Description
YOUSIGN_API_KEY
TEXT
IN
Yousign API key
By default, this value comes from the YousignApiKey parameter in the web.config file.
YOUSIGN_HOST_SERVER
TEXT
IN
Yousign host server (e.g.: https://api.yousign.app/v3)
By default, this value comes from the YousignHostServer parameter in the web.config file.
Parameter
Type
Direction
Description
VALID_STATUS_LIST
TEXT
IN
Valid status to download the document
Possible values:
draft
ongoing
done
deleted
expired
canceled
approval
rejected
declined
Default: done,canceled,expired,deleted,rejected
YOUSIGN_DOCUMENT
FILE
OUT
Yousign document
YOUSIGN_STATUS
TEXT
OUT
IN
Docaposte host server
By default, this value comes from the DocaposteHostServer parameter in the web.config file.
OUT
Transaction status
Parameter
Type
Direction
Description
DOCAPOSTE_TRANSACTION_ID
TEXT
IN
ID of the transaction to check
Parameters
Type
Direction
Description
DOCAPOSTE_USERNAME
TEXT
IN
Docaposte username
By default, this value comes from the DocaposteUsername parameter in the web.config file.
DOCAPOSTE_PASSWORD
TEXT
IN
Docaposte password
By default, this value comes from the DocapostePassword parameter in the web.config file.
DOCAPOSTE_HOST_SERVER
Parameters
Type
Direction
Description
DOCAPOSTE_DOCUMENT_NAMES
TEXT
IN
Name(s) of the document(s) sent for signature(s)
DOCAPOSTE_DOCUMENTx
FILE
OUT
Signed document(s), where x is the document number
DOCAPOSTE_STATUS
TEXT
TEXT
IN
Sender’s phone number, which must contain the country code (using a + before the country code is optional, e.g. +15551234567) *
MESSAGE_SID
Text
OUT
Alphanumeric code returned to identify successfully sent messages; for more information, see
ERROR_MESSAGE
Text
OUT
Message returned in case of error; for a list of Twilio error messages and codes, see
ERROR_CODE
Text
OUT
Error code returned in case of error; for a list of Twilio error messages and codes, see
Parameter
Type
Direction
Description
BODY
Text
IN
Message text
TO
Text
IN
Recipient’s phone number, which must contain the country code (using a + before the country code is optional, e.g. +15551234567)
Parameter
Type
Direction
Description
ACCOUNT_SID
Text
IN
Account security identifier *
AUTH_TOKEN
Text
IN
Account authentication token *
FROM
Text
Links
Remarks
New participant
Displays a blank participants form to add a new delegation
Refresh
Refreshes the participant list displayed
Filter on *
Remarks
Name
Filters by participant name
Description
Filters by participant description
* A filter can be applied to a part of a field.
Columns
Remarks
Name
Participant’s name (a link displays the participants form in edit mode)
Description
Participant description
Utilization
Number of processes the participant belongs to, added to the number of files the participant is a manager of
Users
Number of potential users of the participant
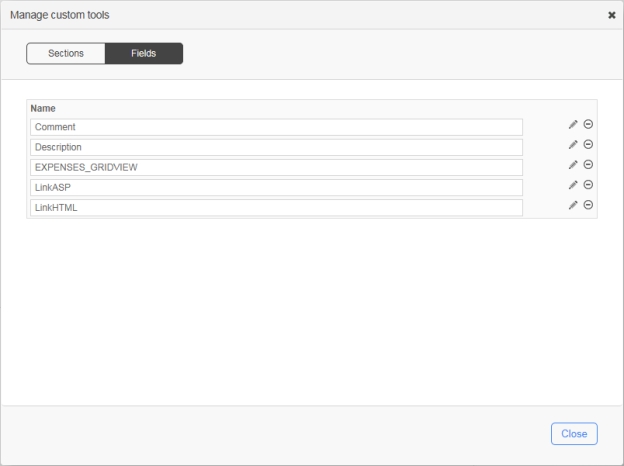
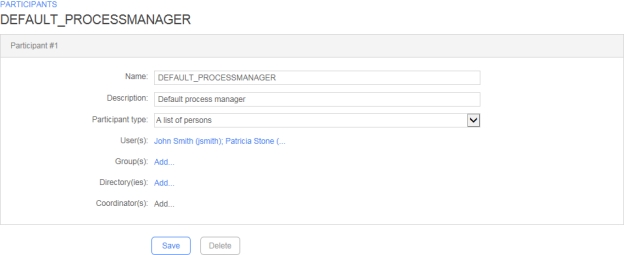
Fields
Remarks
Name
Unique identifier for the participant; must respect nomenclature and be limited to 30 characters (required field)
Description
Participant description limited to 255 characters (required field)
Participant type
Type of participant defining possible associations to the directory (required field): Person, List of persons, or List of persons with coordinator(s) (a link allows associated users to be added or deleted)
User(s)
List of users associated to a participant (a link allows associated users to be added or deleted)
Group(s) [1]
List of groups associated to a participant (a link allows associated groups to be added or deleted)
Accessible only to participants of the List of persons and List of persons with coordinator type.
Accessible only to participants of the List of persons with coordinator type.
Fields
Remarks
Name *
Filters by person’s name
Available
List of possible associations to the directory
Selected
List of existing associations to the directory
* Visible only if associated with a user or a coordinator and if the number of users in the database is higher than the limit set by the software administrator.
A Person type participant is associated with a single user.
A List of persons type participant is associated to one or more users and/or groups and/or directories.
A List of persons with coordinator type participant is associated with one or more coordinators, and to one or more users and/or groups and/or directories.
When adding users, groups, and directories to a participant, note that the list is cumulative in that adding 3 users, 2 groups, and 4 directories will result in a list of users that contain the sum of those users, groups, and directories.
A group or directory does not need to be specific to add users that belong to those groups or directories; adding those groups or directories will result in adding all the users that are part of those groups and directories to the participant list.
The following conditions apply when changing the participant type:
Person to List of persons or List of persons with coordinator(s): The participant must not be used in a process action.
List of persons to Person: A single user must be associated to the participant, and the participant must not be used in a process action.
List of persons to List of persons with coordinator(s): Add at least one coordinator.
List of persons with coordinator(s) to List of persons: The participant must not be used in a process action where the assignment is made by the coordinator.
A participant cannot be deleted if the person (or persons) is part of a process or is a process/folder manager.
New directory
Displays a blank directory form to add a new directory
Refresh
Refreshes the directory listing
Delete
Delete a directory
Columns
Remarks
Order
Use the up and down arrows to change the order of the list
Name
Directory name (a link displays the directory form in edit mode)
Description
Directory description
Group(s)
Number of groups associated to the directory (a link displays the corresponding groups)
User(s)
Number of users associated to the directory (a link displays corresponding users)
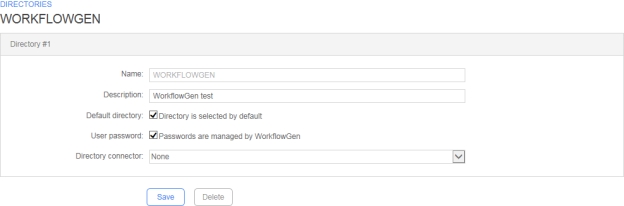
Fields
Remarks
Name
Unique identifier for the directory; must respect nomenclature and be limited to 50 characters (required field)
Description
Directory description limited to 255 characters (required field)
Default directory
If checked, the directory is displayed first among the directory selection lists in the Administration Module
User password
Check to allow WorkflowGen to manage passwords
Directory connector
Various sources that can be used for authentication management
Links
Remarks
New category
Displays a blank categories form to add a new category
Refresh
Refreshes the displayed category list
Filter on *
Remarks
Name
Filters by category name
Description
Filters by category description
Columns
Remarks
Name
Category name (a link displays the category form in edit mode)
Description
Category description
Utilization
Number of processes listed in the category
Fields
Remarks
Name
Unique identifier for the category; must respect nomenclature and be limited to 30 characters (required field)
Description
Category description limited to 255 characters (required field)
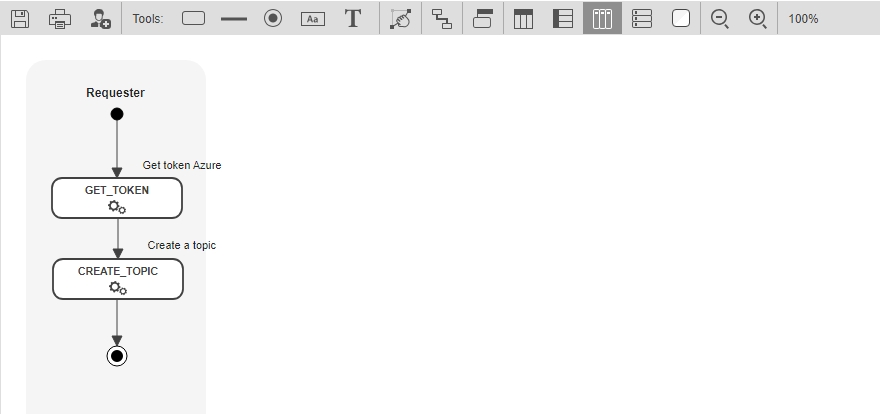
The STARTPROCESS workflow application lets you launch a new request with the corresponding parameters. It provides a simple solution for inter-process communications.
There are three ways to use STARTPROCESS to launch a new request:
Process ID
Process name with process version
Process name with test
You can define other parameters as needed in the workflow process to launch; for example COMPANY (text type IN parameter), e.g. ACME_COMPANY.
If there are parameters that are no longer required by the selected sub-process, they become invalid and will appear in this list and can be deleted manually.
WorkflowGen supports VBScript and JavaScript expressions in action parameters, which can be created either directly as action parameter values, or in TEXT type process data mapped to action parameters as IN values.
Under Send the value of in the Edit parameter panel, choose a text and place the expression in the text area.
Next to Scripting, check Enable, then choose either JavaScript or VBScript.
In the Edit data panel, place the expression in the Default value text area.
Tip: Click the pencil icon next to the Default value text area to open a larger text editor that includes JavaScript and VBScript syntax highlighting.
Specify the language either on the Mapping tab in the Form Designer, or in the Edit parameter panel:
All WorkflowGen macros (except notification macros) are fully supported in both languages and are enclosed by < >(e.g. <WF_PROCESS_INST_ID> for the request number).
In both languages, the expected result must be either a number, a string, or a date.
This example would return the request number plus 5 in both JavaScript and VBScript:
To create custom menus in the Administration Module, you must create and modify an XML file called admin.xml in the CustomMenu folder located in the \wwwroot\wfgen\App_Data\customMenus folder.
These custom menus will then be available as extra menu options in the Administration Module. WorkflowGen supports two levels of custom menu items.
Menu items can be secured by user profile.
You can also use images in a custom theme. To do this, create a new Theme package for WorkflowGen and direct the icon path to its location in the \wfgen\App_Themes\MYTHEME\admin\images folder.
The default path is \wfgen\App_Themes\Default\admin\images. You can also add your custom images to this folder and use them from the Default theme folder (see the example below).
admin.xml fileTo create custom menus in the User Portal, you must create and modify an XML file called portal.xml in the CustomMenu folder located in the \wwwroot\wfgen\App_Data\customMenus folder.
These custom menus will then be available as extra Menu options on the User Portal home page.
Menu items can be secured by user profile.
You can also use images in a custom theme. To do this, create a new Theme package for WorkflowGen and direct the icon path to its location in the \wfgen\App_Themes\MYTHEME\portal\images folder .
The default path is \wfgen\App_Themes\Default\portal\images. You can also add your custom images to this folder and use them from the Default theme folder (see the example below).
portal.xml file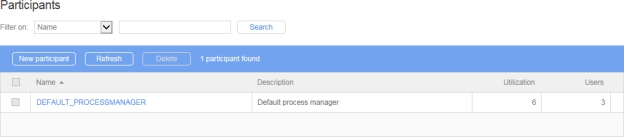

IN
Version of the process to launch
TEST
Text
IN
Test mode
Y: Launch a test version
N: Launch the active version
Parameter
Type
Direction
Description
PROCESS_ID
Numeric
IN
Process ID of the request to launch (to be used independently, without the other parameters)
PROCESS_NAME
Text
IN
Process name of the request to launch
PROCESS_VERSION
Parameter
Type
Direction
Description
REQUEST_ID
Numeric
OUT
Returns the ID of the new request
IMPERSONATE_USERNAME
Text
IN
Username of the impersonating user
Parameter
Type
Direction
Description
PROCESS_ID
Numeric
IN
Send value of MY_PROCESS_ID (a numeric process data containing the ID of the process to start, e.g. 1320)
Parameter
Type
Direction
Description
PROCESS_NAME
Text
IN
Send value of MY_PROCESS_NAME (a text process data containing the name of the process to start, e.g. LEAVE_APPLICATION)
PROCESS_VERSION
Numeric
IN
Send value of MY_PROCESS_VERSION (a numeric process data containing the version number of the process to start, e.g. 2)
Parameter
Type
Direction
Description
PROCESS_NAME
Text
IN
Send value of MY_PROCESS_NAME (a text process data containing the name of the process to start, e.g. LEAVE_APPLICATION)
TEST
Text
IN
Send value of MY_TEST (e.g. Y)
Numeric
Specifies if the custom link will be displayed in the new menu item only or also on the Administration Module home page (default)
Possible values: true (default) or false
Icon
Specifies the path to a custom icon to be displayed instead of the default circular arrow icon
Specifies the path to a custom icon to be displayed instead of the default "Earth" icon
Parameter
Description
Title
Specifies the title of the node
The title of the menuItem node will be the name used for the menu item on the Administration Module home page.
Profile
Specifies if the link will be visible to users with an Administrator or User profile
Possible values: user or admin
✏️ Note: If user is specified, it does not grant access to all users but only to those that have access to the Administration Module (for example, folder managers).
URL
Specifies the URL to add as a custom link
📌 Example: http://www.workflowgen.com/
Description
Specifies a description for the custom link.
📌 Example: Visit the WorkflowGen website!
Target
Specifies if the custom link will be opened within the WorkflowGen page (default) or in a new browser
Possible values: "" (default) or _new
Parameter
Description
Title
Specifies the title of the node
The title of the menuItem node will be the name used for the menu item on the User Portal home page.
Profile
Specifies if the link will be visible to users with a User, Supervisor, Manager, or Administrator profile
Possible values:
user
supervisor
manager
admin
URL
Specifies the URL to add as a custom link
📌 Example: http://www.workflowgen.com/
Description
Specifies a description for the custom link.
📌 Example: Visit the WorkflowGen website!
Target
Specifies if the custom link will be opened within the WorkflowGen page (default) or in a new browser
Possible values: "" (default) or _new
showInHomepage
Icon
<?xml version="1.0" encoding="utf-8" ?>
<menu>
<menuItem title="My links..." profile="user">
<menuItem title="Advantys" url="http://www.advantys.com/" target="_new" description="Advantys Web Site" profile="user" showInHomepage="true" />
<menuItem title="WorkflowGen" url="http://www.workflowgen.com/" target="" description="WorkflowGen Web Site" profile="admin" icon="myicon.gif" showInHomepage="false" />
</menuItem>
</menu><?xml version="1.0" encoding="utf-8" ?>
<menu>
<menuItem title="WorkflowGen Resource Center" profile="user" url="http://www.workflowgen.com/resources" description="Open the WorkflowGen Resource Center web site" target="_new" icon="" />
<menuItem title="WorkflowGen" profile="supervisor" url="http://www.workflowgen.com/" description="Open the WorkflowGen website" target="_blank" icon="" />
<menuItem title="Advantys" profile="manager" url="http://www.advantys.com/" description="Open the Advantys web site" target="_self" icon="" />
<menuItem title="Google Search" profile="admin" url="http://www.google.com/" description="Open Google Search" target="_parent" icon="search_l.gif" />
<menuItem title="Yahoo!" profile="user" url="http://www.yahoo.com/" description="Open the Yahoo! website" target="_top" icon="" />
<menuItem title="New Leave Application" profile="user" url="/wfgen/show.aspx?QUERY=START&P=LEAVE_APPLICATION" description="Launch a new leave application" target="_new" icon="http://dev4/wfgen/App_Themes/Default/portal/images/request_followup_form_l.gif" />
</menu>Save changes
Save and close button
Save changes and close the screen
Add button
Save the current parameter and display a blank form to add a new parameter
Delete button
Allow the deletion of the current parameter
Close button
Close the screen without saving
OR
On the Mapping tab in the Form Designer, choose the data's Value IN button, select the expression from the Data drop-down list, check Enable next to Scripting, then choose either JavaScript or VBScript.
Columns
Remarks
Parameter
Name of the application or sub-process parameter required by the action; a link displays the parameter form in edit mode
Direction
Parameter direction
Value
Process data associated to the parameter; a link displays the parameter form in edit mode
Columns
Remarks
Parameter
Parameter name; a link displays the parameter form in edit mode
The Add link displays a blank parameter form to add new data.
Direction
Parameter direction
Value
Data associated to the parameter
Deletion
Clicking x deletes the parameter
Fields
Remarks
Parameter
Unique identifier for the parameter; must respect nomenclature and be limited to 30 characters (required field)
Application parameters such as FORM_FIELDS_READONLY are available through the Other parameters button. This is commonly associated with the name/ID of the form field.
✏️ Note: Parameter names should respect the following XML naming rules:
They should begin with a letter or an underscore
They should contain only letters, digits, hyphens, underscores, and periods
They should not contain spaces
They should not begin with the letters XML in any case (e.g. xml or Xml)
For more information, see .
Browse
This button is only visible for actions that have at least one default application parameter defined
Direction
Parameter direction:
IN: When the action is instantiated, the value of the parameter is initialized with a text, or the value of a macro or process data.
OUT: When the action is being closed, the value of the parameter is stored in a process data value.
INOUT: When the action is instantiated, the value of the parameter is initialized with a text, or the value of a macro or process data, and then, when the action is being closed, the value of the parameter is stored in a process data value.
Send the value of
The IN value to send to the parameter Depending on the type of data to be associated, this value can be process data, a macro or a freeform text value.
Receive the value into
The process data where the OUT value of the parameter is stored
Save button
Users are associated with a group only when the group is saved (at creation or when manually re-saved). If synchronized, the user list is refreshed at the time of the synchronization. If no synchronization has been defined for that directory, users in the virtual groups of that directory will not be updated automatically.
Links
Remarks
New group
Displays a blank group form to add a new group
Refresh
Refreshes the group list displayed
External filters
Remarks
Directory
Displays the specified group directory
Type
All
Directory
Query
Filter on *
Remarks
Name
Filters by group's name
Description
Filters by group's description
Query
Filters by group’s query
Filters by group's email address
Group code
Filters by group's code
* A filter can be applied to part of a field.
Columns
Remarks
Multi-select checkboxes
Actions:
Activate the selected group’s members
Deactivate the selected group’s members
Delete the selected groups
Name
Name of the group (a link displays the group form in edit mode)
Description
Description of the group
Users
Number of users associated to the group (a link displays the corresponding users)
Directory
Group directory
✏️ Note: This column is only visible when you select All from the Directory drop-down list.
Fields
Remarks
Directory
Group directory
Name
Unique identifier for the group in the directory (required field)
Description
Group description (required field)
Query
Statement allowing a group definition based on query parameters (directory filter); see below for
(Help)
Help on query syntax (field name list)
User of a group: {ISMEMBER(FINANCE)}
Users from a defined city: CITY = 'LOS ANGELES'
Combinations, such as: Country='USA' and {ISMEMBER(FINANCE)}
Deleting a group does not delete the associated users.
All parameters are optional, and parameter names can be set by the process designer. To copy a data from one to another, the only action required is to set the default value as the data to copy and set the data into which you want to retrieve it. The parameters’ directions must be INOUT. There is no limit to the number of parameters.
Parameter
Type
Direction
Description
FORM_DATA
File
INOUT
The merge target FORM_DATA. All FORM_DATA_SOURCE parameters will merge into this parameter’s default value (IN) and will update the specified data (OUT) with the result.
FORM_DATA_SOURCE1
File
IN
Specific form data to merge into the target form data.
FORM_FIELDS_MERGE1
Parameter
Type
Direction
Description
FORM_DATA_SOURCE[2..N]
File
IN
Specific form data to merge into the target form data.
FORM_FIELDS_MERGE[2..N]
Text
IN
The fields to merge from FORM_DATA_SOURCE[2..N] to FORM_DATA. It also supports the wildcard character.
FORM_ARCHIVE
Parameter
Type
Direction
Description
FORM_DATA
File
INOUT
Send value of FORM_DATA
Receive value of FORM_DATA
FORM_DATA_SOURCE1
File
IN
Send value of FORM_DATA_VALIDATES_ACCOUNTING
FORM_FIELDS_MERGE1
Parameter
Type
Direction
Description
FORM_DATA
FILE
INOUT
Contains the form data: the dataset in .NET to store the data to/from the WorkflowGen XML file (see below for an example of this file) WorkflowGen generates this file at every form submit and no default value needs to be defined. WorkflowGen will create and update this file automatically.
FORM_URL
TEXT
IN
Used to display the ASP.NET form that users complete during process execution or whose fields are populated with default values defined during process design
It should contain the path/location of the blank form that can be stored in the process data or associated directly to this parameter, and can be an absolute or relative path.
An XML file formData.xml containing:
/wfgen/WfApps/WebForms/MyFirstWebForm/v1/Form.aspx
You can pre-populate web form fields by specifying which values are to populate which form fields. This is done by providing the field name to an action parameter as an IN or INOUT parameter and then sending the value of a freeform text, a WorkflowGen macro, or a process data.
Rule: Display the requester’s name in the web form field called REQ_NAME when the form loads.
Method: Associate the form field name with the Requester.Name macro.
You can store the various web form field values in the process data by specifying which field values are to be stored to which process data. This is done by providing a field name to an action parameter as an OUT (or INOUT) parameter and by retrieving that field value to a specified process data.
Rule: Retrieve the Manager's answer/decision in process data called MGR_DECISION
Method: Associate the form field name with pre-defined process data
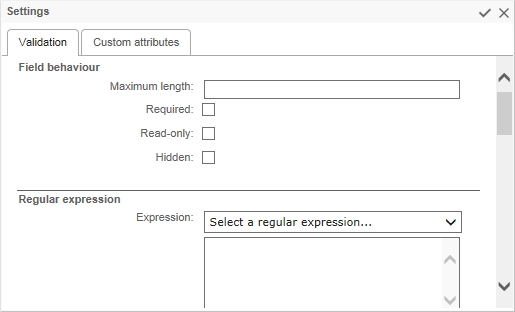
You can control the required, read-only, and hidden ASPX form field properties through the action parameters without developing any .NET code. The value of the parameter has to be set to a list of fields to set (or not) separated by a comma or a semicolon. This list supports the generic wildcard character * (asterisk) and the exclusion character ^ (caret). A standardized field naming convention makes it easy to set the various field properties per action.
Parameter
Type
Direction
Description
FORM_FIELDS_READONLY
TEXT
IN
List of read-only fields
FORM_FIELDS_REQUIRED
TEXT
IN
List of required fields
FORM_FIELDS_HIDDEN
Rule: The fields EMP_NAME and EMP_DATE are required
Method: FORM_FIELDS_REQUIRED = EMP_NAME, EMP_DATE
Rule: All the fields are set to read-only except the fields with a name that begins with EMP_
Method: FORM_FIELDS_READONLY = *, ^EMP_*
Rule: All the fields are set to visible except the DATE field and the fields with a name that begins with SUP_ and ends with _APP
Method: FORM_FIELDS_HIDDEN = ^*, DATE, SUP_*_APP
This is a way to have a static copy of the form, so that the copy can be viewed, printed, or sent by email without having to create any additional web form code.
FORM_ARCHIVE: HTML static copy of the ASP.NET form (OUT)
The value of the filename has to be set in the initial XML file:
<FORM_ARCHIVE>form_archive.htm</FORM_ARCHIVE>
As well, the dataset must have a field named FORM_ARCHIVE.
WorkflowGen handles this, so no extra work by the process or form designers is needed.
When the web form is submitted by the end-user, the EFORMASPX application will create a static copy of the form and store it within the WorkflowGen directory. WorkflowGen will then be able to link this static copy to the FORM_ARCHIVE parameter.
The only things that the process designer needs to do are:
Create a process data to store the static form (generated by WorkflowGen).
Associate it to the FORM_ARCHIVE action parameter.
Directory(ies) [1]
List of directories associated to a participant (a link allows associated directories to be added or deleted)
Coordinator(s) [2]
List of coordinators associated to a participant (a link allows associated coordinators to be added or deleted)


The Global Lists module allows authorized users to manage data lists from the Administration Module to be used with web forms.
Global Lists management provides a solution to manage and centralize data to fill drop-down lists in your web forms.
There is no limit to the number of items in a Global List, which can have up to 20 columns. Good user interface performance depends on the number of cells (items × columns), and is optimized for at least 5000 cells (for example, 1000 items with 5 columns or 250 items with 20 columns).
The supported data types for columns are text, numeric, or date.
The data that populate a Static Global List come from within the user interface.
The data that populate a Dynamic Global List come from a database. The content of the list is updated each time the web form is executed.
Click the Define link to define or edit a global list.
You can import data into a global list from a file or a copy of your clipboard. The supported formats are WorkflowGen Global List XML or CSV.
The CSV format must be as follows:
By default, columns are considered as text data types; therefore, if all columns are text data types, it is not necessary to specify the data types.
In this case, the second line is used to set the columns’ data types.
To protect some data like double quotes, commas, etc., you can enclose the string with double quotes.
You can export data from a global list to a file. The supported formats are WorkflowGen Global List XML or CSV.
All connection strings in \wwwroot\wfgen\web.config are available for use in Global Lists and the Form Designer except for the master database connection string. While the application tries to verify that user-supplied SQL queries used in these contexts are secure and contain only SELECT statements, you should also make sure that exposed connection strings are secured at the database level. This means that if you don’t want a process manager or a Global List manager to be able to update or modify a certain database, the connection string should have read-only access to your database.
Keep in mind that process designers can also use any connection string that they have access to from the Form Designer’s code-behind editor. If you want to restrict a Global List manager’s access to a connection string, while still allowing the process designer to use it, you should add the connection string to the WebForm application’s web.config (\wwwroot\wfgen\WfApps\WebForms\web.config).
Connection strings in the WebForms web.config are not exposed in the WorkflowGen UI, so for process designers to be able to use them, they must know the name of the connection string. This is also a convenient way to give different process managers access to specific connection strings.
The DOCUSIGNCHECK workflow application lets you check the status of an envelope and download its associated file, which is a concatenation of attached files.
You can check the status of an envelope and download the file from DocuSign according to your status criteria.
Application logs are available. These can be specified by setting the value of the DocuSignCheckLogLevel parameter in the web.config file to 0 to deactivate logs, 1 for error logs, 2 for information logs, or 3 for debug logs; the default value is 0.
There are two ways to configure DocuSign account information: you can define the configuration in the web.config file or in the Configuration Panel, or you can manage the configuration on each DOCUSIGNCHECK action.
It's necessary to have authorized your DocuSign application for use. To do this, go to the following address: <SERVER>/oauth/auth?response_type=code&scope=signature%20impersonation&client_id=<CLIENT_ID>&redirect_uri=<REDIRECT_URI>
<SERVER>: https://account.docusign.com (production) orhttps://account-d.docusign.com
In the following example, the action is directly followed by the DOCUSIGNCHECK action. This action will loop back on itself until the status changes to signed, completed, voided, or declined.
If the status returned meets the condition, the document will be downloaded from DocuSign.
With the system loop action feature, the DOCUSIGNCHECK action will be executed every x seconds until the OUT condition is met.
Custom notification templates can be used instead of the default WorkflowGen notification templates. These templates can be created in HTML or as plain text and can also use many regular WorkflowGen macros to display process-specific information.
For WorkflowGen to use the custom notifications, they must be added to the process data as FILE type.
To do this, first create new process data for each template to be used, then browse to and attach the custom template to be used.
WorkflowGen can use an unlimited number of custom notifications per action. To add a custom notification, follow the steps below.
On the Notifications tab, in the Additional section:
Select the event that will cause the notification.
Select the recipient of the notification.
Select the process data that contains the attached notification template. You can choose the custom template created or use the default WorkflowGen template.
To create a template, use a text editor to create a file as follows:
To create a custom subject line for the templates, the first line in the HTML template must be SUBJECT: followed by the subject line to display. Macros may also be used here.
Create an HTML page that will act as a template for the email. In order to support Unicode, we recommend saving the file using UTF-8 encoding and adding a UTF-8 character set in the header of the HTML page, as shown below. CSS styles can also be applied within the HTML page.
Add images to standard notification templates (custom or built-in, e.g. \wfgen\App_Data\Templates\Emails). Image tags whose source (src="") begin with http are not included in the email and simply related. Image tags whose source begins with a drive letter (e.g. C:\) will be included in the email and result in a larger size email. However a connection to the server is not required.
The image is included in the message:
The image is not included in the message:
A non-Unicode text notification template can be created using a text editor such as Notepad and must be saved as a .txt file.
In addition to some regular macros that are available, the following macros may also be used in the custom notification templates.
The ADOBESIGNCHECK workflow application lets you verify the status of an agreement and download its associated file, which is a concatenation of attached files.
You can verify the status of an agreement and download the file from Adobe Sign based on your status criteria.
Application logs are available. These can be specified by setting the value of the AdobeSignCheckLogLevel parameter in the web.config file to 0 to deactivate logs, 1 for error logs, 2 for information logs, or 3 for debug logs; the default value is 0
For instructions on how to configure the Adobe Sign API, see the section in the chapter.
In the following example, the ADOBESIGNSEND action is directly followed by the ADOBESIGNCHECK action. This action will loop back onto itself until the status changes to SIGNED, APPROVED, CANCELLED, EXPIRED, or ARCHIVED.
If the status returned meets the condition, the document will be downloaded from Adobe Sign.
With the system loop action function, the ADOBESIGNCHECK action will be executed every x seconds until the OUT condition is met.
The main WorkflowGen modules can be accessed directly from the address bar of your browser by entering the URLs for each.
http://YOURSITE/wfgen/default.aspx
http://YOURSITE/wfgen/admin/default.aspx
To access the Configuration Panel directly, use the following URL:
http://YOURSITE/wfgen/admin/Config.aspx
For information on how to use WorkflowGen URLs for integration, see the section in the .
Processes are organized in folders administered by managers. Only one folder level is possible in WorkflowGen.
A folder is assigned to a global participant. The persons who are part of that participant are known as folder managers or process managers. A manager may be one or more persons. However, the participant type List of persons with a coordinator cannot be used for the purpose of assigning folder managers.
Managers have full access to the process definition of their processes, but not to other folders or other administration features.
Users with a WorkflowGen administrator profile have complete access to all folders and their associated processes.
The Edit condition panel allows a condition (evaluated during the transition to the next action) to be modified. The banner located above the input area allows the condition’s expression syntax to be edited quickly. Any JavaScript or VBScript expression with a correct syntax can be used as a condition (choose either JavaScript or VBScript next to Language). The syntax is validated upon saving the condition or by clicking the Check the syntax button.
The SENDHTTPPOST workflow application lets you create outgoing webhooks to external systems. Webhooks allow an API to exchange information with other applications through HTTP POST requests, and can be used to build integrations with extendable applications such as Slack, GitHub, and Dropbox. For example, they can be used for notifications when an expected event (as previously configured by the user) has occurred. Since they allow real-time communication, webhooks are efficient and performant.
The SENDHTTPPOST workflow application sends outgoing webhooks to external applications using JSON or URLENCODED payloads. SENDHTTPPOST will then receive and process the response from the external API. For more information, see the topic on the .
For an example of how you can use SENDHTTPPOST to send messages to Slack channels from WorkflowGen, see
<WF_PROCESS_INST_ID> + 5(function(){
var today = <WF_SYSTEM_DATE>;
var tomorrow = new Date();
tomorrow.setDate(today.getDate()+1);
return tomorrow;
})();function test(){
var today = <WF_SYSTEM_DATE>;
var tomorrow = new Date();
tomorrow.setDate(today.getDate()+1);
return tomorrow;
}
test();<?xml version="1.0" encoding="UTF-8" ?>
<NewDataSet>
<Table1 />
</NewDataSet>Parameter
Type
Direction
Description
REQUEST_ID
Numeric
IN
The request ID to cancel
Parameter
Type
Direction
Description
NOTIFY_PARTICIPANT
Text
IN
Notify request participants of the cancellation:Y or N (default)
Text
IN
The fields to merge from FORM_DATA_SOURCE1 to FORM_DATA, separated by commas. It supports the asterisk (*) wildcard character to select all fields starting with the prefix.
✏️ Note: If you don’t specify a FORM_FIELDS_MERGE[N] parameter, all of the fields in FORM_DATA_SOURCE[N] will be merged.
File
INOUT
The merge target FORM_ARCHIVE. All FORM_ARCHIVE_SOURCE parameters will merge into this parameter’s default value (IN) and will update the specified data (OUT) with the result.
FORM_ARCHIVE_SOURCE[1..N]
File
IN
Specific form archive to merge into the target form archive.
FORM_FIELDS_ARCHIVE[1..N]
Text
IN
Section IDs to merge from FORM_ARCHIVE_SOURCE[1..N] to FORM_ARCHIVE, separated by commas. It does not support the asterisk wildcard parameter; instead, you must specify the exact IDs of each section to merge.
Text
IN
Send value of ACCOUNT_*
FORM_DATA_SOURCE2
File
IN
Send value of FORM_DATA_VALIDATES_SALES
FORM_FIELDS_MERGE2
Text
IN
Send value of SALES_DECISION,SALES_COMMENT
FORM_ARCHIVE
File
INOUT
Send value of FORM_ARCHIVE
Receive value into FORM_ARCHIVE
FORM_ARCHIVE_SOURCE1
File
IN
Send value of FORM_DATA_VALIDATES_ACCOUNTING
FORM_FIELDS_ARCHIVE1
Text
IN
Send value of ACCOUNT
FORM_ARCHIVE_SOURCE2
File
IN
Send value of FORM_ARCHIVE_VALIDATES_SALES
FORM_FIELDS_ARCHIVE2
File
IN
Send value of SALES
TEXT
IN
List of hidden fields
Macro
Remarks
<WF_PROCESS_INST_RELDATA_VALUE.DATANAME>
A process data value where DATANAME is the name of the data whose value you want to display
<WF_PROCESS_INST_RELDATA_DESCRIPTION.DATANAME>
Retrieves the description of a process data
<WF_PROCESS_INST_RELDATA_FILE.DATANAME>
A process data value where DATANAME is the name of the data whose value you want to add as an attachment to the email
<WF_LINK_ACTIVITY_INST_LAUNCH>
A link will be displayed to launch the action directly from the notification
<WF_LINK_ACTIVITY_INST_FORM>
A link will be displayed to view the action follow-up form directly from the notification
<img src="C:\inetpub\wwwroot\wfgen\App_Themes\Default\portal\images\activity_s.gif"><img src="http://localhost/wfgen/App_Themes/Default/portal/images/activity_s.gif"><html>
<head>
<meta http-equiv="Content-Type" content="text/html; charset=UTF-8">
<title>My Title</title>
<style type="text/css">
body
{
font-family:Arial;
}
</style>
</head>
<body>
<table width="90%">
<tr>
<td>
<img src="C:\inetpub\wwwroot\wfgen\App_Themes\Default\portal\images\activity_s.gif"> <WF_PROCESS_INST_NAME>
</td>
</tr>
<tr>
<td>
Manager Decision
</td>
<td>
<WF_PROCESS_INST_RELDATA_VALUE.MGR_DEC>
</td>
</tr>
<tr>
<td>
Date
</td>
<td>
<WF_SYSTEM_DATE>
</td>
</tr>
<tr>
<td>
Launch the Action
</td>
<td>
<a href="<WF_LINK_ACTIVITY_INST_LAUNCH>">link 1</a>
</td>
</tr>
<tr>
<td>
Go To Action Follow-Up Form
</td>
<td>
<a href="<WF_LINK_ACTIVITY_INST_FORM>">link 2</a>
</td>
</tr>
<tr>
<td>
Go To Request Follow-Up Form
</td>
<td>
<a href="<WF_LINK_PROCESS_INST_FORM>">link 3</a>
</td>
</tr>
<tr>
<td>
Go To Request Follow-Up Form
</td>
<td>
<a href="http://YOURSITE/wfgen/show.aspx?QUERY=PROCESS_INSTANCE_FORM&ID_PROCESS_INST=<WF_PROCESS_INST_ID>">Request Link</a>
</td>
</tr>
</table>
</body>
</html>SUBJECT: My Custom Subject line
Manager Decision: <WF_PROCESS_INST_RELDATA_VALUE.MGR_DEC>
Date: <WF_SYSTEM_DATE>
Launch the Action: <WF_LINK_ACTIVITY_INST_LAUNCH>
Go To Action Follow-Up Form: <WF_LINK_ACTIVITY_INST_FORM>
Go To Request Follow-Up Form: http://YOURSITE/wfgen/Show.aspx?QUERY=PROCESS_INSTANCE_FORM&ID_PROCESS_INST=<WF_PROCESS_INST_ID>Deletes a global list
Links
Remarks
New list
Displays a blank categories form to add a new category
Refresh
Refreshes the global list
Import
Imports data from CSV or XML format into an existing list or as a new list; this is useful to quickly fill data from file or copy/paste from clipboard.
Export
Exports data to a CSV or XML file; this is useful to export data for multiple environments (development, production, test, etc.)
Duplicate
Duplicates a global list
Search
Remarks
Name
Filters on the list’s name
Manager
Filters on the name of the manager of the list
Update date
Filters on the update date (period from/to)
Updated by
Filters on the last user who has updated the list (last name or first name)
Columns
Remarks
Name
Name of the list
Manager
None (no restriction) or the global participant authorized to update the list; you can restrict the access to the global list to user(s) of a global participant.
Content
Number of items or a link to define the global list form
Last update
Date and time of the last update
By
Last user who has updated the list
Tabs
Remarks
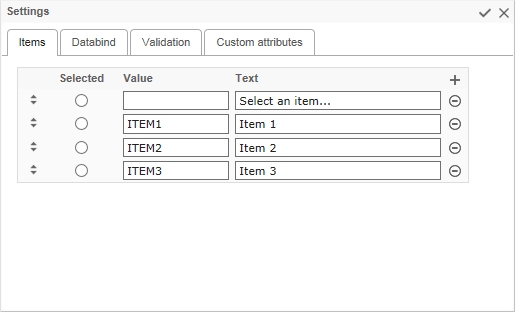
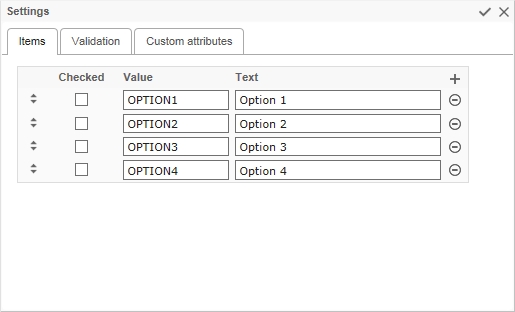
Items
Add static items into the list; items can be sorted by value or descriptive text, and translation languages can be chosen from a drop-down list.
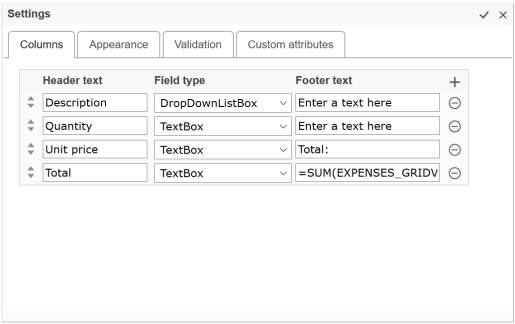
Columns
Add columns (limited to 10 columns)
Supported datatypes:
Text
Numeric
Date
By default, columns are Text (text data type) and Value (text data type).
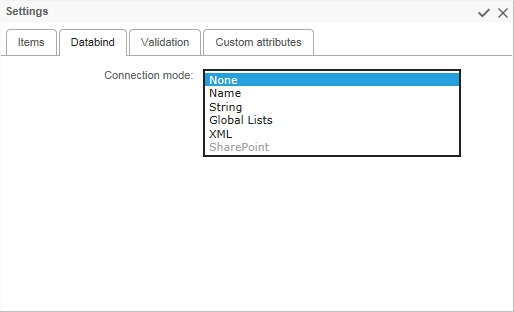
Databind
Connection name or string to the bound database
Name of the connection string defined by the Administrator in the WorkflowGen web.config file
Connection string to a database
SQL query (SELECT command) to retrieve data
✏️ Note: It is strongly recommended to use a connection name rather than a connection string to simplify multi-environment management. Connection names are centrally managed in the WorkflowGen web.config file.
Delete
<CLIENT_ID>: Corresponds to your DocuSign application's Integration Key value
<REDIRECT_URI>: Redirect address (e.g. https://docusign.com)
IN
DocuSign Auth server
DocuSign values:
account.docusign.com (production)
account-d.docusign.com (demo)
By default, this value comes from the DocuSignAuthServer
DOCUSIGN_RSA_KEY
TEXT
IN
DocuSign RSA key
By default, this value come from the /Files/DocuSign/rsaKey.pem file.
DOCUSIGN_HOST_SERVER
TEXT
IN
DocuSign host server
DocuSign values:
https://docusign.net (production)
https://demo.docusign.net (demo)
By default, this value comes from the DocuSignHostServer
OUT
Envelope status
Parameter
Type
Direction
Description
DOCUSIGN_ENVELOPE_ID
TEXT
IN
DocuSign envelope ID to check
Parameters
Type
Direction
Description
DOCUSIGN_CLIENT_ID
TEXT
IN
DocuSign client ID
Corresponds to your DocuSign application's Integration Key value
By default, this value comes from the DocuSignClientId parameter in the web.config.
DOCUSIGN_USER_GUID
TEXT
IN
DocuSign user GUID
Corresponds to the value of User ID in the DocuSign configuration panel
By default, this value comes from the DocuSignUserGuid parameter in the web.config.
DOCUSIGN_AUTH_SERVER
Parameters
Type
Direction
Description
VALID_STATUS_LIST
TEXT
IN
Valid status to download the document
Default: signed,completed,voided,declined
DOCUSIGN_DOCUMENT
FILE
OUT
DocuSign document
DOCUSIGN_STATUS
TEXT
TEXT
IN
Authentication refresh token
By default, this value comes from the AdobeSignAuthServer parameter in the web.config file.
To obtain it, see the section.
ADOBESIGN_HOST_SERVER
TEXT
IN
Adobe Sign host server (e.g. https://api.naX.adobesign.com, where x is the server ID)
By default, this value comes from the AdobeSignHostServer parameter in the web.config file.
OUT
Agreement status
Parameter
Type
Direction
Description
ADOBESIGN_AGREEMENT_ID
TEXT
IN
ID of the Adobe Sign agreement to verify
Parameters
Type
Direction
Description
ADOBESIGN_CLIENT_ID
TEXT
IN
Adobe Sign client ID
By default, this value comes from the AdobeSignClientId parameter in the web.config file.
ADOBESIGN_CLIENT_SECRET
TEXT
IN
Adobe Sign client secret
By default, this value comes from the AdobeSignClientSecret parameter in the web.config file.
ADOBESIGN_REFRESH_TOKEN
Parameters
Type
Direction
Description
VALID_STATUS_LIST
TEXT
IN
Valid status to download the document
Possible values:
OUT_FOR_SIGNATURE
OUT_FOR_DELIVERY
OUT_FOR_ACCEPTANCE
OUT_FOR_FORM_FILLING
OUT_FOR_APPROVAL
AUTHORING
CANCELLED
SIGNED
APPROVED
DELIVERED
ACCEPTED
FORM_FILLED
EXPIRED
ARCHIVED
PREFILL
WIDGET_WAITING_FOR_VERIFICATION
DRAFT
DOCUMENTS_NOT_YET_PROCESSED
WAITING_FOR_FAXIN
WAITING_FOR_VERIFICATION
Default: SIGNED,APPROVED,CANCELLED,EXPIRED,ARCHIVED
ADOBESIGN_DOCUMENT
FILE
OUT
Adobe Sign document
ADOBESIGN_STATUS
TEXT
TEXT
A process can be declared as a sub-process and then used in another process action as an independent or embedded sub-process.
A process is made up of the following components:
Participants (e.g. requester, actor)
Relevant data (e.g. form, agreement, amount, etc.)
Actions (e.g. find information, validate, process, wait)
Transitions (e.g. next actions, conditions)
Assignment method (e.g. automatic, manual, etc.)
Notifications (e.g. assignment, closing, etc.)
The definition of a process involves building a number of rules. To simplify implementation, WorkflowGen groups process definition into several sections:
Information related to process creation (status, version, etc.) and general parameters (archiving, notification upon closing, process lead time).
Global participants selected or process-specific participants that will take on the roles of either a requester, an actor, or a process supervisor.
Data that are used by the process per request and that are relevant and necessary to carry out the process workflow.
WYSIWYG built-in form designer to create the forms used by the workflow.
Workflow definition that is made up of actions and their associated transitions, conditions, and exceptions.
Display or quit the process definition full screen mode.
Provides both an overview and details of all parameters used in the process, and also provides a description of any workflow design errors. As well, the report shows summary usage statistics on the process.
Allow testing the process if the status is set to In test. To be able to select the Test link, the process/folder manager must be one of the requesters of the process.
Links
Remarks
New folder
Displays a blank folder form to add a new folder
Refresh
Refreshes the folder list displayed
Filter on *
Remarks
Name
Filters by folder name
Description
Filters by folder description
* A filter can be applied to a part of a field.
Columns
Remarks
Folder
Folder name (a link displays the process list contained in the folder)
Description
Folder description
Process
Number of processes contained in the folder
Edit
Link to edit the folder information
Fields
Remarks
Folder name
Unique identifier for the folder; must respect nomenclature and be limited to 30 characters (required field)
Description
Folder description limited to 255 characters (required field)
Process manager
Name of the global participant managing the folder (required field)
A process manager must be a Person or List of persons type global participant.
A folder cannot be deleted if it contains processes.
Links
Remarks
New
Displays a blank process form to where you can add a new process
Refresh
Updates the process list
Delete
Delete a process
Filter on *
Remarks
Name
Filters by process name
Description
Filters by process description
* A filter can be applied to a part of a field.
External filters
Remarks
Status
Filters by process status
Columns
Remarks
Name
Process name and version (a link displays the process form in edit mode)
Description
Process description
Status
Process status
This JavaScript implementation is based on ECMAScript 3.5.
In JavaScript, time units are expressed in milliseconds:
1 minute = 60,000 milliseconds (1 * 60 * 1000 = 60000)
1 hour = 3,600,000 milliseconds (1 * 60 * 60 * 1000 = 3600000)
1 day = 86,400,000 milliseconds (1 * 24 * 60 * 60 * 1000 = 86400000)
In conditions, you can divide by the time unit's equivalent in milliseconds to use in comparisons. For example, a notification sent when a request is 12 or more hours late might look like this:
Fields
Remarks
Data
List of process data that can be used in the condition
Macros
List of WorkflowGen macros that can be used in the condition
Otherwise
Inserts the keyword OTHERWISE
JavaScript
Fnc()
Encapsulate the condition in an IIFE (see below)
In JavaScript mode, use the Fnc() button to encapsulate the condition in an IIFE (Immediately-Invoked Function Expression). For example:
Process data equal to Lorem ipsum:
JavaScript: <DATA> == "Lorem ipsum"
VBScript: <DATA> = "Lorem ipsum"
Process data greater than 5:
JavaScript: <DATA> > 5
VBScript: <DATA> > 5
Compare process data dates:
JavaScript: <DATE1> > <DATE2>
VBScript: DateDiff("s",<DATE1>,<DATE2>) > 0
More than 5 hours have elapsed since:
JavaScript: (<WF_SYSTEM_DATETIME> - <DATE1>) * 3600000 > 5
VBScript: DateDiff("h",<WF_SYSTEM_DATETIME>, <DATE1>) > 5
Combination of different comparisons:
JavaScript: <DATA1> == "Lorem ipsum" || (<DATA2> > 10000 && <DATA3> == "Director")
VBScript: <DATA1> = "Lorem ipsum" Or (<DATA2> > 10000 And <DATA3> = "Director")
Process data file has not been defined:
JavaScript: <FILE_DATA> == null
VBScript: IsNull(<FILE_DATA>)
Process data file has a specific size (less than 1 MB) and a specific file name:
JavaScript: <FILE_DATA.SIZE> < 1024000 && <FILE_DATA.NAME>.indexOf("report") > -1
VBScript: <FILE_DATA.SIZE> < 1024000 And InStr(1,<FILE_DATA.NAME>,"report") > 0
You can only add one condition to a transition. To add more conditions between the same actions, create additional transitions between the actions and place the additional conditions on them.
You can only place one condition or one exception on a given transition.
Each condition is evaluated individually. For example, if there are two conditions on separate transitions between actions, and both are TRUE, then the next action will be created twice.
Exception type
Remarks
Action overdue
Exception triggered by the system when an action is overdue
Action cancellation triggered by
Exception triggered when a user or supervisor cancels an ongoing action or sub-process
To prevent users and/or supervisors from cancelling the action, uncheck Users and/or Supervisors. Otherwise, Users, Supervisors, Administrators, and System are checked by default, and can all cancel actions.
✏️ Note: Administrators and System cannot be unchecked, and can always cancel actions.
Assignment error
Exception triggered when an action is assigned to a user that is not associated with the participant
Execution error
Exception triggered by the system when an error occurs during an automatic application execution (a system action)
Default
Exception triggered by default
You can only add one exception to a transition. To add more exceptions between the same actions, create additional transitions between the actions and place the additional exceptions on them.
You can only place one exception or one condition on a given transition.
Each exception is evaluated individually. For example, if there are two exceptions on separate transitions between actions, and both exceptions occur, then the next action will be created twice.
When an exception occurs at runtime, the default exception is assumed if no specific exception path corresponding to the exception type was defined in the process definition.
If an exception path is linked to the end of the process and the exception occurs at runtime, all the ongoing actions are cancelled and the request is closed with the status Closed – Cancelled.
The default payload content type (APP_CONTENT_TYPE) is JSON; URLENCODED is also supported.
Since the application parameters are case-sensitive, parameters must use the API’s accepted notation.
The SENDHTTPPOST application requires the APP_URL parameter, which corresponds to the external API URL.
The TOKEN parameter is available for authentication for external APIs where the token is not included in the URL. In these cases, the token will be sent in the payload using the TOKEN parameter.
The response can contain an optional payload mapped to user-defined OUT parameters.
In case of error when then APP_RESPONSE_STATUS OUT parameter is not defined, an exception will be triggered; 2xx HTTP response status codes are successful responses.
Besides the optional parameters listed below, you can also add additional custom IN and OUT parameters (specific to the external API) to send and receive custom user-defined data to and from the external API. For example, in a Slack integration, you can add a parameter to include an emoji in a Slack message, and map this to Slack’s "icon_emoji" parameter (this is the Slack API’s accepted notation for this particular parameter).
The default timeout (APP_TIMEOUT) is 3000 milliseconds; the maximum timeout is 60,000 milliseconds.
The HTTP request headers can be defined with the APP_HEADER_xxx parameters, where xxx is the header field name.
The default maximum response length is 4194304 characters (4 MB); this default value can be modified by setting the SendHttpPostMaxResponseLength parameter value in the web.config file.
Application logs are available; these can be specified by setting the SendHttpPostLogLevel parameter value in the web.config file to 0 to disable logging, 2 for simple logs, or 3 for debug logs.
A payload created by SENDHTTPPOST to send a message to a Slack channel would look something like this:
A payload created by SENDHTTPPOST to send nested JSON to be converted into objects by an external API would look something like this:
Parameter
Type
Direction
Description
APP_URL
Text
IN
External API URL
Parameter
Type
Direction
Description
TOKEN
Text
IN
API authorization token (use this parameter to specify a token for external APIs that don’t include the token in the URL)
APP_TIMEOUT
Numeric
IN
Maximum time interval between the request sending and the response reception (default: 3000 milliseconds; maximum 60,000 milliseconds)
APP_CONTENT_TYPE
Parameter
Type
Direction
Value
APP_HEADER_Authorization
Text
IN
Bearer AbCdEf123456
APP_HEADER_location
Text
IN
canadaeast
The parameters defined above will generate two headers in the request payload:
When setting the parameter APP_REQUEST_CONTENT_IS_ARRAY to Y, it will convert the JSON into an array:
Display name
Filters by group's displayed name
Distinctive name
Filters by group's distinctive name
System identifier
Filters by group's system identifier (SID)
Test
Query syntax test and query result
Group email address
Group code
Group code
Display name
Group displayed name
Distinctive name
Group distinct name
System identifier
Group SID
User(s)
Number of users associated to the group (a link displays the corresponding users)
Synchronized
If checked, the group is synchronized
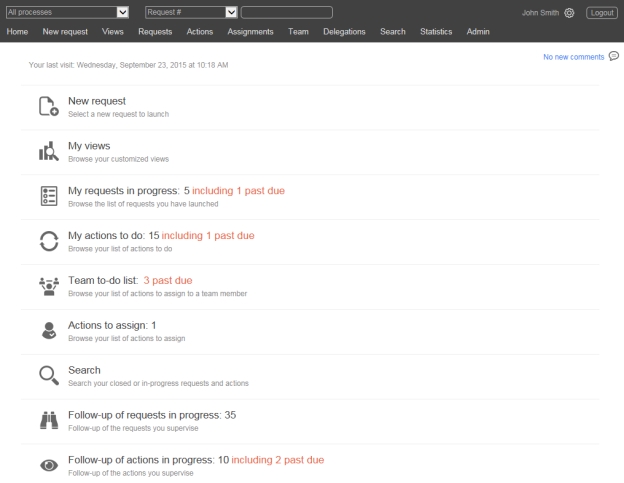
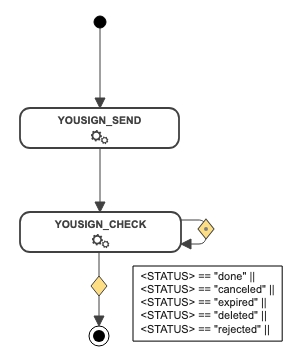
* The pre-overdue notification feature is available in WorkflowGen 5.1.7 and later. A process XPDL using this feature will not be compatible with previous versions of WorkflowGen including release 5.1.6. An error will be raised when trying to import the new XPDL into those versions.
To add an additional notification, click the plus sign (+) in the rightmost column header, choose an event and a template if desired (otherwise these will use the defaults of To do and Default, respectively), then choose the recipient(s). Click again to save the notification. You can then add a condition if desired.
Click on the event, the recipient(s), the template, or the condition to edit them. To remove a notification, click the x to the right of the notification.
You can define a hierarchy to handle overdue and pre-overdue action notifications by specifying additional notification conditions based on JavaScript or VBScript date/time calculation functions. You can do this in JavaScript by manipulating the date object directly, in VBScript using the DateDiff function, or by using the Current Action.Overdue and Current Action.Pre-overdue macros (see the section for more information).
In a process action, if you want to notify the requester that the action is late within one day, and also notify the process supervisor should the action continue to be late after two days, you have to add the two additional notifications on the action with the following settings:
Type: Overdue Recipient: Requester
JavaScript:
VBScript:
Using a macro:
Type: Overdue Recipient: The supervisor participant
JavaScript:
VBScript:
Using a macro:
In a process action, if you want to notify a user that an action will become late in advance of a due date, you have to add an additional notification on the action using the Prior overdue (pre-overdue) event.
To add a new pre-overdue notification to an action:
In a process action notification tab, under the Additional section, select the Prior overdue event.
Select the recipient(s).
Select the Default template or a custom template previously created.
JavaScript:
VBScript:
Using a macro:
JavaScript:
VBScript:
Using a macro:
There is no limit to the number of additional pre-overdue notifications that can be added to an action (e.g. 2 days, 1 day, 1 hour, 30 minutes, etc.).
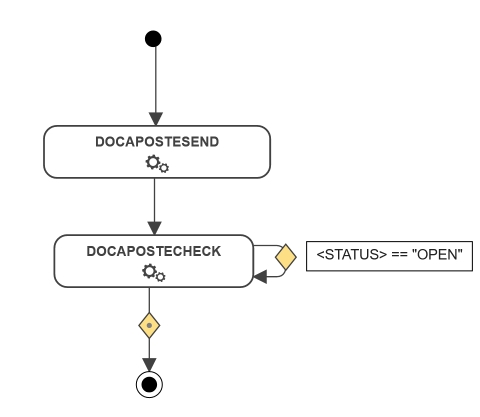
The RAISEEXCEPTION workflow application raises the cancel exceptions on specified actions, as controlled by the action cancellation workflow exception in the conditions definition panel. This workflow application can thus be called by an action to cancel one or several other actions in a running request. The application is converted as an assembly workflow to simplify configuration and improve performance.
COL_NAME[,...n]
["TEXT|NUMERIC|DATE"[,...n]]
VALUE[ ,...n]iso,country
AD,Andorra
AE,United Arab Emirates
AF,Afghanistan
AG,Antigua and Barbuda
AI,AnguillaId,iso,Country
NUMERIC,TEXT,TEXT
1,AD,Andorra
2,AE,United Arab Emirates
3,AF,Afghanistan
4,AG,Antigua and Barbuda
5,AI,AnguillaId,Lastname,Firstname,Address,Birthday
NUMERIC,TEXT,TEXT,TEXT,DATE
1,DOE,John,"1111 N. Sample, Mt. Prospect, IL 60000","01/01/1980"(function(){
var myVar = <DATA>
return myVar == "Lorem ipsum"
})(){
"channel": "#marketing-channel",
"text": "This is a test",
"username": "eric_knox"
}{
"Person": {
"Address": {
"Street": "Test",
"Zipcode": "XXX XXX"
},
"Age": 30,
"Name": "John"
}
}Authorization: Bearer AbCdEf123456
location: canadaeast[{
"person": {
"address": {
"street": "160 Guy Street",
"zipcode": "J4G 1U4"
},
"age": 30,
"name": "John"
}
}]Text
IN
Request content type supported by the external API (SENDHTTPPOST supports JSON and URLENCODED; the default is JSON)
APP_RESPONSE_CONTENT
Text
OUT
Returned optional payload or error message
APP_RESPONSE_STATUS
Text/Numeric
OUT
Returned HTTP request status code
APP_HEADER_xxx
Text
IN
External API header parameters where xxx is the header field name
APP_REQUEST_CONTENT_IS_ARRAY
Text
IN
When set to Y, the application will convert the JSON request payload into an array; the default is N
Only supported when building JSON request payload with IN parameters.
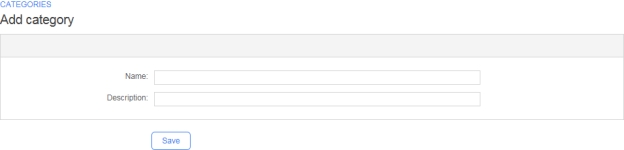
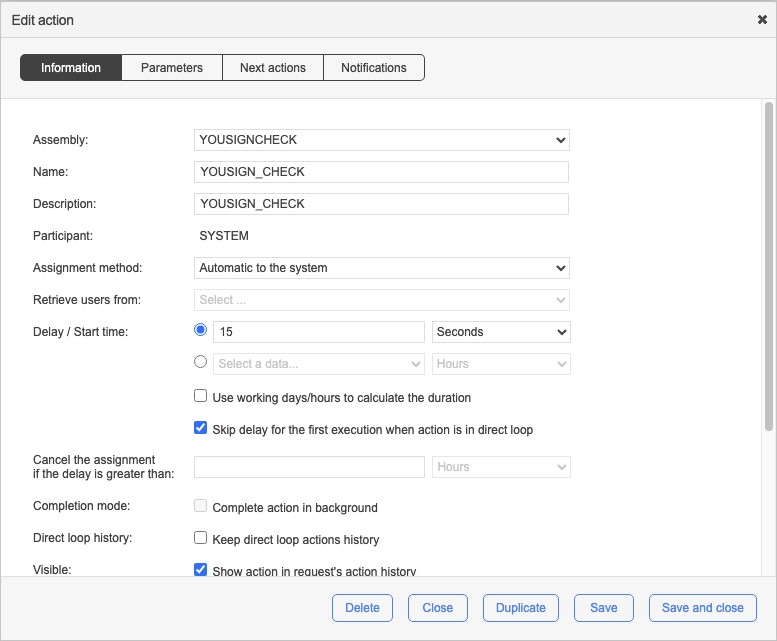
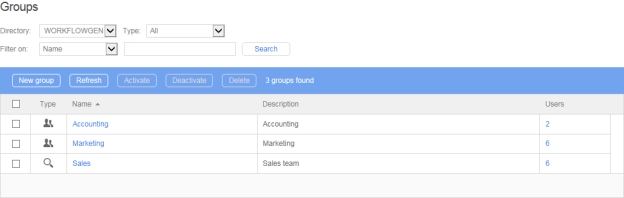
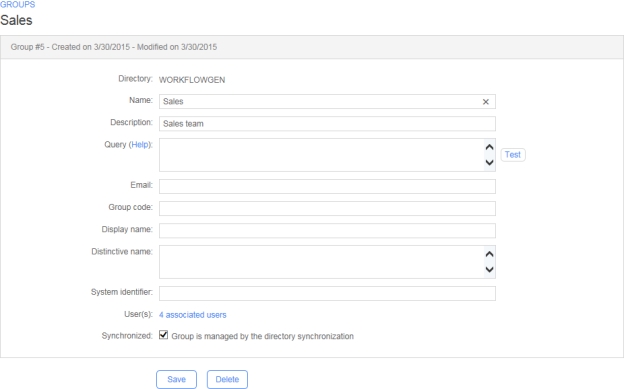
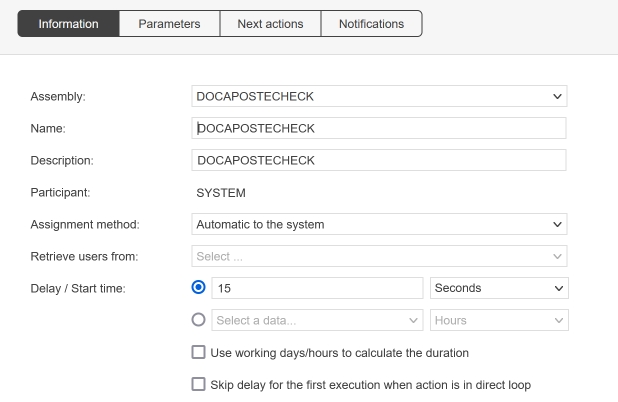
&&
Inserts the logical operator AND
||
Inserts the logical operator OR
==
Inserts the logical operator EQUAL TO
!=
Inserts the logical operator NOT
null
Test function to find out if the data contains no value
getTime()
Returns the numerical value of a date in milliseconds
VBScript
( )
Enclose the selected text between parentheses
And
Inserts the logical operator AND
Or
Inserts the logical operator OR
Not
Inserts the logical operator NOT
IsNull()
Test function to find out if the data contains no value
DateDiff
Inserts blank DateDiff condition syntax to set values (see Overdue and pre-overdue notifications)
<WF_SYSTEM_DATETIME> - <WF_ACTIVITY_INST_LIMIT_DATETIME>) / 3600000 >= 12<WF_ACTIVITY_INST_OVERDUE_MINUTES><WF_ACTIVITY_INST_PREOVERDUE_MINUTES>Enter the condition (see below for examples).
Fields
Remarks
To assign
Specifies if an email is automatically sent to the user who has to assign the action
To do
Specifies if an email is automatically sent to the user who has to handle the action
Overdue
Specifies if an email is automatically sent to the user who has to handle an overdue action
Assignment cancelled
Specifies if an email is automatically sent when an action assignment has been automatically or manually cancelled
Fields
Remarks
Event
Type of event notifications:
To do
Cancelled
Assignment cancelled
Assignment error
Overdue
Prior overdue (pre-overdue) *
Closed
Execution error
Recipient
Recipient(s) of the notification:
The requester
The action initiator (if the assignment method is manual)
The action assignee
Free-form email addresses (comma or semicolon separated)
The users associated to a participant
The user who has handled the action ... (action name)
Email addresses contained in the data ... (selected from the list below). Use , (comma) or ; (semicolon) as email separator.
Template
Email message templates:
Default (uses the standard email template located in \App_Data\Templates\Emails)
Use the content of the data (select one in the list below); the list is filled in with text and file process data.
When defining your own template in data or a file you can use:
The reserved keyword SUBJECT to define an email custom subject line
Macros
Custom email templates; see for instructions on how to create custom email templates
Columns
Remarks
Event
The type of event notification
Recipient
Recipient(s) of the email
Template
The selected template of the message to be sent
Condition
A link displays the notifications condition form in edit mode
Deletion
Click the x to delete the notification
web.configweb.config\wfgen\WfApps\WebServices\RaiseException) can be disabled and removed. Authentication settings at the application level are not required.This feature is useful when one or more actions need to be cancelled after a certain point in the workflow has been reached, even though those actions have already been activated. For example, if three parallel actions are ongoing, but one of the parallel actions is concluded ahead of the others and your workflow rules have determined that the two other actions are no longer required, you can activate RAISEEXCEPTION to cancel the other two actions and allow the workflow to continue.
Additionally, you can:
Use default parameters to cancel all open actions in a specific request.
Use optional parameters to cancel a list of action instantiations in a list of requests or to cancel on behalf of a specific user.
Use additional parameters to define multiple pairs of action references.
The REQUEST_ID and ACTIVITY_NAME parameters must always be used together.
Parameter
Type
Direction
Description
REQUEST_ID
Numeric
IN
ID of the request where the action will be cancelled
ACTIVITY_NAME
Text
IN
Name of the action that will be cancelled
In this example, the application will cancel all instances of the PENDING_ACTION action in request 455:
The REQUEST_ID_LIST and ACTIVITY_NAME_LIST parameters must always be used together.
Parameter
Type
Direction
Description
REQUEST_ID_LIST
TEXT
IN
List of request IDs where the action will be cancelled
ACTIVITY_NAME_LIST
TEXT
IN
List of action names that will be cancelled
USERNAME
In this example, the application will cancel all the instances of the actions PENDING_ACTION1 and PENDING_ACTION2 in each of requests 445, 446, and 447:
In this example, the application will cancel all the instances of the action named PENDING_ACTION in request 445 on behalf of John Doe (jdoe):
Parameter
Type
Direction
Description
EX?_REQUEST_ID
Numeric
IN
Indicates the ID of the request where the action will be cancelled for the pair specified by the ? (question mark)
EX?_ACTIVITY_NAME
Text
IN
Indicates the name of the action that will be cancelled for the pair specified by the ? (question mark)
IGNORE_NOTHINGTODO_ERROR
In this example, the application will cancel all instances of the PENDING_ACTION1 action in request 455 and all instantiations of the PENDING_ACTION2 action in request 456. If actions 455 and 456 have no instance then no error is raised.
The following errors can occur during the execution of the transactions:
Error
Cause
Solution
WorkflowGen Context is empty
All the RAISE_EXCEPTION parameters are empty
Check the RAISE_EXCEPTION parameters.
Application parameters are not correctly entered
The RAISE_EXCEPTION parameters are not correctly filled
Check the RAISE_EXCEPTION parameters.
(WorkflowGen Web Exception)
HTTP Status: ...Response error: ... or The FUNCTION_NAME parameter was not found
An error occurred while trying to send the HTTP request to WorkflowGen
Check the HTTP status:
401: Security error
Check your authenticating parameters:
404: Unable to connect to the URL
500: Internal server error
Check for indications in the returned error message.
Error while trying to connect to WorkflowGen database Error message: ...
Data name (a link displays the data form in edit mode. To add new data, click New data to open a blank data form.
Description
Data description
Data type
Type of data
Direction *
Direction of the sub-process parameter
* Only displayed if the process was defined as a sub-process.
The options available in the Edit data panel vary depending on the data file type (File, Text, Numeric, or Date/Time).
Fields
Remarks
Name
Unique identifier for the data; must respect nomenclature and be limited to 30 characters (required field)
✏️ Note: Data names should respect the following XML naming rules:
They should begin with a letter or an underscore
They should contain only letters, digits, hyphens, underscores, and periods
Browse
Lists the IDs of all the form fields created with the built-in form designer and enables it to manually select the fields with their IDs to declare as process data
✏️ Note: This button appears on the Add data form.
Description
Data description limited to 255 characters (required field)
Data type
Type of data (required field):
Text
Includes automatic detection of URLs (http://) and email addresses and displays them as links rather than plain text
Numeric
Default value
Default value of the data
For text type data: Click the pencil icon to open the Edit text inline editor.
For file type data: Click the pencil icon to open the Create file or Edit file inline editor. You can specify a file name (otherwise the file will be saved with the data name by default) and the file will be saved with the extension that matches its type. If you enter an extension that doesn’t match the file type, it will be appended with the correct extension. Alternately, click Browse or Choose file (depending on your browser) to choose a file. (If you choose a file in a format not supported by the editor, you will not be able to edit it and so the pencil icon will not appear.) To delete the file, click the
Only displayed if the process data is a file.
Only displayed if the process was defined as a sub-process.
The type of data can only be changed if the data are not used:
By the parameters of the actions of the process
In the dynamic assignment of an action of the process
In the transition or notification conditions
If the data is not a parameter of a sub-process that is in use
Data cannot be deleted if they are involved in the workflow of the process (as a parameter or in the transition conditions). Data cannot be deleted if they are set as a sub-process parameter and used by a parent process.
Columns
Remarks
Display order
The arrows allow the data display order to be modified. This can also be done by drag-and-drop. This affects the position of the data on the user module as well.
Name
General validations performed by the report generator:
A process must have at least a beginning and an end.
A process must have one single participant in the role of requester.
There can only be one OTHERWISE condition in the transitions of an action.
Action validations performed by the report generator:
All actions must have at least one next action or END.
If an action has a transition to an end of a process, the transition of the next actions must have a condition.
An action that loops must have a condition.
For an application or a sub-process, all the required parameters of an action must be defined.
Action validations performed by the report generator:
It is advised to use an exception transition if actions use the following assignment methods and if the username is retrieved from process data:
Automatic to the person who handled...
Manual by the person who handled...
Action sections have sub-sections that provide information about the following:
General
Required parameters
Additional parameters
Previous action
The Portlet allows you to retrieve information from the WorkflowGen User Portal homepage.
The results received from HTTP are stored in XML RSS format and classified by category. This format allows the processing and presentation of the data with any language able to read and parse XML content.
(<WF_SYSTEM_DATETIME> - <WF_ACTIVITY_INST_LIMIT_DATETIME>) / 3600000 < 24DateDiff("h",<WF_ACTIVITY_INST_LIMIT_DATETIME>,<WF_SYSTEM_DATETIME>) < 24<WF_ACTIVITY_INST_OVERDUE_HOURS> < 24(<WF_SYSTEM_DATETIME> - <WF_ACTIVITY_INST_LIMIT_DATETIME>) / 3600000 >= 48DateDiff("h",<WF_ACTIVITY_INST_LIMIT_DATETIME>,<WF_SYSTEM_DATETIME>) >= 48<WF_ACTIVITY_INST_OVERDUE_HOURS> >= 48(<WF_ACTIVITY_INST_LIMIT_DATETIME> - <WF_SYSTEM_DATETIME>) / 86400000 <= 3DateDiff("d", <WF_SYSTEM_DATETIME> , <WF_ACTIVITY_INST_LIMIT_DATETIME>) <= 3<WF_ACTIVITY_INST_PREOVERDUE_DAYS> <= 3(<WF_ACTIVITY_INST_LIMIT_DATETIME> - <WF_SYSTEM_DATETIME>) / 60000 <= 15DateDiff("n", <WF_SYSTEM_DATETIME> , <WF_ACTIVITY_INST_LIMIT_DATETIME>) <= 15<WF_ACTIVITY_INST_PREOVERDUE_MINUTES> <= 15REQUEST_ID = 455
ACTIVITY_NAME = "PENDING_ACTION"REQUEST_ID_LIST = "455, 456, 457"
ACTIVITY_NAME_LIST = "PENDING_ACTION1, PENDING_ACTION2"REQUEST_ID = "455"
ACTIVITY_NAME = "PENDING_ACTION"
USERNAME = "jdoe"
PASSWORD = "1234"EX1_REQUEST_ID = 455
EX1_ACTIVITY_NAME = "PENDING_ACTION1"
EX2_REQUEST_ID = 456
EX2_ACTIVITY_NAME = "PENDING_ACTION2"
IGNORE_NOTHINGTODO_ERROR = "Y"TEXT
IN
Used to set the username used to cancel the action ✏️ Notes:
This username must be part of a participant of the process.
If this parameter is not specified then the account used is the one specified as the Workflow engine service default identity in the Security section on the General tab in the Configuration Panel.
PASSWORD
TEXT
IN
Used to set the password corresponding to the username used to cancel the action
EXCEPTION_NAME
Exception that will be triggered on the action
Possible values:
CANCEL
ERROR
TIMEOUT
ASSIGNMENT_ERROR
EXCEPTION_MESSAGE
Used with the ERROR exception name to provide more details about the error in the follow-up action
Text
IN
Ignore Nothing to do error
By default, RAISE_EXCEPTION returns an error if you try to cancel an action that doesn’t have any open instantiation. If you set this parameter value to Y, the application will ignore this type of error.
An error occurred while trying to connect to the WorkflowGen database
Check your connection string in the configuration file.
Check for indications in the returned error message
Parameters: <Request Id parameter name>/<Activity Name parameter name>, Error: WorkflowGen has raised a security exception.
The user defined by the IDENTITY parameters is not a participant of the process
Check IDENTITY_USERNAME and IDENTITY_PASSWORD parameters.
Identify the request with parameters names returned in the error message.
Parameters <Request Id parameter name>/<Activity Name parameter name>, Error: The activity name <Activity Name> doesn’t exist in the request <Request Identifier>.
One of the activity names defined in the RAISE_EXCEPTION parameters doesn’t exist.
Check the RAISE_EXCEPTION parameters.
Check for indications in the returned message.
Parameters <Request Id parameter name>/<Activity Name parameter name>, Error: The action <Activity Name> doesn’t have any open instantiation in the request <Request Identifier>".
One of the actions to cancel is not open
Check the RAISE_EXCEPTION parameters.
Check for indications in the returned message.
To ignore this error, set IGNORE_NOTHINGTODO_ERROR parameter to Y.
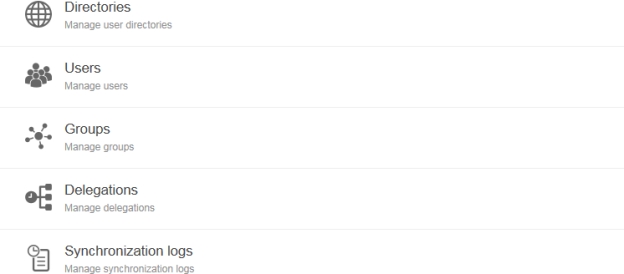
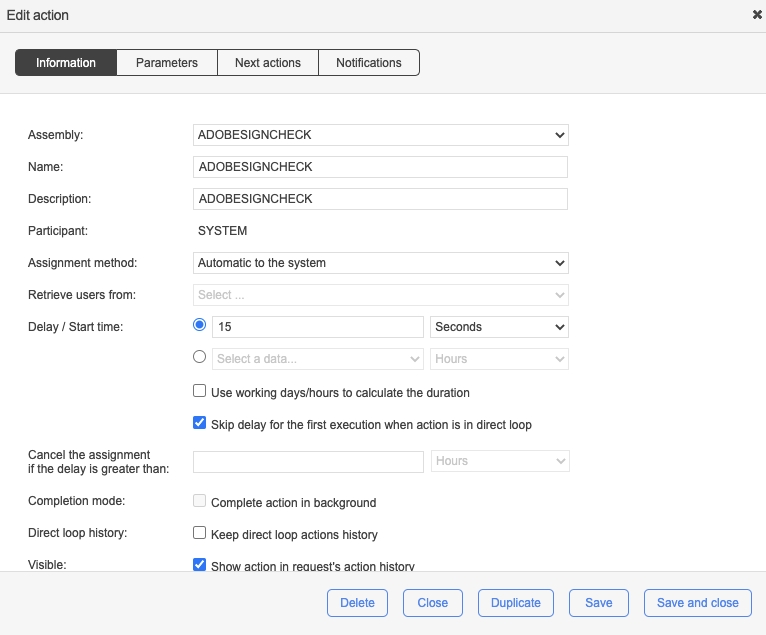
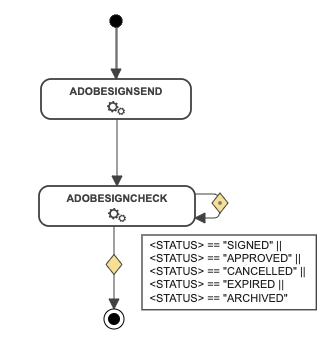
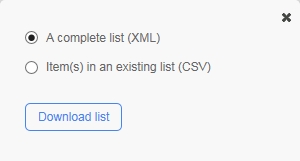
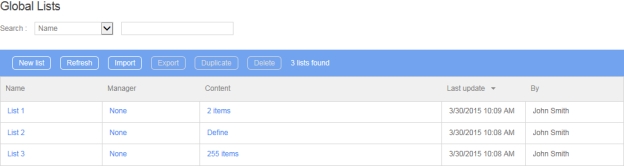
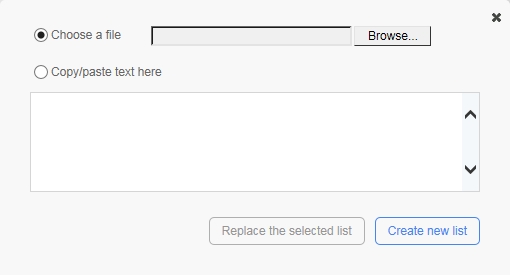
All process data must be used in the action parameters or in the transition conditions.
Data used in a condition must be associated to an OUT or INOUT direction action parameter if no default value is set.
Actions that include a transition with an OTHERWISE condition must have another transition with a condition that is not an OTHERWISE condition.
If the action comes from a synchronization, the By the action initiator assignment method is not possible.
If the action can be launched after an exception transition, the By the action initiator assignment method is not possible.
The Automatic to the action initiator assignment method is not allowed if the participant is not a requester and if the participant of the previous action is different.
The By the action initiator assignment method is not allowed if the action is called after an exception.
Ensure that all required application parameters for an action are defined.
Ensure that all the required action parameters for a sub-process are defined
It is advised to use an exception transition if actions use an automatic application (web proc, web service or asynchronous web proc).
It is advised to use an exception transition if actions use a sub-process.
All process data must be used.
Ensure that default and additional parameters used as OUT types are linked with data.
Automatic applications must use an exception.
Public or private access level
Categories
List of categories with which the process is associated
Lead time
Process lead time
Use working days/hours in duration calculation
Uses only office hours to calculate time schedule
Notify the requester when closed
Notification is sent to the requester when the request is closed
Archive the results of the actions
Saves the result of each process action at each step of the process
List of groups associated with this participant
Directories
List of directories associated with this participant
Coordinators
List of coordinator users for this participant
Graphical follow-up
Visible in the graphical follow-up
Permission for requests
Access to all requests
Permission for supervisors
Special permissions for supervisors
Permission for comments
None, read, or read/write permissions
Query
Supervisor limited scope query
Used in actions
Actions in which this participant is used
The selected data will appear in every search screen as selected criteria without search parameters
Display in columns in the lists
The selected data will appear in a column in all lists of requests and actions (single-process mode)
Display in column in homepage
The selected data will appear in a column on the home page (single-process mode)
Read-only
Define data as read-only
This saves disk space when used on file process data by associating a single copy of the file per process for all closed actions and closed requests.
✏️ Note: An action’s OUT and INOUT parameters using data declared as read-only will not be updated.
⚠️ Caution: In general, do not define EFORM applications'FORM_DATA elements (which contain the data of a form) as read-only.
Used in actions
List of actions in which the data is used
Used in conditions
List of process transitions in which the data is used
Next actions
Notifications
Additional notifications
Fields
Remarks
Requests
Request environment
In progress
Number of requests in progress
Closed
Number of requests closed
Total
Total requests launched
Fields
Remarks
Name
Process name
Version
Process version
Description
Process description
Status
Process status
Sub-process
Is this a sub-process?
Fields
Remarks
Description
Participant description
Scope
The participant is defined in the global information
Role
Participant role in the process
Participant type
Type of association to the directory
Users
List of users associated with this participant
Fields
Remarks
Description
Data description
Data type
Type of data
Default value
Default value of the data
Security
List of participants with access to the data
Show the data in the follow-up forms
The selected data will be visible in the following places:
Request and action follow-up forms
Default notification messages (emails)
Action data popup window
Search criteria list
✏️ Note: Unchecking this option disables and unchecks the Search criteria by default, Display in columns in the lists, and Display in column options.
Access level
Groups
Search criteria by default
They should not begin with the letters XML in any case (e.g. xml or Xml)
For more information, see https://www.w3schools.com/xml/xml_elements.asp.
Date/Time
File
xIn both editors, press Ctrl+Space to display a drop-down list from which you can choose and insert process data and WorkflowGen macros.
Format
Only applicable to Numeric and Date/Time type data. Upon saving the data, the Format drop-down will be populated with the following formats:
Numeric formats:
Custom (user-defined)
Currency ({0:C})
Decimal ({0:D})
Scientific ({0:E})
Fixed-point ({0:F})
General ({0:G})
Number ({0:N})
Percent ({0:P})
Round-trip (float) ({0:R})
Hexadecimal ({0:X})
Date/Time formats:
Custom (user-defined)
Short date
Long date
Full date/time (short time)
Custom
Displays associated format; allows custom formats to be specified if Custom formatting is specified above.
Precision
Number of decimal places displayed (for applicable formats)
Culture
Force data to display using the selected culture (language format); the default value is the current user’s culture.
Time zone
Applicable only to Date/Time type data. Specifying a specific time zone will force data to display using the selected time zone. The default value is the current user’s time zone.
New file [1]
File to update/add
Choose file
Displays a file browser in a pop-up window
Sub-process parameter [2]
Direction of the data when used as parameter by a parent process
Security
Defines participants who have access to the data; a link allows data access to be restricted to certain participants or processes.
✏️ Note: You can only select from Participants with Requester or Actor roles.
Visibility
Allow the definition of visibility options
✏️ Note: Data visibility is still updatable on active or archived processes.
Option 1: Show the data into the follow-up forms (checked by default)
The selected data will be visible in the following places:
Request and Action follow-up forms
Default notification messages (e-mails)
Action data pop-up window
Search criteria list
✏️ Note: Unchecking this option disables and unchecks the three other options.
Option 2: Search criteria by default (unchecked by default)
The selected data will appear in every search screen as selected criteria without search parameters.
✏️ Note: You can only filter by the data defined in the active process version or the latest process version if none are active.
Option 3: Display in column in the lists (unchecked by default)
The selected data will appear in every action or request list in a column when a single process is selected (single-process mode).
Option 4: Display in column in home page (unchecked by default)
The selected data will appear in the home page in a column when a single process is selected (single-process mode).
Column size (in pixels)
Define the data column size in the lists and home page; enabled when visibility option 3 or visibility option 4 is checked
Read-only
Define data as read-only
This saves disk space when used on file process data by associating a single copy of the file per process for all closed actions and closed requests.
✏️ Note: An action’s OUT and INOUT parameters using data declared as read-only will not be updated.
⚠️ Caution: In general, do not define EFORM appplications'FORM_DATA elements (which contain the data of a form) as read-only.
Button / Column
Remarks
New action
Opens the Select an action type window and then the Add action form
Refresh
Updates the action list
Delete
Deletes the selected action
Order
The arrows allow the action display order to be modified within the process workflow
Name
Action name
A link displays the action form in edit mode. The Add link on the Edit action screen displays a blank action form to add new Help data)
WorkflowGen features an HTML5 graphical process workflow designer, built on the latest HTML5 and SVG standards, with a simpler user interface and improved behavior for a more fluid design experience. It also provides greater compatibility with different design environments (such as mobile devices) that might not support Flash, which was the mode used in previous versions of WorkflowGen.
Click the Graphical link to see this view.
Icon
Tools
Remarks
Save the layout
Save the current layout of the workflow diagram
Print the diagram
Print the current diagram
Add participant
Add a new participant to the process
Function
Method
Add an element (action, synchronization, endpoint, comment, text)
Drag and drop the element from the toolbar onto the canvas.
Delete an element (action, synchronization, endpoint, comment, text)
Click the element, then click the x that appears in the top right corner.
Add a transition
Click the action and click the down arrow, then drag and drop it onto the desired action.
Add a transition loop
Click the action and click the down arrow, then drag and drop the transition onto the same action.
Delete a transition
Click the transition, then click the x that appears in the top right corner.
You can reach the content generated by the Portlet module with the following URL: http://yoursite/wfgen/show.aspx?QUERY=SHOW_RSS.
Parameter
Description
USERNAME
Retrieve data for this user. The current login is assumed if this parameter is missing.
📌 Example: wfgen_admin
CATEGORY
List of categories to retrieve separated by ; (semicolon). If this parameter is missing, all the available categories are returned.
📌 Example: REQUEST_RUNNING_NB;ACTION_TODO_NB
PROCESS
Allows content to be filtered by some specific processes. Specify the names of the processes separated by ; (semicolon).
📌 Example: LEAVE_APPLICATION
PROCESS_CATEGORY
Allows content to be filtered by some specific process categories. Specify the names of the categories separated by ; (semicolon).
📌 Example: HR
SHOW_NEW_REQUEST
Retrieve the list of processes that the current user can launch.
📌 Example: Y
Retrieve all categories for the user whose username is johnd:
Retrieve the actions to do (normal and overdue) for the user whose username is johnd:
Retrieve information relative to the HR category for the current user:
To connect to the Portlet module, you must use an account that has access to the WorkflowGen User Portal (e.g. wfgen_admin).
You must remove the domain name from the username when calling the Portlet module if the usernames are prefixed by the domain name (see User Management for more information).
Official information about the RSS 2.0 standard is available at http://blogs.law.harvard.edu/tech/rss.
Name
Path
Description
channel
rss
Root node
title
rss/channel
Channel title
📌 Example: WorkflowGen
description
rss/channel
Channel description
📌 Example: WorkflowGen
pubdate
The available categories are as follows:
Name
Description
REQUEST_RUNNING_NB
Number of ongoing requests
REQUEST_RUNNING_OVERDUE_NB
Number of overdue ongoing requests
ACTION_TODO_NB
Number of actions to do
ACTION_TODO_OVERDUE_NB
Number of overdue actions to do
ACTION_TEAM_NB
Number of team actions to do
When an error occurs, the HTTP status of the page is modified and a runtime error will be displayed with a custom number.
The following errors can occur during the execution of the script:
Error
Description
Number
HTTP status
Unable to connect to the database
The database is unavailable.
100
500
Unknown user
The username passed through the USERNAME parameter does not correspond to an existing WorkflowGen user.
101
500
Error during the execution of the request <CATEGORY>
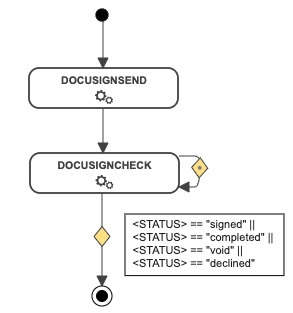
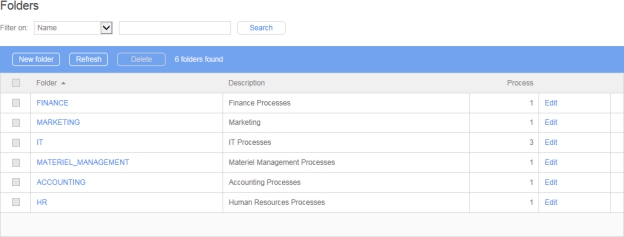
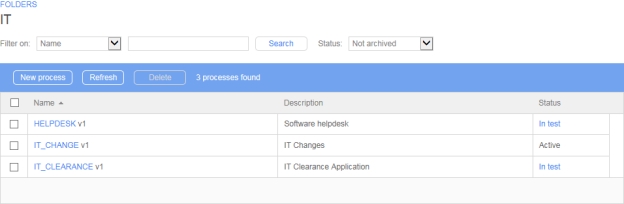
http://yoursite/wfgen/show.aspx?QUERY=SHOW_RSS&USERNAME=johndhttp://yoursite/wfgen/show.aspx?QUERY=SHOW_RSS&USERNAME=johnd&CATEGORY=ACTION_TODO_NB;ACTION_TODO_OVERDUE_NBhttp://yoursite/wfgen/show.aspx?QUERY=SHOW_RSS&PROCESS_CATEGORY=HR<?xml version="1.0" encoding="UTF-8" ?>
<rss version="2.0">
<channel>
<title>WorkflowGen</title>
<description>WorkflowGen</description>
<pubdate>Fri, 24 Oct 2011 15:19:42 GMT</pubdate>
<language>en-US</language>
<item>
<title>Ongoing requests</title>
<link>http://yoursite/wfgen/...</link>
<description>15</description>
<category>REQUEST_RUNNING_NB</category>
</item>
<item>
<title>Actions to do</title>
<link>http://yoursite/wfgen/...</link>
<description>10</description>
<category>ACTION_TODO_NB</category>
</item>
</channel>
</rss>XSL
Path of the XSL sheet used to transform the RSS content.
📌 Example: http://yoursite/portlet.xsl
rss/channel
Channel content publication date
language
rss/channel
Channel language
item
rss/channel
Categories container node
title
rss/channel/item
Category title
link
rss/channel/item
Contextual link of the category in WorkflowGen
description
rss/channel/item
Category value
category
rss/channel/item
Category name
ACTION_TEAM_OVERDUE_NB
Number of overdue team actions to do
ACTION_TOASSIGN_NB
Number of actions to assign
ACTION_TOASSIGN_OVERDUE_NB
Number of overdue actions to assign
REQUEST_CLOSED_NB
Number of requests closed since my last visit
REQUEST_CLOSED_OVERDUE_NB
Number of overdue requests closed since my last visit
REQUEST_TOFOLLOW_NB
Number of requests to follow
REQUEST_TOFOLLOW_OVERDUE_NB
Number of overdue requests to follow
ACTION_TOFOLLOW_NB
Number of actions to follow
ACTION_TOFOLLOW_OVERDUE_NB
Number of overdue actions to follow
NEW_REQUEST
List of available processes that the user can launch
An error occurred during the execution of the SQL request corresponding to the <CATEGORY> category.
102
500
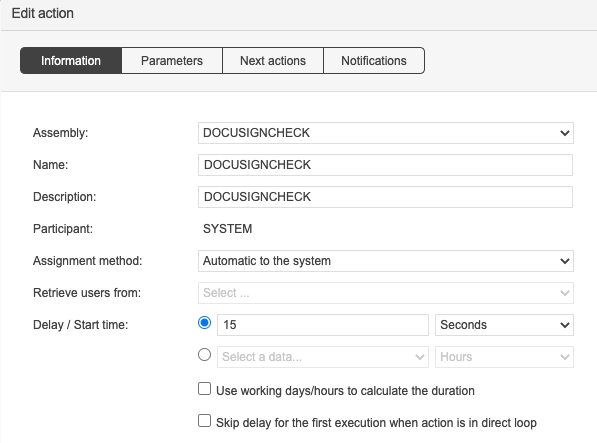
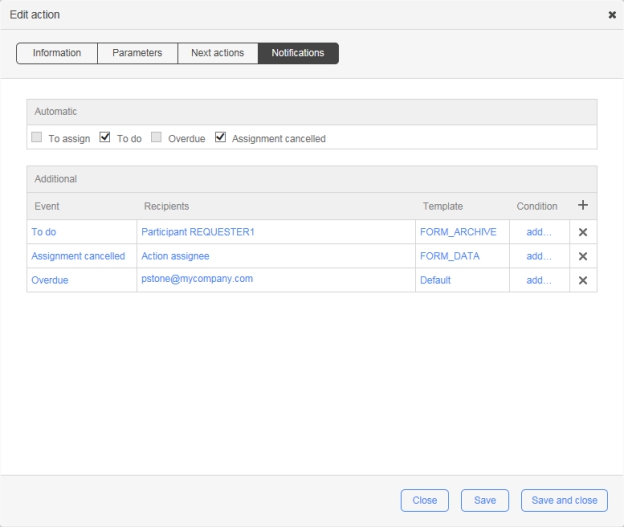
Full date/time (long time)
General date/time (short time)
General date/time (long time)
Month day
Round-trip date/time
RFC 1123 date/time
Sortable date/time (ISO 8601)
Short time
Long time
Universal sortable date/time
Universal full date/time
Year month
Description
Action description
Previous actions
Lists actions preceding the current action within the workflow
Next actions
Lists actions following the current action within the workflow
A link displays the Edit action form, which lists actions that following the current one. The Add link on the Edit action form displays the action form in edit mode for each following action.
Add action
Add a new action to the process
Add synchronization
Add a synchronization action to the process
Add end point
Add an end point to the process
Add comment
Add a comment to the process
Add text
Add text to the process
Add break points
Add break points to transitions
Choose auto positioning mode
Switch between auto and manual positioning mode for the transition anchors
Show assignment methods
Show assignment methods on actions
Display vertical swimlanes
Add a vertical swim lane overlay on the graphical view with actions displayed in the participant columns
Display horizontal swimlanes
Add a horizontal swim lane overlay on the graphical view with actions displayed in the participant rows
Display vertical panels
Add a vertical panel overlay on the graphical view with actions displayed in the participant columns
Display horizontal panels
Add a horizontal panel overlay on the graphical view with actions displayed in the participant columns
Display color picker
Display a color picker from which you can choose the swimlane/panel and the background color
Decrease zoom
Decrease the zoom scale by 15%
Increase zoom
Increase the zoom scale by 15%
Maximize canvas
Maximizes the canvas size
Return to default canvas size
Returns to the default canvas size
Add a condition
Double-click the transition.
Add more than one condition to a transition
You cannot add more than one condition to a single transition. Instead, create a new transition between the actions and add the condition here.
Update a condition
Double-click the transition or condition.
Delete a condition
Click the condition, then click the x that appears in the top right corner.
Delete a participant
Click the participant, then click the x that appears in the top right corner.
Auto positioning mode
Click the auto positioning mode tool then choose one of the options.
Add a breakpoint
Click the add breakpoint tool then click the transition (breakpoints will be created individually). As well, clicking the breakpoint tool will show all of the existing breakpoints.
Delete a breakpoint
Click the breakpoint, then click the x that appears in the top right corner or press the DELETE key (only the selected breakpoint will be deleted). In the case of loop transitions, a minimum of two breakpoints are required.
Change the position of a loop transition
Change the position of each of the breakpoints so that the transition points to the new position.
Change the target/source of a transition
Click the transition, hover over the target/source of a transition until the hand pointer appears, then drag and drop the target/source onto another action.
Change the loop of an action toward another action
Click the loop, then change the target and the source toward the other action.
Resize swimlanes
Click the participant, place the pointer over the border between participants, click the border, then drop it on the new position.
Change the order of participants
Click the participant, then drag and drop it onto the new position (the orange header indicates the new position of the participant).
Associate actions with participants in swimlanes
Can be enabled and disabled in the Workflow section on the Administration tab in the Configuration Panel.
Zoom
The zoom percentage is displayed in the top right corner of the workflow.
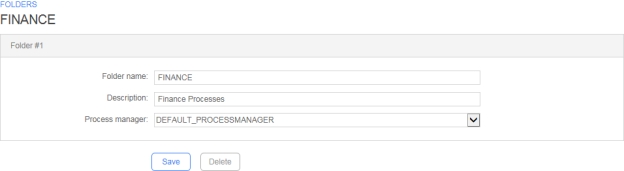
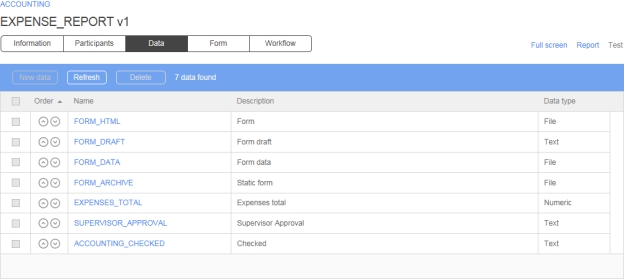
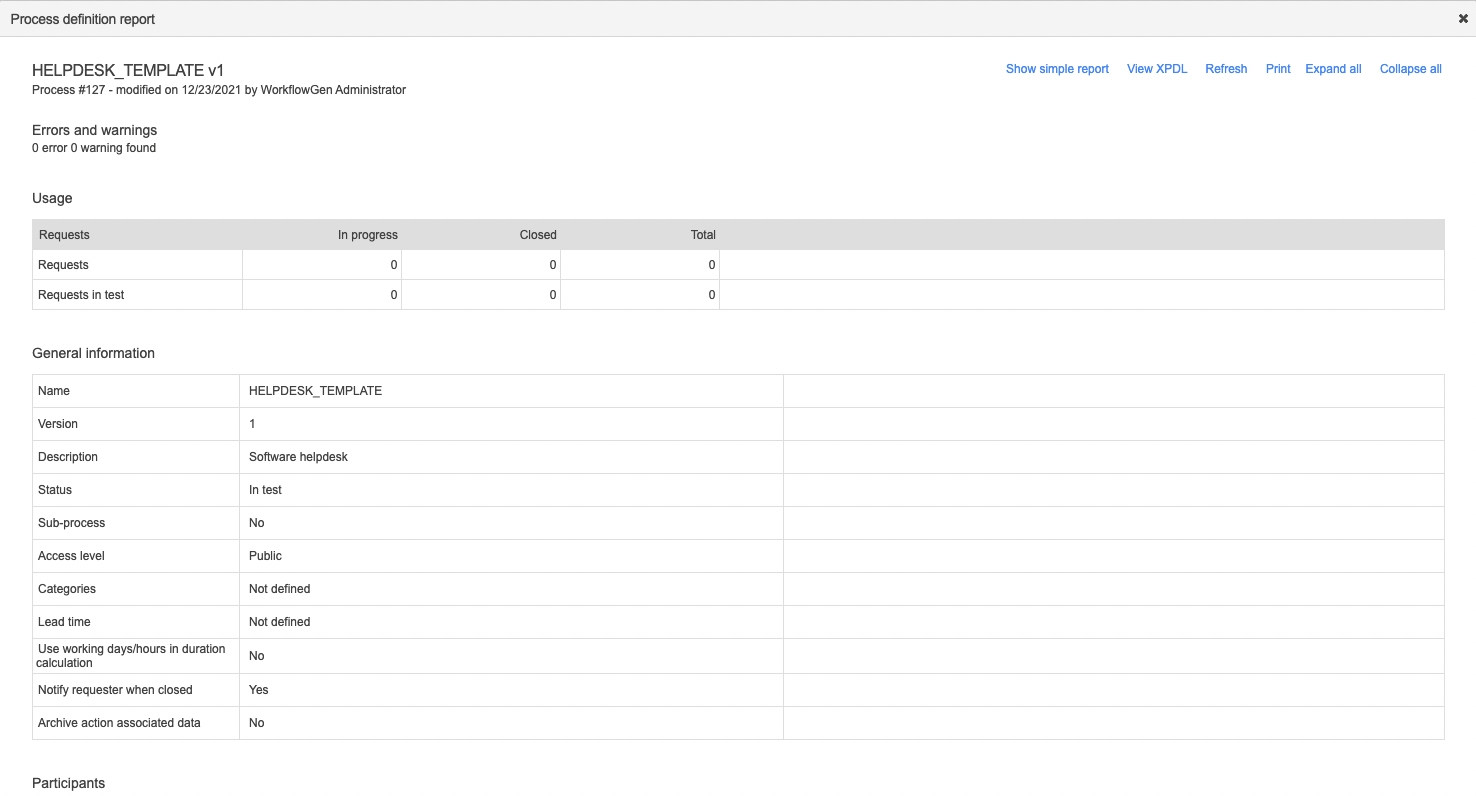
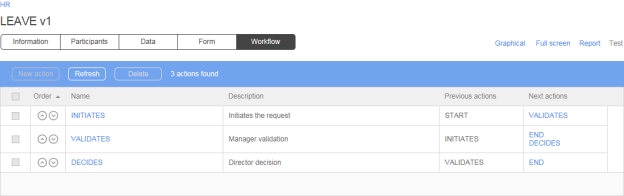
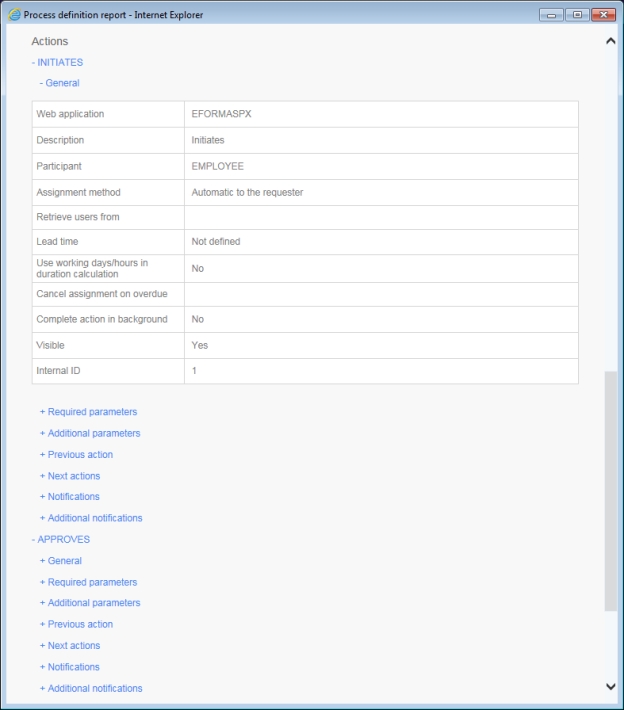
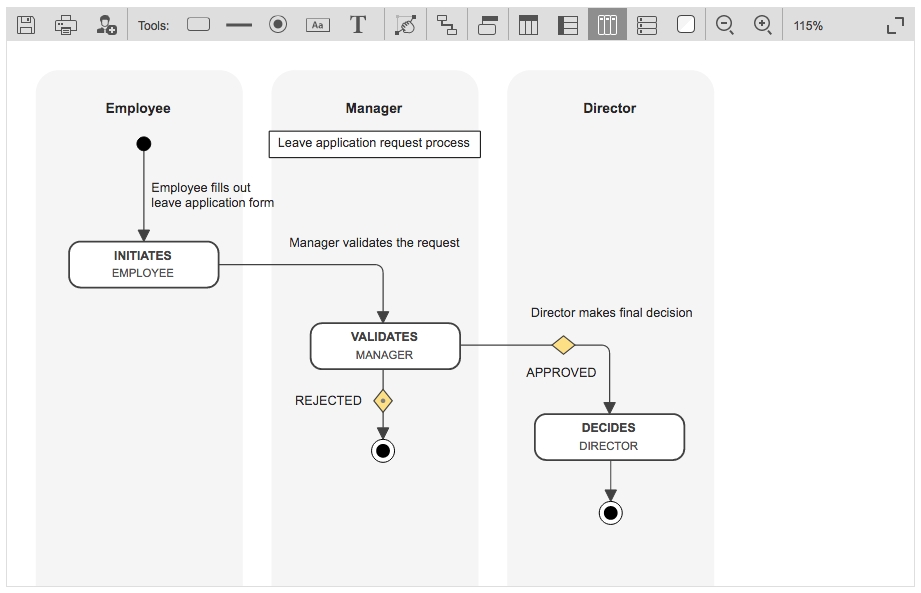
In read-only mode if the participant is of the global type.
Only one requester is allowed per process.
Accessible only to List of persons and List of persons with coordinator type participants.
Accessible only to
* Visible only if associated with a user or a coordinator and when the number of users in the base is greater than the limit set by the software administrator.
A Person type participant can only be associated with a single user.
A List of persons type participant is associated to one or several users or groups or directories.
A List of persons with coordinator type participant is associated with one or several coordinators and to one or several users, groups or directories.
A participant cannot be deleted if the participant is being used in a process action.
A global participant can only be associated once to a process.
There can only be one participant in the Requester role in a process.
There can be multiple participants with the Supervisor role in a process, each with different security settings and different follow-up access specified via the limited scope query.
The following conditions apply when changing the participant type:
Person to List of persons or List of persons with coordinator(s): The participant must not be used in a process action.
List of persons to Person: A single user must be associated to the participant, and the participant must not be used in a process action.
List of persons to List of persons with coordinator(s): Add at least one coordinator.
The supervisor limited scope feature allows dynamic filtering of requests and action follow-up access for process supervisors. When a user is associated with a process supervisor participant with limited scope access enabled, the User Portal homepage follow-up results, portlet RSS feeds, follow-up search results, and statistics reports will be shown only with accessible requests and actions. The supervisor limited scope is defined using criteria conditions in which the syntax is similar to SQL query criteria conditions and allows the usage of a user’s profile and requests data information as filter criteria in the query definition.
A limited scope query can be defined for process participant with the process supervisor role only. You need to add a new process or edit a process supervisor participant and define the query in order to enable the limited scope feature. The query length is limited to a maximum of 255 characters.
If a query is empty, then the process supervisor has follow-up access to all requests and actions of the specific process.
To access online supervisor limited scope query definition help, click the Query (Help) link.
Click the Test link to validate the syntax of a supervisor limited scope query. Saving an invalid syntax query is not allowed.
The fields and macros available for supervisor limited scope queries are listed below. The fields refer to the user’s profile information. You can also use request data as a comparison value in criteria conditions for a query to filter the results.
* Macros only support hard-coded static text as a parameter. Indicating a process data name is not supported. For example:
Valid: {ISMEMBER(my_group_name)}
Not valid: {ISMEMBER(@GROUP_NAME)}
This example matches requests/actions for users is in the province of Quebec:
This example matches requests/actions for users who have an email ending with advantys.com:
This example matches users in my group:
This example matches requests/actions for users whose department is equal to the value of the DEPT_DATA request data:
To compare a text to a request data, you must inverse the comparison order, with the text first, followed by the operator and the data.
This example matches requests/actions for users whose city is equal to the value of the MY_CITY request data and the value of the MY_COUNTRY request data is CANADA:
You can use standard SQL comparison operators such as =, !=, <>, IS NULL, NOT IS NULL, LIKE, NOT LIKE, etc.
For better compatibility, it is recommended to use standard operators that are supported on the database hosting WorkflowGen.
This example matches requests/actions for users who are not located in Montreal:
You can use standard SQL logical operators such as AND and OR to combine multiple criteria conditions to a maximum of 255 characters length in the query. When there are many criteria conditions, it is strongly recommended to use parentheses to logically enclose them.
This example matches requests/actions for users who are located in either Toronto or CITY_DATA of CANADA:
Text values in criteria conditions must be enclosed between single quotes. Double quotes are not supported for enclosure but are valid as a value. Wildcard characters such as % (percent sign) and _ (underscore) can be used with the LIKE operator.
This example matches requests/actions for users whose last name starts with AN:
You can use request data in criteria conditions to filter requests dynamically, since the request data value can be different from one request to another. To do this, call these request data in the criteria condition by prefixing them with the @ character.
This example matches requests/actions for users whose company is equal to the value of request data DATA1:
(DATA1 is an arbitrary convention; any request data name may be used.)
You can also use macros in criteria conditions contained in the query. You just have to add an available macro in the criteria condition.
This example matches requests/actions for a user who is member of the Dev group, member of the WORKFLOWGEN directory and comes from Montreal:
It is very important to respect the syntax in the Available macros list.
In some cases, the WorkflowGen User Portal is reduced in performance or has a slower response time when the limited scope is applied for a process supervisor with filtering queries that use LIKE operators and wildcard characters (%,_) in criteria conditions. The is due to a possible large amount of information that needs to be filtered by the limited scope engine for user accessible requests and actions.
We suggest testing the supervisor-limited scope query in a development environment before releasing for production.
* A filter can be applied to a part of a field.
* Only needed by the web procedures and the web services.
* The delete link is identified by an x visible only if the application is not used by a process action.
To add a parameter, click the Parameters link on the Edit application screen, then click Add on the Edit parameters list screen.
An application cannot be deleted if it is used in a process.
A parameter cannot be deleted if its application is used in a process.
This application allows you to declare a .NET class method as a workflow application. It is the fastest solution to develop a custom workflow application (compared to web services). The execution performance is exceptional because WorkflowGen instantiates the assembly directly without network communication or web service authentication.
Copy a sample .dll assembly into a WorkflowGen bin folder.
In the Administration Module, click Applications and then New application.
Enter the following information in the appropriate fields:
Class full name: Select WorkflowApp.Test
Method: Select GetString
These parameters are automatically generated:
IN: message (Text)
OUT: RETURN_VALUE (Text)
You can now use this workflow application in your process.
This application allows you to declare a WCF service client proxy .NET class method as a workflow application.
In the WorkflowGen Administration Module, click Applications and then New application.
Enter the following information in the appropriate fields:
Name: WCFSERVICE_SAMPLE_GET_STRING
Class full name: Select workflowAppWCFSampleTest.ServiceClient
Method: Select GetString
These parameters are automatically generated:
IN: message (Text)
OUT: RETURN_VALUE (Text)
You can now use this workflow application in your process.
Name: WCFSERVICE_SAMPLE_GET_STRING
WorkflowGen supports web services based on the SOAP standard. This means that web services can now be integrated into WorkflowGen to be used by process actions, without the need to program them. WorkflowGen can now use predefined web services and reference them by using their WSDL (Web Services Description Language) file.
A URL to the WSDL file defining the web service is required to display the available web methods that can be called by WorkflowGen. Once the WSDL is referenced and saved (in the WorkflowGen application definition), and one of its defined web methods are selected, the WorkflowGen application parameters are automatically generated.
The data types of the parameters are mapped to the corresponding WorkflowGen data types (numeric, text, datetime). All complex XML types are mapped to a WorkflowGen file data.
Public web services are web services that are available for public re-use. To reference one as a WorkflowGen Application, follow the example below.
In the Administration Module, create a new WorkflowGen application and define the following:
Name
Description
Private web services are web services that are not available for public re-use. They generally use a secure URL that requires the proper authentication. To reference one as a WorkflowGen application, follow the example below.
In the Administration Module, create a new WorkflowGen application and define the following:
Name
Description
WorkflowGen will create some extra parameters when referencing a WSDL. Other parameters can also be used in addition to those already defined in the WSDL file.
The other parameters that are defined by WorkflowGen are:
RETURN_VALUE: If the web service returns a value, WorkflowGen will automatically add an OUT parameter.
WFG_WS_URL: Specify a web service URL to override the predefined URL.
WFG_WS_USERNAME: Specify a username to override the predefined username.
The GETUSERSFROMDIR workflow application lets you retrieve a username list, a user email list, or a user ID list. These lists are obtained from a WorkflowGen automatic system action that executes SQL queries on the WorkflowGen database. They can either be used for automatic notifications or to define the users of an action in a WorkflowGen process (by storing the output of GETUSERSFROMDIR as a data element and using the resulting data element to specify the users in the notification or action assignment).
The x character: The x character in some parameter names means that there can be more than one instance of the parameter. For example, QUERYx_CMD means there can be QUERY1_CMD, QUERY2_CMD, QUERY3_CMD, etc.
Action: You must create a GETUSERSFROMDIR type WorkflowGen action to use this application.
Listed below are the fields and macros available for the queries created in the QUERYx_CMD parameters. They can be used in the conditions for these queries to filter their results.
This example returns a username list of users in the province of Quebec:
This example returns a username list of users that have email addresses ending with advantys.com:
This example returns a username list of users in my group:
QUERY1_CMD: Executing an SQL queryTo execute an SQL query, you must add the QUERY1_CMD IN parameter to the action. If the parameter is empty or non-existent, no operation will be performed.
This example returns the Montreal username list in the RESULT_LIST parameter:
RESULT_LIST / QUERYx_RESULT_LIST: Retrieving queries resultsTo get the result of all the queries (username list in string format), you must add the RESULT_LIST OUT parameter to the action. To retrieve the result by query, you have to add the QUERYx_RESULT_LIST OUT parameter for each query (associated to their process data).
This example returns the username list of Montreal, Toronto, and New York in the RESULT_LIST parameter. QUERY1_RESULT_LIST contains the username list of Montreal, QUERY2_RESULT_LIST contains the username list of Toronto, and QUERY3_RESULT_LIST contains the username list of New York. RESULT_LIST contains the usernames of all three QUERYx_CMD parameters.
QUERY1_DIR: Directory specificationYou can specify the user directory on which the query will be executed. You have to add the QUERY1_DIR IN parameter in the action. If this parameter has a NULL value or does not exist, the default directory is WORKFLOWGEN (or the directory specified as the default by an Administrator).
This example returns the username list of users in Montreal from the YourCompany directory into the RESULT_LIST parameter:
QUERYx_CMD: Using more than one queryYou can add queries in the same WorkflowGen action and retrieve all of the results in one complete list or in one list per query. You must add the QUERYx_CMD IN parameters, where x is the number of the query. To get the result of each query, you have to add the QUERYx_RESULT_LIST OUT parameters.
This example returns the username list of users from Montreal in the WORKFLOWGEN directory into the QUERY1_RESULT_LIST parameter, the username list of users from Montreal in the INTRANET directory into the QUERY2_RESULT_LIST parameter, and the complete username list from the two queries into the RESULT_LIST parameter:
QUERYx_TOP: Specify results maximumYou can specify the maximum number of records returned by your queries by adding QUERYx_TOP as an IN parameter of the action. The query will not be able to return more results than the number specified in this parameter.
This example returns only the first two usernames of the query:
This example returns all usernames from this query:
QUERYx_DEFAULT_VALUE: Specify a default valueYou can specify a default value to be returned for queries that return no values. You must add the QUERYx_DEFAULT_VALUE IN parameter in the action.
In this example, the query returns no value because the company entered does not exist, so the RESULT_LIST parameter will contain default1:
RESULT_SEPARATOR: Separator specificationYou can specify the character that will separate the result in the returned list by adding the RESULT_SEPARATOR IN parameter. The default separator is , (comma).
In this example, the RESULT_LIST parameter value is: name1***name2***name3:
RESULT_COUNT / QUERYx_RESULT_COUNT: Number of records returnedYou can retrieve the number of records returned for each query or for all queries. For the total number of records returned for all queries, you must add the RESULT_COUNT OUT parameter to the action. For the number of records per query, you must add the QUERYx_RESULT_COUNT OUT parameters to the action.
The following example returns the total number of records in the RESULT_COUNT parameter and the number of records of each query (QUERY1 and QUERY2) in the QUERY1_RESULT_COUNT and QUERY2_RESULT_COUNT parameters:
You can also use parameters in the SQL conditions contained in the QUERYx_CMD parameter. You must add IN parameters with different names for the following reserved parameters:
QUERYx_CMD
QUERYx_DIR
QUERYx_TOP
You can then call these parameters in the condition by prefixing them with the @ character.
This example returns the username list from Montreal in the WORKFLOWGEN directory:
Remember that the parameter name used in the condition must have the same name as the one defined in the WorkflowGen action.
QUERYx_CMD: Using macros in SQL query conditionsYou are also able to use macros in the SQL conditions contained in QUERYx_CMD by adding an available macro in the condition.
The following example returns the username list of users who are members of the Dev group, members of the WORKFLOWGEN directory, and are in Montreal:
You must respect the syntax in the Available macros list.
RESULT_LIST_EMAIL / QUERYx_RESULT_LIST_EMAIL: Retrieving the queries result in an email list formatIf you want to retrieve the emails of the usernames returned by the queries, you must add the RESULT_LIST_EMAIL OUT parameter to the action. If you want to retrieve the emails by query, you must add the QUERYx_RESULT_LIST_EMAIL OUT parameter to each query.
This example returns the Montreal and Toronto email list of Montreal and Toronto in the RESULT_LIST_EMAIL parameter. QUERY1_RESULT_LIST_EMAIL contains the Montreal email list and QUERY2_RESULT_LIST_EMAIL contains the Toronto email list:
To manage execution errors, you must add a corrective (debug) action linked to the GETUSERSFROMDIR action. This corrective action is a manual action and is executed upon an execution error. You must add this exception on the transition between the two actions. The following table lists the most frequent errors returned by the application.
The GetUsersFromDirMaxResultNb parameter in the WorkflowGen web.config file specifies the maximum number of records that can be returned by a query.
This limit reduces the risk of a time limit expiration error that may occur when query results are too large. If the number of returned records is higher than this constant value, an error message stating that the queries returned too many records will be displayed.
The YOUSIGNSEND workflow application lets you send one or more documents to Yousign for electronic signature.
The YOUSIGNSEND application will create a unique envelope and send it to one or multiple signers.
You can specify one or multiple files per YOUSIGNSEND action. To do this, use the FILEx parameter, where x corresponds to the file number (e.g FILE1). At least one file is required.
You can specify one or multiple signers. To do this, use the combination of SIGNER_FIRSTNAME_LIST, SIGNER_LASTNAME_LIST, and SIGNER_EMAIL_LIST. You can also use SIGNER_FIRSTNAMEx , SIGNER_LASTNAMEx, and SIGNER_EMAILx, where x corresponds to the signer number.
Application logs are available. These can be specified by setting the value of the YousignSendLogLevel parameter in the web.config file to 0 to deactivate logs, 1 for error logs, 2 for information logs, or 3 for debug logs; the default value is 0.
In the Yousign administration interface, click the Integrations tab, then select the API menu.
Click the New API key button.
Enter a description in the Description field. Select an environment (depending on your usage), then select Full-Access permissions.
You can use either of the following configurations: with a signers list or with signer numbers.
Mobile
PAGER
Pager
FAX
Fax
OFFICE
Office
DEPARTMENT
Department
COMPANY
Company
JOBTITLE
Job Title
PERSONALTITLE
Title
EMPLOYEENUMBER
Employee number
EMPLOYEETYPE
Employee type
POSTALADDRESS
Postal address
POSTALCODE
Zip code
CITY
City
STATE
State/Area
COUNTRY
Country
EXTATT_1
Extended attribute 1
EXTATT_2
Extended attribute 2
EXTATT_3
Extended attribute 3
EXTATT_4
Extended attribute 4
EXTATT_5
Extended attribute 5
QUERYx_RESULT_COUNTQUERYx_RESULT_LIST
RESULT_LIST
RESULT_COUNT
RESULT_SEPARATOR
Change the name of this parameter for a name other than the reserved parameters’ names.
The queries return too many records
Add conditions in the QUERYx_CMD parameters to filter the results.
The parameter [parameter name] must have a value
Check in the WorkflowGen action if the parameter is empty.
[Parameter name] parameter is required
Add this parameter to the WorkflowGen action.
Available fields
Definition
LASTNAME
Last name
FIRSTNAME
First name
USERNAME
Username
EMAIL
PHONE
Telephone
Available macros
Definition
{ISMEMBER(groupname)}
Get the group’s members
Error message
Solution
This directory does not exist
Check if the directory entered in the query is valid.
XML context is empty or incorrect
Verify if the application has been launched by WorkflowGen.
Database connection error
Check if the database connection string in the config.inc file is valid.
Query error
Check if the fields or macros used in the QUERYx_CMD parameter are valid.
The queries return too many values
Add conditions in the QUERYx_CMD parameter to filter the results.
MOBILE
The parameter [parameter name] has the same name as a WorkflowGen-reserved parameter. You must change the name.
QUERY1_CMD: STATE = 'QC'
RESULT_LISTQUERY1_CMD: EMAIL LIKE '%ADVANTYS.COM'
RESULT_LISTQUERY1_CMD: {ISMEMBER(MYGROUPNAME)}
RESULT_LISTQUERY1_CMD: CITY = 'MONTREAL'
RESULT_LISTQUERY1_CMD: CITY = 'MONTREAL'
QUERY2_CMD: CITY = 'TORONTO'
QUERY3_CMD: CITY = 'NEW YORK'
QUERY1_RESULT_LIST
QUERY2_RESULT_LIST
QUERY3_RESULT_LIST
RESULT_LISTQUERY1_CMD: CITY = 'MONTREAL'
QUERY1_DIR: YourCompany
RESULT_LISTQUERY1_CMD: CITY = 'MONTREAL'
QUERY1_DIR: WORKFLOWGEN
QUERY2_CMD: CITY = 'MONTREAL'
QUERY2_DIR: INTRANET
QUERY1_RESULT_LIST
QUERY2_RESULT_LIST
RESULT_LISTQUERY1_CMD: CITY = 'MONTREAL'
QUERY1_TOP: 2
RESULT_LISTQUERY1_CMD: CITY = 'MONTREAL'
RESULT_LISTQUERY1_CMD: COMPANY = 'COMPANY_DOES_NOT_EXIST'
QUERY1_DEFAULT_VALUE = default1
RESULT_LISTQUERY1_CMD: CITY = 'MONTREAL'
RESULT_SEPARATOR: ***
RESULT_LIST
This example returns the value: name1, name2, name3:
QUERY1_CMD: CITY = 'MONTREAL'
RESULT_LISTQUERY1_CMD: CITY = 'NY'
QUERY1_DIR: WORKFLOWGEN
QUERY2_CMD: CITY = 'NY'
QUERY2_DIR: INTRANET
RESULT_LIST
RESULT_COUNT
QUERY1_RESULT_COUNT
QUERY2_RESULT_COUNTQUERY1_CMD: CITY = @PARAM1
PARAM1: MONTREAL
RESULT_LISTQUERY1_CMD: CITY = 'MONTREAL' and {ISMEMBER(Dev)}
RESULT_LISTQUERY1_CMD: CITY = 'MONTREAL'
QUERY2_CMD: CITY = 'TORONTO'
QUERY1_RESULT_LIST_EMAIL
QUERY2_RESULT_LIST_EMAIL
RESULT_LIST_EMAILList of users associated with a participant; a link allows associated users to be added or deleted.
Group(s) [3]
List of groups associated with a participant; a link allows associated groups to be added or deleted.
Directory(ies) [3]
List of directories associated with a participant; a link allows associated directories to be added or deleted.
Coordinator(s) [4]
List of coordinators associated with a participant; a link allows associated coordinators to be added or deleted.
Graphical follow-up
Allow the associated users of the participant to view the graphical follow-up of the requests and the graphical help of the process from the user module.
Permission for requests [6]
Allow the associated users of the participant to access all requests, actions and data of the process in read-only user mode.
Permission for supervisors
Reassign current actions
Cancel current requests
View statistics
Permission for comments
None: The comments list will be hidden to the participant’s associated users
Read: The participant’s associated users can only view the comments list
Read + Write: The participant’s associated users can view and post new comments
Query (Help)
The supervisor limited scope feature allows for dynamic filtering of requests and actions for process supervisor participants only. A test link is available to validate the syntax of the supervisor limited scope query.
Supervisor’s participant does not have to be associated to an action.
This request access permission is specific per process version.
List of persons with coordinator(s) to List of persons: The participant must not be used in a process action where the assignment is made by the coordinator.
Mobile
PAGER
Pager
FAX
Fax
OFFICE
Office
DEPARTMENT
Department
COMPANY
Company
JOBTITLE
Job title
PERSONALTITLE
Title
EMPLOYEENUMBER
Employee number
EMPLOYEETYPE
Employee type
POSTALADDRESS
Postal address
POSTALCODE
Zip/postal code
CITY
City
STATE
State/Area
COUNTRY
Country
EXTATT_1
Extended attribute 1
EXTATT_2
Extended attribute 2
EXTATT_3
Extended attribute 3
EXTATT_4
Extended attribute 4
EXTATT_5
Extended attribute 5
Columns
Remarks
Order
Use the arrows to change the display order of the participant
Name
Participant name
A link displays the participant form in edit mode. Click New participant to associate a global participant or to create a new process specific participant.
Description
Participant description
Role
Role of the participant in the process
Users
Number of users associated to the participant
Fields
Remarks
Scope
Scope information: process or global
Name [1]
Unique identifier for the participant (including global ones); must respect nomenclature and be limited to 30 characters (required field)
Description
Participant description limited to 255 characters (required field)
Role [2]
Role of the participant in the process:
Requester
Actor
Process supervisor [5]
Participant type [1]
Participant type, define possible associations to the directory (required field):
Person
List of persons
List of persons with coordinator(s)
Fields
Remarks
Name *
Filters by person’s name
Available
Lists possible associations to the directory
Selected
Lists current associations to the directory
Available fields
Definition
LASTNAME
Last name
FIRSTNAME
First name
USERNAME
Username
EMAIL
PHONE
Telephone
Available macros
Definition
{ISMEMBER(groupname)} *
Member of the group groupname
{ISMANAGER(username)} *
Manager of the user username
{ISSTAFFMEMBER(username)} *
Staff member of the user username
User(s)
MOBILE
Username to be used if an authentication is required to access the application’s URL
Password *
Password to be used if an authentication is required to access the application’s URL
Content type
Type of data encoding to be used when the application returns to WorkflowGen:
application/x-www-form-urlencoded
application/xml; charset=UTF-8
application/json
Context format
Defines the format type of the context parameters exchanged between the application and WorkflowGen:
JSON
XML ADO.NET DataSet (default WorkflowGen schema)
XML ADO Recordset
Schema definition
If checked the schema will be embedded inline in the XML (for XML context formats only)
Parameters
Application parameters (a link displays the parameters form in edit mode)
Default application
If checked the application is the default one
Active
If checked the application is active
Impersonate username
A WorkflowGen username to impersonate by the application (for Incoming Webhook and Non Interactive Client)
Client ID
A client ID from the registered application of your authentication service provider e.g. Azure Active Directory (for Non Interactive Client)
Link to delete the application parameter
If checked, the parameter is displayed in the parameter list of the action based on the current application
They should not contain spaces
They should not begin with the letters XML in any case (e.g. xml or Xml)
For more information, see https://www.w3schools.com/xml/xml_elements.asp.
Name: SAMPLE_GET_STRING
Description: Returns a string with a ! (exclamation point)
Type: Assembly
Assembly full name or path: WorkflowAppSample
Click Save.
Description: Returns a string with a ! (exclamation point)
Type: WCF service
Assembly full name or path: WorkflowAppWCFSampleTest
Click Save.
Username: A valid WorkflowGen Administrator
Password: The valid password for the username
Reference a web service and WSDL by defining a URL to a valid web service and to its related WSDL file and save the application.
📌 URL example:
📌 WSDL example:
Select the web method to use. The WSDL defines which web methods are available to be used. Once you select a web method and save the application, the associated parameters are automatically mapped and the application may now be used by process actions.
Username: A valid WorkflowGen Administrator
Password: The valid password for the username
Reference a web service and WSDL by defining a URL to a valid web service and to its related WSDL file and save the application.
The examples below demonstrate the use of a web service located on a SharePoint 2007 website. In this example, the web service is called lists.asmx. For more information, see http://msdn2.microsoft.com/en-us/library/ms445760.aspx.
📌 URL example:
📌 WSDL example:
Select the web method to use. The WSDL defines which web methods are available to be used. Once you select a web method and save the application, the associated parameters are automatically mapped and the application can now be used by process actions.
WFG_WS_PASSWORD: Specify a password to override the predefined password.
Links
Remarks
New application
Displays a blank application form to add a new application
Refresh
Refreshes the displayed application list
Filter on *
Remarks
Name
Filters by application name
Description
Filters by application description
External filters
Remarks
Actives only
Displays active applications only
Fields
Remarks
Name
Unique identifier for the application; must respect nomenclature and be limited to 30 characters (required field)
Description
Application description limited to 255 characters (required field)
Type
Application type:
Assembly
Asynchronous Web Procedure
WCF Service
Web Application
Web Procedure
SOAP Web Service
Incoming Webhook
Non Interactive Client
URL
The relative or the absolute URL of the application; both will work (required field)
WSDL
The WSDL URL to define a WSDL-based web service (if applicable); see WSDL web services for details on WSDL-based web services.
Columns
Remarks
Order
Display the application in order list
Name
Application name (a link displays the application form in edit mode)
Description
Application description
Active
Application is active
Utilization
Number of actions in which the application is used
Columns
Remarks
Name
Application parameter name
Data type
Application parameter data type
Direction
Application parameter direction
Required
Required parameter
Default
Optional parameter; displays the parameter in the parameter list of the actions based on the current application by default
Fields
Remarks
Name
Application parameter name (required field)
Description
Application parameter description (required field)
Data type
Application parameter data type:
Text
Numeric
Date/Time
File
Direction
Application parameter directions:
IN (input)
OUT (output)
INOUT (input/output)
Required
Is this parameter required?
Yes (disables the default property)
No (enables the default property)
Username *
Deletion *
Default
Emails of signers, separated by the value defined in the DATA_SEPARATOR parameter
FILEx
FILE
IN
File(s) to send, where x corresponds to the file number; you can add one or multiple files
Email(s) of signer(s), where x corresponds to the signer number; you can add one or multiple signers
FILEx
FILE
IN
File(s) to send, where x corresponds to the file number; you can add one or multiple files
Page to be signed by the signer, where x corresponds to the signer number; you can add one or more signers
SIGNER_X_POSITION_LIST
TEXT
IN
X position of the signature area for the signer, separated by the value defined in the DATA_SEPARATOR parameter
The value must be a positive numeric integer.
SIGNER_X_POSITIONX
TEXT
IN
X position of the signature area for the signer, where x corresponds to the signer number
The value must be a positive numeric integer.
SIGNER_Y_POSITION_LIST
TEXT
IN
Y position of the signature area for the signer, separated by the value defined in the DATA_SEPARATOR parameter
The value must be a positive numeric integer.
SIGNER_Y_POSITIONX
TEXT
IN
Y position of the signature area for the signer, where x corresponds to the signer number
The value must be a positive numeric integer.
SIGNATURE_NAME
TEXT
IN
Name of the signature request
SIGNER_PHONE_LIST
TEXT
IN
Phone number of the signer(s), separated by the value defined in the DATA_SEPARATOR parameter
SIGNER_PHONEX
TEXT
IN
Signer's phone number, where x is the signer number.
SIGNER_LOCALE_LIST
TEXT
IN
Location of the signer(s), separated by the value defined in the DATA_SEPARATOR parameter
SIGNER_LOCALEX
TEXT
IN
Location of the signer, where x is the signer number
SIGNER_AUTH_MODE_LIST
TEXT
IN
Authentication mode of the signer(s), separated by the value defined in the DATA_SEPARATOR parameter
SIGNER_AUTH_MODEX
TEXT
IN
Signer authentication mode, where x is the signer number
Default: no_otp
FILE_NATUREX
TEXT
IN
Nature of the document of the file to send, where x corresponds to the signer number
Default: signable_document
SIGNATURE_WIDTH
TEXT
IN
Signature field width in pixels
Default: 25
SIGNATURE_HEIGHT
TEXT
IN
Signature field height in pixels
Default: 37
SIGNATURE_NAME
TEXT
IN
Signature on a contract
SIGNER_PAGE_LIST
TEXT
IN
1,2
SIGNER_X_POSITION_LIST
TEXT
IN
100,100
SIGNER_Y_POSITION_LIST
TEXT
IN
100,100
FILE1
FILE
IN
contract.pdf
YOUSIGN_SIGNATURE_ID
TEXT
OUT
xxxxx-xxxxx-xxxxx-xxxxx
Bernard
SIGNER_LASTNAME2
TEXT
IN
Martin
SIGNATURE_NAME
TEXT
IN
Signature on a contract
SIGNER_PAGE1
TEXT
IN
1
SIGNER_PAGE2
TEXT
IN
2
SIGNER_X_POSITION1
TEXT
IN
100
SIGNER_X_POSITION2
TEXT
IN
100
SIGNER_Y_POSITION1
TEXT
IN
100
SIGNER_Y_POSITION2
TEXT
IN
100
FILE1
FILE
IN
contract.pdf
YOUSIGN_SIGNATURE_ID
TEXT
OUT
xxxxx-xxxxx-xxxxx-xxxxx
Parameter
Type
Direction
Description
SIGNER_FIRSTNAME_LIST
TEXT
IN
First names of signers, separated by the value defined in the DATA_SEPARATOR parameter
SIGNER_FIRSTNAME_LIST
TEXT
IN
Last names of signers, separated by the value defined in the DATA_SEPARATOR parameter
SIGNER_EMAIL_LIST
TEXT
Parameter
Type
Direction
Description
SIGNER_FIRSTNAMEx
TEXT
IN
First name(s) of signer(s), where x corresponds to the signer number; you can add one or multiple signers
SIGNER_LASTNAMEx
TEXT
IN
Last name(s) of signer(s), where x corresponds to the signer number; you can add one or multiple signers
SIGNER_EMAILx
TEXT
Parameter
Type
Direction
Description
YOUSIGN_API_KEY
TEXT
IN
Yousign API key
By default, this value comes from the YousignApiKey parameter in the web.config file.
YOUSIGN_HOST_SERVER
TEXT
IN
Yousign host server (e.g. https://api.yousign.app/v3)
By default, this value comes from the YousignHostServer parameter in the web.config file.
Parameter
Type
Direction
Description
DATA_SEPARATOR
TEXT
IN
Separator used to separate the content of SIGNER_FIRSTNAME_LIST, SIGNER_LASTNAME_LIST, SIGNER_EMAIL_LIST , SIGNER_PAGE_LIST, SIGNER_X_POSITION_LIST, SIGNER_Y_POSTION_LIST , SIGNER_PHONE_LIST , SIGNER_LOCAL_LIST, and SIGNER_AUTH_MODE_LIST
Default : , (comma)
SIGNER_PAGE_LIST
TEXT
IN
Page to be signed by the signer(s), separated by the value defined in the DATA_SEPARATOR parameter
SIGNER_PAGEX
TEXT
Parameter
Type
Direction
Description
YOUSIGN_SIGNATURE_ID
TEXT
OUT
Contains the Yousign signature ID; you can use this ID in the YOUSIGNCHECK workflow application
Parameter
Type
Direction
Value
SIGNER_FIRSTNAME_LIST
TEXT
IN
John,Bernard
SIGNER_FIRSTNAME_LIST
TEXT
IN
Bridges,Martin
SIGNER_EMAIL_LIST
TEXT
Parameter
Type
Direction
Value
SIGNER_FIRSTNAME1
TEXT
IN
John
SIGNER_LASTNAME1
TEXT
IN
Bridges
SIGNER_FIRSTNAME2
TEXT
IN
IN
IN
IN
IN
The ADOBESIGNSEND creates a single envelope and sends it to one or multiple signers.
You can specify one or multiple files per ADOBESIGNSEND action. To do this, use the FILEx parameter, where x corresponds to the file number (e.g. FILE1). At least one file is required.
You can specify one or multiple signers. To do this, use the combination of SIGNER_NAME_LIST and SIGNER_EMAIL_LIST. You can also use SIGNER_NAMEx and SIGNER_EMAILx, where x corresponds to the signer number.
You can specify one role per recipient. To do this, based on the method that you use to specify signers (with or without _LIST), you can use SIGNER_ROLE_LIST or SIGNER_ROLEx, where x corresponds to the signer number. Possible values: SIGNER (default), APPROVER, ACCEPTOR, CERTIFIED_RECIPIENT, FORM_FILLER or DELEGATE_TO_SIGNER, DELEGATE_TO_APPROVER
Application logs are available. These can be specified by setting the value of the AdobeSignSendLogLevel parameter in the web.config file to 0 to deactivate logs, 1 for error logs, 2 for information logs, or 3 for debug logs; the default value is 0.
In the Adobe Sign administration interface, add a new API Application, then click Configure OAuth for application.
Activate the following scopes and select account under Modifier:
agreement_write
agreement_read
You can retrieve the Client ID and Client Secret directly from the configuration tab.
Insert a valid address in the Redirect URI field; it will be useful in the next step.
Since Adobe Sign doesn't support client_credentials authentication, it's necessary to use a refresh token in order to retrieve a valid access_token. The refresh token is valid for 60 days. These 60 days are renewed upon each API call, which means that when you run ADOBESIGNSEND or ADOBESIGNCHECK, the token's validity is extended by 60 days.
In order to be able to use your new Adobe Sign application, you need to authorize it to access the defined scopes. Execute the following URL in your browser:
Replace the following information with your own values:
<HOST_SERVER> : Your Adobe Sign account's host server. Usually, the URL is composed like this: https://api.naX.adobesign.com, whereX is the server ID.
<REDIRECT_URI> : The URL that you defined in your Adobe Sign application.
<CLIENT_ID> : Your Adobe Sign application's client ID.
After granting consent to your application, you'll be redirected to your REDIRECT_URI with a CODE parameter in the URL.
The code returned by Adobe Sign is for one-time use and will be used to obtain the refresh token.
In order to obtain the refresh token, execute the following request, specifying your values:
HOST_SERVER : Your Adobe Sign account's host server. Usually, the URL is composed like this: https://api.naX.adobesign.com , where X is the server ID.
<CONSENT_CODE> : One-time use code obtained in the previous step (Consent and obtaining a one-time code).
<CLIENT_ID> : Client ID of your Adobe Sign application.
<CLIENT_SECRET> : Your Adobe Sign application's client secret.
<REDIRECT_URI> : The URL that you defined in your Adobe Sign application.
After executing the request, you'll obtain a value for the refresh token, contained in the refresh_token data.
You can use one of the following two configurations: with a list of signers or with signer numbers.
Parameter
Type
Direction
Description
SIGNER_NAME_LIST
TEXT
IN
Names of signers, separated by the value defined in the DATA_SEPARATOR parameter
SIGNER_EMAIL_LIST
TEXT
IN
Email addresses of signers, separated by the value defined in the DATA_SEPARATOR parameter.
FILEx
Parameter
Type
Direction
Description
SIGNER_NAMEx
TEXT
IN
Name(s) of the signer(s), where x corresponds to the signer number; you can add one or multiple signers
SIGNER_EMAILx
TEXT
IN
Email address(es) of the signer(s), where x corresponds to the signer number; you can add one or multiple signers
FILEx
Parameters
Type
Direction
Description
ADOBESIGN_CLIENT_ID
TEXT
IN
Adobe Sign client ID client Adobe Sign
By default, this value comes from the AdobeSignClientId parameter in the web.config file.
ADOBESIGN_CLIENT_SECRET
TEXT
IN
Adobe Sign client secret
By default, this value comes from the AdobeSignClientSecret parameter in the web.config file.
ADOBESIGN_REFRESH_TOKEN
Parameters
Type
Direction
Description
DATA_SEPARATOR
TEXT
IN
Separator used to the separate the contents of SIGNERS_NAME_LIST, SIGNERS_EMAIL_LIST, and SIGNER_ROLE_LIST
Default: , (comma)
SIGNER_ROLE_LIST
TEXT
IN
Roles of the signers, separated by the value defined in the DATA_SEPARATOR parameter
SIGNER_ROLEX
Parameter
Type
Direction
Description
ADOBESIGN_AGREEMENT_ID
TEXT
OUT
Contains the Adobe Sign agreement ID; you can use this ID in the workflow application
Parameter
Type
Direction
Value
SIGNER_NAME_LIST
TEXT
IN
John Smith,Bernard Martin
SIGNER_ROLE_LIST
Parameter
Type
Direction
Value
SIGNER_NAME1
TEXT
IN
John Smith
SIGNER_NAME2
TEXT
IN
Bernard Martin
SIGNER_EMAIL1
* A filter can be applied to a part of a field.
* These fields can be synchronized with Active Directory. These fields are not required by the application; however, it is possible to use them through workflow macros.
A user will be archived and not deleted if:
The user is associated to a participant as a user.
The user is the creator or modifier of a process.
The user is associated to a request or an action.
A user cannot receive an inactive, deleted, or archived status if:
The user is the only person assigned as a coordinator to a List of persons.
The user is the only person in a group assigned to a List of persons type participant.
The user is the only person in a List of persons type participant.
You can replace a user with another one (the user that replaces another user must belong to the same directory and to the same groups). All roles in process definitions will be reassigned to the new user.
Ongoing (open) requests will be reassigned to the new user; closed (historical) actions will maintain the correct participant who performed the action.
This function is useful when a someone leaves their position in the organization and their ongoing tasks and roles must be reassigned.
If a user exceeds the maximum number of connection attempts set in the Configuration Panel, their account will be locked and must be unlocked by an administrator. To do this, open the user’s profile and click the Unlock user button.
The user activity report can be generated by selecting the Activity report link in the user’s profile page.
The generated report summarizes all the activities for the selected user, such as:
Request type
In progress
Closed
Total
Action type
In progress
Closed
Total
Process
Participant
Global
Delegated user
Process
Participant
Global
User
Process
Participant
Global
Role
Folder
Participant
Directory
Groups
Participant
Directory
Groups
User
STATE = 'QC'EMAIL LIKE '%ADVANTYS.COM'{ISMEMBER(MYGROUPNAME)}DEPARTMENT = @DEPT_DATACITY = @MY_CITY AND 'CANADA' = @MY_COUNTRYCITY <> 'MONTREAL'COUNTRY = 'CANADA' AND (CITY = 'TORONTO' OR CITY = @CITY_DATA)LASTNAME LIKE 'AN%'COMPANY = @DATA1CITY = 'MONTREAL' and {ISMEMBER(Dev)}http://quickstarts.asp.net/QuickStartv20/webservices/Samples/MathService/vb/Server/MathService.asmxhttp://quickstarts.asp.net/QuickStartv20/webservices/Samples/MathService/vb/Server/MathService.asmx?WSDLhttp://myspsserver/_vti_bin/lists.asmxhttp://myspsserver/_vti_bin/lists.asmx?WSDL<HOST_SERVER>/public/oauth?redirect_uri=<REDIRECT_URI>&client_id=<CLIENT_ID>&response_type=code&scope=agreement_read:account+agreement_write:accountcurl --location --request POST '<HOST_SERVER>/oauth/token' \
--header 'Content-Type: application/x-www-form-urlencoded' \
--data-urlencode 'code=<CONSENT_CODE>' \
--data-urlencode 'client_id=<CLIENT_ID>' \
--data-urlencode 'client_secret=<CLIENT_SECRET>' \
--data-urlencode 'redirect_uri=<REDIRECT_URI>' \
--data-urlencode 'grant_type=authorization_code'DELEGATE_TO_ACCEPTORDELEGATE_TO_CERTIFIED_RECIPIENTDELEGATE_TO_FORM_FILLERSHAREFILE
IN
File(s) to send, where x corresponds to the file number; you can add one or multiple files
FILE
IN
File(s) to send, where x corresponds to the file number; you can add one or multiple files
TEXT
IN
Authentication refresh token
By default, this value comes from the AdobeSignAuthServer parameter in the web.config file.
To obtain it, see the Configuring the Adobe Sign API section.
ADOBESIGN_HOST_SERVER
TEXT
IN
Adobe Sign host server (e.g. https://api.naX.adobesign.com, where X is the server ID)
By default, this value comes from the AdobeSignHostServer parameter in the web.config file.
TEXT
IN
Role(s) of the signer(s), where x corresponds to the signer number; you can add one or multiple signers
AGREEMENT_NAME
TEXT
IN
Name of the agreement, which will be displayed in the email sent to the user
Default: WorkflowGen
TEXT
IN
APPROVER,SIGNER
FILE1
FILE
IN
contract.pdf
ADOBESIGN_AGREEMENT_ID
TEXT
OUT
xxxxx-xxxxx-xxxxx-xxxxx
TEXT
IN
SIGNER_EMAIL2
TEXT
IN
SIGNER_ROLE1
TEXT
IN
APPROVER
SIGNER_ROLE2
TEXT
IN
SIGNER
FILE1
FILE
IN
contract.pdf
ADOBESIGN_AGREEMENT_ID
TEXT
OUT
xxxxx-xxxxx-xxxxx-xxxxx
Filters by user’s employee number
Telephone
Filters by user’s telephone number
Mobile
Filters by user’s mobile phone number
Fax
Filters by user’s fax number
Pager
Filters by user’s pager number
Office
Filters by user’s office
Job Title
Filters by user’s job title
Employee type
Filters by user’s employee title
Initials
Filters by user’s initials
Personal Title
Filters by user’s title
Postal address
Filters by user’s postal address
Zip code
Filters by user’s zip code
City
Filters by user’s city
State/Area
Filters by user’s state or area
Country
Filters by user’s country
LDAP Path
Filters by user’s LDAP path
Extended attribute 1
Filters by user’s extended attribute #1
Extended attribute 2
Filters by user’s extended attribute #2
Extended attribute 3
Filters by user’s extended attribute #3
Extended attribute 4
Filters by user’s extended attribute #4
Extended attribute 5
Filters by user’s extended attribute #5
Common name
Filters by user’s displayed name
Distinctive name
Filters by user’s distinctive name
System identifier
Filters by user’s system identifier (SID)
User directory
✏️ Note: This column is only visible when you select All from the Directory drop-down list.
User’s email address
Profile
User’s profile (defines application access rights: administrator or user)
Group(s)
Name of the directory group the user is associated; a link displays the corresponding groups
Status *
User’s account status:
Active
Inactive
Synchronized
If checked, the user is synchronized
Default language
Language applied when the user's account was created
Selected language
Language selected by the user
Default time zone
Time zone applied when the user’s account was activated
Selected time zone
Time zone selected by the user
Manager
The user selected as manager
Staff members
Count of users who have been assigned this user as manager; clicking this allows access to the staff member list
Telephone *
User’s telephone number
Mobile *
User’s mobile telephone number
Fax *
User’s fax number
Pager *
User’s pager number
Office *
User’s office number
Department *
User’s department number
Company
User’s company name
Job title *
User’s job title
Employee type *
Employee type the user belongs to
Initials *
User’s initials
Title *
User’s title
Employee number
User’s employee number
Postal address *
User’s postal address
Zip code *
User’s zip code
City *
User’s city
State/Area *
User’s state or area
Country *
User’s country
LDAP path *
User’s LDAP path
Common name *
User’s displayed name
Distinctive name *
User’s distinctive name
Extended attribute 1 to 5 *
User's extended attribute
System identifier *
User's SID
Begin
End
Begin
End
Directory
Groups
User
Coordinator
User
Links
Remarks
New user
Displays a blank user form to add a new user
Refresh
Refreshes the user list displayed
External filters
Remarks
Directory
Displays the specified user directory
Profile
Displays users with the selected profile
Status
Displays users with the specified status(es):
All
Active or inactive
Active
Inactive
Archived
Filter on
Filters by specified criteria (e.g. name, username, email, etc.)
Search
Search for users by name, username, email, etc.
Filter on *
Remarks
Name
Filters by user’s name
Username
Filters by user’s username
Filters by user’s email address
Department
Filters by user’s department
Company
Filters by user’s company name
Columns
Remarks
Multi-select checkboxes
Actions:
Activate the selected user(s)
Deactivate the selected user(s)
Delete the selected user(s)
Lastname Firstname
User’s last name and first name; a link displays the user form in edit mode.
Username
Username of the user
Profile
Profile of the user
Status
Status of the user’s account: active or inactive
Fields
Remarks
Directory
User directory
Username
Unique user identifier in all directories; limited to 255 characters (required field)
✏️ Note: The username cannot contain the : (colon) character.
Password
User’s password (click Change password to change the user’s password)
Last name
User’s last name (required field)
First name
User’s first name
Employee number
Directory
multipart/form-data
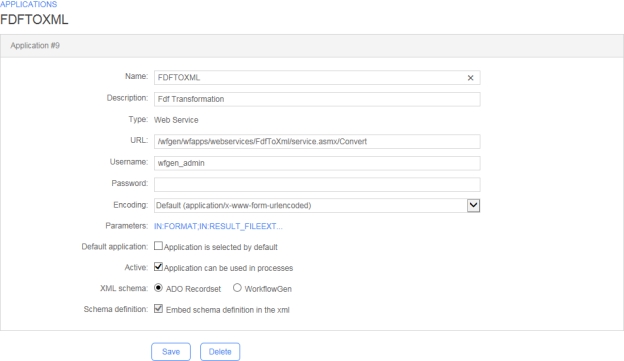
The DOCUSIGNSEND application will create a unique envelope and send it to one or multiple signers.
You can specify one or multiple files per DOCUSIGNSEND action. To do this, use the FILEx parameter, where x corresponds to the file number (e.g FILE1). At least one file is required.
You can specify one or multiple signers. To do this, use the combination of SIGNER_NAME_LIST and SIGNER_EMAIL_LIST. You can also use SIGNER_NAMEx and SIGNER_EMAILx, where x corresponds to the signer number.
You can specify an access code by signer. To do this, depending on the method you use to specify signers (i.e., with or without _LIST), you can use either SIGNER_ACCESS_CODE_LIST or SIGNER_ACCESS_CODEx, where x corresponds to the signer number.
You can specify the positions of the DocuSign tags for the signer name, the signature location, and the signature date. DocuSign will automatically recognize the tags.
Application logs are available. These can be specified by setting the value of the DocuSignSendLogLevel parameter in the web.config file to 0 to deactivate logs, 1 for error logs, 2 for information logs, or 3 for debug logs; the default value is 0.
You can use either of the following configurations: with a signers list or with signer numbers.
Signers are handled sequentially, whether configured using a list or using numbers.
Parameter
Type
Direction
Description
SIGNER_NAME_LIST
TEXT
IN
Names of signers, separated by the value defined in the DATA_SEPARATOR parameter
SIGNER_EMAIL_LIST
TEXT
IN
Emails of signers, separated by the value defined in the DATA_SEPARATOR parameter
FILEx
Parameter
Type
Direction
Description
SIGNER_NAMEx
TEXT
IN
Name(s) of signer(s), where x corresponds to the signer number; you can add one or multiple signers
SIGNER_EMAILx
TEXT
IN
Email(s) of signer(s), where x corresponds to the signer number; you can add one or multiple signers
FILEx
There are two ways to configure DocuSign account information: you can define the configuration in the web.config file or in the Configuration Panel, or you can manage the configuration on each DOCUSIGNSEND action.
Parameters
Type
Direction
Description
DOCUSIGN_CLIENT_ID
TEXT
IN
DocuSign client ID
Corresponds to your DocuSign application's Integration Key value
By default, this value comes from the DocuSignClientId parameter in the web.config.
DOCUSIGN_USER_GUID
TEXT
IN
DocuSign user GUID
Corresponds to the value of User ID in the DocuSign Control Panel
By default, this value comes from the DocuSignUserGuid parameter in the web.config.
DOCUSIGN_AUTH_SERVER
Parameters
Type
Direction
Description
DATA_SEPARATOR
TEXT
IN
Separator used to separate SIGNERS_NAME_LIST, SIGNERS_EMAIL_LIST, and SIGNER_ACCESS_CODE_LIST content
Default: ,
EMAIL_SUBJECT
TEXT
IN
Email subject used for the DocuSign envelope
Default:Please sign this document sent from WorkflowGen
PREFIX_SIGNHERE
Parameter
Type
Direction
Description
DOCUSIGN_ENVELOPE_ID
TEXT
OUT
Contains the DocuSign envelope ID; you can use this ID in the workflow application
Parameter
Type
Direction
Value
SIGNER_NAME_LIST
TEXT
IN
John Doe,Jack Adi
SIGNER_ACCESS_CODE_LIST
Parameter
Type
Direction
Value
SIGNER_NAME1
TEXT
IN
John Doe
SIGNER_NAME2
TEXT
IN
Jack Adi
SIGNER_EMAIL1
DocuSign lets you specify the location where you want your signer to sign. By default, the tags are /fx/ for the signer's full name, /dx/ for the date, and /sx/ for the Sign Here button; x corresponds to the signer number.
Add tags to your document, as shown below:
Since DocuSign doesn't remove characters from the document and just adds an overload on the tags, you can set the tags' colors to the same color as your background (white, in the following example):
The DOCAPOSTESEND application creates a single envelope and sends it to one or more signers.
You can specify one or more files per DOCAPOSTESEND action. To do this, use the FILEx parameter, where x is the file number (e.g.: FILE1). At least one file is required.
You can specify one or more signers. To do this, use the combination of SIGNER_FIRSTNAME_LIST, SIGNER_LASTNAME_LIST, and SIGNER_EMAIL_LIST. You can also use SIGNER_FIRSTNAMEx, SIGNER_LASTNAMEx, and SIGNER_EMAILx, where x is the number of the signer.
You can specify one type of signature per recipient. To do this, depending on the method you use to specify signers (with or without _LIST), you can use SIGNATURE_TYPE_LIST or SIGNATURE_TYPEx, where x is the signer number. Possible values: OTP (default), PAD, TOKEN, CONSENT_PROOF or IDENTITY.
Application logs are available. These can be specified by setting the value of the DocaposteSendLogLevel parameter in the web.config file to 0 to disable logging, 1 for error logs, 2 for information logs, or 3 for debug logs; The default value is 0.
You can use one of the following two configurations: with a list of signers or with signer numbers.
Parameter
Type
Direction
Description
SIGNER_FIRSTNAME_LIST
TEXT
IN
First names of signers, separated by the value defined in the DATA_SEPARATOR parameter
SIGNER_LASTNAME_LIST
TEXT
IN
Last names of signers, separated by the value defined in the DATA_SEPARATOR parameter
SIGNER_EMAIL_LIST
Parameter
Type
Direction
Description
SIGNER_FIRSTNAMEx
TEXT
IN
First name(s) of the signer(s), where x corresponds to the signer number; you can add one or more signers
SIGNER_LASTNAMEx
TEXT
IN
Last name(s) of the signer(s), where x corresponds to the signer number; you can add one or more signers
SIGNER_EMAILx
Parameters
Type
Direction
Description
DOCAPOSTE_USERNAME
TEXT
IN
Docaposte username
By default, this value comes from the DocaposteUsername parameter in the web.config file.
DOCAPOSTE_PASSWORD
TEXT
IN
Docaposte password
By default, this value comes from the DocapostePassword parameter in the web.config file.
DOCAPOSTE_HOST_SERVER
Parameters
Type
Direction
Description
DATA_SEPARATOR
TEXT
IN
Separator used to separate the contents of SIGNERS_FIRSTNAME_LIST,SIGNERS_LASTNAME_LIST, SIGNERS_EMAIL_LIST, and SIGNER_TYPE_LIST
Default : , (comma)
SIGNER_TYPE_LIST
TEXT
IN
Signature type of signers, separated by the value defined in the DATA_SEPARATOR parameter
Possible values:
OTP(default)
PAD
SIGNER_TYPEX
Parameter
Type
Direction
Description
DOCAPOSTE_TRANSACTION_ID`
TEXT
OUT
Contains the Docaposte transaction ID; you can use this ID in the workflow application
DOCAPOSTE_DOCUMENT_NAMES
TEXT
OUT
Contains the names of the documents sent to Docaposte; you can use these values in the workflow application
You can customize the content of the body of the email to be sent to the signer. The template must contain the <DOCAPOSTE_SIGN_URL> tag, which will be replaced by the link allowing the signer to add their signature.
Default value:
Parameter
Type
Direction
Value
SIGNER_FIRSTNAME_LIST
TEXT
IN
John,Bernard
SIGNER_LASTNAME_LIST
TEXT
IN
Smith,Martin
SIGNER_EMAIL_LIST
Parameter
Type
Direction
Value
SIGNER_LASTNAME1
TEXT
IN
Smith
SIGNER_LASTNAME2
TEXT
IN
Martin
SIGNER_FIRSTNAME1
The JSONTODATA application requires either the JSON_CONTENT or the JSON_CONTENT_FILE parameter; these correspond to the JSON to parse.
The application supports the JSONPath query language (see https://github.com/json-path/JsonPath), which allows extraction of specific data from JSON content, similar to XPath expressions in XML.
Application logs are available. These can be specified by setting the value of the JsonToDataLogLevel parameter in the web.config file to 0 to deactivate logs, 1 for error logs, 2 for information logs, or 3 for debug logs; the default value is 0.
Parameter
Type
Direction
Description
JSON_CONTENT
TEXT
IN
Query to execute
JSON_CONTENT_FILE
FILE
IN
Query to execute, stored in a file
The application supports custom OUT parameters to map simple JSON content.
📌 Example
The following parameters allow you to map the JSON content to different process data:
Parameter
Type
Direction
Retrieve the value into a data
Result
person.address.street
Text
OUT
DATA_STREET
160 Guy Street
person.address.zipcode
Text
OUT
DATA_ZIPCODE
The application supports the JSONPath query language, similar to XPath expressions in XML. This language allows you to retrieve specific data from a JSON. For more details regarding the JSONPath syntax, see https://github.com/json-path/JsonPath.
📌 Example
In the above example, we want to get the names of Charles's grandchildren who are older than seven years old, and we also want these names to be separated by a | (using the APP_JSONPATH_DELIMITER IN parameter). At the same time, we are also getting Elizabeth's age and date of birth. To get the information, the following parameters must be defined:
Parameter
Type
Direction
IN Value
OUT Value
APP_JSONPATH_DELIMITER
Text
IN
|
PARAM1__JSONPATH
Text
INOUT
person.children[?(@.name == 'Charles')].children[*].children[?(@.age > 7)].name
In the PARAM1__JSONPATH parameter name, the PARAM1 name is not relevant, but it must be followed by the __JSONPATH suffix (two underscores are used in the suffix).
To retrieve a value into a Text process data, you can use a single INOUT Text parameter (e.g. PARAM1__JSONPATH parameter as in the example above).
To retrieve a value into a Numeric or DateTime process data, you must use separate parameters: an IN Text parameter for the JSONPath query and an OUT parameter that maps to the Numeric or DateTime process data. Both parameters must share the same name prefix (e.g. AGE__JSONPATH and AGE parameters as in the example above).
The default value of APP_JSONPATH_DELIMITER is a comma (,) when this parameter is not defined.
<!DOCTYPE html>
<html lang=""en"" xmlns=""http://www.w3.org/1999/xhtml"">
<head>
<meta charset=""utf-8"" />
</head>
<body>
<p>Hello {firstname} {lastname},</p>
<p>
Please sign the document sent from WorkflowGen.
<br />
<a href=""<DOCAPOSTE_SIGN_URL>"">Click here to sign on Docaposte</a>
</p>
<p>Regards,</p>
<p>WorkflowGen</p>
</body>
</html>{
"person": {
"address": {
"street": "160 Guy Street",
"zipcode": "J4G 1U4"
},
"age": 30,
"name": "John"
}
}{
"person": {
"name": "Elizabeth",
"age": 85,
"dob": "1937-09-23T00:00:00Z",
"children": [
{
"name": "Charles",
"age": 60,
"children": [
{
"name": "Nathalie",
"children": [
{
"name": "George",
"age": 8
},
{
"name": "Charlotte",
"age": 10
},
{
"name": "Jefferson",
"age": 7
}
]
},
{
"name": "Harry"
}
]
},
{
"name": "Bob",
"age": 57,
"children": [
{
"name": "John"
},
{
"name": "Mark"
}
]
}
]
}
}J4G 1U4
person.age
Text
OUT
DATA_AGE
30
person.name
Text
OUT
DATA_NAME
John
data DATA1_VALUE (value will be: George|Charlotte)
AGE__JSONPATH
Text
IN
$.person.age
AGE
Numeric
OUT
data AGE_VALUE (value will be: 85)
DOB__JSONPATH
Text
IN
$.person.dob
DOB
DateTime
OUT
data DOB_VALUE (value will be: 1937-09-23T00:00:00Z)
TOKENCONSENT_PROOF
IDENTITY
TEXT
IN
Email addresses of the signers, separated by the value defined in the DATA_SEPARATOR parameter
FILEx
FILE
IN
File(s) to send, where x is the file number; you can add one or more files
TEXT
IN
Email address(es) of the signer(s), where x is the signer's number; you can add one or more signers
FILEx
FILE
IN
File(s) to send, where x is the file number; you can add one or more files
TEXT
IN
Docaposte host server
By default, this value comes from the DocaposteHostServer parameter in the web.config file.
DOCAPOSTE_OFFER_CODE
TEXT
IN
Docaposte offer code
By default, this value comes from the DocaposteOfferCode parameter in the web.config file.
DOCAPOSTE_ORGANIZATIONAL_UNIT_CODE
TEXT
IN
Docaposte organizational unit code
By default, this value comes from the DocaposteOrganizationalUnitCode parameter in the web.config file.
TEXT
IN
Signature type of signer(s), where x corresponds to the signer number; you can add one or more signers
Possible values:
OTP(default)
PAD
TOKEN
CONSENT_PROOF
IDENTITY
CUSTOM_REFERENCE
TEXT
IN
Provider reference
The content of this parameter can allow the provider to identify the transaction on its end with; for example, a value specific to its business domain (e.g. customer file number).
Default:WorkflowGen
TEST_MODE
TEXT
IN
Indicates whether the transaction is a TEST transaction (Y or N)
Default: N
EMAIL_SUBJECT
TEXT
IN
Subject of the email that will be sent to signers
Default: Please sign the document sent from WorkflowGen
EMAIL_FROM
TEXT
IN
Domain name of the email address that will be used to send the email to signers
Default : do-not-reply
EMAIL_BODY
FILE
IN
Content of the email to send to signers (see the Customizing the body of the email section)
TEXT
IN
SIGNER_TYPE_LIST
TEXT
IN
PAD,OTP
FILE1
FILE
IN
contract.pdf
DOCAPOSTE_TRANSACTION_ID
TEXT
OUT
xxxxx-xxxxx-xxxxx-xxxxx
DOCAPOSTE_DOCUMENT_NAMES
TEXT
OUT
contract.pdf
TEXT
IN
John
SIGNER_FIRSTNAME1
TEXT
IN
Bernard
SIGNER_EMAIL1
TEXT
IN
SIGNER_EMAIL2
TEXT
IN
SIGNER_TYPE1
TEXT
IN
PAD
SIGNER_TYPE2
TEXT
IN
TOKEN
FILE1
FILE
IN
contract.pdf
DOCAPOSTE_TRANSACTION_ID
TEXT
OUT
xxxxx-xxxxx-xxxxx-xxxxx
DOCAPOSTE_DOCUMENT_NAMES
TEXT
OUT
contract.pdf
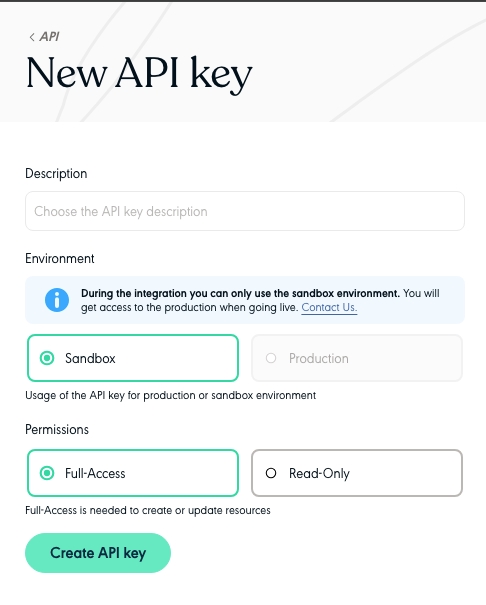
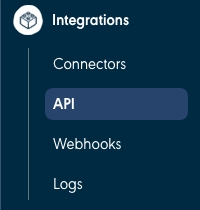

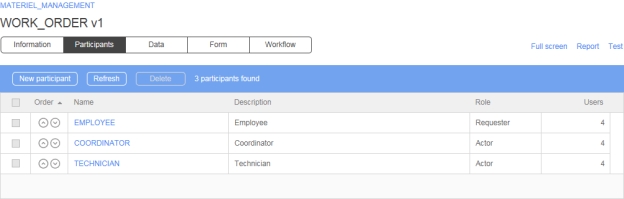
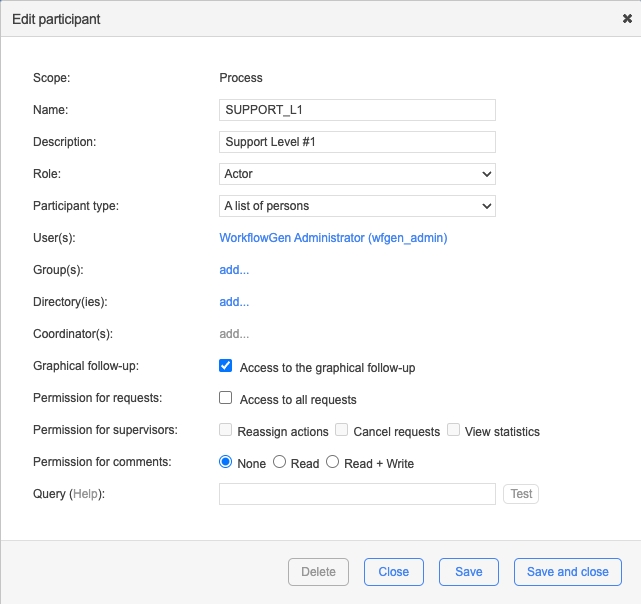
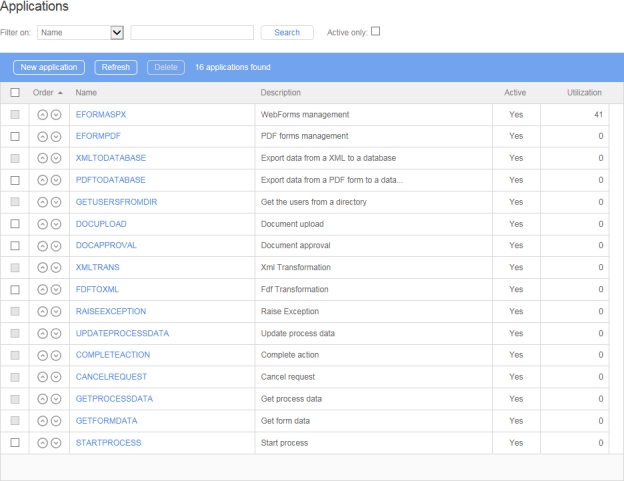

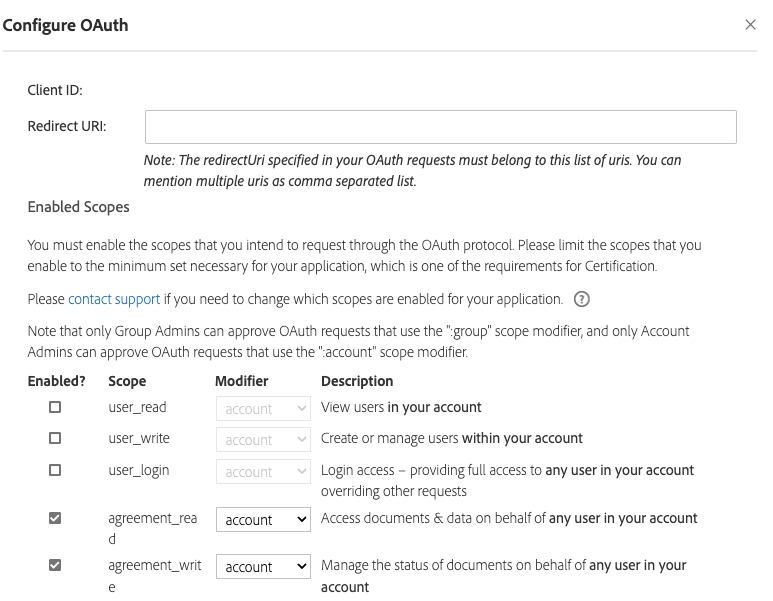
Links
Remarks
Information
Displays the process form in edit mode
Participants
Displays process participant list
Data
Displays process data list
Form
Displays the form designer
Workflow
Displays process action list
Links
Remarks
Full screen
Displays the contents of the different tabs in the menu bar in full screen
Report
Displays the process documentation and checks for the validity of the process definition
Test
Launches a new test request for this process
Fields
Remarks
Template
Selection of workflow templates to be tested directly, customizable and usable in the Default list or in the Library
Default:
2 levels approval
Parallel tasks
Simple approval
Name
Unique identifier for the process; must respect nomenclature and be limited to 30 characters (required field)
Version
Process version number is read-only and automatically increments when creating new version
Description
Process description limited to 255 characters (required field)
Status
Process status:
Active
In test
Under construction (default)
Functions
Remarks
New version
Creates a new version during process development
This also allows the capability to create a new version from an XPDL definition file. The version number found in the XPDL will be kept if the version number was not already used for the current process; otherwise, it automatically increments.
Duplicate
Duplicates the current process definition as a new process
Move
Allows the process to be moved into a new folder
Export
Allows the process to be exported as an XPDL file
Import
Allows the process to be created from an XPDL file
Fields
Remarks
Request type
Type of requests to delete:
All
In test
Real (active)
Request status
Status of requests to delete:
All
Open
Closed
Launching period
Defines the launching period for requests to be deleted from Icons display a calendar allowing the date to be chosen.
Request number
Request numbers to delete (separated by commas)
Only a process manager or an administrator can delete a process. Deleting a process causes all of the associated requests to be deleted.
If the process has "real" (active) requests, only the administrator can delete the process. This is allowed only if the process is not used as a sub-process by actions of another process.
Only the process/folder manager or administrator can delete requests that are associated with a process in test mode.
Only the administrator can delete requests that are associated with an active process.
If the process is active, modifications on it are restricted to the following:
Modify process status
Modify process categories
Modify text, link, or support email of the process and actions
Delete the process
Create a new version of the process
Duplicate the process
Delete associated requests
Modify which users are associated with the process participants from the directories
Modify data visibility (but not security)
If the process is archived, modifications on it are restricted to the following:
Delete the process
Create a new version of the process
Duplicate the process
Delete associated requests
Modify which users are associated with the process participants from the directories
Modify data visibility (but not security)
Activating a process causes a previous active version to be archived. Current/ongoing requests will continue to use the process version that was used when they were launched.
Only a WorkflowGen administrator can move a process from one folder to another. This does not affect the end users, but will affect which process/folder managers may then access the process.
Area / Actions
Remarks
Available
Available categories
Selected
Selected categories
Add ...
Link to a simple add category screen
Click >> or double-click an item in the Available list
Add selected categories from the Available list to the Selected list
Click << or double-click an item in the Selected list
Remove selected categories from the Selected list
Only a WorkflowGen Administrator or process/folder manager can export and import a process as an XPDL file.
Elements
Description
Process Information
All process general information
Participants
All participant information
Data
All data information
Form
All form data
Workflow
All workflow action information
Elements
Description
Process Information
All process general information
Participants
All participant information
Data
All data information
Form
All form data
Workflow
All workflow action information
Fields
Remarks
Process version
When creating a new process by importing an XPDL, the version number of the process in the XPDL will be used.
When creating a new version of a process from the WorkflowGen database, the version number of the new process will have the latest version number.
When creating a new version of a process from an XPDL file, the version number of the new process will have the version number in the XPDL file if the version number of the process hasn’t been already used; otherwise the latest version number will be automatically incremented for the new process.
Process category
No category will be added to the process if the category information is missing in the XPDL file. If the category doesn’t exist in WorkflowGen, it will not be added to the process.
Process notification to requester on closed
The notification will be checked if the notification value is missing in the XPDL file or the value is set to Y. If N is set as value in the XPDL file then the notification is unchecked.
Participant scope
See the next section, .
Participant associated user(s)
No user will be added to the participant if the user information is missing in the XPDL file.If the user doesn’t exist in WorkflowGen, it will not be added to the participant.
The import rules for participants vary depending on whether they are global or process participants, whether or not a participant with the same name already exists, and whether the import is being performed by an administrator or by a process manager.
If a global participant with the same name as the global participant being imported exists:
The existing global participant will be associated to the process being imported.
The associations in the XPDL file will be added to the existing global participant if the Import associations into existing global participants option is checked; otherwise, the associations in the XPDL file will be ignored.
✏️ Note: The Import associations into existing global participants option is always available to administrators, but is only available to process managers when Restrict process managers from editing global participants is set to false. For information on this, see Security in the Configuration Panel section.
If a process participant with the same name as the global participant being imported exists:
The participant will be created in the process scope.
The associations in the XPDL file will be added to the new process participant.
If the participant does not exist:
Only administrators can create new global participants. (Process managers can only create process participants.)
The participant will be created in the global scope.
The associations in the XPDL will be added to the new global participant.
If a global participant (in WorkflowGen) with the same name as the process participant being imported exists:
The existing global participant will be associated to the process being imported.
The associations in the XPDL file will be added to the existing global participant if the Import associations into existing global participants option is checked; otherwise, the associations in the XPDL file will be ignored.
✏️ Note: The Import associations into existing global participants option is always available to administrators, but is only available to process managers when Restrict process managers from editing global participants option is unchecked in the Security section on the Administration tab in the Configuration Panel.
If a process participant (in WorkflowGen) with the same name as the process participant being imported exists:
The participant will be created in the process scope.
If the participant does not exist:
The participant will be created in the process scope.
Click the Import button.
Browse for the XPDL file.
Select Import new participants as global participants to import the new participants as global participants (see the previous section, Import rules for participants).
Select Import directory associations to import users associated to existing participants.
Select Import process version number to import the version number.
Select Add your user account to new participants to add your user account as a user (and coordinator, if applicable) to participants representing more than one person (such as A list of persons or A list of persons with coordinators). This option is checked by default. Unchecking this option allows you to not add yourself as long as the participant has the minimum number of users and coordinators to be valid.
Click Import to start the import.
FILE
IN
File(s) to send, where x corresponds to the file number; you can add one or multiple files
FILE
IN
File(s) to send, where x corresponds to the file number; you can add one or multiple files
TEXT
IN
DocuSign Auth server
DocuSign values:
account.docusign.com (production)
account-d.docusign.com (demo)
By default, this value comes from the DocuSignAuthServer parameter in the web.config.
DOCUSIGN_RSA_KEY
TEXT
IN
DocuSign RSA key
By default, this value come from the /Files/DocuSign/rsaKey.pem file.
DOCUSIGN_HOST_SERVER
TEXT
IN
DocuSign host server
DocuSign values:
https://docusign.net (production)
https://demo.docusign.net (demo)
By default, this value comes from the DocuSignHostServer parameter in the web.config.
TEXT
IN
Prefix of the SignHere tag
Default: /s
SUFFIX_SIGNHERE
TEXT
IN
Suffix of the SignHere tag
Default: /
X_OFFSET_SIGNHERE
TEXT
IN
Vertical alignment of the SignHere tag in pixels
Default: 0
Y_OFFSET_SIGNHERE
TEXT
IN
Horizontal alignment of the SignHere tag in pixels
Default: 0
PREFIX_FULLNAME
TEXT
IN
Prefix of the Full name tag
Default: /f
SUFFIX_FULLNAME
TEXT
IN
Suffix of the Full name tag Default: /
X_OFFSET_FULLNAME
NUMERIC
IN
Vertical alignment of the Full name tag in pixels
Default: 0
Y_OFFSET_FULLNAME
NUMERIC
IN
Horizontal alignment of the Full name tag in pixels
Default: 0
PREFIX_DATE
TEXT
IN
Prefix of the Date tag
Default: /d
SUFFIX_DATE
TEXT
IN
Suffix of the Date tag
Default: /
X_OFFSET_DATE
NUMERIC
IN
Vertical alignment of the Date tag in pixels
Default: 0
Y_OFFSET_DATE
NUMERIC
IN
Horizontal alignment of the Date tag in pixels
Default: 0
TEXT
IN
abc123,def456
FILE1
FILE
IN
contract.pdf
DOCUSIGN_ENVELOPE_ID
TEXT
OUT
xxxxx-xxxxx-xxxxx-xxxxx
TEXT
IN
SIGNER_EMAIL2
TEXT
IN
SIGNER_ACCESS_CODE1
TEXT
IN
abc123
SIGNER_ACCESS_CODE2
TEXT
IN
def456
FILE1
FILE
IN
contract.pdf
DOCUSIGN_ENVELOPE_ID
TEXT
OUT
xxxxx-xxxxx-xxxxx-xxxxx
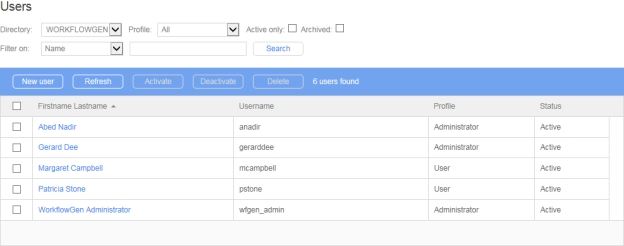
The Remote Approval feature lets users perform request approvals via email, as an alternative to launching the actual form within the WorkflowGen User Portal.
Remote Approval is an optional route for a regular form approval action in a WorkflowGen process. It is embedded inside the form approval action that asynchronously triggers a notification to the user using the WorkflowGen notification engine.
Users can still reply via the normal form approval procedure. The system will take the approval result from either approach based on a first-come-first-served basis and complete the action accordingly. No separate action is required in the workflow design process.
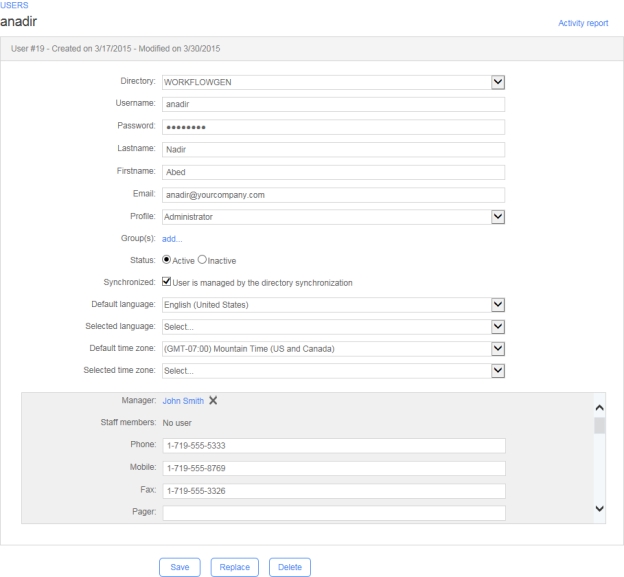
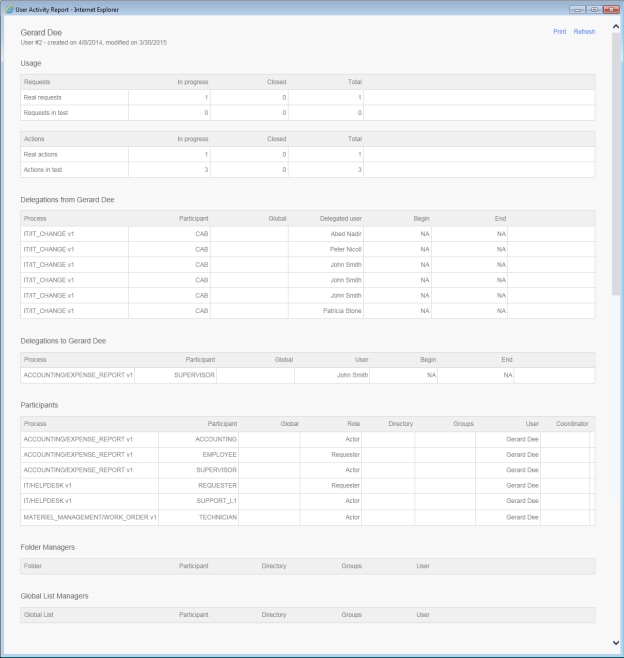
Simple request
Library:
Expense report
Software helpdesk
Investment application
IT Changes
IT Clearance application
Leave application
New Product Creation
Work Order
A customized workflow template can be created and deployed on the server with the following folder and file structure: \wfgen\App_Data\Templates\Processes\[language]\[folder name]\[process name]v[x].xml
📌 Example: \wfgen\App_Data\Templates\Processes \En\MyCompany\MY_PROCESSv1.xml
✏️ Note: Only processes with forms created with the built-in form designer can be used as workflow templates.
Closed – cancelled
Built-in form: Enable form designer
Activate the built-in form designer
Sub-process: Enable sub-process mode
Determines if the process can be used as a sub-process by another process, from an API call, or as a stand-alone process
Access level
Required field if the sub-process option is checked
If the process was declared as a sub-process, you can choose between two access levels:
Private: The process can only be instantiated by a parent process
API: The process can only be instantiated from one of the API endpoints (GraphQL, Webhooks, SOAP Web Services, and Remote Launch URL)
Public: The process can be manually launched from the User Portal or instantiated by a parent process or external application
Categories
Process categories list
The Add link allows categories to be added to or removed from the process.
Lead time
The amount of time before the process is considered late
Units:
Years
Months
Days (takes only working days into account)
Hours (takes working days and hours into account)
Minutes (takes working days and hours into account)
Seconds (takes working days and hours into account)
You can choose the way lead time will be calculated enabling or disabling the Use working days/hours to calculate the duration option.
Use working days/hours to calculate the duration
Calculate duration based on office hours
Request closure notification: Notify the requester
Send an email to the requester of the process upon closing the process (unchecked by default)
Archiving: Archive action associated with the data
Save the result of each request action at each step of the process (unchecked by default)
If this option is not activated, all of the action history data and files are deleted once the request is closed and only the final data and files will be stored.
Process data storage
Allow process file data (including attachments) to be stored in the database
This allows you to perform online WorkflowGen data backup without interrupting service (WorkflowGen users can continue to work during the backup).
✏️ Note: The maximum supported process data file size is 2147 MB (2.147 GB)
Help text
Process help text in the user module; the Add link allows this text to be edited
Help link
URL of an external help document on the process, visible in the user module
Test
Test the Help link in a new browser window
Support email
Email for process support which will be displayed in the user module
Delete requests
Displays the dialog box for deleting requests
Save Button
Saves updates
Close Button
Closes the window
Participant associated group(s)
No group will be added to the participant if the group information is missing in the XPDL file.If the group of a directory doesn’t exist in WorkflowGen, it will not be added to the participant.
Participant associated directory(ies)
No directory will be added to the participant if the directory information is missing in the XPDL file. If the directory doesn’t exist in WorkflowGen, it will not be added to the participant.
Participant associated coordinator(s)
No coordinator will be added to the participant if the coordinator information is missing in the XPDL file. If the coordinator doesn’t exist in WorkflowGen, it will not be added to the participant.
Data security
In the "allow access for specific participants" case, if the user doesn’t exist in WorkflowGen, it will not be added to the access list.
As of WorkflowGen 7.21.0, Remote Approval supports delegations, where delegatees can perform approvals by email.
Remote Approval settings are set on the Remote Approval tab in the Configuration Panel (see Remote Approval).
Remote Approval requires parameters to control which information to provide to the remote approver, and how. These parameters also control how to return the approval results as well as other approver information back to the WorkflowGen system.
Remote Approval requires additional parameters to be added to an EFORMASPX action. These parameters are to define the questions for remote approver and map the approver’s response to the action.
To successfully complete a web form action with Remote Approval, the action must have a valid FORM_DATA IN parameter. In the case of a first action (when the form data is not available), FORM_DATA should have a template XML file with the following format:
Only approval answers and the approver’s information need to be returned via Remote Approval parameters. Other regular action parameters that pass values in or out of the web form remain unchanged.
In order to send out a notification email to approver, a custom notification must be defined. Under the notification tab of an approval action, add an additional notification with To do as the event, an action assignee as recipient, and a custom email template with the information about the remote approval. This custom notification is the same as a regular custom notification for any WorkflowGen action.
Parameter
Type
Direction
Description
FORM_DATA (required)
FILE
INOUT
INOUT parameter that holds the WorkflowGen request form data file. This is a default parameter for EFORMASPX actions.
FORM_ARCHIVE
FILE
OUT
Remote Approval requires passing the FORM_ARCHIVE process data as a WorkflowGen parameter in order to capture all the field updates that occur during Remote Approval. The parameter direction must be OUT in order to return the updated archive content back to WorkflowGen.
✏️ Notes:
No update will be made to the archived web form if FORM_ARCHIVE is not defined in the Remote Approval action.
FORM_ARCHIVE is needed for EFORMASPX actions only.
Qx_KEYWORDS_n
Parameter
Type
Direction
Description
KEYWORDS_BRACKETS
TEXT
IN
To answer a Remote Approval question in regular approval mode, you must follow a pre-defined syntax:
Q1: [answer]
The square brackets ([ and ]) are the default value if this parameter is not used. You can customize it by assigning different characters to enclose the answer. For example, you can set KEYWORDS_BRACKETS to ## for an answer format:
Q1: #answer#
✏️ Note: This consists of two characters only, for the opening and closing characters.
USER_NAME_FORMAT
TEXT
IN
The full name of the approver who replies will be retrieved from the WorkflowGen database. The approver’s full name will be returned to the field control in the web form if USER_NAME_FIELDNAME is defined.
By default, the user’s full name will be in Firstname Lastname format. You can customize the format by using the control characters L and F, for last name and first name, respectively. For example:
John Doe → F L
USER_NAME_FIELDNAME
Remote Approval supports three different types of approval questions: multiple choice, questions with numeric answers, and questions with free-form text answers.
Usually, Remote Approval is used to provide approval questions with two possible answers (for example, Yes or No). To do this, three main parameters are used:
Qx_KEYWORDS_n holds a list of possible keywords (comma-separated) for choice n
Qx_RESULT_n holds the normalized answer for choice n
Qx_RETURN_FIELDNAME specifies the web form field name that holds the final normalized answer for question x.
Since there can be more than one question in an action, x in these parameters represents the question number, and n at the end represents the choice of answer. You can define as many keywords and results as you need.
In this example, there are two Y/N questions in a Remote Approval action:
If the approver replies ok to question 1 and bad to question 2, the final normalized answers for questions 1 and 2 will be yes and reject, respectively.
If you need to define more than two choices, you must add a new keywords/result combination. For example:
You can define as many keyword/result combinations as you need.
Remote Approval also supports numeric and free-form type questions.
A numeric type question requires the following keywords/result combinations:
Qx_KEYWORDS_1=[0-9]: [0-9] is a keyword reserved for numeric type questions; you only need to use Qx_KEYWORDS_1
Qx_RETURN_FIELDNAME: The web form field name that holds the retrieved answer)
A free-form text type question does not require a keyword, only Qx_RETURN_FIELDNAME (the web form field name that holds the retrieved answer).
There are two Remote Approval answer modes: normal and quick.
In normal approval mode, a Remote Approval email can ask more than one question, and will expect replies in a structured format.
In quick approval mode, the email recipient can respond to the first question without any formatting needed. As well, they can include a comment by adding it to the second line under the response to the first question. This mode accepts only one question; as such, questions other than Q1_RETURN that have been specified as action parameters will be ignored. Quick approval mode is enabled on the Remote Approval tab in the Configuration Panel (see Remote Approval).
An approval email contains the following:
To answer these questions, you would need to reply to the email using the following syntax:
Each answer is prefixed with Qx: where x is the question number. As well, answers are enclosed in brackets to indicate the beginning and end of the answer. Similarly, COMMENT has the same structure, except it is prefixed with the reserved word COMMENT:.
Only a keyword for question 1 is needed, with an optional comment. The first line below is the answer to question 1, and the second line is the comment:
A custom to-do email notification must be defined to be sent to action assignees for a Remote Approval action. This is similar to the default to-do notification of a regular EFORMASPX action. This custom email relies on the WorkflowGen notification system to distribute the approval email to one or multiple approvers.
To prevent spam or other unrelated incoming emails from arriving in the Remote Approval collector email account, and to assure the approver’s identity, a valid reply to a Remote Approval request must follow the following four conditions:
The email subject line cannot be empty.
The reply email should have the same email header key (Thread-Index) as registered for the associated request action in the WorkflowGen database.
The remote approver's email address must match the one used by WorkflowGen in order to ensure the reply address belongs to a valid WorkflowGen user.
The remote approver must be one of the action assignees for the particular request action.
Invalid emails will automatically be deleted from the collector email account.
The following is an example of an email subject line containing the WorkflowGen request and action IDs:
Authorization for expenditure required #1374-4
Here, Authorization for expenditure required is the email subject, 1374 is the request ID (prefixed by a number sign), and 4 is the action ID (prefixed by a hyphen).
The email subject is defined on the first line of the custom email template with the prefix SUBJECT:. The WorkflowGen request and action IDs can be appended to the subject line using the <WF_PROCESS_INST_ID> and <WF_ACTIVITY_INST_ID> WorkflowGen macros, respectively.
Remote Approval will validate the email reply by verifying the request and action IDs obtained from the email subject. Validation conditions 2 and 3 (see above) are still applicable during the validation process.
It is highly recommended to keep the Subject line validation option disabled for greater security.
In case of an email approval reply with an incorrect answer or missing a required comment, Remote Approval will send the email back to the approval sender and ask for a revision.
This email will provide the possible keywords to remind the approval of which can be used for the answer. As well, the approver must reply to all of the questions again following the syntax (in normal approval mode), even if there was only one incorrect or missing answer.
Depending on the approver’s WorkflowGen user profile default language preference, either an English or a French message will appear on the revision notification email. If the user has a preferred language other than English or French, English will be used by default.
A custom email notification must be defined in order to distribute Remote Approval emails to approvers.
The creation of custom notifications follows the same rules as any other WorkflowGen custom notification; all WorkflowGen macros are supported (see the Custom notification templates section for more information).
File process data can be attached to a Remote Approval email so that the approver can have direct access to any file type data. A special macro can be used to add a file process data to the email:
<WF_PROCESS_INST_RELDATA_FILE.XXXXX>
Add this tag to the email body, and the file from the XXXXX process data will be appended to the email as an attachment. It will not be rendered as text in the body of the email. If multiple attachments are required, add this tag multiple times with the relevant process data name.
In case an overdue notification must be sent, add an additional notification by specifying the event as "Overdue" and use the same Remote Approval email template.
Remote Approval attempts to process an approval reply as if an approver has actually launched an approval action and submitted the web form. The form data and action parameter values are updated accordingly. This means that when the next action is launched, WorkflowGen already obtains the form data from Remote Approval and is able to display the result on the web form.
However, in order to reflect the approval result in the form archive, the approval field control must be visible by the time the action before the Remote Approval action is submitted. Remote Approval updates the form archive generated by the previous action by searching for the matching field control and assigning the value via JavaScript. It does not perform any re-rendering of the web form. For example, if a process has two actions, and the approval field in the first action is hidden by default in the web form, the form archive generated by the first action will not contain the approval field control.
Remote Approval will not be able to populate the approval result on the archive form even though WorkflowGen is still able to retrieve the latest form data and action parameter values.
Remote Approval fields only support the CheckBoxList, RadioButtonList, ListBox, and DropdownListBox controls. Remote Approval comment fields only support the TextBox and TextArea controls.
When considering the incorporation of Remote Approval in an action, we suggest the following:
Set the relevant approval field as always visible but read-only in the previous action.
Set the approval field as visible only after SubmitToWorkflow() is called in the previous action, in order to add the approval field to the archive page only.
Use CSS to hide the approval field in the previous action.
Remote Approval will automatically generate basic event log information in the Windows Event Viewer as well as detailed log files within the WorkflowGen \App_Data folder. By default, the log is located in the WorkflowGen web folder DRIVE:\wwwroot\wfgen\App_Data\LogFiles\RemoteApproval\.
If WorkflowGen has been configured to use a different ApplicationDataPath (defined in the web.config file), the log files will be within the path specified in the config file. For example, if ApplicationDataPath is set to \SERVER_B\App_Data\, then the Remote Approval log files will be created in \SERVER_B\App_Data\LogFiles\RemoteApproval\.
The log file name will be the date, in the format YYYY-MM-DD.log.
The log file will contain a summary of activity, including details of technical issues, and information on the WorkflowGen actions closed via the Remote Approval application. There are five levels of details:
Level 0: None (no log file will be created)
Level 1: Execution summary message only
Level 2: Exception error message only
Level 3: Execution summary messages and exception error messages
Level 4: Execution summary messages and full detail exception messages (including event viewer information logs)
The log file level is set on the Remote Approval tab in the Configuration Panel (see Remote Approval).
The following table provides brief explanations of some possible error messages found in the Remote Approval log.
Error message
Description
Socket Error: No such host is known.
The application was not able to connect to the incoming email server. Check the collector email address settings.
Server Respond: ERR access denied.
There is an error in the username used for the incoming email server. Check the spellings of the incoming email address and password.
Socket Error: A connection attempt failed because the connected party did not properly respond after a period of time, or established connection failed because connected host has failed to respond [server address]:[port number].
The email server is not responding and timed out. Possible reasons:
Email server is not online
Incorrect port number: Check the incoming mail server port
Incorrect email server type: Check the incoming mail server type
System Error: The token supplied to the function is invalid.
Possible incorrect email server security. Check the incoming mail server security.
Server Respond: ERR maildrop already locked.
The response email is being locked by the email server.
<?xml version="1.0" standalone="yes"?>
<NewDataSet>
<Table1>
<CURRENT_REQUEST></CURRENT_REQUEST>
</Table1>
</NewDataSet>Q1_KEYWORDS_1=yes,y,ok
Q1_RESULT_1=yes
Q1_KEYWORDS_2=no,n,refused
Q1_RESULT_2=noQ2_KEYWORDS_1=approved,approve,ok
Q2_RESULT_1=approve
Q2_KEYWORDS_2=refuse,refused,reject,rejected
Q2_RESULT_2=rejectQ1_KEYWORDS_1=yes,y,ok
Q1_RESULT_1=yes
Q1_KEYWORDS_2=no,n,refused
Q1_RESULT_2=no
Q1_KEYWORDS_3=modify,moreinfo
Q1_RESULT_3=moreinfoWhat is your choice?
Question 1: Y or N
Question 2: Y or NQ1: [Y]
Q2: [N]
COMMENT: [Request approved.]Y
Request approved.Your decision is in an incorrect format. Please reply to this email with one of the valid keywords or a numeric type value.
Q1: [n,NO or y,YES]
----Your reply was----
Q1: [maybe]Your decision requires a mandatory COMMENT. Please reply to this email again with the valid keywords and a comment.
Q1: [n,NO or y,YES]
COMMENT: [your comment]
----Your message----
Q1: [n]Votre réponse est incorrecte, veuillez répondre avec un des mots-clés suivants :
Q1: [n,NON ou o,OUI]
----Votre réponse était----
Q1: [possible]L, FJohn (Doe) → F (L)
TEXT
IN
See the Email customization section for details on this parameter.
Qx_RESULT_n
TEXT
IN
See the Email customization section for details on this parameter.
Qx_RETURN_FIELDNAME
TEXT
IN
The normalized result from Qx_RESULT_n will be passed to the field name specified in this parameter.
✏️ Note: No other parameter should be defined in a Remote Approval that has the suffix _RETURN_FIELDNAME.
TEXT
IN
Regular web forms can use WorkflowGen macros to obtain the assignee’s full name. In Remote Approval, the approver is defined based on the receipt of the approval reply, a specific parameter is required to return the actual approver’s name back to WorkflowGen.
Create this parameter to specify the field control ID that receives the returned approver name. Only TextBox type field control IDs are supported.
USER_FIRSTNAME_FIELDNAME
TEXT
IN
Create this parameter by assigning the field control ID in your form to display the approver’s first name in the WorkflowGen user profile on the form archive page.
USER_LASTNAME_FIELDNAME
TEXT
IN
Create this parameter by assigning the field control ID in your form to display the approver’s last name in the WorkflowGen user profile on the form archive page.
USER_TITLE_FIELDNAME
TEXT
IN
Create this parameter by assigning the field control ID in your form to display the approver’s job title in the WorkflowGen user profile on the form archive page. Only TextBox, RadioButtonList, and DropDownList type field control IDs are supported.
COMMENT_FIELDNAME
TEXT
IN
Create this parameter by assigning the field control ID in your form to display the approver’s comment on the form archive page. Only TextBox type field control IDs are supported.
✏️ Note: You can specify the control ID by entering the text string or by passing a process data only if the process data contains the ID of the control. If no control ID is found, or the control ID is invalid, no name will be displayed and this parameter will be ignored.
COMMENT_REQUIRED_RESULTS
TEXT
IN
Create this parameter by specifying which approver results will require a mandatory comment. Approver results refer to Qx_RESULT_n parameters. You can enter a comma-separated text string for this parameter to specify more than one result requiring a comment.
📌 Example:
Q1_RESULT_2,Q2_RESULT_2,Q3_RESULT_1
Here, the second answers of questions 1 and 2 (Q1 and Q2) and the first answer of question 3 (Q3) will require comments.
✏️ Notes:
Mandatory comments require the COMMENT parameter in the action.
All required results share the same COMMENT parameter.
The approver will receive an email for re-approval if a mandatory comment is missing.
QUICKAPPROVALMODE
TEXT
IN
Quick mode can be enabled or disabled globally for all Remote Approval actions in the Configuration Panel as a default setting. Defining the QUICKAPPROVALMODE parameter for an individual Remote Approval action in a process will override the global default setting.
✏️ Note: The only text string allowed for this parameter is Y or N.
wfgResponse Error: Remote reply for action (Req #xxxx) cannot be accepted. Action may have already been expired/opened/completed by webform.
The application cannot complete the action, possibly due to an error connecting to WorkflowGen, or the action may have already expired or been closed or completed within the WorkflowGen User Portal.
Cannot clean up temp file ([FILENAME]) yet. It may be still in use.
The application has tried to clean up temporary files in the tmp folder, but the files might still be in use; in this case, the application will skip the removal of this file.
The response for Request #xxxx is in an incorrect format ([YOUR ANSWER]). An email has been sent.
The response is improperly formatted, no keyword has been detected in the email contents, or the keyword is invalid. Check also if Quick mode is enabled.
Email subject does not indicate it is a Remote Approval reply; email has been removed from mailbox.
An email received by the email server does not contain the required prefix RE: that indicates it is a reply to a remote approval request. This email will be automatically removed from the server.
Error parsing request information or reading email header/content before processing reply.
An email received by the email server does not contain all the necessary information such as thread index or the request/action IDs in the subject line that are needed to identify the associated WorkflowGen request action. Check the email server settings if the thread index was discarded, or you can add the request to action IDs in the email notification subject.
The response for Request #XXXX is missing a mandatory comment for answer ([YOUR ANSWER]). An email has been sent.
The response provided requires a mandatory comment. The approver must add COMMENT: [YYYYYY] (or YYYYY if Quick mode is enabled) in the email reply. The email will be automatically removed from the server.
Client found response content type of ‘text/html; charset=utf-8’, but expected ‘text/xml’
The WorkflowGen API web service is not returning a proper XML data. Make sure the \ws folder is enabled as an IIS application.
Applicative error + detail (level 4)
This refers to the exception detail to determine the source of the error. Check the following settings that can cause the application to throw an applicative error:
Connection string toward the WorkflowGen database: Ensure that the connection string is well defined, that the server and the database name are correct and available from the web server, and that the given user has sufficient rights to connect, read and write data into the database.
SMTP server information: Check that the SMTP server address is correct and can be resolved by the web server. Ensure that the sender email address is allowed to send messages from your SMTP server. As well, make sure that the given server can relay the message correctly.

Click .NET in the toolbar to open the ASP.NET code editor, which can be used to define server-side procedures, events, and global variables to handle any specific custom tasks. This feature is mainly intended for ASP.NET server-side development.
Click JS in the toolbar to open the JavaScript code editor, which can be used to define server-side procedures, events, and global variables to handle any specific custom tasks. This feature is mainly intended for JavaScript client-side development.
Check Enable server-side editing mode on the General tab in the Form configuration panel to activate this mode, which allows form designers to modify the content of the form's C# runat server tag (e.g. <script runat="server") and JavaScript script tag (e.g. <script jseditor="true">) directly in the generated default.aspx file on the server (usually located in the \wfapps\webforms[PROCESSNAME]\V[VERSION] folder) using Visual Studio Professional or Visual Studio Code.
You must save the form on the WorkflowGen Form screen every time you make changes to a script's code in the default.aspx file in order to keep the form's HTML script tags (FORM_HTML) up to date. This is mandatory before you can export the XPDL process definition for deployment on another server.
If you're using the Form Designer, you can enable AJAX mode by checking Enable AJAX mode on the General tab of the Form configuration panel.
Icon
Name
Description
New form
Creates a new form or replaces the current form
Save the form
Saves the current form (you can also press Ctrl+S to save)
Print the form
Prints the current form
Icon
Name
Description
New
Clears the ASP.NET code
Save
Saves the ASP.NET code
Comment/Uncomment
Adds or removes // before the selected line(s)
Design
Icon
Name
Description
New
Clears the JavaScript code
Save
Saves the JavaScript code
Comment/Uncomment
Adds or removes // before the selected line(s)
Design
A form created with the built-in Form Designer has one header, one or several sections, one or several fields per section, a Submit button, an optional Save as a draft button, and one footer.
Name
Description
Web forms
Enable server-side editing mode
See
Enable AJAX mode
See
Header
Title
The title of the form
Name
Description
Include jQuery API and jQuery UI libraries
Check this option to include the jQuery and jQuery UI libraries in runtime mode (form execution); by default, these libraries are available in design mode
Available versions:
v1.7.2 & v1.8.20
v1.10.2 & v1.10.3
Free text
Custom web references to be included in the HTML head that will be available in both design and run-time modes. Only <script>, <meta>, <link>, and <style> tags are supported. When you enter a tag, the free text editor automatically inserts its closing tag.
📌 Example:
<link rel="stylesheet" type="text/css" href="mystyle.css" />
<style type="text/css">
body {background-color:yellow}
Name
Description
Select a language
The Form Designer allows you to translate form labels and error messages to the languages available in WorkflowGen. Select a language for translation from the languages available in the drop-down list.
✏️ Note: Generic language selections such as English, French, Spanish, etc., correspond to the version of the language that the administrator initially used to create a form. For example, if the administrator used English (United States) to create a form, then in this instance the selections English (United States) and English would be one and the same.
Free text
Write translated text that corresponds to the selected language. If a field is left empty, then the language will defer in the following order: Country-specific language > Generic language > Default language.
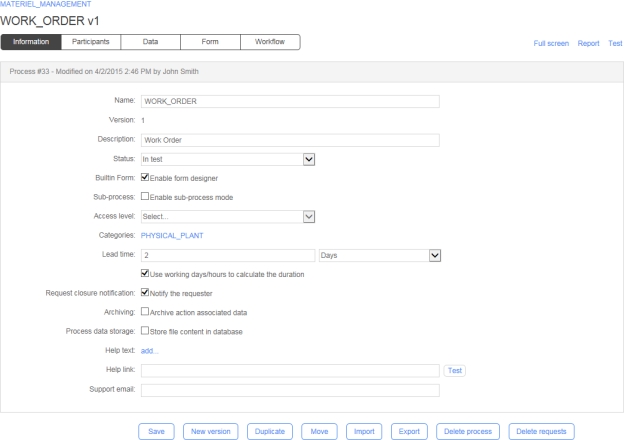
protected void Page_Load(object sender, EventArgs e)
{
base.Page_Load(sender, e);
// Register the custom button to the script manager for postback management in AJAX mode
if (ScriptManager.GetCurrent(this) != null) {
ScriptManager.GetCurrent(this).RegisterPostBackControl(ACTION1_BUTTON1);
}
}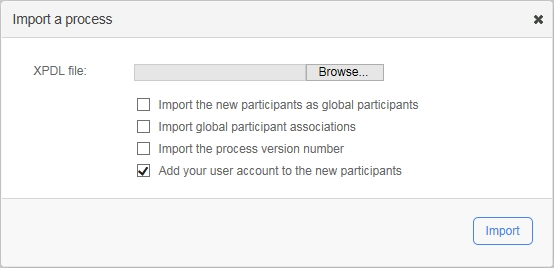
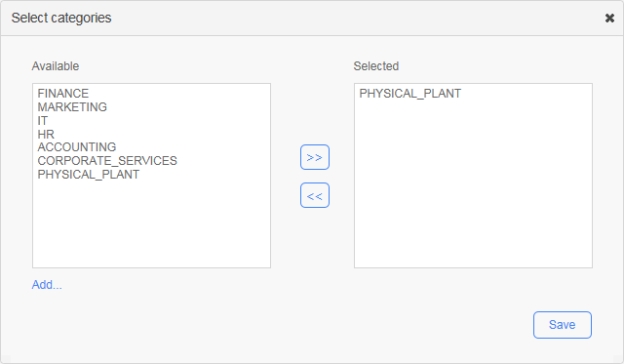
p {color:blue}
</style>
<meta name="description" content="my content" />
<script type="text/javascript">
alert("Hello World!");
</script>
<script type="text/javascript" src="myscript.js">
</script>
To fold a code block, click the down arrow next to the line number, which will insert a double-arrow icon in place of the code. To unfold the code block, click the right arrow.
Press Ctrl+Spaceto display a drop-down menu that lists the available variables and keywords.
Save a section or field as tool
Saves the selected section or field as a custom tool
Duplicate a section or field
Makes a copy of the selected section or field and inserts it in the form. The duplicate section or field will appear below the selected section or field.
Delete a section or field
Deletes the selected section or field from the form
Form configuration
Opens the Form configuration window
Workflow view
Displays the interactive workflow view
Undo/redo
Undoes or redoes the most recent changes made to the form
Styles
Select a style
List of default and custom styles; select an item to change the style of the current form.
Tools
Select a tool
List of default and custom tools; select an item in order to add the tool to the form using the Insert button.
Insert the selected tool
Inserts the selected tool in the form
Id
Edit ID
Edit section and field identifiers
Tooltip
Edit tooltip
Edit section and field tooltips
Format
Edit format
Edit section and field format
Appearance
Edit appearance
Edit the appearance of headers, footers, labels, sections, and fields (see Appearance)
Behavior
Edit field and section behavior
Displays the interactive view of the workflow, activates the Required, Read-only, and Hidden clickable options for each form field, and sets the behavior of sections and form fields for each action (see Field & section behavior)
Mapping
Edit field’s action data mapping
Displays the interactive view of the workflow, activates clickable options Retrieve the value and Send the value for each form field and defines the data input and output for each action (see Field data mapping)
.NET
ASP.NET
Switch to the ASP.NET code editor
JS
JavaScript
Switch to the JavaScript code editor
Form Designer
Switch to the Form Designer
JS
JavaScript
Switch to the JavaScript code editor
Form Designer
Switch to the Form Designer
.NET
ASP.NET
Switch to the ASP.NET code editor
Width
The width of the form header
Numeric value with or without the unit of measure (px, pt, in, cm, mm, pc, em, ex, %), e.g. 720px
Height
The height of the form header
Numeric value with or without the unit of measure (px, pt, in, cm, mm, pc, em, ex, %), e.g. 38px
Image alignment
The alignment for the header image:
Right: The image will be aligned to the right.
Left: The image will be aligned to the left.
None: No alignment.
Image URL
The URL of the image to be shown
Image width
The width of the image
Image height
The height of the image
Image repeat
Sets if and how the image will be repeated:
No-repeat: the image will not be repeated
Repeat: the image will be repeated both vertically and horizontally (this is the default setting)
Repeat x: the image will be repeated only horizontally
Repeat y: the image will be repeated only vertically
Sections
Width
The width for all sections
Numeric value with or without the unit of measure (px, pt, in, cm, mm, pc, em, ex, %), e.g. 720px
Adjust width automatically
Check to apply adjusted width to all sections
Labels
Alignment
The alignment for all field labels:
Right: the label will be aligned to the right of the field
Left: the label will be aligned to the left of the field
Top: the label will be aligned on top of the field
Width
The width for all field labels
Numeric value with or without the unit of measure (px, pt, in, cm, mm, pc, em, ex, %), e.g. 150px
Apply the width
Check to apply the width to all field labels
Buttons
Submit label
The label for the submit button
Save-as-draft label
The label for the save as draft button
Enable save-as-draft
Check to enable and display the save as draft button
Footer
Width
The width of the form footer
Numeric value with or without the unit of measure (px, pt, in, cm, mm, pc, em, ex, %), e.g. 720px
Height
The height of the form header
Numeric value with or without the unit of measure (px, pt, in, cm, mm, pc, em, ex, %), e.g. 22px
Image alignment
The alignment for the footer image:
Right: the image will be aligned to the right side
Left: the image will be aligned to the left side
None: no alignment
Image URL
The URL of the image to be shown
Image width
The width of the image
Image height
The height of the image
Image repeat
Sets if and how the image will be repeated:
No repeat: the image will not be repeated
Repeat: the image will be repeated both vertically and horizontally (this is the default setting)
Repeat-x: the image will be repeated only horizontally
Repeat-y: the image will be repeated only vertically
Security
Enable XML Signature
Check to enable the use of XML signature in the form data
Digital signatures are used to certify that a document has not been modified by the system or by someone who gained unauthorized access to the system. The XML signature is a W3C standard that defines the syntax and processing rules for creating and representing digital signatures. This is a method of associating a key with referenced data to insure the integrity of this data.
Misc.
Display a confirmation message for quick deletion
Check to prompt a confirmation message prior to deletion
Custom styles can be created and deployed on the server using the following folder and file structure: \wfgen\App_Data\Templates\Forms[language][folder name]\css[style name].css
📌 Example
\wfgen\App_Data\Templates\Forms\En\MyCompany\css\MyStyle.css
The Appearance Editor lets you customize the appearance of individual form items and provides further options. You can change the appearance of headers and footers, fields and their labels, radio buttons, checkboxes, the Submit button, and the optional Save-as-draft button. Click the Appearance tab to open the Appearance Editor.
You can use the Appearance Editor in Express or Advanced modes.
To use Express mode, hover over the item you want to customize and a toolbar will appear that lets you change the appearance of text and the size of the top margin. (If the item contains several fields, toolbars will appear in the corresponding positions.) You can also change the width of labels and fields.
Advanced mode provides extended customization options. To show the Advanced mode panel, hover over the item to display the Express mode toolbar, then click the pencil icon to the right.
Text lets you set the text appearance, alignment, and word spacing. Layout sets the width and padding of the item. Borders adds and customizes the appearance of borders. Field sets the top, left, and right margins of the field.
You can also add images to section headers and bodies:
The Image URL field contains the URL of the image to display.
Image repeat sets if and how the image will be repeated:
No repeat: the image will not be repeated
Repeat: the image will be repeated both vertically and horizontally (this is the default setting)
Repeat x: the image will be repeated horizontally only
Repeat y: the image will be repeated vertically only
Image position "x" aligns the image to the left, horizontal center, or right.
Image position "y" aligns the image to the top, vertical center, or bottom.
On the Apply to... tab, you can choose the items to which you want to apply the customized appearance settings using the checkboxes.
To apply your customized appearance and exit the Advanced mode menu, click the checkbox icon at the top right of the panel. To cancel changes and exit, click the x icon.
The Behavior section is used to visually define the behavior of form sections nd fields for each action of the workflow.
To activate the interactive workflow view and define the behavior of the form, click Behavior on the toolbar.
To define the behavior of sections and fields of the form at the action level, click the desired action in the interactive view of the workflow. Once the action is selected, the Required, Read-only, and Hidden settings are activated as clickable buttons for each section and the form field.
To activate the Required, Read-only, and Hidden settings of each section and form field, click the button related to the section or field for which you want to manage the behavior.
To define the behavior of the form for the other actions of the workflow, click another action via the interactive view and repeat the above operation according to the desired behavior.
Sections
Required
Read-only
Hidden
All sections
✔️
✔️
✔️
Default – Fields
Required
Read-only
Hidden
File attachment (Standard .NET FileUpload control)
✔️
✔️
✔️
File attachment (WorkflowFileUpload control)
❌
✔️
✔️
CheckBox
* Not supported in field conditions.
The Mapping screen enables you to visually define the default values (data in) and/or data to be stored by the workflow (data out) of the form fields for each action of the workflow.
To activate the interactive workflow view and manage the mapping of the form, click Mapping on the toolbar.
To set the default values of form fields at the action level, click the desired action in the interactive view of the workflow.
Once the action is selected, the Value IN and Value OUT buttons are activated in each form field.
A default value will automatically populate a field when displaying the form following the launch of an action. These default values can be of several types:
Manually-entered text
A macro selected from the list of available macros
Workflow data selected in the data list
To set the default value of a field at the action level, click the Value IN button to the right of the field concerned.
In the dialog box that appears, set the default value of the field by entering text in the Text section, by selecting a macro from the drop-down Macro list, or by selecting process data in the Data combo box. Click the check mark at the top right to save.
To set the default values of other form fields for each of the actions of the workflow, click another action via the interactive view and repeat the previous operation.
To set the form data to be stored for an action, click the desired action in the interactive view of the workflow.
Data stored by the workflow corresponds to the value of form fields that will be retrieved by the workflow as a result of an action, and that can be used for the following purposes:
As workflow conditions
In the assignment of an action, setting the time for action and content of notifications
Through the tracking features and/or statistics (reporting)
To send the value of a form field and therefore store it as process data, click Value OUT to the right of each field in question.
Fields whose values have been sent are automatically declared in the Data tab of the process definition and will be usable as workflow transitions, as tracking features and statistics (reporting), etc.
To define the data stored for each of the actions of the workflow, click another action via the interactive view and repeat the previous operation.
To enable the Quick approval feature on validation actions, click the Quick approval tab and check Enable Quick approval. Click Edit email approval keywords to specify email approval keywords (comma-separated) for the configured Quick approval parameters. Once enabled, you can also Enable Quick approval comments for comments actions.
To enable Quick approval by default, check Enable Quick approval by default on the Portal tab in the Configuration Panel.
The XMLTODATABASE workflow application lets you export data from any XML document to one or several databases. It is a synchronous system application that does not require the user to take action. The configuration of the SQL transaction is done via an XML document that enables SQL queries to be performed on ODBC, OLEDB, or other custom data sources.
Synchronization
Allows a synchronization type action to be created (synchronization bar)
Manual
Allows a manual type action to be created (an action that is not associated with a form)
Sub-process independent
Allows an independent sub-process type action to be created
Sub-process embedded
Allows an embedded sub-process type action to be created
Tab
Remarks
Information
Displays the action form in edit mode
Parameters
Displays the list of required and additional parameters of an application type action
Next actions
Displays the list of actions following the current action in the workflow process
Notifications
Displays the automatic and additional notification lists for the action
Fields
Remarks
Application or action type
Type of action or application used by the action
Name
Unique identifier for the action; must respect nomenclature and be limited to 30 characters (required field)
Description
Action description (limited to 255 characters)
Participant [1]
Participant involved in the action (required field)
Sub-process [1]
Sub-process associated to the action (required field)
The list of available sub-processes is built according to the process status:
If the process is active, you can choose only active or archived sub-processes
If the process is in test or under construction, you can choose in test, active, or archived sub-processes
⚠️ Warning: If you change the sub-process to another one, all of the current parameters of the previous sub-process will be deleted.
If the action is a sub-process.
If the action is an application.
Available for Automatic to the person and Manual assignment methods.
Enabled if the assignment method is manual.
Enabled if a lead time is specified.
The default help text limit of 10,000 characters can be customized by editing the value of the AdministrationMaxHelpTextSize parameter in the web.config file.
Only a process/folder manager or an administrator can delete an action. If the process is active or archived, the action cannot be deleted.
It is not possible to create a transition leading back to the first action of a process (this is not the same as a loop transition, which is permitted). You must add a new action that will be automatically assigned to the requester and create a loop with it.
Here, the action UPDATES is added:
- INITIATES > VALIDATES > UPDATES > VALIDATES > UPDATES > VALIDATES > ...
Method
Remarks
Automatic to the requester
The action is assigned to the user who initiates the request (e.g. first action of the process is assigned to the requester).
Automatic to the action initiator [1]
The action is assigned to the user who handled the previous action (e.g. launch of several actions one after the other by the same person).
Automatic to the person [2]
If the type of participant is Person, the action is assigned to the user associated with the participant.
If the type of participant is List of persons, the action can be assigned to the user whose username is found in the chosen process data. If the process data contains a list of usernames (separated by commas) then one instance of the activity is created and assigned to each user of the list. In this case, an assignment error might occur if the assigned user is not associated with the participant.
Automatic to the person who handled... (an action)
The action is assigned to the user who handled the selected action (e.g. the final approval must be done by the same user who approved first). The list of available actions to select (in the second drop-down) will be the ones to which the selected participant has previously been associated.
Automatic to the manager of the requester
The action is assigned to the manager of the user who initiates the request. An assignment error might occur if no manager is associated with the requester.
The Automatic to the action initiator method is available if the participant of the previous action is the same as the participant of the current action.
If the Automatic to the person method is selected, the Retrieve the user from the data field must be filled in.
Method
Remarks
Manual by the action initiator
The user who handled the previous action selects the user to receive the next action assignment in the participant user list.
Manual by the person who handled... (an action)
The user who handled the selected action chooses the user who will receive the next action assignment in the participant user list. The list of available actions to select (in the second drop-down) menu will be the ones to which the selected participant has previously been associated.
For processes that contain sub-processes or automatic applications, this method can replace By the action initiator when the previous action has been handled by the system.
Manual by the coordinator
(Dispatching) One of the coordinators (of the selected participant) assigns the action to a user associated with the action participant.
Self-service
The first user associated with the participant who decides to handle the action receives the action assignment, at which time others are not able to handle the action anymore.
The following table shows the available assignment methods depending on the action type (synchronization, application, or sub-process) and the action application type (web procedure, web service, asynchronous web procedure, or web application).
Available assignment methods
Sync
Web procedure, web service, async web procedure
Web application
Sub-process
Automatic
Automatic to the requester
❌
❌
See next table
The Automatic to the action initiator method is available if the participant of the previous action is the same as the participant of the current action.
If the Automatic to the person method is selected, the Retrieve the user from the data field must be filled in.
The following table shows the available assignment methods when selecting an Application action type and a Web application action application type depending on the associated participant type and participant role.
Available assignment methods
Person
List of persons: Participant
List of persons: Requester
List of persons with coordinator: Participant
List of persons with coordinator: Requester
Automatic
Automatic to the requester
❌
The Automatic to the action initiator method is available if the participant of the previous action is the same as the participants of the current action.
If the Automatic to the person method is selected, the Retrieve the user from the data field must be filled in.
Field
Remarks
Action to be added *
Process action to add as the action following the current action
* An action can only be used once as the "next action" in the transition from the current action.
Columns
Remarks
Next action
Name of the next action
Transitions to
List of possible actions to follow
Condition/Exception
A link displays the transition’s condition form in edit mode
Deletion
Clicking x deletes the transition to the next action
Fields
Remarks
Application
Allows an action to be created based on the selected application
The WorkflowGen engine calls the XMLTODATABASE application with the context and the parameters. XMLTODATABASE uses the context and the parameters to get the following:
The XML data document to export
The transactions document, which contains:
Information on how to connect to the database
Information on where the data should be taken in the XML data document (using XPaths)
After XMLTODATABASE has gathered all of the above information, it is ready to perform the export. Once the export is complete, it returns the context to WorkflowGen so that the workflow may continue.
The XML transactions document specifies the SQL commands that will be executed on the databases. It is used for two main functions: connecting to the database, and mapping the fields of the query to the fields of the XML data document. Remember that the XML data document (generally named FORM_DATA) can be constructed in many ways. For this reason, XPaths are used to map the database fields to the XML fields.
Any one XMLTODATABASE activity can have an unlimited number of databases and an unlimited number of commands per database. This means that the export can be done to several databases, and each database can have more than one command.
Attribute
Description
name
Used to map the transaction to the XMLTODATABASE activity/action
In WorkflowGen, a TRANSACTION parameter (TEXT type data) must be defined for every XMLTODATABASE activity/action. The text entered in the parameter must match the transaction name attribute in order to use the right transaction for the right activity.
Attribute
Description
name
Name of the database used for the transaction
connectionstringname
Contains the name of a connection string that is centrally managed in the WorkflowGen web.config file (see the below)
connectionstring
Contains the ConnectionString to connect to the database
provider
Used to inform XMLTODATABASE which namespace should be used to create the access to the database (System.Data.OleDb or System.Data.Odbc)
✏️ Note: This attribute can only be used with the connectionstring attribute.
transaction
Used to inform XMLTODATABASE whether to use a DB transaction for the export (values: yes or no)
Attribute
Description
type
Used to inform XMLTODATABASE what kind of command is being performed
Possible values can be any valid SQL command, except if it is calling a stored procedure. In this case, the type must be PROCEDURE.
loop
Used to perform a batch of commands using all of the values returned by the XPath in the xpath attribute of the command node (possible values: yes or no)
For example, if the loop attribute is set to yes, and the XPath returns 10 results, the XPath contained in the command query will be executed 10 times (once for each result). If the loop attribute is set to no, the command will be executed only once with the first node returned by the XPath contained in the query.
xpath
Used to specify a part of the XPaths used in the query
There are four ways to define an XML transaction for an XMLTODATABASE action. In all of the following cases, the transaction document is defined as follows:
XMLTODATABASE first looks for a TRANSACTIONS_TEXT parameter.
If this parameter is not found, it then looks for a TRANSACTIONS_FILE parameter.
If this parameter is not found either, it then looks for a file with your transaction’s name.
If this file is not not found either, it then parses the Transactions.xml file to find a node with your transaction’s name.
The priority order, then, is as follows:
TRANSACTIONS_TEXT parameter.
TRANSACTIONS_FILE parameter.
MyTransaction.xml file.
Transactions.xml file.
In this case, the transaction file is located in the \wfgen\App_Data\Files\XmlToDatabase folder, and named Transactions.xml. The XMLTODATABASE application parses this file to find your transaction.
The XMLTODATABASE action contains the following parameters:
TRANSACTION: IN direction text type data
XML: IN direction file type data
If your transaction is not found inside the Transactions.xml file, the XMLTODATABASE application looks for an .xml file with the same name as your transaction. The transaction document should be created in the MY_TRANSACTION.xml file.
The XMLTODATABASE action contains the TRANSACTION and XML parameters.
If you can’t access the web server's \App_Data folder, or if you want to include your transaction in your process definition (to be exported and shared by an XPDL file), you can upload your transaction file in a process file data type. To do this:
Create a process file data type and upload your MY_TRANSACTION.xml file.
Edit your XMLTODATABASE action, add a new parameter named TRANSACTIONS_FILE, and send the value of your process data.
If you can’t access the \App_Data folder of the web server, or if you want to include your transaction in your process definition (to be exported and shared by an XPDL file), you can write your transaction within a process text data type.
To do this:
Create a process text data type and write your transaction as a default value.
Edit your XMLTODATABASE action, add a new parameter named TRANSACTIONS_TEXT, and send the value of your process data:
You can specify which fields must be formatted as date or numeric values using the following parameters:
Parameter
Description
XML_FIELDS_DATE
List of date type fields; must contain a list of XPath expressions separated by , (comma) characters
XML_FIELDS_NUMERIC
List of numeric type fields; must contain a list of XPath expressions separated by , (comma) characters
XML_LOCALE
Culture code to use to format the date and numeric values (e.g. en-GB or en-US)
DATE type fields are formatted as follows: yyyy-mm-dd hh:MM:ss
Numeric fields are formatted as follows: XXXX.XX
Rule: All the nodes found in the XML document with the name REQUEST_DATE and the specific node situated at /MyData/MyExample/Date_Field will be formatted as date
Method: XML_FIELDS_DATE = //*/REQUEST_DATE, /MyData/MyExample/Date_Field
The SQL commands can be launched as transactions. If errors occur, a rollback is launched and the initial state of the database is restored. The value of the transaction attribute of the database node must be set to yes.
If the transaction handles many databases, the execution of the commands will be multi-transactional, meaning if an error occurs in a command in one of the databases, a rollback on all database transactions performed will be launched.
The transactions can be tested before being executed on the database. The value of the constant XmlToDatabaseTestMode in the configuration file must be set to Y.
If the XmlToDatabaseEnableTrace parameter in the configuration file of the web service is set to Y, a log file will be created in the \wfgen\App_Data\LogFiles\XmlToDatabase directory.
The log entries are in the following format:
Date; [Database name;] Transaction name; SQL query; Execution result
Execution result values are:
OK if the query was run successfully, or
ERROR: Error code - Error description if an error occurred.
The following errors can occur during the execution of the transactions:
Error
Cause
The XML file parameter is missing
The required XML parameter has a null value or is not completed.
The XML context cannot be empty
The XMLTODATABASE application must receive a context from WorkflowGen; it cannot be used without being part of a WorkflowGen process.
XML parsing error (1)
The XML parameter is pointing to an invalid XML file.
XML parsing error (2)
The XML transaction file is an invalid XML file.
XML parsing error. The provider attribute is required
The provider attribute of the database node is not present in the transaction.
XML file structure:
The command node could look like this:
The XPATH: tags in the query will be replaced with /data/, which is the XPath attribute value.
The PARAM: tag is used to identify a WorkflowGen parameter instead of using an XML field.
The following is a more complex example using the loop property.
XML file structure:
The command nodes could look like this:
❌
✔️
✔️
CheckBoxList
❌
✔️
✔️
CheckBoxListVertical
❌
✔️
✔️
Currency
✔️
✔️
✔️
Date
✔️
✔️
✔️
DateTime
✔️
✔️
✔️
DropdownListBox
✔️
✔️
✔️
Gridview
✔️*
✔️
✔️
Gridview - Column
✔️*
❌
❌
Label
❌
❌
✔️
ListBox
✔️
✔️
✔️
Numeric
✔️
✔️
✔️
Password
✔️
✔️
✔️
RadioButton
❌
✔️
✔️
RadioButtonList
✔️
✔️
✔️
RadioButtonList Vertical
✔️
✔️
✔️
ReadOnlyCurrency
❌
❌
✔️
ReadOnlyDate
❌
❌
✔️
ReadOnlyDateTime
❌
❌
✔️
ReadOnlyNumeric
❌
❌
✔️
ReadOnlyText
❌
❌
✔️
TextArea
✔️
✔️
✔️
Text
✔️
✔️
✔️
The following macros can be used in transition conditions or in the additional parameters of application type actions. They will be replaced by their associated value during process execution.
* field: See the next table.
See below for examples of values for the macros listed above.
You can use macros in the transitions and additional notification conditions or in the action parameters to send the value of the macro to the parameter value by choosing one macro from the list or by concatenating several macro codes as a text value.
If you want to send the username of the requester in the action's REQUESTER_USERNAME field, you have to add an additional parameter with the following settings:
Parameter name: REQUESTER_USERNAME
Send the value of a macro: Requester.Username
If you want to send the first name and the last name of the requester in the action's REQUESTER_NAME field with a space in between the two, you have to add an additional parameter with the following settings:
Parameter name: REQUESTER_NAME
Send the value of a text: <WF_REQUESTER_FIRSTNAME> <WF_REQUESTER_LASTNAME>
In transition or notification conditions, you can use the following macros on file type process data to access the file properties.
The following examples assume you have a file type data called MY_FILE.
Rule: Check if the file name contains the keyword "report":
Method: InStr(1,<MY_FILE.FILENAME>,"report",1) <> 0
Rule: Check if the file size is less than 1 MB:
Method: <MY_FILE.SIZE> < 1024
Rule: Check if the file is a Microsoft Word document:
Method: <MY_FILE.CONTENTTYPE> = "application/msword"
Rule: Check if the file was modified today:
Method: <MY_FILE.DATELASTMODIFIED> > [Date]
You can also use the name of the data to check if the file exists in the process by using the IsNull() function.
If you have a FILE type data called MY_FILE, you can use the syntax below in a condition to check if the file exists:
IsNull(<MY_FILE>)
The following table shows examples of the macros listed above.
This feature helps to simplify the deployment of business processes in a multi-instance WorkflowGen environment by allowing you to define common data or instance-specific data as a key-value pair that can be used in your process by way of a macro in action parameters, in transition conditions to control the flow, and in action notifications instead of hard-coding these data in the process definition.
You can create your own macros by defining custom app settings in the WorkflowGen web configuration file.
You must use the EngineMacroAppSettings configuration parameter to define your custom macros. You can specify the exact key name, or use a prefix followed by * (asterisk) as shown in the example below, which adds the three custom macros (<WF_APP_SETTING_MySecretKey1>, <WF_APP_SETTING_MySecretKey2>, and <WF_APP_SETTING_MySecretKey3>).
The <WF_APP_SETTING_MySecretKey1>, <WF_APP_SETTING_MySecretKey2>, and <WF_APP_SETTING_MySecretKey3> macros will be available at design and runtime with the app setting below in the web.config:
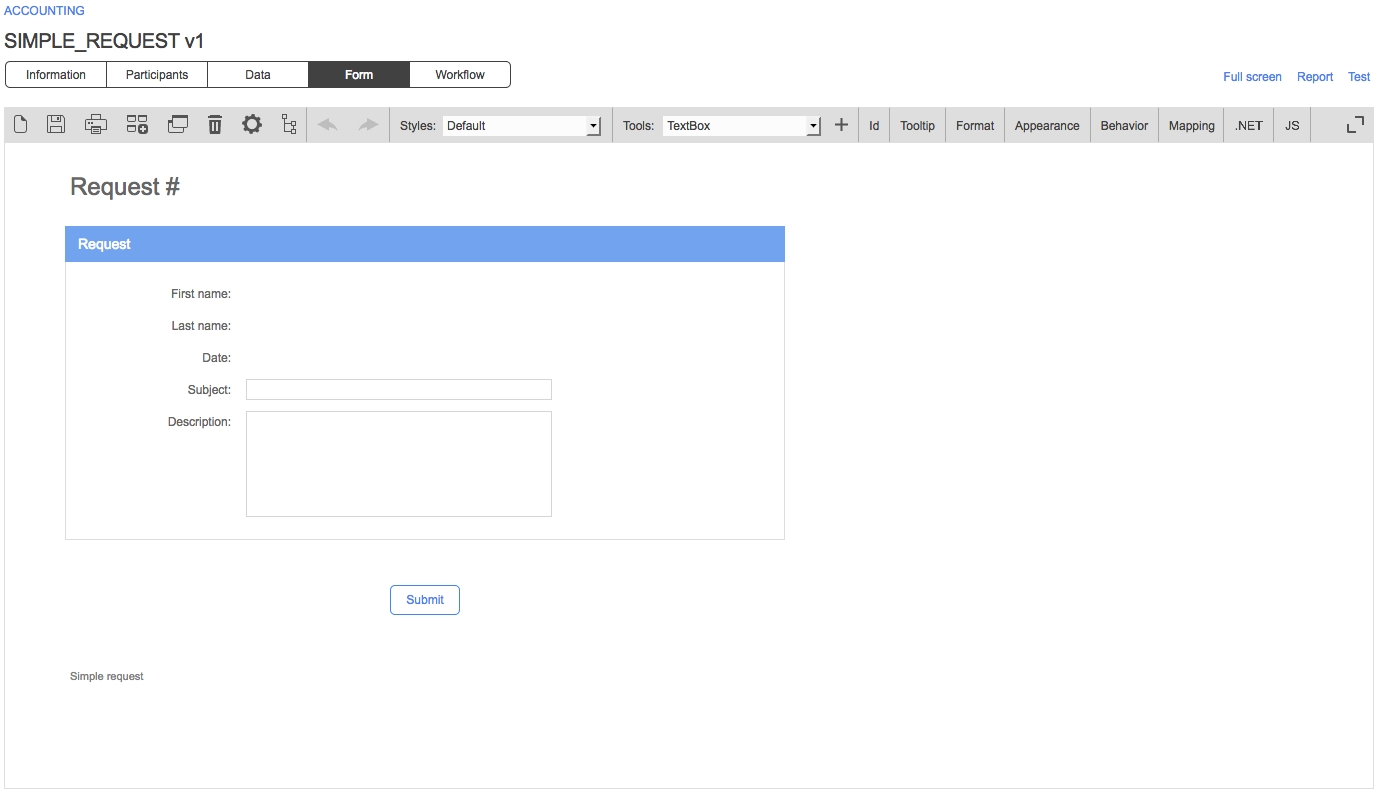
<transactions>
<transaction name="">
<databases>
<database name="" connectionstringname="" connectionstring="" provider="" transaction="">
<command type="" loop="" xpath="">
[QUERY HERE]
</command>
</database>
</databases>
</transaction>
</transactions>...
<database name="MYDB" connectionstringname="MYDBSOURCE">
....
<connectionStrings>
<add name="MYDBSOURCE" connectionString="Data Source=MYSQLSERVER;Initial Catalog=MYDB;User ID=user;password=pwd;" providerName="System.Data.SqlClient"/>
<connectionString>
...<transactions>
<transaction name="MY_TRANSACTION">
...
</transaction>
</transactions>02/12/2020 4:41:23 PM; ACCESS; TEST_TRANS; INSERT INTO DATA ...; OK02/12/2020 4:41:24 PM; ACCESS; TEST_TRANS; DELETE FROM DATA2; ERROR: 1234-Table was not found<data>
<request_number>1</request_number>
<request_first_name>John</request_first_name>
<request_last_name>Smith</request_last_name>
</data><command type="INSERT" loop="no" xpath="/data/">
INSERT INTO EXAMPLE (request_number, request_first_name, request_last_name, request_date)
VALUES (
{XPATH:request_number},
'{XPATH:request_first_name}',
'{XPATH:request_last_name}',
'{PARAM:REQUEST_DATE}')
</command><Library>
<publishers>
<publisher>Grasset</publisher>
</publishers>
<AUTHORS>
<author id="100">
<name>Stephen King</name>
<description>Horror novel author</description>
<birth_date>1947-09-21</birth_date>
</author>
<author id="200">
<name>John Smith</name>
<description>Description of the author</description>
<birth_date>1972-06-06</birth_date>
</author>
</AUTHORS>
<BOOKS>
<book id="38">
<title>Title of book #38</title>
<description>Description of the book #38</description>
<author id="100"/>
</book>
<book id="39">
<title>Title of book #39</title>
<description>Description of the book #39</description>
<author id="200"/>
</book>
<book id="40">
<title>Title of book #40</title>
<description /> // Will insert a NULL value automatically
<author id=""/> // Will insert a NULL value automatically
</book>
</BOOKS>
</Library><command loop="yes" type="INSERT" xpath="/Library/AUTHORS/">
INSERT INTO AUTHORS
([AUTHOR_ID],[AUTHOR_NAME],[AUTHOR_DESC],[AUTHOR_PUBLISHER])
VALUES ({XPATH:author/@id},
'{XPATH:author/name}',
'{XPATH:author/description}',
'{XPATH::/Library/publishers/publisher}' )
</command>
<command loop="yes" type="INSERT" xpath="/Library/BOOKS/">
INSERT INTO BOOKS
([BOOK_ID],[BOOK_TITLE],[BOOK_DESCRIPTION],[BOOK_AUTHOR_ID])
VALUES ({XPATH:book/@id},
'{XPATH:book/title}',
'{XPATH:book/description}',
'{XPATH:book/author/@id}')
</command>Sub-process version
The sub-process version (optional)
Auto finds the most recent active, in test, or archived version (in that order) and chooses it, but if you specify a specific version in the Number field, that version will be chosen regardless of its status.
Sub-process requester [1]
Process users automatically defined as the requester of the sub-process (required field)
Assignment method [2]
Method of assigning the action to a participant (required field)
Retrieve users from [3]
Process data containing a list of usernames (separated by commas) of the persons to whom the action will be assigned (required field)
Split mode
Sets the action's behavior between a traditional synchronization bar and a split bar. Disabling incoming transition synchronization:
Checked (split bar): Do not synchronize incoming transitions (e.g. parallel actions)
Unchecked (synchronization bar): Synchronize incoming transitions (e.g. parallel actions)
✏️ Note: Applicable to synchronization and split bars only.
Begin block activity
Defines a new block of activities specifying the begin action of the block (e.g. split action). The split action can be any type; the current synchronization bar will be automatically considered as the end action of the block (e.g. joint action).
✏️ Note: Applicable to synchronization bars only.
Lead time [4]
Amount and unit of time before the action is considered late; the value can be specified by a fixed value or retrieved at runtime from a data value.
Units:
Years
Months
Days (takes working days into account)
Hours (takes working days and hours into account)
Minutes (takes working days and hours into account)
Seconds (takes working days and hours into account)
You can choose the way the lead time will be calculated by checking (or not checking) the Use working days/hours to calculate the duration option.
Pause during
Amount and unit of time a synchronization or split bar will be paused before launch; the value can be specified by a fixed value or retrieved at runtime from a data value
You can choose the way the pause time will be calculated by checking (or not checking) the Use working days/hours to calculate the duration option.
✏️ Note: Applicable to synchronization and split bars only.
Delay / Start time
Amount and unit of time a system action will be delayed before launch; the value can be specified by a fixed value or retrieved at runtime from a data value You can choose the way the delay/start time will be calculated by checking (or not checking) the Use working days/hours to calculate the duration option.
You can also choose to start the first action execution without the specified delay by checking the Skip delay for the first execution when action is in direct loop option (enabled by default).
✏️ Note: Applicable to system actions only (e.g. assembly, web service, web procedure, etc.).
Cancel the assignment if the delay is greater than [5]
The action assignment can be automatically cancelled if the delay is greater than this specified value. You must specify a duration unit for this field.
Completion mode
Indicates if the action must be completed by the workflow engine in background
This option is useful when the completion takes a long time (a lot of notifications, the action is followed by a web service or a web process, etc.).
In this case, the user doesn't have to wait for the action completion to be redirected to the request follow-up form or the portal home page (according to the redirection setting defined in the Configuration Panel by the administrator).
Direct loop history
Keep direct loop actions history:
Checked (default): Creates a separate action for every execution when the action loops to itself only (original behavior)
Unchecked: Creates a single action for all executions when the action loops to itself only
✏️ Note: Applicable to system actions only (e.g. assembly, web service, web procedure, etc.).
Visible
Indicates if the action is displayed in the request follow-up form's actions history in the User Portal
Help text [6]
Help text for the action, visible in the User Portal; a link allows this text to be edited
Help link
URL of an external help document relating to the action, visible in the User Portal
Support email
Email address for support on the action, visible in user mode
Icon size
The action icon size for the process workflow graphical view; check Apply size to all actions to change the size of all action icons at once
Internal ID
Action’s ID
Automatic to the manager of the action initiator
The action is assigned to the manager of the user who handled the previous action. An assignment error might occur if no manager is associated with the action initiator.
Automatic to the manager of the person who handled … (an action)
The action is assigned to the manager of the user who handled the selected action. An assignment error might occur if no manager is associated with the user who handled the selected action. The list of available actions to select (in the second drop-down) will be the ones that the selected participant has previously been associated to.
Automatic to the system
Used for a synchronization related application or an automatic application (web procedure, asynchronous web procedure, or web service).
✔️
Automatic to the action initiator [1]
❌
❌
✔️
✔️
Automatic to the person [2]
❌
❌
✔️
✔️
Automatic to the person who handled...
❌
❌
See next table
✔️
Automatic to the manager of the requester
❌
❌
See next table
✔️
Automatic to the manager of the action initiator
❌
❌
See next table
✔️
Automatic to the manager of the person who handled...
❌
❌
See next table
✔️
Automatic to the system
✔️
✔️
See next table
✔️
Manual
Manual by the action initiator
❌
❌
See next table
❌
Manual by the person who handled...
❌
❌
See next table
❌
Manual by the coordinator
❌
❌
See next table
❌
Self-service
❌
❌
See next table
❌
❌
✔️
❌
✔️
Automatic to the action initiator [1]
✔️
❌
❌
❌
❌
Automatic to the person [2]
✔️
✔️
✔️
✔️
✔️
Automatic to the person who handled...
❌
✔️
✔️
✔️
✔️
Automatic to the manager of the requester
❌
✔️
✔️
✔️
✔️
Automatic to the manager of the action initiator
❌
✔️
✔️
✔️
✔️
Automatic to the manager of the person who handled...
❌
✔️
✔️
✔️
✔️
Automatic to the system
❌
❌
❌
❌
❌
Manual
Manual by the action initiator
❌
✔️
✔️
✔️
✔️
Manual by the person who handled...
❌
✔️
✔️
✔️
✔️
Manual by the coordinator
❌
❌
❌
✔️
✔️
Self-service
❌
✔️
✔️
✔️
✔️
Unable to commit transactions
The commit operation has not succeeded.
Error while opening log file
The log file cannot be opened.
The TRANSACTION parameter is missing
The required TRANSACTION parameter has a null value or is not completed.
The definition of the transaction has not been found
The transactions.xml file has no transaction with the name attribute corresponding to the value of the TRANSACTION parameter.
SQL Instruction not valid: the parameter has not been found
The PARAM {parameter name} has not been found.
XML parsing error. The connectionstring attribute is required
The connectionstring attribute has not been specified in the database node.
The XML field was expected to be date, but its value is not valid
One of the XPaths in the XML_FIELDS_DATE that was passed refers to a field that is not a date field.
The XML field was expected to be numeric, but its value is not valid
One of the XPaths in the XML_FIELDS_NUMERIC that was passed refers to a field that is not a numeric field.
The XPath is not a valid XPath expression
One of the XPaths in your transaction file is not a valid XPath expression.
The XPath passed as a parameter is not a valid XPath expression
One of the XPaths in your XML_FIELDS_DATE or XML_FIELDS_NUMERIC parameters is not a valid XPath expression.
Error while loading the XML file: File was not found
The XML parameter is not pointing to an XML file.
Database connection error
The connection to the database cannot be established. Check the validity of the connection string contained in the database node's connectionstring attribute.
✏️ Note: It is strongly recommended to use a connection name rather than a connection string to simplify multi-environment management.
Error during the execution of the SQL command
The execution of the SQL command failed. Check the syntax of the related SQL command.
Error during the execution of the SQL loop command
The execution of the SQL command failed. Check the syntax of the related SQL command.
SQL instruction not valid: the XML field has not been found.
One of the XPath expressions you have used in your parameters of the command returned no fields. Check the syntax of your XPath expressions.
The culture code for the XML file in the param XML_LOCALE is not valid.
Check that the XML_LOCALE parameter is in the right format (e.g. en-US or fr-CA).
Process. Id
<WF_PROCESS_ID>
Process identifier
Process. Name
<WF_PROCESS_NAME>
Process name
Process. Description
<WF_PROCESS_DESC>
Process description
Process. Status
<WF_PROCESS_STATUS>
Process status
Process. FormUrl
<WF_PROCESS_FORM_URL>
Process form URL
Process. Version
<WF_PROCESS_VERSION>
Process version
Action. Id
<WF_ACTIVITY_ID>
Action identifier
Action. Name
<WF_ACTIVITY_NAME>
Action name
Action. Description
<WF_ACTIVITY_DESC>
Action description
Current action. Id
<WF_ACTIVITY_INST_ID>
Action instance identifier
Current action. Name
<WF_ACTIVITY_INST_NAME>
Action instance name
Current action. Creation date
<WF_ACTIVITY_INST_CREATION_DATETIME>
Action creation date
Current action. Deadline
<WF_ACTIVITY_INST_LIMIT_DATETIME>
Action deadline
Current action. Pre-overdue days
<WF_ACTIVITY_INST_PREOVERDUE_DAYS>
Number of days before the action becomes overdue, rounded up to the nearest day
Current action. Pre-overdue hours
<WF_ACTIVITY_INST_PREOVERDUE_HOURS>
Number of hours before the action becomes overdue, rounded up to the nearest hour
Current action. Pre-overdue minutes
<WF_ACTIVITY_INST_PREOVERDUE_MINUTES>
Number of minutes before the action becomes overdue, rounded up to the nearest minute
Current action. Pre-overdue seconds
<WF_ACTIVITY_INST_PREOVERDUE_SECONDS>
Number of seconds before the action becomes overdue, rounded up to the nearest second
Current action. Overdue days
<WF_ACTIVITY_INST_OVERDUE_DAYS>
Number of days that the action is overdue, rounded down to the nearest day
Current action. Overdue hours
<WF_ACTIVITY_INST_OVERDUE_HOURS>
Number of hours that the action is overdue, rounded down to the nearest hour
Current action. Overdue minutes
<WF_ACTIVITY_INST_OVERDUE_MINUTES>
Number of minutes that the action is overdue, rounded down to the nearest minute
Current action. Overdue seconds
<WF_ACTIVITY_INST_OVERDUE_SECONDS>
Number of seconds that the action is overdue, rounded down to the nearest second
Current action. Count
<WF_ACTIVITY_INST_COUNT>
Number of completed instances for the current action
Current action. Direct loop count
<WF_ACTIVITY_INST_DIRECT_LOOP_COUNT>
Number of completed instances on direct loop for the current action
Request. Id
<WF_PROCESS_INST_ID>
Request identifier (process instance)
Request. Relative Id
<WF_PROCESS_INST_RELATIVE_ID>
Request relative identifier
Request. Month relative Id
<WF_PROCESS_INST_MONTH_RELATIVE_ID>
Request month relative identifier
Request. Year relative Id
<WF_PROCESS_INST_YEAR_RELATIVE_ID>
Request year relative identifier
Request. Name
<WF_PROCESS_INST_NAME>
Request name (process instance)
Request. Creation date
<WF_PROCESS_INST_CREATION_DATETIME>
Request creation date (process instance)
Request. Deadline
<WF_PROCESS_INST_LIMIT_DATETIME>
Request deadline (process instance)
Action. Participant name
<WF_PARTICIPANT_NAME>
Action participant name
System. Date
<WF_SYSTEM_DATE>
System date
System. Date/time
<WF_SYSTEM_DATETIME>
System date/time
System. Time
<WF_SYSTEM_TIME>
System time
System. Language
<WF_SYSTEM_LANGUAGE>
User system language
System. Null
<WF_SYSTEM_NULL>
Enable process designer to reinitialize a PDF form field value to Null
System. ApplicationBase Url
<WF_SYSTEM_APPLICATION_BASE_URL>
Returns the application root URL (e.g. http://[servername])
System. ApplicationUrl
<WF_SYSTEM_APPLICATION_URL>
Returns the WorkflowGen application URL (e.g. http://[servername]/wfgen)
System. ApplicationPortal ScriptUrl
<WF_SYSTEM_APPLICATION_PORTAL_SCRIPT_URL>
Returns the WorkflowGen application portal page URL (e.g. http://[servername]/wfgen/show.aspx)
System. ApplicationConfigPath
<WF_SYSTEM_APPLICATION_CONFIG_PATH>
Returns the physical path to the WorkflowGen web.config (e.g. C:\inetpub\wwwroot\wfgen\web.config)
System.
ApplicationDataPath
<WF_SYSTEM_APPLICATION_DATA_PATH>
Returns the physical path of the application data folder (e.g. C:\inetpub\wwwroot\wfgen\app_data)
System.Guid
<WF_SYSTEM_GUID>
System-generated globally unique identifier
⚠️ Important: The generated GUID will be the same when used in standard action parameters except when the scripting option is enabled, in which case each expression will have a unique GUID.
Parent. Process Name
<WF_PARENT_PROCESS_NAME>
Returns the parent process name in a sub-process action
Parent. Process Version
<WF_PARENT_PROCESS_VERSION>
Returns the parent process version in a sub-process action
Parent. Request Id
<WF_PARENT_PROCESS_INST_ID>
Returns the parent request ID in a sub-process action
Parent. Current action Id
<WF_PARENT_ACTIVITY_INST_ID>
Returns the parent current action ID in a sub-process action
Web configuration app settings
<WF_APP_SETTING_name>
Macros created based on custom web configuration app settings (see the section)
Manager's first name
EMAIL
Email address
PHONE
Telephone number
MOBILE
Mobile telephone number
PAGER
Pager number
FAX
Fax number
OFFICE
Office number
DEPARTMENT
Department number
COMPANY
Company
JOBTITLE
Title
INITIALS
Initials
TITLE
Civic status
EMPLOYEENUMBER
Employee number
EMPLOYEETYPE
Type of employee
POSTALADDRESS
Postal address
ZIPCODE
Zip code
CITY
City
STATE
State
COUNTRY
Country
OBJECTSID
SID
EXTATT1
Extended attribute 1
EXTATT2
Extended attribute 2
EXTATT3
Extended attribute 3
EXTATT4
Extended attribute 4
EXTATT5
Extended attribute 5
File description
DATELASTMODIFIED
DATETIME
Date of last modification of the file
"2_LEVELS_APPROVAL"
Process.Description
"2 levels approval"
Process.Status
"ACTIVE"
Process.FormUrl
"http://mycompany.com/wfgen/wfapps/webforms/MACRO_TEST_2/V1/Default.aspx"
Process.Version
1
Action.Id
2
Action.Name
"INITIATES"
Action.Description
"The Requester initiates the request"
Current action.Id
2
Current action.Name
"2-VALIDATES"
Current action.Creation date
2019-04-20T20:23:07Z
Current action.Deadline
2019-04-30-T20:25:25:46Z
Current action.Count
2
Request.Id
1701
Request.Relative Id
12
Request.Month relative Id
12
Request.Year relative Id
12
Request.Name
"2_LEVELS_APPROVAL #1795"
Request.Creation date
2019-04-20T20:35:00Z
Request.Deadline
2019-04-30T09:00:00Z
Action.Participant name
"John"
System.Date
4/20/2019
System.Date/time
4/20/2019 2:44 PM
System.Time
1:44 PM
System.Language
"en-US"
System.Null
<NULL>
Application.BaseUrl
http://myserver.com
Macro
Tag
Value
Current user. field *
<WF_USER_field> *
User information
Assigned user. field *
<WF_ASSIGNEE_field> *
Assignee user information
Requester. field *
<WF_REQUESTER_field> *
Requester information
Action initiator. field *
<WF_INITIATOR_field> *
Field
Description
LASTNAME
Last name
FIRSTNAME
First name
USERNAME
Name of the user
MANAGER
Manager's username
MANAGER_LASTNAME
Manager's last name
Field
Type
Description
FILENAME
TEXT
File name
SIZE
NUMERIC
File size in bytes
CONTENTTYPE
TEXT
File content type
DESCRIPTION
Macro
Example
Current user.field
<WF_USER_FIRSTNAME> <WF_USER_DEPARTMENT> will give "John Accounting"
Assigned user.field
<WF_ASSIGNEE_EMPLOYEENUMBER>
<WF_ASSIGNEE_EMPLOYEETYPE> will give "11225 Permanent"
Requester.field
<WF_REQUESTER_COMPANY>
<WF_REQUESTER_LASTNAME> will give "My company Smith"
Action initiator.field
<WF_INITIATOR_FIRSTNAME>
<WF_INITIATOR_LASTNAME> will give "John Smith"
Process.Id
12
Action initiator information
MANAGER_FIRSTNAME
TEXT
Process.Name
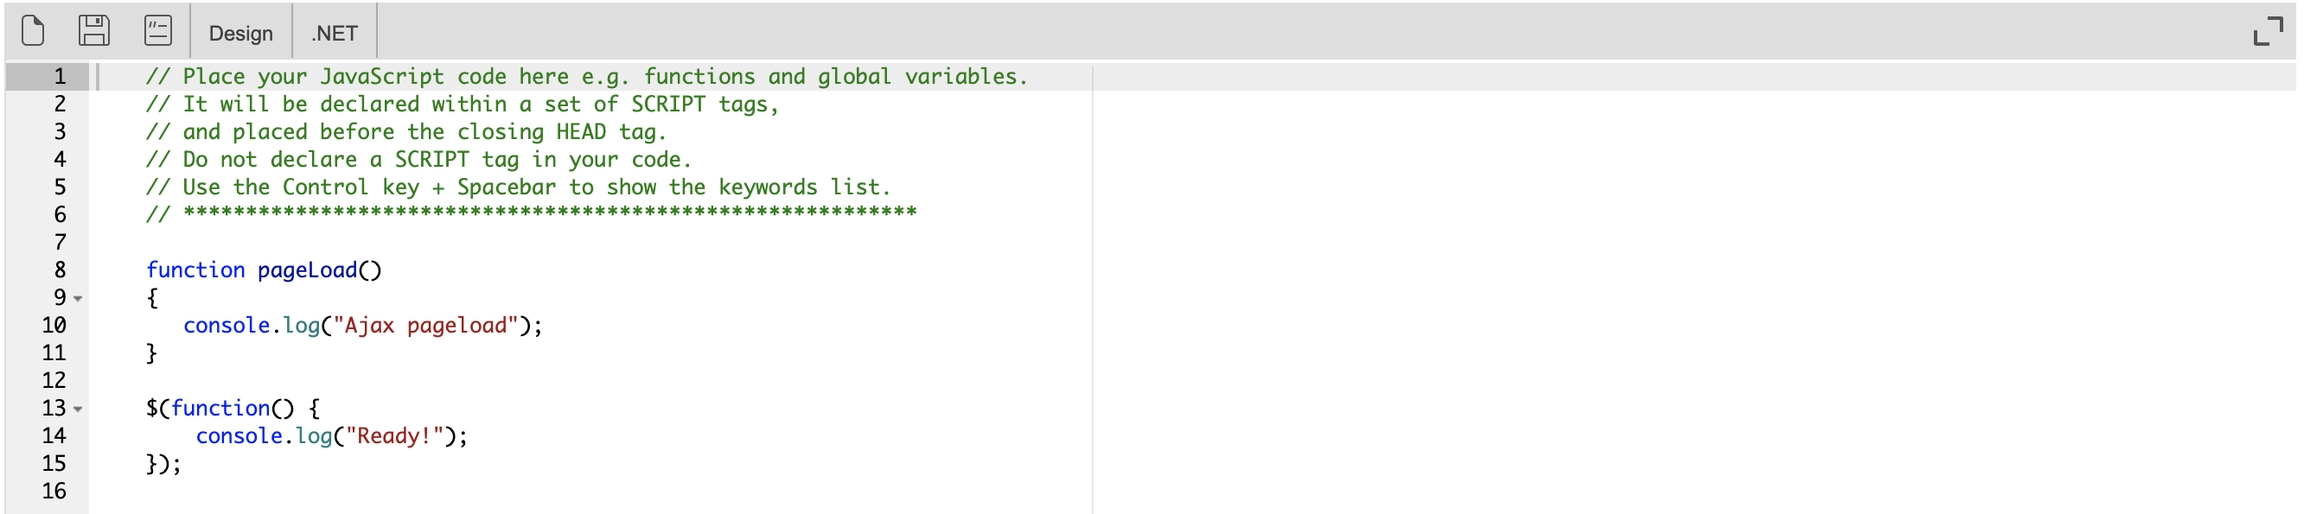
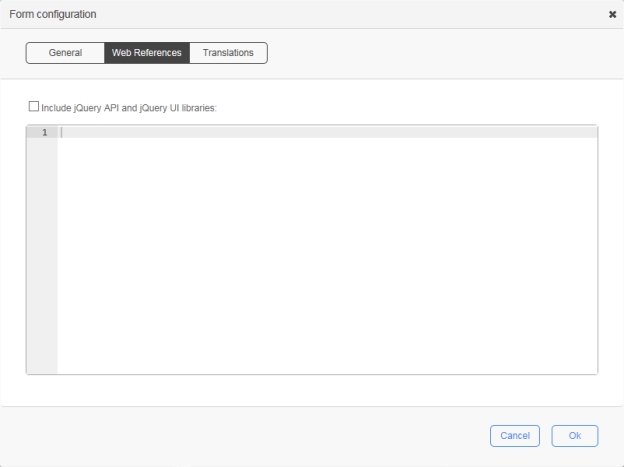
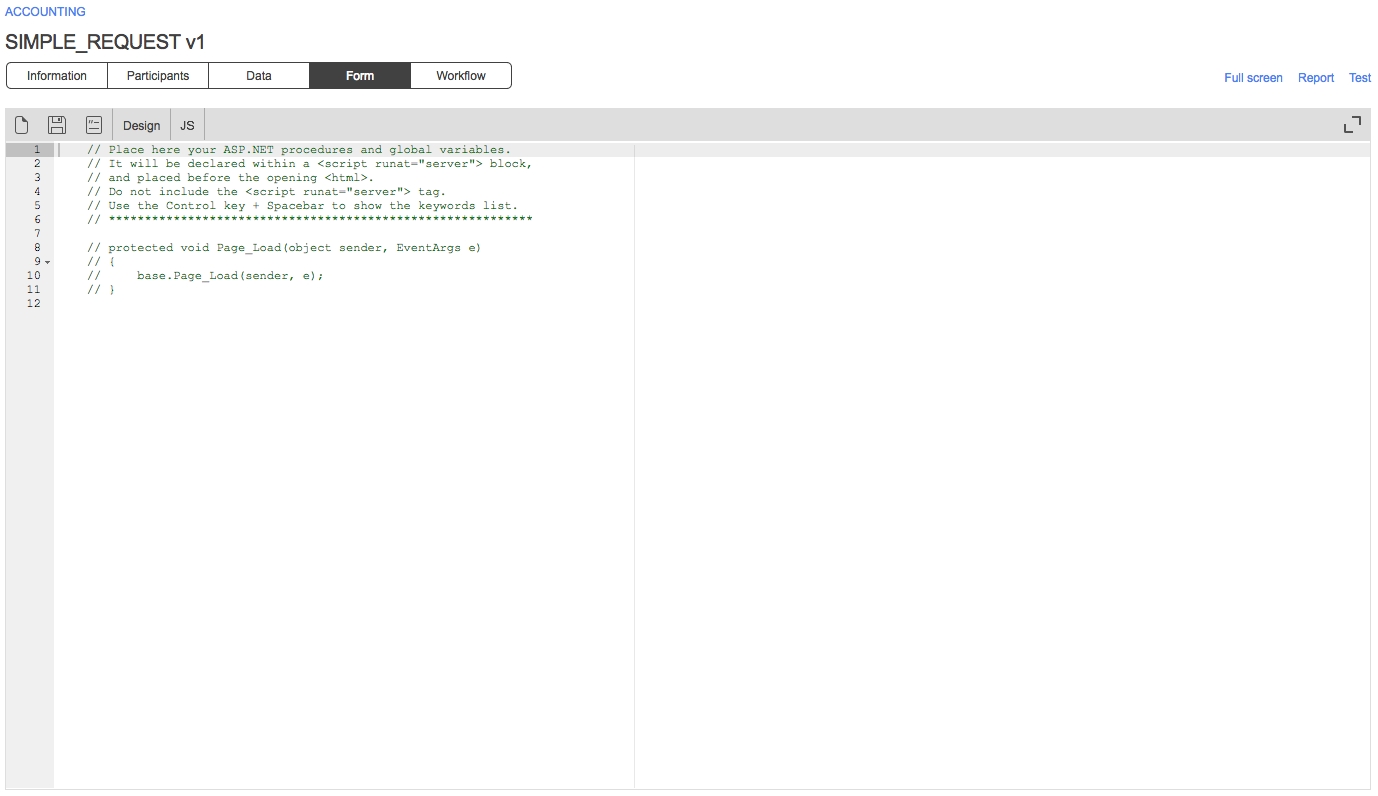
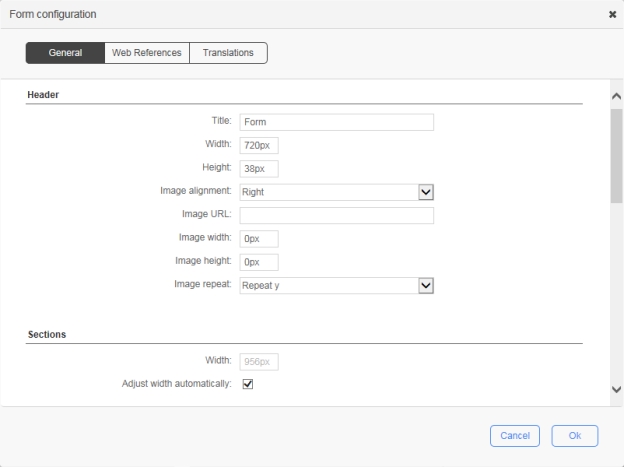
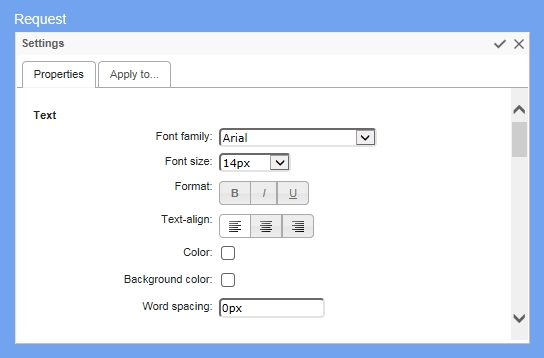
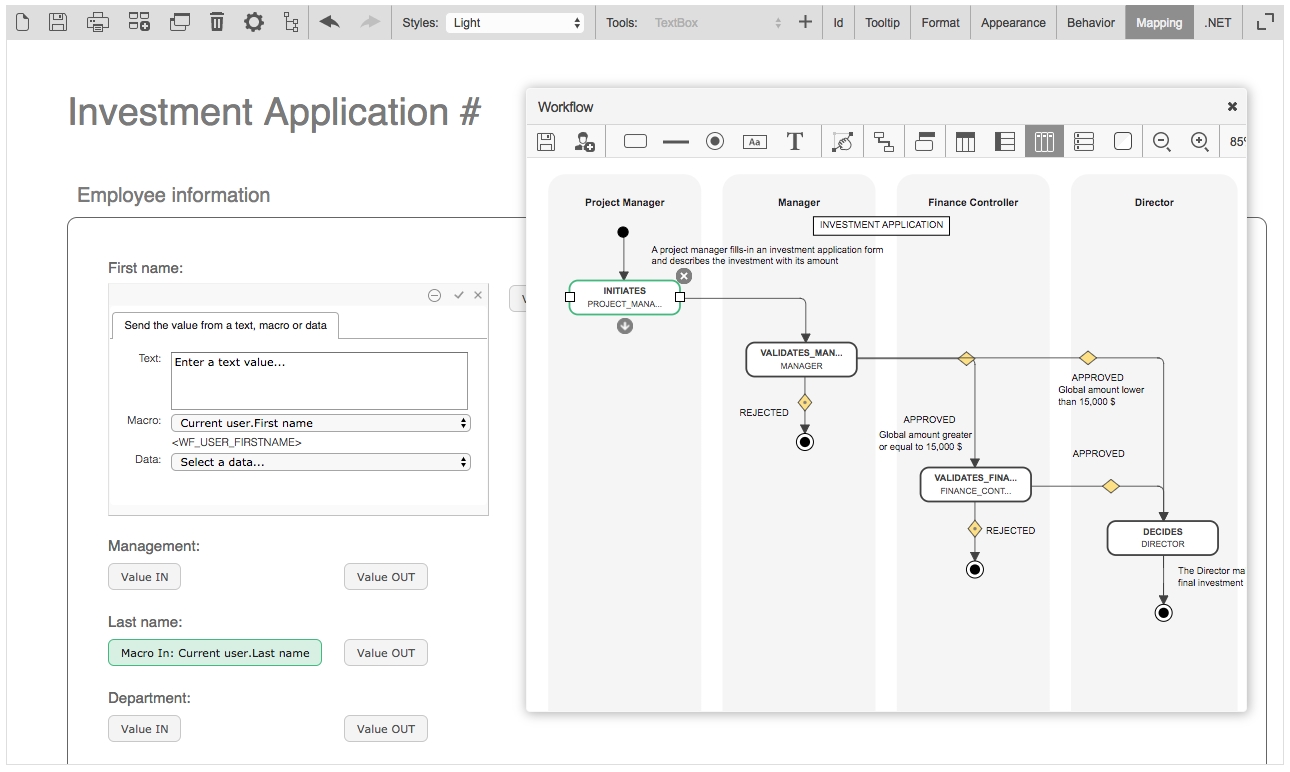

<configuration>
<appSettings>
<add key="MySecretKey1" value="4n(#N$HT0$Bohv!" />
<add key="MySecretKey2" value="9et9tzV{Hnn]EsDE" />
<add key="MySecretKey3" value="e#8BHvXa8N*LvFaY" />
<add key="EngineMacroAppSettings" value="MySecretKey1, MySecret*" />
</appSettings>
</configuration>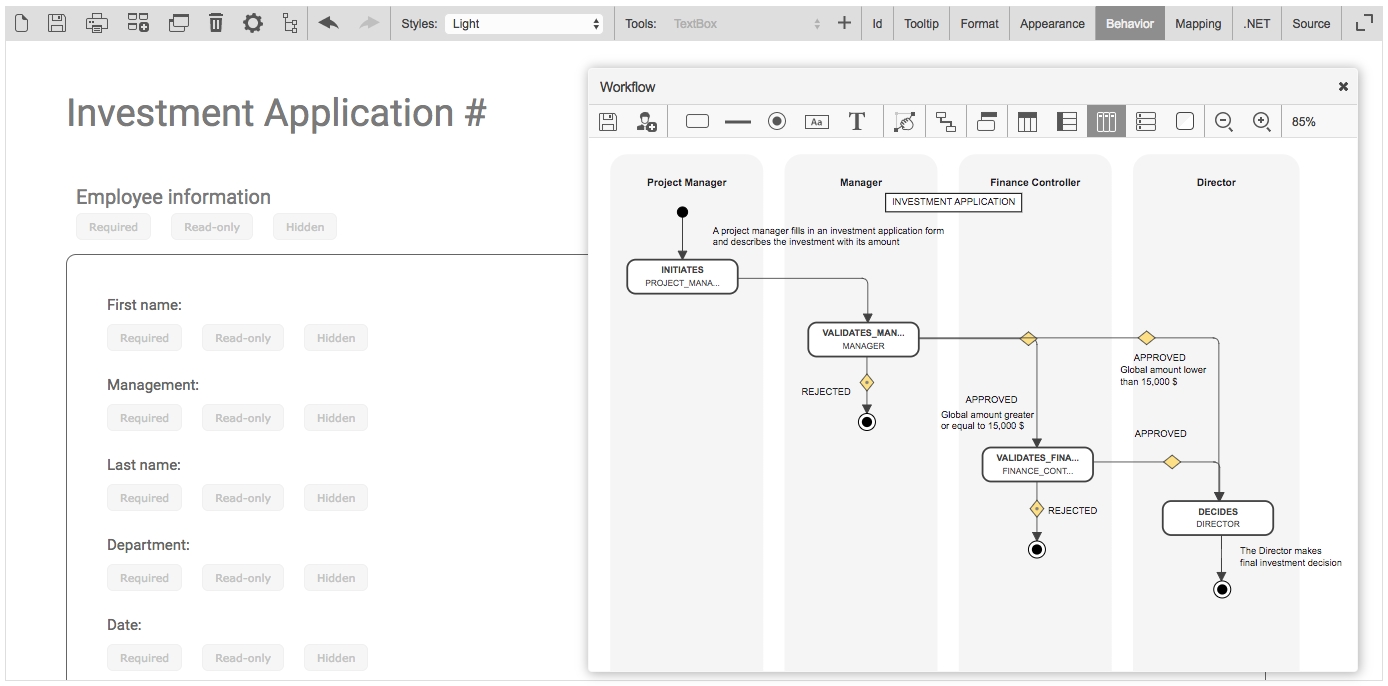
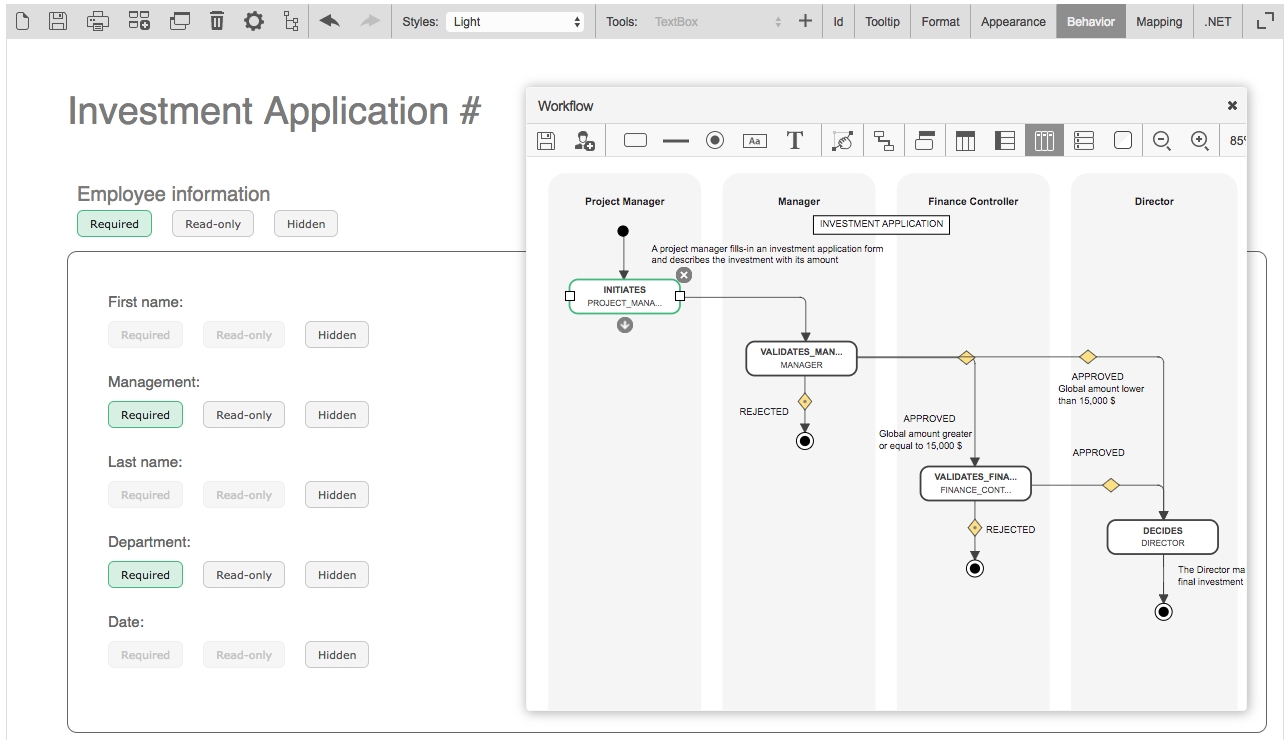
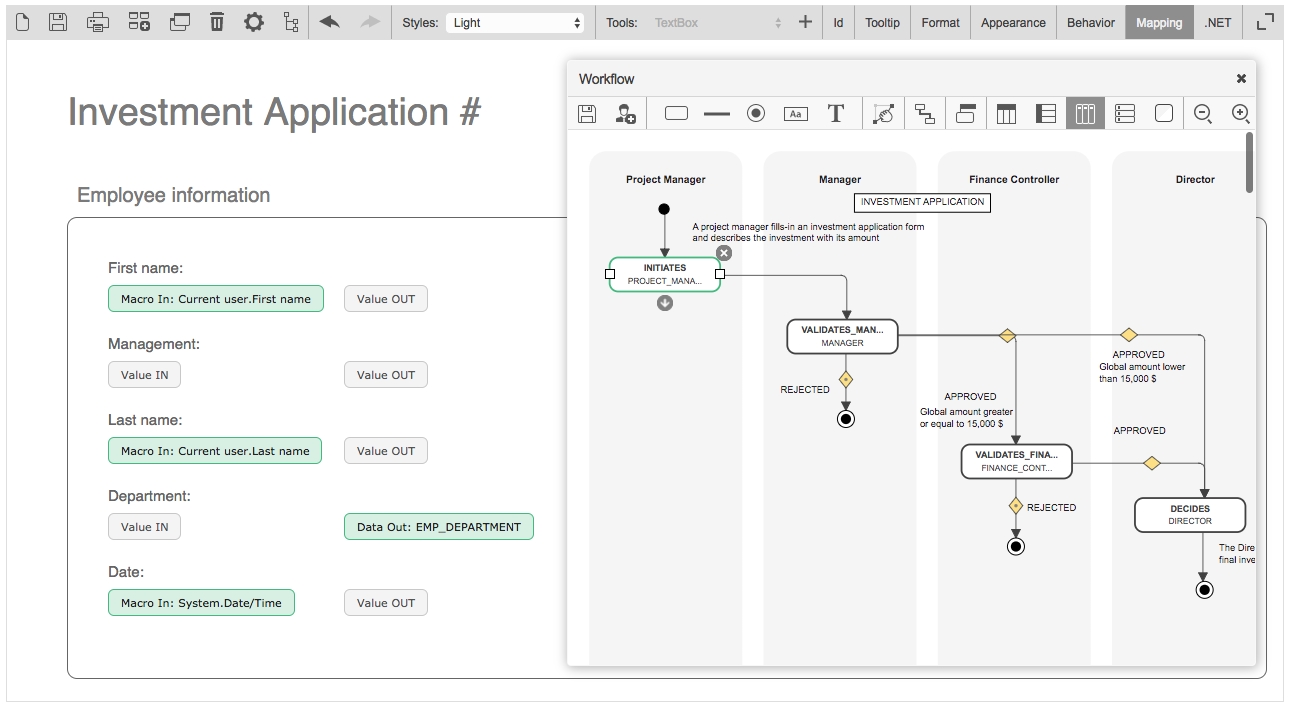
The Directory Synchronization module provides an efficient way to synchronize WorkflowGen users and groups with one or more existing enterprise directories.
The following are some key points about synchronization:
The synchronization process can be manual or automatic.
The built-in WORKFLOWGEN directory cannot be synchronized.
A user’s username must be unique across all WorkflowGen directories.
You can synchronize multiple directories or multiple portions of a directory with different connectors.
In the case of an account deletion, the user will either be archived or deactivated, depending on parameters specified. If archived, the username will then be renamed and the account disabled.
It is recommended that you synchronize a new user account with the New user default status option set to Inactive. These new accounts can later be activated manually by the Administrator in the user/group lists, or automatically by using the self-activation feature.
Only users with an Administrator profile can access the synchronization module.
From the WorkflowGen Administration Module, you can list the directory synchronizations, consult synchronization parameters, or add new synchronizations.
When creating a new synchronization that is based on Active Directory, LDAP, or TEXT, the following fields will appear to define the method of synchronization.
Once saved, it's no longer possible to change the directory connector.
For the text connector, the column separation character in the text file can be a semicolon (;), a comma (,), or a Tab character.
This field makes it possible to specify a path to access the files for the text connector. It takes as a value the path where the files are located, followed by the synchronization name.
For Active Directory, an LDAP path is required. Only a single LDAP path is supported per connector.
For an LDAP query, an LDAP query must be specified to query user accounts.
For an LDAP query, an LDAP query must be specified to query groups.
For Active Directory or LDAP connectors, a login and password may be required to provide access to the directory server.
For the Active Directory connector, define if the synchronization should include only the container of the targeted OU or include all the children of the targeted OU.
With WorkflowGen, groups and users can be synchronized. User synchronization is required, but group synchronization can be activated or deactivated.
In order to perform synchronization, the module uses a field to identify the users, and defines the additions, deletions, or updates. The default field is USERNAME, but you can choose any field from WorkflowGen (e.g. Ads_Path, EMPLOYEENUMBER, etc.) as long as it is processed by the connector.
As with users, parameters can be set for the group synchronization field.
To facilitate importing, and in certain cases to avoid double entries concerning user names, it is possible to prefix usernames with a character string.
📌 Example: Domain\
To facilitate importing and to avoid, in certain cases, double entries concerning group names, it is possible to prefix the group names with a character string.
📌 Example: Domain\
There are three synchronization modes: Add only allows new users to be imported, Add and modify also allows data for existing users to be updated, and Add, modify and delete has an additional function that enables archiving of WorkflowGen users who are not included in the Imported Directory.
Add only: During synchronization, any user that exists in the directory to be imported but does not exist in the WorkflowGen directory will be added to the latter. Data for existing users will not be modified. In order to be added, a user must at least have a user name (USERNAME) and a last name (LASTNAME). If this condition is not satisfied, an error occurs and the add is cancelled. In case of a defect with one of these values (USERNAME and LASTNAME), an alert (WARNING) is generated.
Add and modify: This type of synchronization functions the same as the preceding one with regards to additions. It also allows you to update data for users who are already present in the directory and are to be synchronized. In this way, data for a user present in the WorkflowGen directory and in the directory to be imported will be updated.
There are three synchronization modes: Add only allows only new groups to be imported, Add and modify allows data for existing groups to be updated, and Add, modify and delete has an additional function that enables archiving of WorkflowGen groups that are not included in the imported directory.
This option defines the default status of new user accounts that are created during the synchronization. Set the status to Active if you want a new user account to be activated by default. Set the status to Inactive if you want to manage a new user account activation manually, or to enable the user self-activation feature. This is recommended for clients who are using the per-user license mode.
This option allows an inactive new user account to activate itself when logging into WorkflowGen for the first time. The ‘Inactive’ new user default status option must be selected in order to use this option.
In order to provide proper user tracking in WorkflowGen, when a deletion request is generated, users that have performed actions are not actually deleted; you can either deactivate them or archive them. Once archived, the user will retain their unique internal ID, but their username will be renamed with an archive suffix and sequence number.
Triggering can occur manually (using the Synchronize button) or automatically.
Manual: Manual synchronization makes it possible to perform synchronization on an on-demand basis only. To do this, click the Synchronize button on the synchronization file concerned.
Test: This mode has the same running mode as manual synchronization, except that processing is, in reality, not performed. Instead, it is only simulated in order to anticipate if synchronization will take place correctly or not. To do this, click the Test button. A synchronization test is logged in the same way as a real synchronization.
Automatic: Data synchronization can take place automatically. In this case, a scheduled task analyzes the configuration of all the synchronizations on a daily basis, and subsequently runs the process.
If synchronization is performed automatically, you can choose the frequency for synchronization. This can be every day, once a week, or once a month. For automatic synchronization, see the section for instructions on how to set specific dates and times for the operation.
The purpose of the connector is to import users and groups from Active Directory into a WorkflowGen directory. The connector operates with the LDAP protocol using ADSI (Active Directory Service Interface). Access to Active Directory is read-only.
Read-only LDAP access to Active Directory is required for an anonymous account or for an account that has access to the Active Directory server.
If the Active Directory server is located behind a firewall, the LDAP protocol must be open.
You can use the ADSVIEW utility tool provided in the setup package to check that your LDAP path refers to the correct container to retrieve the users and groups of your directory.
The connector needs an LDAP path in order to retrieve the data in Active Directory. This path consists of:
The protocol: LDAP://, in this case.
The name of the server or its IP address.
Optionally, the port separated from the name of the server with : (colon). Default: 389
In order to run the query that is needed to synchronize the users, the Organization (O) and the Organizational Units (OU) must be specified starting from the bottom upwards, preceding them with DC= and separating them with , (comma).
An Active Directory structure is as follows:
Top level Domain (DC): thecompany.com
Organization unit (OU): group within the domain: BusinessUnit2
Sub-unit (OU): sub-group within the domain: IT Department
In order to access users and groups of IT Department, the LDAP path would be:
The LDAP path does not support the . operator, but it does support spaces. Therefore, the .com is identified by the DC=com operator.
CN is also supported as a container type.
Only one branch of the directory can be associated with a given directory. If multiple OUs at the same level must be queried, then the parent of both OUs must be queried, or two directories created. For example, if the structure /Company/Department1 and /Company/Department2 and /Company/Department3
For more information, see .
Synchronization is performed for users. However, it is also possible to synchronize groups, and consequently group user memberships. You can import data directly from the OU or the container that is the target path. You can retrieve data from the child containers by activating the Deep search mode.
For users to be synchronized, their sn and sAMAccountName attributes must be set in Active Directory. These map to Last name and Username, respectively.
The Active Directory connector does not take into account the Disabled property of AD user accounts; these accounts will therefore be synchronized as active users. If you don't want the synchronization to include inactive AD accounts, you'll need to use the instead, with the (!(userAccountControl:1.2.840.113556.1.4.803:=2)) filter added to the user synchronization query. As well, make sure to set the desired behavior for the If a user is archived option to either Archive (default) or Deactivate whenever an existing account becomes inactive in AD.
User synchronization field and Group synchronization field are set to System identifier by default.
If you have an existing WorkflowGen installation that uses an Active Directory connector for synchronization, we recommend switching the user and group synchronization fields to System identifier, since it is a unique identifier for each user and group object in Active Directory.
The information is retrieved in Active Directory using the LDAP path. As such, it provides an in-depth access to the data by targeting the OU from which the users and groups are to be retrieved.
The following tables list the mapping between the key-entry fields for a user and the field names with Active Directory. These mappings can't be edited, so if you want to edit them, you'll need to use the directory LDAP connector (see below).
The purpose of the LDAP connector is to import users and groups from a generic LDAP directory (e.g. AD, Sun ONE, ADAM, etc.) into a WorkflowGen directory. The connector operates with the LDAP protocol and the connection is performed as read-only.
Read-only LDAP access is required for an anonymous account or for an account that has access to the LDAP server. If the LDAP server is located behind a firewall, the LDAP protocol must be open.
The connector needs an LDAP query in order to retrieve the data in the directory. This query consists of:
The protocol: LDAP://, in this case.
The name of the server or its IP address.
Optionally, the port separated from the name of the server with : (colon). The default port is 389.
An LDAP structure is as follows:
Top level Domain (DC): thecompany.com
Organization unit (OU): Group within the domain: BusinessUnit2
Sub-unit (OU): Sub-group within the domain: IT Department
In order to access users and groups of IT Department, the LDAP queries would be (assuming an Active Directory LDAP structure):
To use a specific CN referencing two groups, the following query filters may be used:
Only one user and group query can be associated with a given directory. If multiple OUs at the same level must be queried, then the parent of both OUs must be queried, two directories created, or a specific query filter devised that includes both OUs.
For example, if the structure /Company/Department1 and /Company/Department2 and /Company/Department3 exists, and only departments 1 and 2 must be queried, then either the entire /Company
Synchronization is performed for users. However, it is also possible to synchronize groups, and consequently, group user memberships.
For users to be synchronized, their sn and sAMAccountName attributes must be set in Active Directory. These map to Last name and Username, respectively.
You can import data directly from the OU or the container that is the target path. You can also retrieve data from the child containers by activating the Deep Search Mode.
The default synchronization fields are set as follows:
Users: System identifier
Groups: name (sn)
The following tables list the mapping between the key-entry fields for a user and the field names with LDAP. These mappings can be edited by selecting the Edit mapping button on the directory editing page.
Make sure to save the field mapping whenever you add or modify an LDAP query.
The purpose of the text connector is to import users and groups using text files into a WorkflowGen directory.
The text connector requires three different text files:
User: One text file that contains the data related to the users to synchronize.
Group: One text file that contains the data related to the groups to synchronize.
Usergroup: One text file that contains the relationships between the users and the groups according to the selected synchronization fields.
Synchronization takes place for the users, but it can also be activated for groups. To do this, check the corresponding box in the synchronization configuration sheet.
Since files to be imported have a standard suffix, use Filepath and key in the path followed by the part that is common to the names of the three files.
If you decide to name your import importWorkflowGen and you have saved it to the DRIVE:\Extract\ directory, you will need to have the importWorkflowGen_USER.txt file in this directory. If you want to perform group synchronization as well, you also need the importWorkflowGen_GROUP.txt and importWorkflowGen_USERGROUP.txt files. When setting the parameters for synchronization, once you have chosen the Text connector, enter DRIVE:\Extract\importWorkflowGen in Filepath.
Data import files must have suffixes as described in the following manner:
The user file must end with _USER.txt
The group file must end with _GROUP.txt
The group user member file must end with _USERGROUP.txt
The rest of the file name must be the same for the three files.
Text files begin with a line listing each of the property names separated with a character that is defined as a constant in the connector file. Each line then corresponds to a record, such as a user, with the values also separated by the delimiting character. If a property is empty, it must nevertheless be delimited by the separating character. The default delimiter is ; (semicolon).
The group user member file only has two fields: synchronization fields for groups and for users. These fields are chosen in the directory synchronization module. As well, it is possible to prefix the names of these fields in order to avoid cases where a field name for synchronizing users is the same as that for groups. These parameters are set in the Configuration Panel in the Administration Module when setting the Active Directory synchronization values.
For example, if the user synchronizing field is Username and the field for the groups is name, the file must contain the GROUP_sAMAccountName and USER_sAMAccountName fields.
With text files exported from Active Directory, the connector needs the LDAP path in order to allow it to rebuild the ADSPATH property for the users.
The following tables list the properties that are needed for synchronizing users, with their equivalents in WorkflowGen. These mappings define the column names in the text file and can be edited by selecting the Edit mapping button in the directory editing page.
These are the required fields for the group user member file:
Synchronization field name for groups (e.g. GROUP_SAMAccountName)
Synchronization field name for users (e.g. USER_SAMAccountName)
You can generate an export text file for user data by using the following command:
In this case SERVERNAME is the name of the server hosting the directory, file.CSV is the name of the resulting text file, and OU=myOu,DC=mycompany,DC=com is the path to the container in which you want to put the list of users.
To execute this synchronization automatically, this data export process must be added to the task scheduler before the synchronization script is run. To add a task, see the administrator documentation for the Synchronization module. This method does not allow groups to be synchronized.
The SCIM connector lets you define a new directory that will be used by Microsoft Entra ID (formerly Azure Active Directory) to synchronize users and groups. For information on how to configure this, see the section in the guide.
The self-provisioning connector is a directory connector that automatically creates and synchronizes a user based on the user's session token claims that contain claims from the OpenID Connect provider ID token. For instructions on how to configure this, see the section in the .
Synchronization logs are set up on the Directory synchronization tab in the Configuration Panel; see in the section.
Each synchronization, whether manual or automatic, is logged and available to be viewed by Administrators only, in the Synchronization logs option in the Directories menu.
By default, 31 days of logs are maintained. This parameter can be changed by an Administrator in the Configuration Panel.
Each log provides the details of each synchronization action performed, including listing all users and groups added, modified, or deleted (archived). This also includes warnings (such as a missing email) and errors (such as a missing last name). Log files can be viewed or deleted.
Log files can be found on the WorkflowGen server under the \wfgen application folder at the following location: \wfgen\App_Data\LogFiles\Dir\Synchro.
Add, modify and delete: You can delete users from a WorkflowGen directory through synchronization. In this mode, the user is deleted when they are present in the WorkflowGen directory but not in the directory to be imported.
The path in the server's LDAP tree structure.
/CompanyLDAP query filters are not supported.
The group query is inherently the same as the user query.
Groups and users linked to them must exist within the same LDAP path, otherwise mismatched group/user combinations will be excluded from the synchronization and appear as errors in the synchronization log. This typically occurs when Active Directory groups are defined as CNs within an OU that point to users that are in fact defined in other OUs outside the scope in the LDAP path provided.
For example, this situation will arise if the LDAP path is defined to link only to the /Company/Department1 OU, and within this OU the /Company/Department1/Team1 group points to users in /Company/Department2. In this case, it is recommended to either choose an LDAP path that includes all OUs that are involved in the groups, or to use the LDAP connector type instead to create more refined individual user/group queries and filters.
(none)
Manager
manager
Phone
telephoneNumber
Mobile
mobile
Fax
facSimileNumber
Pager
pager
Office
physicalDeliveryOfficeName
Department
department
Company
company
Job title
title
Employee type
employeeType
Initials
initials
Title
personalTitle
Employee number
employeeID
Postal address
postalAddress
Zip code
postalCode
City
l
State/Area
st
Country
co
LDAP path
ADsPath
Display name
distinguishedName
Distinctive name
cn
Extended attribute 1
extensionAttribute1
Extended attribute 2
extensionAttribute2
Extended attribute 3
extensionAttribute3
Extended attribute 4
extensionAttribute4
Extended attribute 5
extensionAttribute5
System identifier
objectSid
cn
Distinctive name
DistinguishedName
System identifier
objectSid
The top level domain.
The LDAP query and/or filters.
Groups and users linked to them must exist within the same LDAP path, otherwise mismatched group/user combinations will be excluded from the synchronization, and appear as errors in the synchronization log. This typically occurs when AD groups are defined as CNs within an OU that point to users that are in fact defined in other OUs outside the scope of the LDAP path provided.
For example, if the LDAP path is defined to link only to the /Company/Department1 OU, and within this OU the /Company/Department1/Team1 group points to users in /Company/Department2, this situation will arise. In this case, it is suggested to choose a user query that includes all OUs that are involved in the groups.
(none)
Manager (must be a valid username)
manager
Phone
telephoneNumber
Mobile
mobile
Fax
facSimileNumber
Pager
pager
Office
physicalDeliveryOfficeName
Department
department
Company
company
Job title
title
Employee type
employeeType
Initials
initials
Title
personalTitle
Employee number
employeeID
Postal address
postalAddress
Zip code
postalCode
city
l
State/Area
st
Country
co
LDAP path
ADsPath
Display name
distinguishedName
Distinctive name
cn
Extended attribute 1
extensionAttribute1
Extended attribute 2
extensionAttribute2
Extended attribute 3
extensionAttribute3
Extended attribute 4
extensionAttribute4
Extended attribute 5
extensionAttribute5
System identifier
objectSid
cn
Distinctive name
DistinguishedName
System identifier
objectSid
(none)
Manager (must be a valid username)
manager
Phone
telephoneNumber
Mobile
mobile
Fax
facSimileNumber
Pager
pager
Office
physicalDeliveryOfficeName
Department
department
Company
company
Job title
title
Employee type
employeeType
Initials
initials
Title
personalTitle
Employee number
employeeID
Postal address
postalAddress
Zip code
postalCode
City
l
State/Area
st
Country
co
LDAP path
(none)
Display name
(none)
Distinctive name
(none)
Extended attribute 1
(none)
Extended attribute 2
(none)
Extended attribute 3
(none)
Extended attribute 4
(none)
Extended attribute 5
(none)
System identifier
(none)
Field
Active Directory default mapping
Username
sAMAccountName
Password
userPassword
Name
sn
First name
givenName
mail
Field
Active Directory default mapping
Name
sAMAccountName
Description
Description
mail
Group code
groupCode
LDAP path
AdsPath
Field
LDAP default mapping
Username
sAMAccountName
Password
(none)
Name
sn
Firstname
givenName
mail
Field
LDAP default mapping
Name
sAMAccountName
Description
Description
mail
Group code
groupCode
LDAP path
AdsPath
Field
Text default mapping
Username
sAMAccountName
Password
(none)
Name
sn
Firstname
givenName
mail
Field
Text default mapping
Name
sAMAccountName
Description
Description
Default time zone
Display name
Default time zone
Display name
Default time zone
LDAP://servername:port/OU=IT Department,OU=BusinessUnit2,DC=thecompany,DC=comLDAP://servername:port/DC=thecompany,DC=com;(&(objectCategory=person)(objectClass=user)(sn=*)(sAMAccountName=*)(memberOf=CN=TheSpecificCN,OU=LowestOU,OU=HigherOU,DC=thecompany,DC=com)(!(userAccountControl:1.2.840.113556.1.4.803:=2)));adsPath,objectSid,sAMAccountName,sn,GivenName,mail,telephoneNumber,mobile,pager,facSimileTelephoneNumber,department,company,EmployeeType,EmployeeId,title,initials,postalAddress,postalCode,physicalDeliveryOfficeName,st,L,co,manager;subtreeLDAP://servername:port/DC=thecompany,DC=com;(&(objectClass=group));adsPath,objectSid,sAMAccountName,Description;subtreeLDAP://servername:port/DC=thecompany,DC=com;(&(objectCategory=person)(objectClass=user)(sn=*)(sAMAccountName=*) (memberOf=CN=TheSpecificCN,OU=LowestOU,OU=HigherOU,DC=thecompany,DC=com)(!(userAccountControl:1.2.840.113556.1.4.803:=2)));adsPath,objectSid,sAMAccountName,sn,GivenName,mail,telephoneNumber,mobile,pager,facSimileTelephoneNumber,department,company,EmployeeType,EmployeeId,title,initials,postalAddress,postalCode,physicalDeliveryOfficeName,st,L,co,manager;subtreeLDAP://thecompany/dc=thcompany,dc=com;(&(objectClass=group)(|(sAMaccountName=Group1)(sAMaccountName=Group2)));adsPath,objectSid,sAMAccountName,Description;subtreecsvde –f file.csv –s SERVERNAME –d "OU=myOu,DC=mycompany,DC=com" –p subtree –r "(objectClass=OrganizationalPerson)" –l "ADsPath,cn,displayName,givenName,sn,sAMAccountName,mail, telephoneNumber,mobile,pager,facSimileTelephoneNumber,physicalDeliveryOfficeName,department,company, initials,title,employeeID,employeeType,postalAddress,postalCode,l,st,co,personalTitle"sn;givenName;sAMAccountName;mail;
"USER1-01";"Paul Smith";"psmith";"[email protected]";
"USER1-02";"John Doe";"jdoe";"[email protected]";
"USER1-03";"Jack Ryan";"jryan";"[email protected]";
"USER1-04";"Ted Graham";"tgraham";"[email protected]";sAMAccountName;Description
"HR";"GRP1-01"
"IT";"GRP1-02"GROUP_sAMAccountName;USER_sAMAccountName
"HR";"psmith"
"HR";"jdoe"
"IT";"jryan"
"IT";"tgraham"EXECSQL requires the CONNECTION_NAME parameter, which corresponds to the connection name, and the QUERY parameter, which corresponds to the query to execute.
You can specify one or multiple commands per EXECSQL action. For this, the parameters must be prefixed by CMDx_, where x corresponds to the command number (e.g. CMD1_).
The supported query types are SELECT, INSERT, UPDATE, DELETE, SCALAR, and PROCEDURE.
The application supports SQL transaction management.
You can use a global connection for multiple commands. In this case, you must not prefix the CONNECTION_NAME parameter with CMDx_. It is not possible to use a global connection and a local connection (e.g. CONNECTION_NAME and CMD2_CONNECTION_NAME).
You can use a global transaction for multiple commands. In this case, you must not prefix the TRANSACTION parameter with CMDx_. It is not possible to use a global transaction and a local transaction (e.g. TRANSACTION and CMD2_TRANSACTION). It's necessary to define a global connection to be able to define a global transaction.
Application logs are available. These can be specified by setting the value of the ExecSqlLogLevel parameter in the web.config file to 0 to deactivate logs, 1 for error logs, 2 for information logs, or 3 for debug logs; the default value is 0.
Parameter
Type
Direction
Description
CONNECTION_NAME
TEXT
IN
Name of the connection to use
The connection name must be defined in the WorkflowGen web.config file.
QUERY
TEXT
IN
Query to execute
Parameter
Type
Direction
Description
TYPE
TEXT
IN
Type of query to execute
The supported types are:
SELECT (default)
INSERT
TRANSACTION
TEXT
IN
When set to Y, the application triggers a SQL transaction before the request execution and will perform a commit or rollback based on the result.
Default: N
ON_ERROR
For each query, you can define parameters to use during execution. These parameters can be defined in two ways: either by using the QUERY_PARAM prefix or by using an at sign (@).
You can use QUERY_PARAM_MyParam or @MyParam, where MyParam corresponds to the name of the parameter defined in the query.
Parameter
Type
Direction
Description
QUERY
TEXT
IN
SELECT * FROM USERS WHERE LASTNAME = @UserLastname
QUERY_PARAM_UserLastName / @UserLastName
TEXT
IN
Doe
Parameter
Type
Direction
Description
ERROR_MESSAGE
TEXT
OUT
Contains the error message in the event that the parameter value contains CATCH and an exception is thrown during execution
RESULT_COMMIT
TEXT
OUT
Indicates whether a commit was performed on the transaction
Possible values:Y or N
Parameter
Type
Direction
Description
RESULT_ROWx_fieldName
TEXT
NUMERIC
DATETIME
OUT
Contains the value of the fieldName column for row x
You must replace fieldname with your column name (e.g. LASTNAME) and x with the row number (e.g. 2).
RESULT_ROW_fieldName
TEXT
NUMERIC
DATETIME
OUT
Contains the value of the fieldName column for the first row returned
RESULT_JSON
Parameter
Type
Direction
Description
RESULT
NUMERIC
OUT
Contains the numeric result of a SCALAR type query
Parameter
Type
Direction
Value
CONNECTION_NAME
TEXT
IN
MainDbSource
QUERY
TEXT
IN
SELECT LASTNAME, FIRSTNAME, USERNAME FROM USERS
RESULT_JSON
Parameter
Type
Direction
Value
CONNECTION_NAME
TEXT
IN
MainDbSource
QUERY
TEXT
IN
SELECT LASTNAME as REQUEST_GRID_LASTNAME, FIRSTNAME as REQUEST_GRID_FIRSTNAME, USERNAME as REQUEST_GRID_USERNAME FROM USERS
FORM_DATA
Parameter
Type
Direction
Value
CONNECTION_NAME
TEXT
IN
MainDbSource
TYPE
TEXT
IN
INSERT
QUERY
Here's another possibility for query parameters:
Parameter
Type
Direction
Value
CONNECTION_NAME
TEXT
IN
MainDbSource
TYPE
TEXT
IN
INSERT
QUERY
Parameter
Type
Direction
Value
CONNECTION_NAME
TEXT
IN
MainDbSource
TYPE
TEXT
IN
UPDATE
QUERY
Parameter
Type
Direction
Value
CONNECTION_NAME
TEXT
IN
MainDbSource
TYPE
TEXT
IN
DELETE
QUERY
Parameter
Type
Direction
Value
CONNECTION_NAME
TEXT
IN
MainDbSource
TYPE
TEXT
IN
PROCEDURE
QUERY
Parameter
Type
Direction
Value
CONNECTION_NAME
TEXT
IN
MainDbSource
TYPE
TEXT
IN
SELECT
QUERY
Parameter
Type
Direction
Value
CONNECTION_NAME
TEXT
IN
MainDbSource
TYPE
TEXT
IN
SCALAR
QUERY
Parameter
Type
Direction
Value
CONNECTION_NAME
TEXT
IN
MainDbSource
CMD1_TYPE
TEXT
IN
INSERT
CMD1_QUERY
Parameter
Type
Direction
Value
CONNECTION_NAME
TEXT
IN
MainDbSource
CMD1_TYPE
TEXT
IN
INSERT
CMD1_QUERY
The Configuration Panel is used to configure the main settings for the WorkflowGen application. It can be accessed from the home page of the Administration Module or from the URL http://[servername]/wfgen/admin/Config.aspx.
Access to the Configuration Panel can be set in the WorkflowGen web.config configuration file located in the \wfgen directory of your site. To add administrators, add their user names (separated by commas) to the ApplicationConfigAllowedUsersLogin parameter. (The users must first have administrator profiles.)
The Configuration Panel is divided into the following tabs:
: General WorkflowGen settings (e.g. database connection string)
: User Portal settings (e.g. behavior, banner settings, etc.)
: Administration Module settings (e.g. language settings)
This is the type of database that WorkflowGen is using (Microsoft SQL Server).
The database scaling feature allows for the addition of database servers to significantly improve server performance and response times. The additional read-only replica database server can be used as a dedicated read-only server (SELECT SQL queries). The read-only database server is replicated from the existing master.
To test if the master database connection string entered is valid, click the Test button.
📌 SQL server example
The read-only replica database connection string. To test if the connection string entered is valid, click the Test button.
📌 SQL server example
Select the Enable checkbox to activate the database scaling feature.
If the multi-database option is enabled, the checkboxes of the different Portal components will be activated. If checked, the different components will use the read-only replica database. Otherwise, if left unchecked, it will use the primary database.
If the multi-database option is enabled, the different Portal modules will be activated. If checked, the different modules will use the read-only replica database. Otherwise, if left unchecked, it will use the primary database.
The base URL of the web application. You can specify the protocol to use (HTTP or HTTPS), the IP or DNS name of the web server, and/or the TCP port of the website. To test if the value entered is valid, click the Test button.
📌 URL example: http://www.mycompany.com/
You can choose between two delivery methods: Server, which will use your SMTP server to send email notifications, and Pickup directory, which will save email notifications in a pickup folder.
Server:
Host name: The SMTP server address
Port: The SMTP server port; if not set, the SMTP connection will use the default SMTP port (25)
To test the SMTP configuration, click the Test button and enter sender and recipient email addresses. An email will be sent to the address you entered.
See the section for information on how to configure instant messaging in WorkflowGen.
The SMS provider (Twilio).
The Twilio API URL.
The Twilio account security identifier.
The Twilio authorization token.
The telephone number of the instant message sender to display.
Enables instant messaging logs.
Select the authentication mode used to log in to WorkflowGen:
IIS: Users are authenticated by IIS.
Windows: Authentication and user passwords are managed in Windows.
WorkflowGen: Authentication and user passwords are managed in WorkflowGen.
Version 5 (Legacy) uses the same password management mode as earlier versions of WorkflowGen.
One-way Hashing (SHA256) stores hashed account passwords in the WorkflowGen database.
One-way Hashing (SHA256 FIPS compliant) stores hashed account passwords in the WorkflowGen database, compatible with Windows FIPS enabled mode.
Sets the maximum number of user login attempts before the account is locked. Enter 0 for unlimited attempts.
Sets the minimum length of user passwords.
You can specify a domain to remove from users' usernames when they log in to WorkflowGen. If this value is set to All, any domain name will be removed from the value.
The password management mode for directories, applications, SMTP server, and the Remote Approval incoming mail server.
AES (FIPS Compliant) mode uses symmetric password encryption, compatible with Windows FIPS enabled mode.
Version 5 (Legacy) uses the legacy symmetric password management mode.
Password encryption key.
The Windows Service identity to use in order to run the WorkflowGen services.
Sets what time zone is selected by default on the user’s home page on the Portal module. This is used when creating a new user account, whether manually or by directory synchronization. Since it is used only for account creation, it will not override the current user’s selected time zone.
Specifies which weekdays are normally off. This is used by WorkflowGen to calculate process and action deadlines.
📌 Example: Selecting Saturday, Sunday will exclude these days from deadline calculations.
Specifies at which hour the workday begins (based on the current server time zone). This value is used by WorkflowGen to calculate the process and action deadlines. It will be converted to GMT for calculations.
📌 Example: 8 specifies that deadlines are to start being calculated at 8:00 a.m. every day.
Specifies at which hour the workday ends (based on the current server time zone). This value is used by WorkflowGen to calculate the process and action deadlines. It will be converted to GMT for calculations.
📌 Example: 19 specifies that deadlines are to stop being calculated at 7:00 p.m. every day.
Specifies the time zone in which working hours begin and end.
Selects the country to be used to calculate the legal public holidays. This value is used by WorkflowGen to calculate the process and action deadlines, based on one of the DaysOff.*.resx files located in \wfgen\App_GlobalResources. These files can be updated and new ones can be created based on their regional settings. By default, it uses the DaysOff.en-US.resx resource file, which is based on the value of the EngineCountryDaysOff configuration setting in the WorkflowGen web.config file.
📌 Example: United States (English)
This value allows you to specify your custom days off.
📌 Example: 2/1, 11/1 specifies January 2nd and January 11th as holidays.
Defines the look and feel of the UI, including colors, margins, etc. The administrator can use the default skin or manually edit the CSS files to create a different look.
Customizes the WorkflowGen word that is displayed in the User Portal.
📌 Example: Acme Flow
Defines the Portal language. Selecting User preference allows the user to choose their language, but you can impose one by selecting it in the list, in which case the language selection option will be hidden in the Portal User settings panel.
Uncheck this to display process and action descriptions instead of code names.
Number of records displayed in different lists of the User Portal. Default: 10
Number of pages displayed in different lists of the User Portal. Default: 10
Limits the number of records displayed in a search or statistics (data) result list. Default: 1000
You can specify the maximum limit before a filter appears in user lists. Default: 100
Display mode of the New request link on the User Portal home page. You can choose between:
Display requests
Display requests grouped by category
Display categories and hide processes
When a new request is launched, you can choose how WorkflowGen behaves from the following:
Display the request follow-up form
Start the first action
Display the follow-up form of the first action
If this parameter is checked, the user has to confirm the launch of the new request.
Display the follow-up form of the action
Launch the action
Display the follow-up form of the request
Display the follow-up form of the request or the next action
Display the follow-up form of the request (except if action to assign)
Display the follow-up form of the request (except if action to do)
Specifies if the action completion treatment is processed in the background (threading). This option can sometimes improve the response time to the end user or prevent timeout issues, especially if there are large amounts of processing after a web form submission.
Maximum number of records in lists on the User Portal home page before showing pages.
URL of the banner displayed at the top of the User Portal.
📌 Example: http://www.mycompany.com/welcome.htm
Height of the banner (in pixels) displayed at the top of the User Portal.
📌 Example: 50
Specifies if the search result is redirected to the follow-up form when there is only one item found.
Display the result as a customizable report by default
Enable Quick approval by default: Enables the Display Quick approval buttons option in the Search form by default.
Enable custom column editing for process managers and supervisors
Displays URLs and email addresses as clickable links.
Specifies if the processes are grouped by category in the drop-down list box used to switch to the single process view.
Specifies the default width (in pixels) of the columns that display the associated data when the end-user UI is switched to the single-process view. Default: 150
Allows you to enable or disable the Quick View functionality in the User Portal.
Specifies the process data value to display within the Quick View dialog box.
📌 Example: FORM_ARCHIVE
You can choose between two different events to trigger the Quick View dialog box to open: Click (Default) or Hover.
This parameter allows you to enter the same names and data types, which can then be used in a multi-process view.
For example, if you have a process data called CUSTOMER (TEXT) that is used in most of your processes, you can define it as Portal common process data by entering it in the Common process data name list field.
User calling cards are enabled by default. Uncheck this to disable calling cards.
Specifies the maximum number of days, hours, or minutes before deleting requests in progress that contain only one action that is not yet completed and assigned to the requester only. Defaults: 3 and days
The maximum number of simultaneous launches of the same process action. This parameter allows you to avoid simple loops at runtime.
📌 Example: 100
When this is selected, managers and supervisors can delete requests even if the process status is set to Active.
Uncheck this to hide data with empty values in the follow-up form.
Request data will be locked during the time period specified in order to avoid "competition" for access to the same data.
📌 Example: 5
Activate email notification: This parameter allows you to enable or disable email notifications. This will affect all processes regardless of their status.
Notify the user when they are both the sender and recipient of the notification: If this parameter is enabled, email notifications are sent even if the sender and recipient email addresses are the same.
Notify the delegator: If this parameter is enabled, email notifications are sent to the delegator and all the delegates concerned. Otherwise, only to all the delegates.
Sets the default sender name for email notifications. If not set, the default sender email address will be displayed as the sender name.
Sets the default email sender for email notifications. This is only used if a notification is sent by the system.
📌 Example: [email protected]
Default email address for replies to email notifications.
Maximum number of users to send email notifications to per notification.
📌 Example: 100
Maximum size of attachments to requests in megabytes.
If the user has no default or preferred language selected, this parameter is used to specify which language to use for the email notification texts.
Displays URLs and email addresses as clickable links.
This sets the type of information stored in the notification log file.
0 – Disabled: No log file will be created.
1 – Errors only: The log file will display only information pertaining to errors.
2 – All notifications: The log file will contain information pertaining to errors and notifications, such as the time stamp and the recipient’s email address.
If this parameter is checked, end-users can delegate their tasks to other WorkflowGen users. Otherwise, only administrators are able to manage the delegation rules from the Administration Module.
This is used to specify the URL of the host application. For example, in SharePoint, you can create a webpart to display and use the WorkflowGen User Portal or Administration Module in the same way as a stand-alone web browser. This way, a user can remain in the SharePoint portal and use WorkflowGen at the same time without having to work in separate windows.
In this case, you have to specify the host URL in order for WorkflowGen to function properly inside the SharePoint webpart.
CORS configuration is required to use the host application feature. See the section in the WorkflowGen Technical Guide for instructions on how to enable it.
This option will force WorkflowGen to throw an assignment exception error when a self service action is assigned to an invalid user. You should design your process to handle assignment exceptions, otherwise it will halt your workflow.
Number of processes displayed in statistic reports.
📌 Example: 10
Number of users displayed in statistic reports.
📌 Example: 10
Number of actors displayed in statistic reports.
📌 Example: 10
Number of requesters displayed in statistic reports.
📌 Example: 10
Displays URLs and email addresses as clickable links.
You can choose between two different formats when exporting the results generated from a data statistics report. The available formats are:
CSV (comma-separated values): This format does not support Unicode characters.
✏️ Note: You can configure different separators for certain languages and/or cultures by modifying the CSVFieldDelimiter value in the language's \wfgen\App_GlobalResources\Advantys.Workflow.Web.UI.Portal.*.resx file.
Unicode text (tab separator): The values are separated by tab characters but the Unicode character range is supported.
Enables or disables User Portal comments.
Sets the total number of comments that can be displayed on the home page.
Sets the follow-up form comments list auto-refresh rate in milliseconds. Use the value 0 to disable the auto-refresh feature. Default: 300000 (5 minutes)
Sets the action runtime menu comments list window pop-up width size in pixels. Default: 380
Sets the action runtime menu comments list window pop-up height size in pixels. Default: 550
Sets the default comment list sort by field. Default: date
Sets the default comment list sort order. Default: ascending
Expand the comments view displays the comment list the first time the follow-up form is displayed. Default: unchecked (hidden)
Allows you to define the application language for the Administration Module. Selecting User preference allows users to choose their own language, but you can impose one by selecting a language from the list.
Number of records displayed in lists of the Administration Module. Default: 100
Number of pages displayed in lists of the Administration Module. Default: 10
You can specify a maximum limit before a filter appears in the users’ lists. Default: 100
If Restrict name encoding to ANSI character set is checked, only ANSI characters are permitted in the "Name" fields. If this parameter is not checked, only special characters (', ", tab, space, %, /, \, *) are discarded.
Enable this option to keep actions in their respective participants' swim lanes in the workflow designer.
Sets the default language for conditions: JavaScript or VBScript.
The databind data providers, separated by commas (,).
Sets the maximum number of undo operations in the form designer. Default: 30
When a new user is created, the language selected here will be applied to their profile as their default language.
Enables the deletion rules check for users, groups, and directories. Disable this option to improve list and form response times.
Disables process managers’ permissions to modify a global participant’s information (either via the process participants or while importing a process) such as name, description, and user/group/directory associations.
If this option is enabled, the directory synchronization will synchronize the group’s members only if the group is associated to at least one participant. This option is useful to reduce synchronization run time by skipping a group’s member synchronization when the group is not used in a participant.
Defines the maximum number of account deletions per synchronization run. This option is useful for batch account deletion in order to optimize synchronization performance. The default is 0 (unlimited).
If Automatically delete old log files is selected, the temporary XML files created by WorkflowGen are removed once the synchronization is complete.
If Display Update entries in logs is selected, the synchronization logs each action performed on the directory data.
Number of days before deleting the log files.
📌 Example: 31
If this is selected, warnings will be displayed in the log files.
Day of the week to perform the automatic weekly synchronization.
📌 Example: Monday
Date of the month to perform the automatic monthly synchronization.
📌 Example: 1 for the 1st of the month)
Hour of the day to perform the automatic monthly synchronization (in 24-hour format).
Maximum page size for page number based pagination (default: 30; maximum: 100).
Default page number for page number based pagination (default: 1).
Default page size for page number based pagination (default: 30).
Enable GraphiQL (default: disabled).
Enable data caching.
Enable debug mode.
The query execution timeout in milliseconds.
The operation execution timeout in milliseconds.
The maximum number of operations per query.
The maximum file size to send in FILE type parameter URLs in kilobytes.
The maximum content size of FILE type parameters encoded in base64 (only recommended for small files, e.g. under 1 MB).
The local or remote folders where files used by FILE type parameters are stored.
You can disallow input file allowed folders by leaving this field empty, or allow certain folders only by entering comma-separated values according to the table below:
You can disallow file uploads using HTTP and/or HTTPS URLs by leaving this field empty, or allow certain URLs only by entering comma-separated values according to the table below:
Enable debug mode.
The operation execution timeout in milliseconds.
The maximum file size limit for FILE type parameters.
The maximum content size of FILE type parameters encoded in base64 (only recommended for small files, e.g. under 1 MB).
The local or remote folders where files used by FILE type parameters are stored.
You can disallow input file allowed folders by leaving this field empty, or allow certain folders only by entering comma-separated values according to the table below:
You can disallow file uploads using HTTP and/or HTTPS URLs by leaving this field empty, or allow certain URLs only by entering comma-separated values according to the table below:
Usernames (separated by commas) of users who have permissions to perform system or sensitive administration operations through the API, such as process management and deployment, participant management, user management, group management, raise exception, complete activity instance, or other regular API operations through impersonation.
DocuSign user ID. Corresponds to your DocuSign application's Integration Key value.
DocuSign user GUID. Corresponds to the API Username value in the DocuSign configuration panel.
DocuSign Auth server.
DocuSign values:
account.docusign.com (production)
account-d.docusign.com (demo)
DocuSign host server.
DocuSign values:
https://docusign.net (production)
https://demo.docusign.net (demo)
DocuSign RSA key. Corresponds to your DocuSign application's Private Key.
Sets the amount and type of information stored in the DOCUSIGNSEND notification log file:
0 – Disabled: None (no log file will be created)
1 – Error messages: Exception error messages only
2 – Information and error messages: Execution summary messages and exception error messages
Sets the amount and type of information stored in the DOCUSIGNCHECK notification log file:
0 – Disabled: None (no log file will be created)
1 – Error messages: Exception error messages only
2 – Information and error messages: Execution summary messages and exception error messages
Adobe Sign client ID. Corresponds to your Adobe Sign application's Client ID value.
Adobe Sign client secret. Corresponds your Adobe Sign application's Client secret value.
Adobe Sign host server. In general, the URL is composed as follows: https://api.naX.adobesign.com, where X is the server identifier.
Your application's refresh token (see the section).
Your application's refresh URL. The default value is /oauth/v2/token.
Sets the amount and type of information stored in the ADOBESIGNSEND notification log file:
0 – Disabled: None (no log file will be created)
1 – Error messages: Exception error messages only
2 – Information and error messages: Execution summary messages and exception error messages
Sets the amount and type of information stored in the ADOBESIGNCHECK notification log file:
0 – Disabled: None (no log file will be created)
1 – Error messages: Exception error messages only
2 – Information and error messages: Execution summary messages and exception error messages
Your Docaposte - Contralia account username.
Your Docaposte - Contralia account password.
Docaposte host server (e.g. https://test.contralia.fr:443).
Offer code. Available in My account > API access.
Organizational unit code. Available in My account > API access.
Sets the amount and type of information stored in the DOCAPOSTESEND notification log file:
0 – Disabled: None (no log file will be created)
1 – Error messages: Exception error messages only
2 – Information and error messages: Execution summary messages and exception error messages
Sets the amount and type of information stored in the DOCAPOSTECHECK notification log file:
0 – Disabled: None (no log file will be created)
1 – Error messages: Exception error messages only
2 – Information and error messages: Execution summary messages and exception error messages
See the section for information on setting up Remote Approval, such as approval emails, actions, and questions.
Enable Remote Approval.
Refresh interval for Remote Approval email (in seconds). Default: 180
Enables Quick mode, which lets the user reply to approval emails on one line, without any other formatting necessary (the user can still leave an optional comment on the second line). Default: disabled
Enable this mode to use the action reference code in the subject line for validation. Default: disabled (recommended for greater security)
Enable this to enforce case sensitivity on email answers. Default: disabled
Sets the amount and type of information stored in the notification log file:
0 – Disabled: None (no log file will be created)
1 – General messages: Execution summary messages only
2 – Error messages: Exception error messages only
Sets the life span for temporary log files. Default: 1 day
Type of email server: POP, IMAP, Exchange 2007, Exchange 2010 and later (Exchange 2013, 2016, and 2019 are supported), or Exchange Online - Modern Authentication.
The address (or, if using Exchange 2007+, the name) of the server to receive emails. For Exchange Online, use outlook.office365.com or your own Exchange Online domain name.
The port number for an IMAP or POP connection (not required for Exchange 2007+ or Exchange Online).
Enables SSL (use SSL for Exchange 2007+). Default: SSL
Email address for Remote Approval to send and receive approval emails. For Exchange Online, use the email address of the Remote Approval Office user.
The username used to log in to the POP, IMAP, or Exchange 2007+ server. For Exchange Online, use the username of the Remote Approval Office user.
Password used to log in to the POP, IMAP, or Exchange 2007+ server.
Domain name of the incoming Exchange 2007+ account.
Application (client) ID from the Azure Portal.
A secret string that the application uses to prove its identity when requesting a token; can also be referred to as an application password.
Scope of the application, e.g. https://outlook.office365.com/.default&grant_type=client_credentials. Replace outlook.office365.com with your own Exchange Online domain name if needed.
Endpoint where the access token is provided, e.g. https://login.microsoftonline.com/{directory_tenant_ID}/oauth2/v2.0/token. Replace {directory_tenant_ID} with your own directory (tenant) ID from the Azure Portal.
The total size refers to the combined size of all the files on the server. The average size refers to the average size of the files on the server. The maximum size refers to the largest file on the server.
This refers to a request that is open, but with no follow-up action associated with it. It is an irregular request.
Displays a list of actions that have timed out.
Displays a list of errors that are not timeout errors.
The current version of the WorkflowGen installation.
The activation serial number of the WorkflowGen installation, and copyright information.
The various library versions used by the WorkflowGen application.
<?xml version="1.0" standalone="yes"?>
<NewDataSet>
<xs:schema id="NewDataSet" xmlns="" xmlns:xs="http://www.w3.org/2001/XMLSchema" xmlns:msdata="urn:schemas-microsoft-com:xml-msdata">
<xs:element name="NewDataSet" msdata:IsDataSet="true" msdata:UseCurrentLocale="true">
<xs:complexType>
<xs:choice minOccurs="0" maxOccurs="unbounded">
<xs:element name="Table1">
<xs:complexType>
<xs:sequence>
</xs:sequence>
</xs:complexType>
</xs:element>
<xs:element name="REQUEST_GRID">
<xs:complexType>
<xs:sequence>
<xs:element name="REQUEST_GRID_LASTNAME" type="xs:string" minOccurs="0"/>
<xs:element name="REQUEST_GRID_FIRSTNAME" type="xs:string" minOccurs="0"/>
<xs:element name="REQUEST_GRID_USERNAME" type="xs:string" minOccurs="0"/>
</xs:sequence>
</xs:complexType>
</xs:element>
</xs:choice>
</xs:complexType>
</xs:element>
</xs:schema>
<Table1></Table1>
</NewDataSet>UPDATE
DELETE
SCALAR
PROCEDURE
TEXT
IN
When set to CATCH, the application will not return errors to WorkflowGen. This allows an error message to be stored in the ERROR_MESSAGE parameter and to continue the execution.
Default: THROW
TIMEOUT
NUMERIC
IN
Indicates the number of seconds to define in the command execution time
Default: 30
FORM_DATA
FILE
INOUT
FORM_DATA file containing the XML process definition
FORM_DATA_GRIDVIEW
TEXT
IN
Identifier of the GridView to feed to the FORM_DATA
RESULT_CSV_SEPARATOR
TEXT
IN
Separator used in the return value or CSV file
Default: , (comma)
TEXT
OUT
Contains the query result in JSON format
RESULT_JSON_FILE
FILE
OUT
Contains the query result in JSON format stored in a .json file
RESULT_XML
TEXT
OUT
Contains the query result in XML format
RESULT_XML_FILE
FILE
OUT
Contains the query result in XML format stored in an .xml file
RESULT_CSV
TEXT
OUT
Contains the query result in CSV format
Data are separated according to the separator defined in the RESULT_CSV_SEPARATOR parameter.
RESULT_CSV_FILE
FILE
OUT
Contains the query result in CSV format stored in a .csv file
Data are separated according to the separator defined in the RESULT_CSV_SEPARATOR parameter.
TEXT
OUT
{ "TABLE":[ { "LASTNAME":"Administrator", "FIRSTNAME":"WorkflowGen", "USERNAME":"wfgen_admin" }, { "LASTNAME":"Doe", "FIRSTNAME":"John", "USERNAME":"john.doe" } ] }
RESULT_JSON_FILE
FILE
OUT
result.json
RESULT_CSV
TEXT
OUT
"LASTNAME","FIRSTNAME","USERNAME" "Administrator","WorkflowGen","wfgen_admin"
"Doe","John","john.doe"
RESULT_CSV_FILE
FILE
OUT
result.csv
RESULT_ROW_LASTNAME
TEXT
OUT
Administrator
RESULT_ROW1_FIRSTNAME
TEXT
OUT
WorkflowGen
RESULT_ROW2_USERNAME
TEXT
OUT
john.doe
FILE
INOUT
FORM_DATA
FORM_DATA_GRIDVIEW
TEXT
IN
REQUEST_GRID
TEXT
IN
INSERT INTO WFCATEGORY (ID_CATEGORY,NAME,DESCRIPTION) VALUES (@IdCategory, @Name, @Description)
QUERY_PARAM_IdCategory
NUMERIC
IN
1
QUERY_PARAM_Name
TEXT
IN
CategoryName
QUERY_PARAM_Description
TEXT
IN
Description of the category
TEXT
IN
INSERT INTO WFCATEGORY (ID_CATEGORY,NAME,DESCRIPTION) VALUES (@IdCategory, @Name, @Description)
@IdCategory
NUMERIC
IN
1
@Name
TEXT
IN
CategoryName
@Description
TEXT
IN
Description of the category
TEXT
IN
UPDATE WFCATEGORY SET NAME = @Name WHERE ID_CATEGORY = @IdCategory
QUERY_PARAM_IdCategory
NUMERIC
IN
1
QUERY_PARAM_Name
TEXT
IN
NewCategoryName
TEXT
IN
DELETE FROM WFCATEGORY WHERE ID_CATEGORY = @IdCategory
QUERY_PARAM_IdCategory
NUMERIC
IN
1
TEXT
IN
INSERT_CATEGORY
QUERY_PARAM_ID_CATEGORY
NUMERIC
IN
1
QUERY_PARAM_NAME
TEXT
IN
CategoryName
QUERY_PARAM_DESCRIPTION
TEXT
IN
Description of the category
TEXT
IN
EXEC GET_USER @USERNAME = @User
QUERY_PARAM_User
NUMERIC
IN
wfgen_admin
TEXT
IN
SELECT COUNT(*) FROM USERS
RESULT
NUMERIC
OUT
2
TEXT
IN
INSERT INTO WFCATEGORY (ID_CATEGORY,NAME,DESCRIPTION) VALUES (@IdCategory, @Name, @Description)
CMD1_QUERY_PARAM_IdCategory
NUMERIC
IN
1
CMD1_QUERY_PARAM_Name
TEXT
IN
CategoryName
CMD1_QUERY_PARAM_Description
TEXT
IN
Description of the category
CMD2_QUERY
TEXT
IN
SELECT NAME FROM WFCATEGORY WHERE ID_CATEGORY = @IdCategory
CMD2_@IdCategory
NUMERIC
IN
1
CMD2_RESULT_ROW_NAME
TEXT
OUT
CategoryName
TEXT
IN
INSERT INTO WFCATEGORY (ID_CATEGORY,NAME,DESCRIPTION) VALUES (1, "Name", "Description")
CMD1_TRANSACTION
TEXT
IN
Y
CMD1_ON_ERROR
TEXT
IN
CATCH
CMD1_COMMIT
TEXT
OUT
Y
CMD1_ERROR_MESSAGE
TEXT
OUT
NULL
CMD2_TYPE
TEXT
IN
INSERT
CMD2_QUERY
TEXT
IN
INSERT INTO WFCATEGORY (ID_CATEGORY,NAME,DESCRIPTION) VALUES (1, "OtherName", "Other description")
CMD2_TRANSACTION
TEXT
IN
Y
CMD2_ON_ERROR
TEXT
IN
CATCH
CMD2_COMMIT
TEXT
OUT
N
CMD2_ERROR_MESSAGE
TEXT
OUT
Cannot insert duplicate key in object 'dbo.WFCATEGORY'. The duplicate key value is (1).
Integration: Integration settings (e.g. GraphQL, webhooks)
Applications: Workflow application settings
Remote Approval: Remote Approval settings (e.g. log file trace level, mail server)
Diagnostic: File size usage and request-related errors
Product information: Product installation information page
Use SSL/TLS: Check to enable SSL/TLS
Username: The username used for the SMTP connection
Password: The password used for the SMTP connection
Connection timeout (seconds): The time in seconds allowed before server connection timeout (default: 3)
Pickup directory: Specify the path of the pickup folder. This option requires that you set up an SMTP gateway or external SMTP service to retrieve and send email notifications.
Microsoft Identity Platform: OIDC-compliant Microsoft Identity Platform v2.0 authentication.
Azure v1: OIDC-compliant Microsoft Entra ID (formerly Azure AD) authentication.
Auth0: OIDC-compliant Auth0 authentication.
ADFS: OIDC-compliant Active Directory Federation Services 2016 authentication.
Okta: OIDC-compliant Okta authentication.
Gardian: OIDC-compliant Gardian authentication
Display the list of actions to do
Display the list of actions to do or the next action
Display the list of actions to do (except if action to assign)
Display the list of actions to do (except if action to do)
Display the homepage
Display the homepage or the next action
Display the homepage (except if action to assign)
Display the homepage (except if action to do)
Display the homepage and expand the actions to do
Display the homepage and expand the actions to do or the next action
Display the homepage and expand the actions to do (except if action to assign)
Display the homepage and expand the actions to do (except if action to do)
Display the homepage and expand my requests in progress
Enable custom chart editing for process managers and supervisors
Enable custom chart editing for standard users
div.CommentsViewSubOpenedRightAlign
div.CommentsViewOpenedPopUpRightAlign
div.CommentsViewSubOpenedPopUpRightAlign
.CommentsListHeader .ListRow .CellOpenedRightAlign
.CommentsList .ListRow .ListCell .Comment .Row .CellHeader
.CommentsListInput .ListRow .ListCell .NewComment .Row .Cell .TextArea
div.CommentsListBodyPopUpHidden
div.CommentsListBodyPopUpReadOnly
div.CommentsListBodyPopUpReadOnlyHidden
Specific folder only
HTTP from a specific folder only
http://mydomain/folder*
All files and folders whose names start with folder
📌 Examples:
http://mydomain/folderfile.jpg
http://mydomain/folder/file.jpg
http://mydomain/folder/file.jpg
Specific file only
Specific folder only
HTTP from a specific folder only
http://mydomain/folder*
All files and folders whose names start with folder
📌 Examples:
http://mydomain/folderfile.jpg
http://mydomain/folder/file.jpg
http://mydomain/folder/file.jpg
Specific file only
<SERVER>: https://account.docusign.com (production) or https://account-d.docusign.com (demo)
<CLIENT_ID>: Corresponds to the value of your DocuSign application's Integration Key
<REDIRECT_URI>: Redirect address (e.g. https://docusign.com)
4 – Full details for debugging (including Event Viewer): Execution summary messages and full detail exception messages (including Event Viewer information logs)
Value
Description
Empty
No folders allowed
*
All folders allowed
c:\*
All folders on drive c:
c:\Inetpub\*
All subfolders in a specific folder
c:\Inetpub\folder*
All c:\Inetpub folders whose names start with folder
📌 Examples:
c:\Inetpub\folder1
c:\Inetpub\folder1\abc
c:\Inetpub\folder2
Value
Description
Empty
No HTTP or HTTPS URLs allowed
*
All HTTP and HTTPS URLs allowed
https://*
HTTPS URLs only
http://*
HTTP URLs only
http://mydomain/*
HTTP from a specific domain only
Value
Description
Empty
No folders allowed
*
All folders allowed
c:\*
All folders on drive c:
c:\Inetpub\*
All subfolders in a specific folder
c:\Inetpub\folder*
All c:\Inetpub folders whose names start with folder
📌 Examples:
c:\Inetpub\folder1
c:\Inetpub\folder1\abc
c:\Inetpub\folder2
Value
Description
Empty
No HTTP or HTTPS URLs allowed
*
All HTTP and HTTPS URLs allowed
https://*
HTTPS URLs only
http://*
HTTP URLs only
http://mydomain/*
HTTP from a specific domain only
c:\Inetpub\folder2\abc\def
http://mydomain/folder/*
c:\Inetpub\folder2\abc\def
http://mydomain/folder/*
Data Source=DB_SERVER_1;Initial Catalog=WFGEN;User ID=WFGEN_USER;Password=admin123!;Data Source=DB_SERVER_2;Initial Catalog=WFGEN;User ID=WFGEN_USER;Password=admin123!;http://mydomain/folder2/file.jpghttp://mydomain/folder2/file.jpgThe RESTAPICLIENT workflow application allows you to call REST API endpoints to exchange information with other applications through HTTP requests, and can be used to build integrations with extendable applications (such as Azure Services and Slack).
It also allows you to call a REST API endpoint using application/json or application/x-www-form-urlencoded payloads. RESTAPICLIENT will then receive and process the response from the external API by mapping the response content with defined OUT parameters.
The RESTAPICLIENT application requires the APP_URL parameter, which corresponds to the REST API endpoint.
The default request payload content type (APP_REQUEST_CONTENT_TYPE) is application/json. application/x-www-form-urlencoded is also supported.
APP_URL optional parameters📌 Example
The parameters defined above will generate the following URL in APP_URL:
The parameters defined above will generate two headers in the request payload:
The application also supports some predefined authorization header parameters in order to avoid adding these HTTP header parameters with the APP_HEADER_xxx parameter name.
There are two different ways to prepare the request payload. The first way is when you have access to the whole request payload (see below); the second way is by building the JSON or URL encoded payload via IN parameters (see and below).
The following parameters can be used when you have access to the whole request payload, or the request content type is neither application/json nor application/x-www-form-urlencoded. You can set this request payload in a file/text data or directly in the text value.
The following examples show how to build a request payload with application/x-www-form-urlencoded as content type.
Standard URL encoded request payload
The following parameters are used to build a standard URL encoded request payload:
The parameters defined above will generate the following request payload:
JSON request payload encoded into a key name
The following parameters are used to build a JSON payload encoded into a key name:
The parameters defined above will generate the following request payload:
The following examples show how to build a request payload with application/json as content type.
Standard JSON request payload
The following parameters are used to build a simple JSON request payload:
The parameters defined above will generate the following request payload:
If you want to convert this JSON into an array, you have to set the APP_REQUEST_CONTENT_IS_ARRAY parameter value to Y.
Setting the APP_REQUEST_CONTENT_IS_ARRAY parameter to Y will generate the following request payload:
To see how to build more complex JSON, see and sections below.
To set an array into a JSON property, you have to define the property path (e.g. person.spokenlanguages) followed by the __X suffix, where X is the array index number.
The following parameters are used to set a JSON array into a JSON property:
The parameters defined above will generate the following request payload:
If you want to set a JSON array of JSON objects (e.g. "spokenlanguages": [{"spokenlanguage":"french"}, {"spokenlanguage":"english"}]) into a JSON property, see the next section.
The array parameters will be ordered depending on their index number.
Index numbers have no limit (e.g. person.spokenlanguages__9999).
__JSON suffix parameterTo set a JSON object/array into a JSON property, you have to define the property path (e.g. person.children) followed by the __JSON suffix with the JSON object/array as the parameter value.
The following parameters are used to set a JSON object/array into a JSON property:
The parameters defined above will generate the following request payload:
An exception will be thrown if there is more than one JSON property specified in the IN parameters. (e.g. person.children and person.children__JSON).
The __JSON suffix uses
The application supports OUT parameters to be mapped with the HTTP response:
The application also supports additional custom OUT parameters to map simple JSON response payloads.
📌 Example
JSON response payload:
The following parameters allow you to map the response payload into different process data:
For mapping complex JSON, see the next section.
The application supports the JSONPath query language (similar to XPath expressions in XML). This language allows you to retrieve specific data from a JSON. For more details regarding the JSONPath syntax, see .
📌 Example
JSON response payload:
For example, here we want to get the names of Charles's grandchildren who are older than seven years old, and we also want these names separated by a | (using the APP_JSONPATH_DELIMITER IN parameter). At the same time, we are also getting Elizabeth's age and date of birth. To get the information, the following parameters must be defined:
In the PARAM1__JSONPATH parameter name, the PARAM1 name is not relevant, but it must be followed by the __JSONPATH suffix (two underscores are used in the suffix).
This example shows how to obtain an access token and use it to create an Event Grid topic. This can be done by creating a process with two actions having RESTAPICLIENT as application. The workflow below illustrates this example:
The next sections describe the parameters that must be declared for each action.
GET_TOKEN action: Obtaining an OAuth 2.0 access tokenThe following parameters are needed to get an access token to use the Azure Resource management API. This token will be stored in the access_token OUT parameter and will be used when creating an Event Grid topic in the next section.
The parameters defined above will generate the following request payload:
Here's the response from the Azure API:
For more details about how to get an access token to use the Azure Resource API, see .
CREATE_TOPIC action: Creating an Event Grid topicThe following parameters are needed to create an Event Grid topic using the Azure Resource management API.
The parameters defined above will generate the following request payload:
Here's the response from the Azure API:
For more information about how to create an Event Grid topic and the Azure REST API, see .
In case of a Could not create SSL/TLS secure channel error, strong encryption must be enabled by executing the following code in PowerShell:
Restart your IIS server after executing the commands.
APP_METHOD) is GET. Other request methods (POST, PUT, DELETE, etc.) are also supported.
In case of error, when the APP_RESPONSE_IGNORE_ERROR IN parameter is defined and has Y as its value, the error will be ignored and defined OUT parameters (APP_RESPONSE_STATUS or APP_RESPONSE_CONTENT) will be mapped. Otherwise, an exception will be thrown.
Since the application parameters are case sensitive, parameters must use the API’s accepted notation.
The default request timeout is 30,000 milliseconds (30 seconds); this default value can be modified by setting the RestApiClientRequestTimeout parameter value in the web.config file. The request timeout can also be defined in the APP_TIMEOUT IN parameter; the maximum timeout is 3,600,000 milliseconds (1 hour).
✏️ Note: This timeout value must be less than the IIS request timeout value.
The HTTP request headers can be defined with the APP_HEADER_xxx parameters, where xxx is the header field name. For more information, see the Header parameters section.
The request payload can be defined in the APP_REQUEST_CONTENT_FILE or APP_REQUEST_CONTENT IN parameters. When both parameters are defined, the APP_REQUEST_CONTENT_FILE parameter has priority. For more information on these parameters, see the Request payload section.
The response from the REST API can be mapped to the APP_RESPONSE_CONTENT_FILE or APP_RESPONSE_CONTENT OUT parameters. Both parameters can be defined at the same time. For more information on these parameters, see the Response payload section.
Besides the optional parameters listed below, you can also add additional custom IN and OUT parameters to send and receive custom user-defined data to and from the external API. For more information on and examples of these custom IN and OUT parameters, see the Request payload and Response payload sections.
The application supports the JSONPath query language (see https://github.com/json-path/JsonPath), which allows extraction of specific data from a JSON response (similar to XPath expressions in XML). For information on how to use this with the application along with examples, see the Response payload section.
Application logs are available and can be specified by setting the RestApiClientLogLevel parameter value in the web.config file to 0 to disable logging (default), 2 for simple logs, or 3 for debug logs.
The default maximum response length is 4194304 characters (4 MB); this default value can be modified by setting the RestApiClientMaxResponseLength parameter value in the web.config file.
Automatic deletion of temporary files can be disabled by setting the RestApiClientEnableFilesCleanUp parameter value to N in the web.config file; the default value is Y.
IN
Request content type supported by the external API
The application supports application/json and application/x-www-form-urlencoded); the default is application/json.
APP_RESPONSE_IGNORE_ERROR
Text
IN
When set to Y, the application will ignore the error when a WebException occurs or the external API returns a response status equal to or greater than 300; the default is N.
IN
dev-group-advantys
APP_URL_topicName
Text
IN
dev-topic
IN
API authorization Bearer token
APP_AUTH_AZ_SAS_TOKEN
Text
IN
API authorization Azure SAS token
IN
payload
IN
30
person.name
Text
IN
John
IN
chinese
person.spokenlanguages__90, person.spokenlanguages__30). The __30 parameter value will be the first array parameter, and __90 the second one.
An exception will be thrown if there is more than one JSON property specified in the IN parameters (e.g. person.spokenlanguages and person.spokenlanguages__0).
The __X suffix uses two underscore characters.
The parameter value can only be a text value.
OUT
Response payload or error message in a file
APP_RESPONSE_CONTENT
Text
OUT
Response payload or error message
APP_RESPONSE_CONTENT_IS_ARRAY
Text
OUT
Returns Y if the JSON payload is an array
Only supported for application/json content type responses.
OUT
DATA_AGE
person.name
Text
OUT
DATA_NAME
AGE__JSONPATH
Text
IN
$.person.age
AGE
Numeric
OUT
data AGE_VALUE (value will be: 85)
DOB__JSONPATH
Text
IN
$.person.dob
DOB
DateTime
OUT
data DOB_VALUE (value will be: 1937-09-23T00:00:00Z)
PARAM1__JSONPATH parameter as in the example above).
To retrieve a value into a Numeric or DateTime process data, you must use separate parameters: an IN Text parameter for the JSONPath query and an OUT parameter that maps to the Numeric or DateTime process data. Both parameters must share the same name prefix (e.g. AGE__JSONPATH and AGE parameters as in the example above).
The default value of APP_JSONPATH_DELIMITER is a comma (,) when this parameter is not defined.
IN
POST
APP_REQUEST_CONTENT_TYPE
Text
IN
application/x-www-form-urlencoded
grant_type
Text
IN
client_credentials
client_id
Text
IN
b7e29e2f-6e2b-4375-9684-8151431d4ca6
client_secret
Text
IN
lxy/IwKyTedHUWMeeUtyCtu7/YUy0rNGoY3NNWXXotI=
resource
Text
IN
https://management.core.windows.net/
access_token
Text
OUT
DATA_ACCESS_TOKEN
IN
dev-group-advantys
APP_URL_topicName
Text
IN
new-topic-example
APP_URL_api-version
Text
IN
2018-09-15-preview
APP_METHOD
Text
IN
PUT
APP_REQUEST_CONTENT_TYPE
Text
IN
application/json
APP_AUTH_BEARER_TOKEN
Text
IN
DATA_ACCESS_TOKEN
location
Text
IN
canadaeast
Parameter
Type
Direction
Description
APP_URL
Text
IN
External API URL
Parameter
Type
Direction
Description
APP_TIMEOUT
Numeric
IN
Maximum time interval between sending the request and receiving the response
The default is 30,000 milliseconds (30 seconds) and the maximum is 3,600,000 milliseconds (1 hour); the default can be modified by setting the RestApiClientRequestTimeout parameter value in the web.config file.
✏️ Note: This timeout value must be less than the IIS request timeout value.
APP_METHOD
Text
IN
API method
The default is GET. Supports POST, PUT, DELETE, HEAD, PATCH
APP_REQUEST_CONTENT_TYPE
Parameter
Type
Direction
Description
APP_URL_xxx
Text
IN
API URL optional parameter where xxx is the URL parameter name
It must be defined in the APP_URL parameter value between brackets (e.g. APP_URL_subscriptionId for the URL https://management.azure.com/subscriptions/{subscriptionId})
Parameter
Type
Direction
Value
APP_URL
Text
IN
https://management.azure.com/subscriptions/{subscriptionId}/resourceGroups/{resourceGroupName}/providers/Microsoft.EventGrid/topics/{topicName}
APP_URL_subscriptionId
Text
IN
457a2a46-7a7f-4afa-940d-8779e1425fa8
APP_URL_resourceGroupName
Parameter
Type
Direction
Description
APP_HEADER_xxx
Text
IN
External API header parameters where xxx is the header field name
Parameter
Type
Direction
Value
APP_HEADER_Authorization
Text
IN
Bearer AbCdEf123456
APP_HEADER_location
Text
IN
canadaeast
Parameter
Type
Direction
Description
APP_AUTH_BASIC_USERNAME
Text
IN
API authorization Basic username
APP_AUTH_BASIC_PASSWORD
Text
IN
API authorization Basic password; must be used with APP_AUTH_BASIC_USERNAME parameter
APP_AUTH_BEARER_TOKEN
Parameter
Type
Direction
Description
APP_REQUEST_CONTENT_FILE
File
IN
Request payload in a file
APP_REQUEST_CONTENT
Text
IN
Request payload
Parameter
Type
Direction
Description
param1
Text
IN
value1
param2
Text
IN
value2
Parameter
Type
Direction
Description
param1
Text
IN
value1
param2
Text
IN
value2
APP_REQUEST_CONTENT_PAYLOAD_NAME
Parameter
Type
Direction
Value
person.address.street
Text
IN
160 Guy Street
person.address.zipcode
Text
IN
J4G 1U4
person.age
Parameter
Type
Direction
Description
APP_REQUEST_CONTENT_IS_ARRAY
Text
IN
When set to Y, the application will convert the JSON request payload into an array; the default is N
Only supported when building JSON request payload with IN parameters.
Parameter
Type
Direction
Value
person.spokenlanguages__0
Text
IN
french
person.spokenlanguages__1
Text
IN
english
person.spokenlanguages__2
Parameter
Type
Direction
Value
person.children__JSON
Text
IN
[{"name": "child 1"}, {"name": "child 2"}]
Parameter
Type
Direction
Description
APP_RESPONSE_STATUS
Text/Numeric
OUT
Response status code
APP_RESPONSE_CONTENT_TYPE
Text
OUT
Response content type
APP_RESPONSE_CONTENT_FILE
Parameter
Type
Direction
Retrieve the value into a data
person.address.street
Text
OUT
DATA_STREET
person.address.zipcode
Text
OUT
DATA_ZIPCODE
person.age
Parameter
Type
Direction
IN Value
OUT Value
APP_JSONPATH_DELIMITER
Text
IN
|
PARAM1__JSONPATH
Text
INOUT
person.children[?(@.name == 'Charles')].children[*].children[?(@.age > 7)].name
Parameter
Type
Direction
Value
APP_URL
Text
IN
https://login.microsoftonline.com/{tenandId}/oauth2/token
APP_URL_tenantId
Text
IN
a6e70c61-fabd-4885-89f7-97121e92db7f
APP_METHOD
Parameter
Type
Direction
Value
APP_URL
Text
IN
https://management.azure.com/subscriptions/{subscriptionId}/resourceGroups/{resourceGroupName}/providers/Microsoft.EventGrid/topics/{topicName}?api-version={api-version}
APP_URL_subscriptionId
Text
IN
235765d9-5d62-43f4-a730-2ed71a3f8adb
APP_URL_resourceGroupName
Text
Text
Text
Text
Text
Text
File
Text
data DATA1_VALUE (value will be: George|Charlotte)
Text
Text
https://management.azure.com/subscriptions/457a2a46-7a7f-4afa-940d-8779e1425fa8/resourceGroups/dev-group-advantys/providers/Microsoft.EventGrid/topics/dev-topicAuthorization: Bearer AbCdEf123456
location: canadaeastparam1=value1¶m2=value2payload: { param1: "value1", "param2": "value2" }{
"person": {
"address": {
"street": "160 Guy Street",
"zipcode": "J4G 1U4"
},
"age": 30,
"name": "John"
}
}[{
"person": {
"address": {
"street": "160 Guy Street",
"zipcode": "J4G 1U4"
},
"age": 30,
"name": "John"
}
}]{
"person": {
"spokenlanguages": ["french", "english", "chinese"]
}
}{
"person": {
"children": [{
"name": "child 1"
}, {
"name": "child 2"
}]
}
}{
"person": {
"address": {
"street": "160 Guy Street",
"zipcode": "J4G 1U4"
},
"age": 30,
"name": "John"
}
}{
"person": {
"name": "Elizabeth",
"age": 85,
"dob": "1937-09-23T00:00:00Z",
"children": [
{
"name": "Charles",
"age": 60,
"children": [
{
"name": "Nathalie",
"children": [
{
"name": "George",
"age": 8
},
{
"name": "Charlotte",
"age": 10
},
{
"name": "Jefferson",
"age": 7
}
]
},
{
"name": "Harry"
}
]
},
{
"name": "Bob",
"age": 57,
"children": [
{
"name": "John"
},
{
"name": "Mark"
}
]
}
]
}
}POST https://login.microsoftonline.com/a6e70c61-fabd-4885-89f7-97121e92db7f/oauth2/token HTTP/1.1
Host: login.microsoftonline.com
Content-Type: application/x-www-form-urlencoded
grant_type=client_credentials&client_id=b7e29e2f-6e2b-4375-9684-8151431d4ca6&client_secret=lxy/IwKyTedHUWMeeUtyCtu7/YUy0rNGoY3NNWXXotI=&resource=https://management.core.windows.net/{
"token_type":"Bearer",
"expires_in":"3600",
"ext_expires_in":"3600",
"expires_on":"1555951493",
"not_before":"1555947593",
"resource":"https://management.core.windows.net/",
"access_token":"eyJ0eXAiOiJKV1QiLCJhbGciOiJSUzI1NiIsIng1d..."
}PUT https://management.azure.com/subscriptions/235765d9-5d62-43f4-a730-2ed71a3f8adb/resourceGroups/dev-group-advantys/providers/Microsoft.EventGrid/topics/new-topic-example?api-version=2018-09-15-preview
Host: management.azure.com
Content-Type: application/json
Authorization: Bearer eyJ0eXAiOiJKV1QiLCJhbGciOiJSUzI1NiIsIng1d...
location: canadaeast{
"properties":{
"provisioningState":"Creating",
"endpoint":null
},
"location":"canadaeast",
"tags":null,
"id":"/subscriptions/994e2fc0-937d-4110-b355-e7473acef822/resourceGroups/dev-evt-grid/providers/Microsoft.EventGrid/topics/test-from-wfg",
"name":"test-from-wfg",
"type":"Microsoft.EventGrid/topics"
}Set-ItemProperty -Path 'HKLM:\SOFTWARE\Wow6432Node\Microsoft\.NetFramework\v4.0.30319' -Name 'SchUseStrongCrypto' -Value '1' -Type DWord
Set-ItemProperty -Path 'HKLM:\SOFTWARE\Microsoft\.NetFramework\v4.0.30319' -Name 'SchUseStrongCrypto' -Value '1' -Type DWoThe header contains a title, a label, and an optional image.
The title can be used to display the process name. Its text can be edited directly in the form.
The label is used to display the current request number. Its default identifier is CURRENT_REQUEST and can be referenced in an action parameter to receive the Request.Id macro.
The image is used to display a logo. It can be resized or realigned.
A fixed width and height can be set for the header in the form configuration window.
The section has a title to display the section name. Its text can be edited directly on the form.
It can have one or several fields.
Each section must have a unique identifier.
Sections can only be aligned vertically and reordered using the mouse drag-and-drop action.
See for the different types of default section.
The field has a label and an input control.
The label is used to display the name of the field. Its text can be edited directly on the form. It can be resized and realigned.
A fixed width can be set for all labels (General / Labels).
The input control is where a value is captured in the form. It can be resized and realigned.
See for the different types of default field.
The Submit and Save as draft buttons can be renamed in the form configuration window (General / Buttons) or in the Appearance Editor (see ).
The Save as draft button can be enabled or disabled as well.
Their identifiers are submitButton and saveAsDraftButton
The footer contains a title and an optional image.
The title can be used to display a note. Its text can be edited directly on the form.
The image is used to display a logo. It can be resized or realigned in the form configuration window (General / Footer) or in the Appearance Editor (see ).
Default and custom tools are available in the Tools drop-down list.
This feature allows a form designer to save an existing section or field in the current form as a custom tool template in order to be reused in other forms. First, select a section or field then click the Save a section or field as tool icon on the toolbar (see ).
To open this window, click the Tools drop-down menu and select Manage custom tools, which allows you to delete custom tools.
These settings apply to Currency, Date, DateTime, Numeric, Password, and TextArea fields.
These settings (except Items) apply to Label, ReadOnlyCurrency, ReadOnlyDate, ReadOnlyDateTime, ReadOnlyNumeric, and ReadOnlyText fields as well.
The Form Designer supports a custom field tool that is an ASP.NET user control. You can create this tool and manually deploy it on the server. It must have the following elements, folder and file structures:
User control field template:
\wfgen\App_Data\Templates\Forms\[language]\[folder name]\fields\[user control name].txt
User control sources:
ASCX: \wfgen\WfApps\WebForms\[user control name].ascx
Code-behind: \wfgen\WfApps\WebForms\[user control name].ascx.cs
When you enter a tag, the user control field automatically inserts its closing tag. To collapse a code block, click the down arrow next to the line number, which will insert a double-arrow icon in place of the code. To expand the code block, click the right arrow. Press Ctrl+Space to show a drop-down menu that displays the available variables and keywords.
The user control field supports the Custom attributes settings (see ).
The ID menu in the toolbar will activate the field’s identifier edit mode. You can change the identifier of the header label, sections and fields. Identifiers are normally used to identify a form element such as a section or a field in WorkflowGen’s action parameters (e.g. FORM_FIELDS_REQUIRED) or in the form’s ASP.NET code-behind.
Each identifier must be unique.
It must start with a letter.
It can only contain alphanumeric and underscore characters.
It is case sensitive.
The Tooltip menu in the toolbar will activate the field’s tooltip edit mode. You can change the tooltip for the form fields only. Tooltips are normally used to display more information about the field when the user moves the mouse pointer over it.
The Format menu in the toolbar will activate the field’s format edit mode. You can change the format of TextBox, Currency, Date, DateTime, Numeric, Label, ReadOnlyCurrency, ReadOnlyDate, ReadOnlyDateTime, ReadOnlyNumeric and ReadOnlyText fields. Formats are normally used to specify the way to capture and display a specific type of value based on the user’s language and culture.
When inserting a section tool into the form, the new section will be placed in the last position.
Section width will be resized automatically based on the widest field in the form whenever there is a field width change.
A fixed width can be set for all sections.
The section’s settings can be edited by clicking the pencil icon on the right side of the section name.
Each field must have a unique identifier.
Fields within the same section are prefixed with the section’s identifier following an underscore character.
Fields within a section can be reordered vertically using the mouse drag-and-drop action.
A field can be moved from one section to another section using the mouse drag-and-drop action.
When inserting a field tool into the form, the new field will be placed in the last position of the selected section or the first section if no section is selected.
By default, fields are aligned vertically on the same column.
Two fields can be aligned horizontally on the same row using the Remove line break button (left arrow) on the right side of the first field.
Two fields can be aligned vertically on the same column using the Line break button (right arrow) on the right side of the first field.
The field’s settings can be edited edited by clicking the pencil icon on the right side of the field.
The header title label
The header image
The footer title label
The footer image
A section that has no fields
Request
A section that contains first name, last name, and date fields in read-only, plus a category drop-down list, subject textbox, and description multiline textbox
Standard
A section that contains first name, last name, and date fields in read-only
Default fields
Attachment
Attach one file
CheckBox
Single checkbox
CheckBoxList
Multiple checkboxes in horizontal alignment
CheckBoxListVertical
Multiple checkboxes in vertical alignment
Currency
Input for currency value
Date
Input for date value
DateTime
Input for date time value
DropDownListBox
List of items for a single choice selection
GridView
Dynamic table of multiple input fields; each column represents a field and each row represents a record
Label
Text displayed in read-only
ListBox
List of items for a multiple choice selection
Numeric
Input for numeric value
Password
Input for password value (the entered text will be masked)
RadioButton
Single radio button
RadioButtonList
Multiple radio buttons in horizontal alignment
RadioButtonListVertical
Multiple radio buttons in vertical alignment
ReadOnlyCurrency
Read-only currency value
ReadOnlyDate
Read-only date value
ReadOnlyDateTime
Read-only date time value
ReadOnlyNumeric
Read-only numeric value
ReadOnlyText
Read-only text value
TextArea
Multiline textbox
TextBox
Single line textbox
Delete the current custom field tool
The section fields are required based on a custom condition. If the condition is empty then it will be true. The custom condition must be server-side C# syntax code.
📌 Example: MyTextBox.Text == "Hello World"
Read-only
Sets the section’s fields to read-only
Condition
The section fields are read-only based on a custom condition. If the condition is empty then it will be true. The custom condition must be server-side C# syntax code.
📌 Example: MyTextBox.Text == "Hello World"
Hidden
Sets the section fields to be hidden
Condition
The section fields are hidden based on a custom condition. If the condition is empty then it will be true. The custom condition must be server-side C# syntax code.
📌 Example: MyTextBox.Text == "Hello World"
Displays the size of the uploaded file beside the download link
Upload file automatically
Automatically uploads the file, otherwise an upload button will be displayed
Control style
Display the Modify and Delete controls as links or buttons
Image/PDF preview
Display an image or PDF preview (thumbnail)
Position
Display the image preview above (Top) or below (Bottom) the attachment filename and controls
Width / Height
Sets the width and/or height of the image preview in pixels
⚠️ Important: You should only set one of these values in order to preserve the aspect ratio of the original image as displayed in the preview; otherwise, the image will appear distorted.
Storage in form archive
Web address (URL): Stores the image in the form folder
Embedded image: Embeds the image in the form archive HTML
File size limit (kB)
Defines the maximum size of the uploaded file in kilobytes
Size restriction error message
Write error that will appear if file exceeds the file size limit
Allowed extensions
Restricts the allowed file types by extension, separated by commas (e.g. txt,doc,html,xml,png)
Forbidden extensions
List of file extensions not allowed for links
Extension restriction error message
Write error message that will be displayed when file extension error occurs
Empty file error message
Write error message that will display when there is no file to link to
Add button label
Display text for the add button
Update button label
Display text for update button
Delete button label
Display text for delete button
Overwrite button label
Allows you to choose a new file
Cancel button label
Allows you to cancel request for a new file
Display mode
Sets the default display mode:
Display: the field is read-only
Edit: the field can be edited
Download link
Check to display a link to download the uploaded file
Validation
Behavior
✏️ Note: To simplify the capture of a condition, the form fields and operators are listed in the Select a field... and Select an operator... drop-down menus. You can also press Ctrl+Spaceto display a drop-down menu that lists the available variables and keywords.
Required
Sets the field to be required
Condition
The field is required based on a custom condition. If the condition is empty then it will be true. The custom condition must be server-side C# syntax code. To help with the capture of the condition, the list of form fields and a list of operators are displayed.
📌 Example: MyTextBox.Text == "Hello World"
Read-only
Sets the field to be read-only
Condition
The field is read-only based on a custom condition. If the condition is empty then it will be true. The custom condition must be server-side C# syntax code. To help with the capture of the condition, the list of form fields and a list of operators are displayed.
📌 Example: MyTextBox.Text == "Hello World"
Hidden
Sets the field to be hidden
Condition
The field is hidden based on a custom condition. If the condition is empty then it will be true. The custom condition must be server-side C# syntax code. To help with the capture of the condition, the list of form fields and a list of operators are displayed.
📌 Example: MyTextBox.Text == "Hello World"
Custom attributes
Name
Any name that is not in the list of standard reserved attribute names (id, name, class, style, title, multiple, type, value, checked, runat)
Additional reserved attribute names specific to File attachment / General:
Value
Any value
Add a new attribute
Remove the current attribute
Value of the checkbox/radio button
Text
Display text of the checkbox/radio button
Add a new checkbox/radio button
Delete the current checkbox/radio button
Validation
Behavior
✏️ Note: To simplify the capture of a condition, the form fields and operators are listed in the Select a field… and Select an operator... drop-down menus. You can also press Ctrl+Spaceto display a drop-down menu that lists the available variables and keywords.
Required
Sets the field to be required
Condition
The field is required based on a custom condition. If the condition is empty then it will be true. The custom condition must be server-side C# syntax code.
📌 Example: MyTextBox.Text == "Hello World"
✏️ Note: The checkbox fields (list or single) and single radio button are not supported by this behavior.
Read-only
Sets the field to be read-only
Condition
The field is required based on a custom condition. If the condition is empty then it will be true. The custom condition must be server-side C# syntax code.
📌 Example: MyTextBox.Text == "Hello World"
Hidden
Sets the field to be hidden
Condition
The field is required based on a custom condition. If the condition is empty then it will be true. The custom condition must be server-side C# syntax code.
📌 Example: MyTextBox.Text == "Hello World"
Custom attributes
aslist
This property allows a radio button and checkbox field with one item to be converted as a list control (RadioButtonList / CheckBoxList) instead of a RadioButton / CheckBox control in the web form. Accepted Boolean values: true or false
Sets the field to be required
Condition
The field is required based on a custom condition. If the condition is empty then it will be true. The custom condition must be server-side C# syntax code.
📌 Example: MyTextBox.Text == "Hello World"
Read-only
Sets the field to be read-only
Condition
The field is read-only based on a custom condition. If the condition is empty then it will be true. The custom condition must be server-side C# syntax code.
📌 Example: TextBox.Text == "Hello World"
Hidden
Sets the field to be hidden
Condition
The field is hidden based on a custom condition. If the condition is empty then it will be true. The custom condition must be server-side C# syntax code.
📌 Example: MyTextBox.Text == "Hello World"
Regular expression
Expression
A regular expression to determine validity.
📌 Example: email address: \b[A-Za-z0-9._%+-]+@[A-Za-z0-9.-]+\.[A-Za-z]{2,4}\b
A regular expression can be entered freely into the designated area. It is also possible to use regular expressions in the Select a regular expression list.
Error message
Message to display when the validated field is invalid
Range
Minimum value
Minimum value for the field being validated
Maximum value
Maximum value for the field being validated
Error message
Message to display when the validated field is invalid
Custom
OnServerValidate
Server-side C# syntax validation code; must return a Boolean value (true or false)
Validate empty text
Whether the validator validates the control when the text of the control is empty
Error message
Message to display when the validated field is invalid
Compare
Value to compare
Value to compare against
Control to compare
Select another field in the current form to compare against
Operator
Comparison operation to apply to values:
Equal (=)
Greater than (>)
Greater than or equal to (>=
Error message
Message to display when the validated field is invalid
Custom attributes
timezoneconversion
Applicable to Date and DateTime textbox fields only
This property allows the disabling of the default user time zone conversion behavior when the form field is in the Date or DateTime format.
This option is useful if you want to capture and maintain a consistent date-only value in the form field and process data without applying the time zone conversion that sometimes changes the date value depending on the original and current user time zones.
Accepted Boolean values: true or false
Additional reserved attribute names specific to validation
maxlength, requiredcondition, readonlycondition, hiddencondition, validationexpression, regularexpressionerrormessage, minimumvalue, maximumvalue, rangeerrormessage, onservervalidate, validateemptytext, customerrormessage, valuetocompare
Value of the item
Text
Displays text of the item
Add a new item
Delete the current item
Databind
Connection mode
Select the type of connection for data binding:
Name
String
Global lists
Connection by name
Connection name
List of connection names defined in the WorkflowGen web configuration file (<connectionStrings>)
✏️ Note: It is strongly recommended to use a connection name rather than a connection string to simplify multi-environment management. Connection names are centrally managed in the WorkflowGen web.config file.
Select command
SQL select query
📌 Examples: select column_id, column_text from table_name;
Data value field
The data field that provides the item value
📌 Example: column_id
Data text field
The data field that provides the item text
📌 Example: column_text
Append data bound items
Check to append the data bound items to the list. Otherwise, the data bound items will replace all the existing items in the list.
Parameters
Name
Specifies the parameter name if the Select command uses a filter with a dynamic value from a parameter in the select query.
📌 Example: Name=PARAM; Select command=select column_id, column_text from table_name where column_id > @PARAM
Data type
Specifies the data type of the parameter: Boolean, Byte, Char, DateTime, DBNull, Decimal, Double, Empty, Int16, Int32, Int64, Object, SByte,
Filter by field
Specifies another field in the current form where the dynamic value will be retrieved
Default filter value
Specifies the default value if the parameter field has an empty value or no value
If the value is empty
Select from one of the following:
Do nothing
Remove all items
Filter on empty value
Connection by string
Connection String
Specifies the connection string
📌 Example: Data Source=sqlserver_name;Initial Catalog=wfgen;User ID=wfgen_user;Password=abc123!;
Provider name
List of provider names defined in the WorkflowGen web configuration file (AdministrationFormDataProviderName). It also supports custom defined third-party .NET data providers.
System.Data.SqlClient (.NET FWK Data Provider for SQL Server)
System.Data.OleDb (.NET FWK Data Provider for OLE DB)
System.Data.Odbc (.NET FWK Data Provider for ODBC)
Select command, Data value field, Data text field, Append data bound items, Parameters (Name, Field, Default value and Data type)
Same as Connection by name
Connection by global lists
List name
Specifies the list name
Data value column
Select the column used for item’s value
Data text column
Select the column used for item’s label
Sort column
Select the column used to sort the list
Append data bound items
Check to append the data bound items to the list. Otherwise, the data bound items will replace all the existing items in the list.
Filter
Column
Specifies the column name used to filter data
Comparison operator
Equal (=)
Not equal (<>)
Greater than (>)
Filter by field
Select the form field that contains the filter’s value
Default filter value
The default value if the field is empty
If the value is empty
Set the behavior of the filter if the value is empty
Connection by XML
URL
Specifies the file name of an XML file for data binding
📌 Examples:
c:\myfile.xml
http://server_name/myfile.xml
XPath
Specifies an XPath expression to be applied to the XML data contained by the XML file, e.g. rss/channel/item
XSL transform file
Specifies the file name of an Extensible Stylesheet Language (XSL) file (.xsl) that defines an XSLT transformation to be performed on the XML file
📌 Example: c:\myfile.xsl
Data value field, Data text field, Append data bound items
Same as Connection by Name
Connection by SharePoint 2007 and 2010
✏️ Note: The settings in the config file have to be set to detect SharePoint for this option to be active.
URL
URL of the SharePoint list
📌 Example: http://www.mysitesps.com/mylists
Name of the list
Name of the SharePoint list
📌 Example: Country
Data field value
Name of the column containing the value of the item
📌 Example: Id_Country
Data text field
Name of the column containing the text of the item
📌 Example: Description
Validation
Behavior
✏️ Note: To simplify the capture of a condition, the form fields and operators are listed in the Select a field… and Select an operator… drop-down menus. You can also press Ctrl+Spaceto display a drop-down menu that lists the available variables and keywords.
Maximum length
The maximum number of characters that can be entered
✏️ Note: Not available for TextArea fields.
Required
Sets the field to be required
Condition
The field is required based on a custom condition. If the condition is empty then it will be true. The custom condition must be server-side C# syntax code.
📌 Example: MyTextBox.Text == "Hello World"
Read-only
Sets the field to be read-only
Condition
The field is read-only based on a custom condition. If the condition is empty then it will be true. The custom condition must be server-side C# syntax code.
📌 Example: MyTextBox.Text == "Hello World"
Hidden
Sets the field to be hidden
Condition
The field is hidden based on a custom condition. If the condition is empty then it will be true. The custom condition must be server-side C# syntax code.
📌 Example: MyTextBox.Text == "Hello World"
Custom attributes
timezoneconversion
Applicable to Date and DateTime Label fields only
This property allows for the disabling of the the default user time zone conversion behavior when the form field is in Date or DateTime format.
This option is useful if you want to capture and maintain a consistent date-only value in the form field and process data without applying the time zone conversion that sometimes changes the date value depending on the original and current user time zones.
Accepted Boolean value: true or false
Additional reserved attribute names specific to Databind
connectionname, connectionstring, providername, xmldatasource, xpath, transformfile, selectcommand, parametername, parametercontrolid, parameterdefaultvalue, parametertype, datavaluefield, datatextfield
List of field types supported in the GridView:
DropDownListBox
ListBox
Label
Footer text
Display text of the column’s footer
The column’s footer text can be plain text or an expression used to filter rows, calculate the values in a column, or create an aggregate column (e.g. to calculate a summary from all the row values of the same column: =SUM). For more information, refer to DataColumn.Expression at .
Add a new column
Delete the current column
Appearance
Edit button label
Display text for the edit button
Delete button label
Display text for the delete button
Update button label
Display text for the update button
Cancel button label
Display text for the cancel button
Show edit button
Check to display edit button
Show delete button
Check to display delete button
Show header
Check to display the header
Show footer
Check to display the footer
Validation
Behavior
✏️ Note: To simplify the capture of a condition, the form fields and operators are listed in the Select a field... and Select an operator... drop-down menus. You can also press Ctrl+Spaceto display a drop-down menu that lists the available variables and keywords.
Required
Sets the field to be required
Condition
The field is required based on a custom condition. If the condition is empty then it will be true. The custom condition must be server-side C# syntax code.
📌 Example: MyTextBox.Text == "Hello World"
Read-only
Sets the field to be read-only
Condition
The field is read-only based on a custom condition. If the condition is empty then it will be true. The custom condition must be server-side C# syntax code.
📌 Example: MyTextBox.Text == "Hello World"
Hidden
Sets the field to be hidden
Condition
The field is hidden based on a custom condition. If the condition is empty then it will be true. The custom condition must be server-side C# syntax code.
📌 Example: MyTextBox.Text == "Hello World"
Additional reserved attribute names specific to GridView / Appearance
edittext, deletetext, updatetext, showheader, showfooter
Each field within a section will be automatically prefixed with the section’s identifier following an underscore character (e.g. section id=ACTION1; field id=ACTION1_MYFIELD1)
Each field within a GridView field will be automatically prefixed with the GridView’s identifier following the underscore character (e.g. gridview id=ACTION1_MYGRIDVIEW1; field id=ACTION1_MYGRIDVIEW1_TITLE1).
If the field is moved from one section to another section, then the field’s identifier will be automatically prefixed with the new section’s identifier.
If the section’s identifier is changed then all the fields within the section will be automatically prefixed with the new section’s identifier.
6/10/2019 1:45:30 PM ➞ 1:45 PM (en-US)
Long time
6/10/2019 1:45:30 PM ➞ 1:45:30 PM (en-US)
Full date/time (short time)
6/10/2019 1:45:30 PM ➞ Monday, June 10, 2019 1:45 PM (en-US)
Full date/time (long time)
6/10/2019 1:45:30 PM ➞ Monday, June 10, 2019 1:45:30 PM (en-US)
General date/time (short time)
6/10/2019 1:45:30 PM ➞ 6/10/2019 1:45 PM (en-US)
General date/time (long time)
6/10/2009 1:45:30 PM ➞ 6/10/2019 1:45:30 PM (en-US)
Month/day
6/10/2019 1:45:30 PM ➞ June 10 (en-US)
Round-trip date/time
6/10/2019 1:45:30 PM ➞ 2019-06-10T13:45:30.0900000
RFC1123
6/10/2019 1:45:30 PM ➞ Mon, 10 Jun 2019 20:45:30 GMT
Sortable date/time
6/10/2019 1:45:30 PM ➞ 2019-06-10T13:45:30
Universal sortable date/time
6/10/2019 1:45:30 PM ➞ 2019-06-10 20:45:30Z
Universal full date/time
6/10/2019 1:45:30 PM ➞ Monday, June 10, 2019 8:45:30 PM (en-US)
Year/month
6/10/2019 1:45:30 PM ➞ June, 2019 (en-US)
Name
Description
Manage custom tools...
Opens the Manage custom tools window
Custom – sections
List of custom section templates
A custom section template can be created by using the Save a section or field as tool feature or by manually deploying it on the server with the following folder and file structures: \wfgen\App_Data\Templates\Forms\[language]\[folder name]\sections\[section name].txt
📌 Example: \wfgen\App_Data\Templates\Forms\En\MyCompany\sections\MySection.txt
✏️ Note: A custom section template must comply with the content structures and rules used and known by the form designer. This is aimed at advanced users.
Custom – field
List of custom field templates
A custom field template can be created by using the Save a section or field as tool feature or by manually deploying it on the server with the following folder and file structures: \wfgen\App_Data\Templates\Forms\[language]\[folder name]\fields\[field name].txt
📌 Example: \wfgen\App_Data\Templates\Forms\En\MyCompany\fields\MyField.txt
✏️ Note: A custom field template must comply with the content structures and rules used and known by the form designer. This is intended for advanced users.
Default sections
Approval
A section that contains first name, last name, and date fields in read-only, plus an approval radio button list and comment multiline textbox
Field
Description
Save as tool
Name
Enter a unique name for the custom tool
Tools
Select an existing tool in the drop-down list for replacement
Name / Icon
Description
Sections
Name
Name of the custom section tool
Delete the current custom section tool
Fields
Name
Name of the custom field tool
Name / Icon
Description
Close and apply the changes to the section
Close and cancel the changes
Validation
Behavior
✏️ Note: To simplify the capture of a condition, the form fields and operators are listed in the Select a field... and Select an operator... drop-down menus. You can also press Ctrl+Spaceto display a drop-down menu that lists the available variables and keywords.
Required
Sets the section fields to be required
Name / Icon
Description
Close and apply the changes to the field
Close and cancel the changes
General
Enable advanced mode
Enables the file attachment settings listed below
Enable download link
Check if you want to enable the link to open file
Name / Icon
Description
Add a new checkbox/radio button
Delete the current checkbox/radio button
Items
Drag and drop to change the order of the items
Checked
Check the default selected items in the field. The radio button field supports single selection whereas the checkbox field supports multiple selections.
Name / Icon
Description
Close and apply the changes to the field
Close and cancel the changes
Validation
Behavior
✏️ Note: To simplify the capture of a condition, the form fields and operators are listed in the Select a field... and Select an operator... drop-down menus. You can also press Ctrl+Spaceto display a drop-down menu that lists the available variables and keywords.
Maximum length
The maximum number of characters that can be entered
✏️ Note: Now also available for TextArea fields.
Name / Icon
Description
Close and apply the changes to the field
Close and cancel the changes
Items
Drag-and-drop to change the order of the items
Selected
Check the default selected items in the field
The DropdownListBox field supports single selection whereas the ListBox field supports multiple selections.
Name / Icon
Description
Close and apply the changes to the field
Close and cancel the changes
Columns
Drag-and-drop to change the order of the columns
Header text
Display text on the column header
Format types
Description
Numeric
The value is numeric
Currency
The value is a currency
Date Time (system)
WorkflowGen's default date time
Short date
6/10/2019 1:45:30 PM ➞ 6/10/2019 (en-US)
Long date
6/10/2019 1:45:30 PM ➞ Monday, June 10, 2019 (en-US)
Empty
Condition
Show file size
Value
Required
Value
Field type
Short time
protected void Page_Load(object sender, EventArgs e)
{
base.Page_Load(sender, e);
String stylePath=HttpContext.Current.Request.PhysicalApplicationPath.Replace("WfApps\\WebForms\\","App_Data\\Templates\\Forms\\En\\Default\\css");
Page.Header.Controls.Remove(this.FindControl("StyleSheet"));
Page.Header.Controls.Add(
new LiteralControl(
System.IO.File.ReadAllText(stylePath + "\\" + "metal.css")
)
);
string imageUrl="http://mywebsite/mylogo.jpg"
HeaderImage.Style["background-image"] = "url('" + imageUrl+ "')";
HeaderTitleLabel.Text="My Title #";
FooterTitleLabel.Text="My footer";
imageUrl="http://mywebsite/myfooter.jpg";
FooterImage.Style["background-image"] = "url('" + imageUrl+ "')";
}FooterImage.Style["width"] = "200px";
FooterImage.Style["height"] = "100px";accesskeydirlangtabindexxml:langonbluronchangeonclickonfocusonmousedownonmousemoveonmouseoutonmouseoveronmouseuponkeydownonkeypressonkeyuponselectenabledvisibleondatabindingondisposedoninitonloadonprerenderonunloadA list of examples of custom attributes is displayed at the beginning of the tab; you can choose one or enter a specific name.
Less than (<)
Less than or equal to (<=)
Not equal (<>)
controltocompareoperatorcompareerrormessageSharePoint
SingleStringUInt16UInt32UInt64Greater than or equal to (>=)
Less than (<)
Less than or equal to (>=)
Contains
Begins with
Ends with
Is null
Is not null
In
Not In
Between
http://server_name/service.asmx/getmyfilexmlThe XML file must be structured so that the properties of each element are expressed as attributes. If you have an XML file in which property values are expressed in a format other than attributes, you must:
Create a transformation file (.xslt) that can dynamically reformat the .xml file so that it is compatible with the XmlDataSource control.
Specify the path of your XSLT file in the "XSL transform file" parameter (see below).
appenddatabounditemsspsdatasourcespsdatalistspsdatavaluefieldspsdatatextfieldTextBox
✏️ Notes:
TextBox and TextArea fields in the GridView do not support the validation settings.
The Label field in the GridView does not support the databind settings.