For the complete documentation index, see llms.txt. This page is also available as Markdown.

Notifications

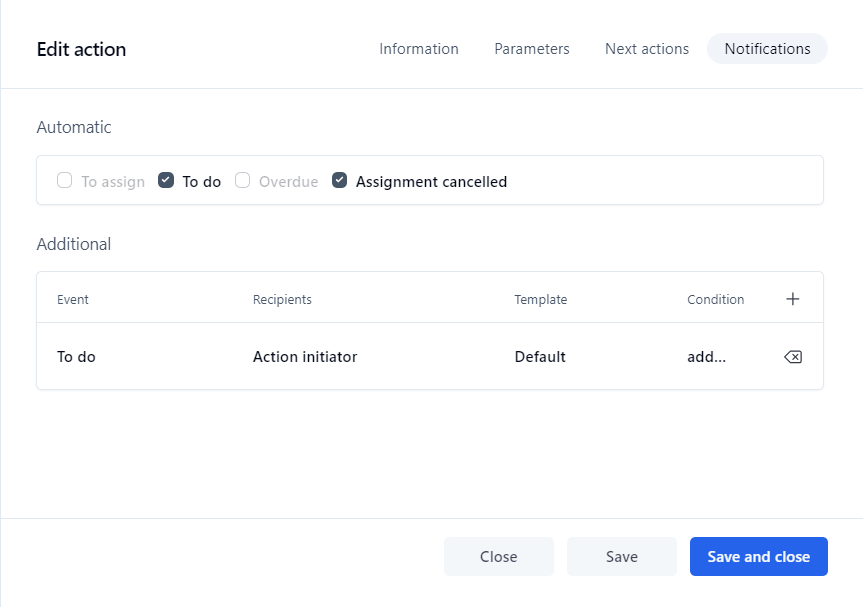
Notifications tab

Automatic notifications

Fields

Remarks

To assign

Specifies if an email is automatically sent to the user who has to assign the action

To do

Specifies if an email is automatically sent to the user who has to handle the action

Overdue

Specifies if an email is automatically sent to the user who has to handle an overdue action

Assignment cancelled

Specifies if an email is automatically sent when an action assignment has been automatically or manually cancelled

Additional notifications

Fields

Remarks

Event

Type of event notifications:

  • To do

  • Cancelled

  • Assignment cancelled

  • Assignment error

  • Overdue

  • Prior overdue (pre-overdue) *

  • Closed

  • Execution error

Recipients

Recipient(s) of the notification:

  • The requester

  • The action initiator (if the assignment method is manual)

  • The action assignee

  • Free-form email addresses (comma or semicolon separated)

  • The users associated to a participant

  • The user who has handled the action ... (action name)

  • Email addresses contained in the data ... (selected from the list below). Use , (comma) or ; (semicolon) as email separator.

Template

Email message templates:

  • Default (uses the standard email template located in \App_Data\Templates\Emails)

  • Use the content of the data (select one in the list below); the list is filled in with text and file process data.

When defining your own template in data or a file you can use:

  • The reserved keyword SUBJECT to define an email custom subject line

  • Macros

  • Custom email templates; see Custom notification templates for instructions on how to create custom email templates

* The pre-overdue notification feature is available in WorkflowGen 5.1.7 and later. A process XPDL using this feature will not be compatible with previous versions of WorkflowGen including release 5.1.6. An error will be raised when trying to import the new XPDL into those versions.

Columns

Remarks

Event

The type of event notification

Recipients

Recipient(s) of the email

Template

The selected template of the message to be sent

Condition

A link displays the notifications condition form in edit mode

Deletion

Click the x to delete the notification

Adding and editing additional notifications

To add an additional notification, click the plus sign (+) in the rightmost column header, choose an event and a template if desired (otherwise these will use the defaults of To do and Default, respectively), then choose the recipient(s). Click again to save the notification. You can then add a condition if desired.

Click on the event, the recipient(s), the template, or the condition to edit them. To remove a notification, click the x to the right of the notification.

While additional notifications are automatically saved, you must click Save or Save and close to save changes to automatic notifications.

Recurring overdue and pre-overdue reminders

As of WorkflowGen 9.6, you can configure recurring reminders directly from an action’s additional notifications. This is the recommended method when you need repeated overdue or pre-overdue reminder emails.

Recurring reminders are available only for Overdue and Prior overdue (pre-overdue) additional notification events. Other additional notification events don’t support a recurrence schedule.

Configuring a recurring reminder

  1. Open the process action.

  2. In the Additional notifications section on the Notifications tab, add or edit a notification.

  3. In the Event column, select one of the following events:

    • Overdue

    • Prior overdue (pre-overdue)

  4. Configure the Recipients and Template columns.

  5. In the Schedule column, click Add.

  6. Configure the recurrence fields:

    • Start: Defines when the first reminder is sent.

      • For an Overdue notification, leave this field empty to send the first reminder when the action becomes overdue, or enter a delay to send it after the due date.

      • For a Prior overdue (pre-overdue) notification, enter how long before the due date the first reminder must be sent. This field is required for pre-overdue recurring reminders.

    • Repeat every: Defines the interval between reminders. Leave this field empty to send only the first reminder.

    • Repeat count: Optional. Defines how many additional reminders are sent after the first reminder. This field is available only when Repeat every has a value.

  7. Click Save and close in the schedule editor.

  • The schedule supports days, hours, and minutes. Start, repeat, and repeat count values must be positive integers.

  • If the Schedule column is left empty, the additional notification keeps its existing one-time behavior.

How recurrence is applied

For Overdue notifications:

  • If Start is empty, the first reminder is sent when the action reaches its due date.

  • If Start has a value, the first reminder is sent after the due date by that amount of time.

  • If Repeat every is configured without a Repeat count, reminders continue while the action remains open.

For Prior overdue (pre-overdue) notifications:

  • Start is required and defines when the first reminder is sent before the action due date.

  • If Repeat every is configured without a Repeat count, reminders continue until the due date.

  • No pre-overdue reminder is sent after the action reaches its due date.

When Repeat count is set, the value represents the number of repeat reminders after the first reminder. For example, a first reminder plus a repeat count of 2 can send up to three reminders in total.

Recurring reminders are processed by the WorkflowGen engine service. The actual send time depends on the engine notification cadence, so a reminder is sent on the next notification run after its scheduled occurrence. The Repeat every value must be greater than or equal to the engine service notification cadence, which is based on the EngineServiceNotificationFrequency setting.

📌 Examples

Notify the assignee every day after the action becomes overdue:

  • Event: Overdue

  • Recipients: Action assignee

  • Start: Empty

  • Repeat every: 1 day

  • Repeat count: Empty

Notify the requester one day before the due date, then every two hours until the due date:

  • Event: Prior overdue (pre-overdue)

  • Recipients: Requester

  • Start: 1 day

  • Repeat every: 2 hours

  • Repeat count: Empty

Notify a supervisor two days after the action becomes overdue, then send two more daily reminders:

  • Event: Overdue

  • Recipients: Supervisor participant

  • Start: 2 days

  • Repeat every: 1 day

  • Repeat count: 2

Conditions

You can still define a condition on a recurring additional notification. The condition is evaluated when the engine processes a due reminder occurrence. If you only need reminders at fixed overdue or pre-overdue intervals, use the schedule fields instead of creating date/time conditions with scripts or macros.

Use conditions for additional business rules, such as sending a recurring reminder only when a process data value has a specific status.

XPDL import and export

When a process is exported, recurring notification settings are stored in the ActivityNotification element’s RecurrenceSchedule attribute. The attribute is exported only for Overdue and Prior overdue (pre-overdue) additional notifications.

The RecurrenceSchedule format is:

The units are:

  • d: days

  • h: hours

  • m: minutes

Imported XPDL files must use positive integer values and valid units. For pre-overdue recurring reminders, the start value is required. The repeat interval must be greater than or equal to the engine service notification cadence.

📌 Examples

  • ,1d,: Overdue reminder due when the action becomes overdue, then repeated every day with no repeat count limit.

  • 1d,,: One reminder one day before or after the due date, depending on the notification event.

  • 2h,30m,4: First reminder two hours before or after the due date, then four additional reminders every 30 minutes.

Overdue and pre-overdue notifications

You can define a hierarchy to handle overdue and pre-overdue action notifications by specifying additional notification conditions based on JavaScript or VBScript date/time calculation functions. You can do this in JavaScript by manipulating the date object directly, in VBScript using the DateDiff function, or by using the Current Action.Overdue and Current Action.Pre-overdue macros (see the Macros section for more information).

  • With overdue notification macros, the actual time overdue is rounded down to the nearest time unit, while with pre-overdue notification macros, the actual time pre-overdue is rounded up to the nearest time unit.

  • For better precision in calculating the duration, it is suggested to use minutes as the time unit in your condition. For example, if you’re using the VBScript DateDiff function in a condition, use n as the unit parameter; if you’re using a macro, use <WF_ACTIVITY_INST_OVERDUE_MINUTES> or <WF_ACTIVITY_INST_PREOVERDUE_MINUTES>.

Examples

In a process action, if you want to notify the requester that the action is late within one day, and also notify the process supervisor should the action continue to be late after two days, you have to add the two additional notifications on the action with the following settings:

Notify the requester if the action is late within 1 day

Type: Overdue Recipient: Requester

  • JavaScript:

  • VBScript:

  • Using a macro:

Notify the process supervisor if the action is late by 2 days

Type: Overdue Recipient: The supervisor participant

  • JavaScript:

  • VBScript:

  • Using a macro:

Pre-overdue notifications

In a process action, if you want to notify a user that an action will become late in advance of a due date, you have to add an additional notification on the action using the Prior overdue (pre-overdue) event.

To add a new pre-overdue notification to an action:

  1. In a process action notification tab, under the Additional section, select the Prior overdue event.

  2. Select the recipient(s).

  3. Select the Default template or a custom template previously created.

  4. Click Add.

  5. Enter the condition (see below for examples).

📌 Examples

Notification sent within 3 days prior to being overdue

  • JavaScript:

  • VBScript:

  • Using a macro:

Notification sent within 15 minutes prior to being overdue

  • JavaScript:

  • VBScript:

  • Using a macro:

There's no limit to the number of additional pre-overdue notifications that can be added to an action (e.g. 2 days, 1 day, 1 hour, 30 minutes, etc.).

  • If you don't specify a condition, the pre-overdue notification will be sent whenever an action is created with a lead time and the Windows Engine service is run. It is best practice to add a condition as per the above examples to control when the prior overdue notification is sent.

  • As of version 5.1.7, any process that includes a pre-overdue notification in an action cannot be imported into WorkflowGen versions 5.1.6 and earlier due to incompatibilities.

Last updated