Loading...
Loading...
Loading...
Loading...
Loading...
Loading...
Loading...
Loading...
Loading...
Loading...
Loading...
Loading...
Loading...
Loading...
Loading...
Azure Active Directory (Azure AD) has been renamed to Microsoft Entra ID (ME-ID). While the WorkflowGen documentation has been updated to reflect this name change, the WorkflowGen application settings still refer to Azure AD (for example, Azure AD SCIM v2 directory connector).
Likewise, certain ME-ID configuration items in the Azure portal have been renamed and/or moved. The WorkflowGen documentation has been updated accordingly, but still might not be completely accurate in this regard. See the Microsoft Entra ID documentation for more information.
This section provides instructions on how to configure the WorkflowGen Azure AD synchronization connector, which relies on Microsoft Entra ID user provisioning features. Users and groups are automatically updated (pushed to WorkflowGen) by ME-ID (every 20 to 40 minutes) using the SCIM v2 protocol.
As mentioned, it's ME-ID that pushes the data to WorkflowGen. The nature of the protocol doesn't allow WorkflowGen to update in any way the directory in ME-ID. In other words, it's ME-ID that queries WorkflowGen for information, not the other way around. This means that ME-ID is the only source of truth for users and groups for the system.
In the instructions, substitute <workflowgen url> with the domain and path to your WorkflowGen instance; for example, localhost/wfgen or mycompany.com/wfgen.
Make sure to have a working WorkflowGen instance within a network reachable by ME-ID with the HTTPS (recommended) or HTTP ports opened.
Make sure to know the address of the instance.
Make sure that the WorkflowGen instance is running.
This section provides instructions on how to define a new directory that will be used by ME-ID to synchronize users and groups. Once you've made sure you've met the prerequisites, you can proceed with configuring WorkflowGen to receive information from ME-ID.
In the WorkflowGen Administration Module (https://<workflowgen url>/admin), click Directories, then click New directory on the Directories screen.
Enter a name and a description for the directory.
From the Directory connector drop-down list, select Azure AD SCIM v2.
This section provides the steps for configuring a typical enterprise application with ME-ID in order to provision your WorkflowGen instance with users and groups.
In order to provision WorkflowGen, you have to register it in the Microsoft Entra admin center, which is done by adding a new enterprise application. To do this:
In your Azure portal, go to the Enterprise applications page, then click New application.
In the Browse Microsoft Entra Gallery page, click Create your own application, then select Integrate any other application you don't find in the gallery (Non-gallery)
Enter a name for the application. Typically, you'd want to give it a name like WorkflowGen SCIM v2
You can now proceed to configure the ME-ID application to provision WorkflowGen.
Click Provision User Accounts on the application page, then click Get started on the Overview page. All of the remaining configurations will be done here.
To set up the connection between WorkflowGen and ME-ID:
Choose Automatic provisioning mode.
Click Admin Credentials. In the Tenant URL field, add your WorkflowGen SCIM URL https://<workflowgen url>/scim (e.g. https://mycompany.com/wfgen/scim).
✏️ Note: If your WorkflowGen base domain already points to the WorkflowGen instance, don't include the wfgen part of the address.
Two new sections should now appear: Mapping and Settings. You'll need to change some mappings in order to correctly match the corresponding data in WorkflowGen, and to reduce the possibility of errors.
Groups
Click the option that contains Groups to change the mapping for groups. Then, in the new page, go to the Attribute Mappings section and keep only the externalId, displayName, and members mappings set to customappsso. You'll also need to change the mapping of externalId to ME-ID's objectId if it is not correctly mapped already. This will prevent two different groups from being provisioned with the same externalId. This attribute must be unique.
You also have the ability to customize which operations should be executed in the WorkflowGen directory. If you're starting from scratch, you should leave Create, Update, and Delete enabled to make sure that Azure can perform any operation it needs to keep WorkflowGen in sync with ME-ID.
The final mapping should resemble the following table. If you have any additional mappings that aren't listed here, you should delete them, because they won't be mapped in WorkflowGen.
Once you've set all of the group mappings, click Save again.
Users
You also need to modify the user mappings. To do this, return to the Provisioning options for the enterprise application, then click the button for user mappings in the Mappings section.
In the Attribute Mappings section of the new page, you only need to change the mapping of externalId to ME-ID's objectId.
You also have the ability to customize which operations should be executed in the WorkflowGen directory. If you're starting from scratch, you should leave Create, Update, and Delete enabled to make sure that Microsoft Entra ID can perform any operation it needs to keep WorkflowGen in sync with it.
The final mapping should resemble the following table. If you have any additional mappings that aren't listed here, you should delete them, because they won't be mapped in WorkflowGen.
Once you've set all of the user mappings, click Save.
You're now ready to launch the synchronizations of users and groups with your WorkflowGen instance. To do this, go to the Settings section of your enterprise application's Provisioning page.
If you want to synchronize only a subset of your ME-ID users and groups, select the Sync only assigned users and groups scope, then manually assign them to this application in the directory. To do this, go to the application's Users and groups section and manually add your users there.
You can also configure the application to synchronize all of your directory's users and groups. In this case, select the Sync all users and groups scope.
Once you're ready, change the provisioning status to On, then click Save.
You've now finished configuring the user and group provisioning from Microsoft Entra ID to WorkflowGen using the SCIM v2 protocol. In WorkflowGen, you can review the provisioning in the synchronization logs in the Administration Module, or in the log files created by the WorkflowGen SCIM API, located in WorkflowGen's APP_DATA directory.
If you already have a synchronization with a classic AD, this section provides instructions on how to migrate your WorkflowGen users to your new Microsoft Entra ID without having to delete then re-create them.
First, it's important to understand how Microsoft Entra ID synchronizes your directory through the SCIM connector before going ahead with a migration. In this guide, we've changed the default mapping between ME-ID object properties and SCIM properties. One of these is the externalId SCIM property, which represents a unique identifier from an external system, so it must be opaque for WorkflowGen. This guide has you change this mapping from displayName in ME-ID to objectId. In WorkflowGen, externalId maps to a user's systemIdentifier property; therefore, the objectId value from ME-ID is being provisioned into the systemIdentifier value in WorkflowGen.
Second, ME-ID begins the synchronization by interrogating the SCIM connector to find existing users. It begins by sending GET requests with its objectId values. Since WorkflowGen doesn't have any Id that corresponds to ME-ID's objectId, it will always fail with a 404 NOT FOUND error. Then, it sends GET requests but with a filter on externalId, and this time, it will find users in WorkflowGen if their systemIdentifier matches a user's objectId in ME-ID.
Deactivate the classic Active Directory synchronization connector.
Create a new Azure SCIM v2 directory connector.
Move the users and groups already in Active Directory from other existing WorkflowGen directories to the SCIM directory.
Create a script that will update users and groups in the SCIM directory with their systemIdentifier
This example contains an algorithm that links users and groups to ME-ID:
This example contains an algorithm that links only users to ME-ID:
If you encounter this issue, it might be because the users and groups are outside the scope of the synchronization. The reason could be that you didn't assign users to the enterprise application and you selected a scope of assigned users only. To resolve this, assign users to the enterprise application by going into its Users and groups section. You can also change the scope of the synchronization to all of the directory's users and groups by editing the enterprise application's synchronization settings.
Another possible cause might be related to other configurations in your Microsoft Entra ID. For more troubleshooting steps, see the Microsoft article.
WfgDirectoriesSyncService.exeA P2 license must be activated in the ME-ID tenant.
Click Save to create the directory.
Copy the generated SCIM token value, since you'll need it for the next step.
Click Create.
In the Secret Token field, paste the SCIM token value that WorkflowGen generated earlier when you created the new SCIM directory.
Click Test Connection and wait for the results. If all goes well, you'll receive a notification along with additional options.
Click Save at the top of the page.
The WorkflowGen group column corresponds to the group fields and properties that will be updated in WorkflowGen.
firstName
jobTitle
title
jobTitle
mail
emails[type eq "work"].value
email
objectId
externalId
systemIdentifier
employeeId
urn:ietf:params:scim:schemas:extension:enterprise:2.0:User:employeeNumber
employeeId
companyName
urn:ietf:params:scim:schemas:extension:enterprise:2.0:User:organization
companyName
department
urn:ietf:params:scim:schemas:extension:enterprise:2.0:User:department
department
manager
urn:ietf:params:scim:schemas:extension:enterprise:2.0:User:manager
manager
mobile
phoneNumbers[type eq "mobile"].value
mobile
city
addresses[type eq "work"].locality
city
state
addresses[type eq "work"].region
state
postalCode
addresses[type eq "work"].postalCode
postalCode
country
addresses[type eq "work"].country
country
physicalDeliveryOfficeName
addresses[type eq "other"].Formatted
office
streetAddress
addresses[type eq "work"].streetAddress
postalAddress
surname
name.familyName
lastName
telephoneNumber
phoneNumbers[type eq "work"].value
phone
userPrincipalName
userName
userName
objectIdME-ID attribute
customappsso attribute
WorkflowGen group
objectId
externalId
systemIdentifier
mailNickname
displayName
name
members
members
users
ME-ID attribute
customappsso attribute
WorkflowGen user
Switch([IsSoftDeleted], , "False", "True", "True", "False")
active
isActive
displayName
displayName
commonName
FacsimileTelephoneNumber
phoneNumbers[type eq "fax"].value
fax
givenName
name.givenName
groups = fetch_groups_from_azure()

for group in groups:
    for user in group.users:
        wfgUser = fetch_wfg_user_with_key(user.something)
        wfgUser.systemIdentifier = user.objectId
        update(wfgUser)

    wfgGroup = fetch_wfg_group_with_key(group.something)
    wfgGroup.systemIdentifier = group.objectId
update(wfgGroup)users = fetch_users_from_azure()
for user in users:
wfgUser = fetch_wfg_user_with_key(user.something)
wfgUser.systemIdentifier = user.objectId
update(wfgUser)This guide provides detailed information and instructions on:
Microsoft Entra ID synchronization: How to configure WorkflowGen users and groups synchronization using Microsoft Entra ID.
Microsoft Entra ID authentication: How to configure WorkflowGen authentication using OpenID Connect and Microsoft Entra ID.
Microsoft Entra ID configuration for WorkflowGen Plus v2: How to authorize access to mobile applications using OpenID Connect and Microsoft Entra ID.
: How to authorize WorkflowGen access to server-side scripts using OpenID Connect and Microsoft Entra ID.
: How to authorize WorkflowGen access to single-page applications using OpenID Connect and Microsoft Entra ID.
: How to configure Microsoft Entra ID for use with the WorkflowGen command line interface.
: How to configure WorkflowGen's Remote Approval service to integrate with Exchange Online using Modern authentication.
: How to configure the WorkflowGen database using Azure SQL database.
: How to configure the optional Read Scale-Out feature.
: How to configure Azure Load Balancer for higher availability and greater scalability.
: How to configure an Azure Files share to use in WorkflowGen.
: How to configure an Azure SendGrid SMTP with WorkflowGen.
: How to generate a universal link to simplify the WorkflowGen Plus v2 mobile app user login.
: How to set up and manage a Kubernetes cluster tailored for WorkflowGen in Azure.
It also provides additional information on , , , and .
This section provides instructions on how to configure an Azure SendGrid SMTP with WorkflowGen.
The SendGrid account must be created in the . See for more information on how to create a SendGrid account. Once you've completed the configuration, you'll have:
The server name (e.g. smtp.sendgrid.net)
The username (e.g. apikey)
The generated password
For more information about the SendGrid SMTP integration, see the Twilio article.
To set up the connection between WorkflowGen and Azure SendGrid SMTP:
Go to the General tab in the Configuration Panel.
In the SMTP section:
Choose Server as the delivery method.
As of WorkflowGen server version 7.16.0, you can generate a universal link to simplify the Microsoft Entra ID (ME-ID) login process for your WorkflowGen Plus mobile app users.
The WorkflowGen Plus v2 mobile app supports ME-ID delegated authentication with the Microsoft Identity Platform v2.0 (ms-identity-v2) provider only.
protocol: workflowgenplus://
hostname: auth.init
You'll need to specify the following parameters:
provider: ms-identity-v2
server_address: Your WorkflowGen application URL, whose value must be URL encoded (e.g. https://mycompany.com/wfgen)
client_id: This is the application (client) ID from your WorkflowGen Plus
The universal link should follow this format:
Once you've generated the universal link, give it to your users, who can use it to sign in to WorkflowGen Plus v2 with the preset sign-in method.
This section provides instructions on how to configure the optional Read Scale-Out feature, which allows load balancing of SQL Database read-only workloads using a read-only replica rather than a read-write replica. For more information on this feature, see the Microsoft article.
25 or 587 set for TLS connections and explicit SSL connections.In the Port field, enter port 25 or 587.
Check Use SSL/TLS.
In the Username field, add your username.
In the Password field, add your password.
Click Test next to the Host name field.
In the Recipient mail field that will then appear under Sender mail, add an email address for testing, then click Send.
4b72dd6c-013e-4a9c-b837-f03a58cb8fd1tenant_id: This is the directory (tenant) ID from your WorkflowGen Plus native application registration in ME-ID (e.g. 6g909d00-8580-49a4-9003-a30f6b87ae86)
audience: Your WorkflowGen GraphQL API URL, whose value must be URL encoded (e.g. https://mycompany.com/wfgen/graphql)
workflowgenplus://auth.init?provider=ms-identity-v2&server_address=https%3A%2F%2Fmycompany.com%2Fwfgen&client_id=4b72dd6c-013e-4a9c-b837-f03a58cb8fd1&tenant_id=6g909d00-8580-49a4-9003-a30f6b87ae86&audience=https%3A%2F%2Fmycompany.com%2Fwfgen%2FgraphqlMake sure to have either a Premium or a Business Critical service tier.
You must have permissions to make changes to the database in the Azure portal.
Install or update the Azure PowerShell module in PowerShell by running the following commands:
For more information, see the Install Azure PowerShell Microsoft article.
Log in to your Microsoft Azure account in PowerShell by running the following command:
If you encounter any security issues with the Microsoft Azure sign-in process, then you must manually add https://login.microsoftonline.com/ and all related websites' URIs to the Trusted sites zone in Internet Explorer's Internet Options.
Enable the Read Scale-Out feature in PowerShell by running the following command:
Replace <resource group> with the resource group name.
Replace <server name> with the server name (e.g. workflowgen.database.windows.net).
Replace <database name> with the database name (e.g. WFGEN
You can also enable Read Scale-Out feature using the Azure SQL Database Rest API.
Go to the Database section on the Configuration Panel General tab.
In the Master database connection string field, add the ApplicationIntent=ReadWrite parameter to the existing connection string and click Test to test the database availability. Here's an example of a connection string:
In the Read-only database connection string field, add (or edit) the connection string with the new ApplicationIntent=ReadOnly parameter, and click Test to test the database availability. Here's an example of a connection string:
Check the Multi-database option. Check the User Portal components and modules that will use the Read-only database. For more information about this, see in the .
This section provides instructions on how to create and configure your Azure Load Balancer feature. From the Microsoft article:
With Azure Load Balancer you can scale your applications and create high availability for your services. Load Balancer supports inbound and outbound scenarios, provides low latency and high throughput, and scales up to millions of flows for all TCP and UDP applications.
Load Balancer distributes new inbound flows that arrive on the Load Balancer's frontend to backend pool instances, according to rules and health probes.
Azure Active Directory (Azure AD) has been renamed to Microsoft Entra ID (ME-ID). While the WorkflowGen documentation has been updated to reflect this name change, the WorkflowGen application settings still refer to Azure AD (for example, Azure AD SCIM v2 directory connector).
Likewise, certain ME-ID configuration items in the Azure portal have been renamed and/or moved. The WorkflowGen documentation has been updated accordingly, but still might not be completely accurate in this regard. See the documentation for more information.
Install-Module -Name AzureRM -AllowClobber
Import-Module -Name AzureRMLogin-AzureRmAccountData Source=workflowgen.database.windows.net;Initial Catalog=WFGEN;User ID=wfgen_user;Password=Admin123!;encrypt=true;trustServerCertificate=false;ApplicationIntent=ReadWrite;Data Source=workflowgen.database.windows.net;Initial Catalog=WFGEN;User ID=wfgen_user;Password=Admin123!;encrypt=true;trustServerCertificate=false;ApplicationIntent=ReadOnly;Set-AzureRmSqlDatabase -ResourceGroupName <resource group> -ServerName <server name> -DatabaseName <database name> -ReadScale EnabledCreate a Basic load balancer following the instructions on the Azure Quickstart page. Once you've completed the steps, you'll have:
A load balancer with its resources configured: a back-end address pool, a health probe, and a load balancer rule
✏️ Note: When creating the load balancer rule, you can configure the sticky-session from the Session persistence drop-down list. If the Session state is enabled in the web forms, the sticky-session is mandatory.
A virtual network
Two virtual machines with IIS installed on both
A network security group
✏️ Note: When creating the NGS rules, adding the RDP rule is recommended for testing only. For production, we recommend using a VPN or private connection. See the Microsoft article for instructions.
The public IP address for the load balancer, which you can find on its overview page
✏️ Note: This public IP address will be used to access to WorkflowGen instances.
To create a Load Balancer and its components via the Azure CLI, first sign in to your Azure account with Azure CLI, then follow the steps below:
Create a load balancer with its resources (back-end address pool, health probe and a load balancer rule).
✏️ Note: You can configure the sticky-session by using the --load-distribution parameter in the script. For more details about all parameters supported see the Manage load balancing rules Microsoft article. If Session State is enabled in the web forms, the sticky-session is mandatory (see the How to enable Session State in the WebForms application WorkflowGen Knowledge Base article for more information).
Create and configure the virtual network. ✏️ Note: The network security group and its rules will be created when configuring the virtual network. It is recommended to add an RDP rule for testing purposes.
with IIS installed on both.
Install WorkflowGen on both virtual machines by following the instructions in the Setup section in the WorkflowGen Technical Guide.
✏️ Note: Once WorkflowGen is installed, it is required to enable Anonymous Authentication for the WorkflowGen website. The wfgen application and sub-applications may have different authentications enabled.
Make sure that both instances of WorkflowGen point to the same database. Your database can be:
An OR
A classic MS SQL database instance on a dedicated server or on one of the virtual machines. Be sure to add inbound and outbound security rules (depending on your needs) for the SQL port in the network security group.
Create an Azure file share following the instructions in the section, and copy the file share path.
✏️ Note: Make sure to replace the ApplicationDataPath setting's value in the WorkflowGen web.config file with the new file share path.
Open the WorkflowGen web.config file and modify the value of the following setting:
For both WorkflowGen instances, replace <load balancer public IP address> above with the load balancer's public IP address.
Configure your WorkflowGen in a web farm architecture following the instructions in the Web farm architecture section in the WorkflowGen Technical Guide. Once you've completed the instructions, you'll have:
A common WebForms folder
Both WorkflowGen Engine and Directory Synchronization services running on one of the WorkflowGen instances only.
Mobile applications must use an approach similar to that of regular web applications, which is called Authorization Code Flow with Proof Key for Code Exchange (PKCE). The main difference between this and the classic Authorization Code Flow is that the mobile application doesn't get a client secret, but instead exchanges a pair of codes to prove the origin of the authentication attempt. The issue is that a mobile application can't be trusted with a client secret because it's distributed directly to users and is therefore no longer under the developer's control, and the sources can be decompiled and analyzed to find secrets like this.
This section provides instructions on how to configure Microsoft Entra ID for mobile apps so that your mobile users can benefit from delegated authentication to ME-ID as well.
The WorkflowGen Plus v2 mobile app (available in the Apple and Google Play app stores) supports ME-ID delegated authentication with the Microsoft Identity Platform v2.0 provider only. As well, it will not work with a WorkflowGen server that is configured to call third-party APIs with OpenID Connect (e.g. using a custom audience and/or multi-scopes).
The WorkflowGen Plus v1 mobile app is no longer supported.
Make sure to have a licensed copy of WorkflowGen installed and running on an IIS web server in HTTPS secure connection mode.
Make sure to have administrative access to ME-ID to be able to configure it properly.
Make sure to have provisioned an existing ME-ID user with which you can authenticate to WorkflowGen so that you can use the application afterwards.
Make sure to have successfully configured delegated authentication to ME-ID with the Microsoft Identity Platform v2.0 provider on your WorkflowGen instance following the instructions in the section with the WorkflowGen GraphQL API application registered as well.
This configuration is done in three steps. First, you have to register a new native application in ME-ID. Then, you have to give the application the necessary permissions to access the WorkflowGen GraphQL API. Finally, you have to register the correct callback URLs that will redirect within the native application.
In the Azure portal, click App registrations in the Azure services section.
Click New registration, and fill in the properties:
Name: WorkflowGen Plus
Supported account types: Accounts in this organizational directory only (Default Directory only - Single tenant)
✏️ Note: Depending on the context, you should choose the right option for your use case for the supported account type value.
Redirect URI:
Type: Public client/native
Value: workflowgenplus://oidc
Click Register at the bottom of the page.
You've now successfully registered your WorkflowGen Plus native application in Microsoft Entra ID.
Click API permissions.
In the Configured permissions section, click Add a permission.
Click My APIs, then select the WorkflowGen GraphQL API application in the list.
Click Delegated permissions and check default under the Permission column.
Click Add permissions.
On the API permissions page, click Grant admin consent for <your tenant name>, then click Yes.
Take note of the information you'll need later on:
A server address: This is your WorkflowGen application URL (e.g. https://<workflowgen url>).
A client ID: This is the application (client) ID in the Overview section of your application registration.
A tenant ID: This is the directory (tenant) ID in the Overview section of your application registration.
An audience: This is the Application ID URI property (e.g. https://<workflowgen url>/graphql) in the Expose an API section of the WorkflowGen GraphQL API application registration.
You'll need to give the server address, client ID, tenant ID , and audience information to the users who will be using the WorkflowGen Plus v2 mobile application. ME-ID delegated authentication won't work unless they copy this information into the mobile app.
You've now successfully registered the WorkflowGen Plus mobile application in Microsoft Entra ID.
Make sure to have a licensed copy of WorkflowGen installed and running on an IIS web server in HTTPS secure connection mode.
Make sure to have Microsoft Entra ID (ME-ID) administrator access to be able to configure it.
Make sure to have provisioned an existing ME-ID user with which you can authenticate to WorkflowGen so that you can use the application afterwards.
Make sure to have successfully configured delegated authentication to ME-ID with the Microsoft Identity Platform v2.0 provider on your WorkflowGen instance following the instructions in the section with the WorkflowGen GraphQL API application registered as well.
This configuration is done in three steps. First, you have to register a new native application in ME-ID. Then, you have to give the application the necessary permissions to access the WorkflowGen GraphQL API. Finally, you have to register the correct callback URLs that will redirect within the native application.
In the Azure portal, click App registrations in the Azure services section.
Click New registration, and fill in the properties:
Name: WorkflowGen CLI
Supported account types: Accounts in this organizational directory only (Default Directory only - Single tenant)
✏️ Note: Depending on the context, you should choose the right option for your use case for the supported account type value.
Redirect URI:
Platform: Public client/native (mobile & desktop)
Value: http://127.0.0.1:8888/callback
✏️ Note: Port 8888 is defined by default; you can change it if it's already in use on your computer.
Click Register at the bottom of the page.
You've now successfully registered your WorkflowGen CLI native application in ME-ID.
Click API permissions.
In the Configured permissions section, click Add a permission.
Click My APIs, then select the WorkflowGen GraphQL API application in the list.
Click Delegated permissions and check default under the Permission column.
Click Add permissions.
On the API permissions page, click Grant admin consent for <your tenant name>, then click Yes.
Take note of the information you'll need later on:
A client ID: This is the application (client) ID in the Overview section of your application registration.
A tenant ID: This is the directory (tenant) ID in the Overview section of your application registration.
You'll need to give this information to the users who will be using the WorkflowGen CLI.
You've now successfully registered the WorkflowGen CLI in Microsoft Entra ID.
The configuration of non-interactive mode is the same as in the Microsoft Entra ID Configuration for Server-Side Scripts section.
<add key="ApplicationUrl" value="http[s]://<load balancer public IP address>/wfgen" />Azure Active Directory (Azure AD) has been renamed to Microsoft Entra ID (ME-ID). While the WorkflowGen documentation has been updated to reflect this name change, the WorkflowGen application settings still refer to Azure AD (for example, Azure AD SCIM v2 directory connector).
Likewise, certain ME-ID configuration items in the Azure portal have been renamed and/or moved. The WorkflowGen documentation has been updated accordingly, but still might not be completely accurate in this regard. See the Microsoft Entra ID documentation for more information.
As of WorkflowGen version 7.22.5, Remote Approval supports the use of a Microsoft 365 user account in Exchange Online using Modern authentication to receive and process approval emails.
Modern authentication uses the industry-standard OAuth2 protocol for authorization. For this, OAuth2 provides a type of grant called Client Credentials that simply exchanges a client ID and secret for an access token that will be used to retrieve and send approval emails from the Office user account mailbox.
This section provides instructions on how to configure Remote Approval to integrate with Exchange Online using Modern authentication. First, you'll need to configure a new application in the Azure portal; then, you'll need to configure the Remote Approval settings in WorkflowGen.
Microsoft plans to disable support for Basic Authentication across all tenants for the Exchange Online service in the near future. It is now suggested to migrate to Modern authentication. See the Microsoft article for more information.
Make sure to have a licensed copy of WorkflowGen installed and running on a server.
Make sure to have administrative access to WorkflowGen.
Make sure to have administrative access to Microsoft Entra ID to be able to configure it properly.
Make sure to have turned ON Modern authentication for Outlook client in the Microsoft 365 admin center. See the Microsoft article for more information.
In the Azure portal, click App registrations in the Azure services section.
Click New registration, and fill in the properties:
Name: Your Remote Approval app name (e.g. WorkflowGen Remote Approval)
You've now successfully registered your Remote Approval app in ME-ID.
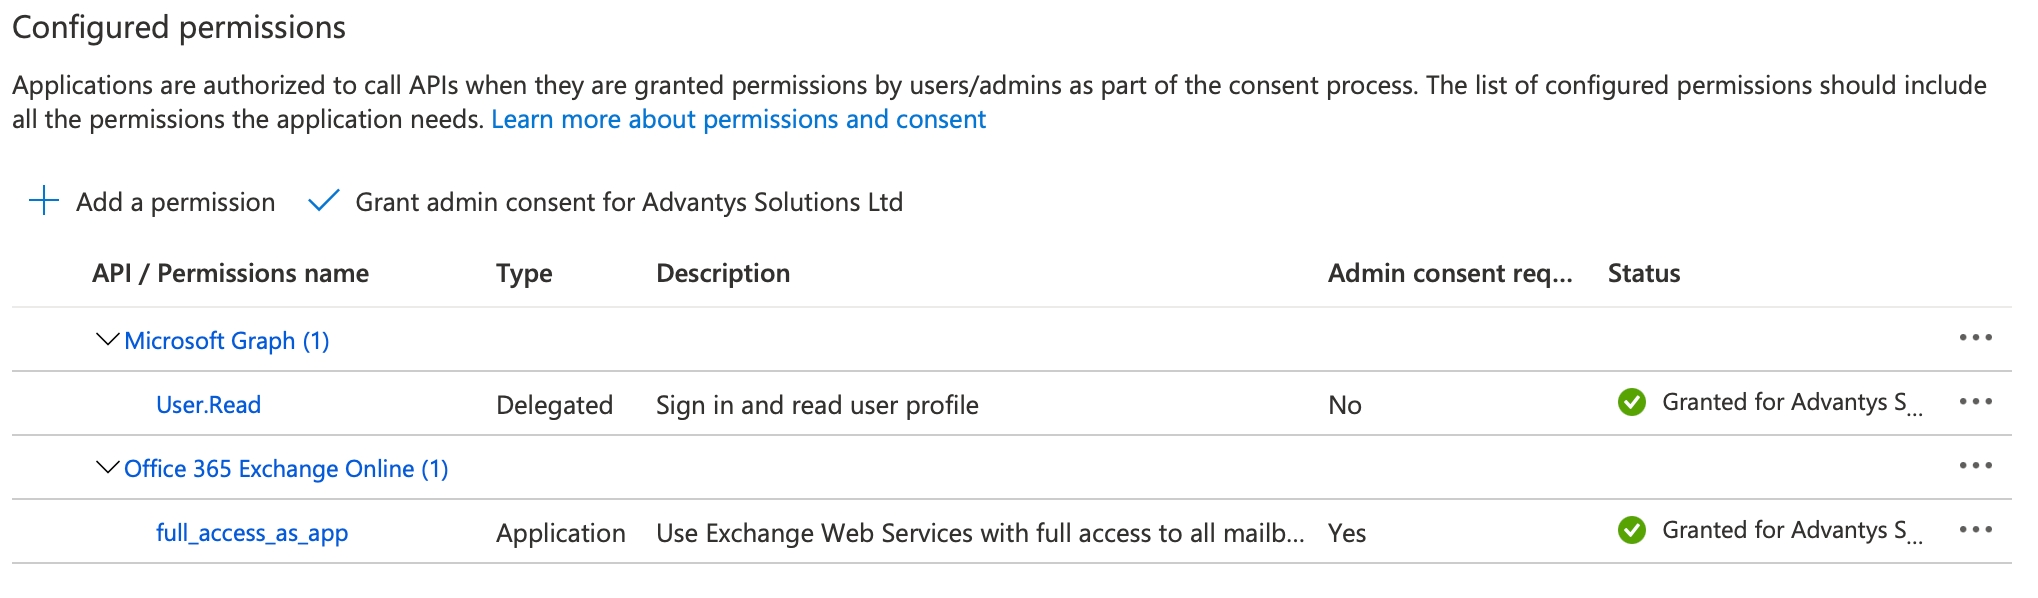
Click API permissions.
In the Configured permissions section, click Add a permission.
Click APIs my organization uses, then search for Office 365 Exchange Online.
Stay within the API permissions section.
If you're a Microsoft 365 administrator, click Grant admin consent for to grant consent to the application.
If you're not a Microsoft 365 administrator, then you'll need to ask one to grant admin consent for your application in their Azure Portal.
In the Applications menu, click Certificates & secrets.
In the Client secrets section, click New client secret and enter the following properties:
Description: client_secret (or something that clearly identifies that it's a secret)
In the Applications menu, click Branding.
If needed, update your application name, company logo, home page URL, terms of service URL, or privacy statement URL.
Click Save when done.
Here's a review of the information you'll need:
The Remote Approval application (client) ID, which can be found in the registered application overview section.
Your directory (tenant) ID, which can be found in the registered application overview section.
A client secret, which is the value that was generated in the Certificates & secrets section from step 4.
You're now ready to configure your Remote Approval settings in WorkflowGen.
Open the Configuration Panel from the WorkflowGen Administration Module home page.
On the Remote Approval tab, fill in the form for the Incoming mail server section:
Type: Exchange Online - Modern Authentication
Your Remote Approval integration with Exchange Online - Modern authentication should now be complete and functional.
You can use Azure Active Directory to authenticate and authorize users in the cluster. See the Integrate Azure Active Directory with Azure Kubernetes Service using the Azure CLI Microsoft article for more information.
By default, AKS doesn't restrict further Windows nodes from preventing Linux deployment on them. It's recommended to use taints and tolerations to avoid problems with Linux deployment being scheduled to Windows nodes. The following is an example of how you can use taints and tolerations to manage hybrid deployments.
Tainting all Windows nodes will prevent any deployment to Windows nodes from being scheduled except when it has the required toleration. Therefore, for many Linux Helm charts that don't have a node selector, the deployments to Linux nodes will automatically be scheduled. Google Kubernetes Engine does this by default. Execute the following command to taint a Windows node:
To be able to deploy Windows pods to Windows nodes, you have to use a combination of tolerations and node selectors in your deployment specification. For example, consider this WorkflowGen deployment:
In order for it to be scheduled to a Windows node, you would have to add the following to the template's spec:
This adds a toleration for the taint that you've just added to the node and tells the Kubernetes scheduler to select a Windows node when scheduling the WorkflowGen pods.
You can also simplify this by creating a RuntimeClass object that holds this information and referencing the runtime class in your Windows deployments:
Apply this file:
Then, add the following to the template's spec:
As you can see, this RuntimeClass also ensures that the deployment will be on a Windows LTSC 2019 (1809) node.
There are two things that you must consider for update management: the Kubernetes version and the operating system update. For information on upgrading the cluster to a specific Kubernetes version, see Upgrade an Azure Kubernetes Service (AKS) cluster.
Applying security patches and updating operating systems differ for Linux and Windows nodes. To get started with operating system updates, see Apply security and kernel updates to Linux nodes in Azure Kubernetes Service (AKS) for more information. (Don't worry about the title of the article; there's a paragraph about Windows updates in it.)
You can use an autoscaler in AKS to automatically scale up the number of nodes in your cluster based on rules to keep up with demands. See Automatically scale a cluster to meet application demands on Azure Kubernetes Service (AKS) for more information. This feature pairs well with the Kubernetes horizontal pod autoscaler. See Horizontal Pod Autoscaler for more information.
You can also use Azure Container Instances to quickly scale up your cluster for a short period of time. See Scaling options for applications in Azure Kubernetes Service (AKS) for more information.
kubectl taint nodes "<NODE_NAME>" os=windows:NoScheduleapiVersion: apps/v1
kind: Deployment
metadata:
name: wfgen-webapps
spec:
replicas: 3
strategy:
type: Recreate
selector:
matchLabels:
app.kubernetes.io/name: workflowgen
app.kubernetes.io/component: webapps
template:
metadata:
labels:
app.kubernetes.io/name: workflowgen
app.kubernetes.io/component: webapps
spec:
containers:
- name: wfgen
image: advantys/workflowgen:7.18.3-win-ltsc2019
imagePullPolicy: Always
resources:
requests:
memory: "2Gi"
cpu: "1"
limits:
memory: "2Gi"
cpu: "1"
ports:
- name: http
containerPort: 80
protocol: TCP
envFrom:
- configMapRef:
name: wfgen-config
env:
- name: WFGEN_START_SERVICE
value: webapps
livenessProbe:
periodSeconds: 30
timeoutSeconds: 5
initialDelaySeconds: 60
exec:
command:
- powershell
- C:\healthcheck.ps1
livenessProbe:
timeoutSeconds: 5
initialDelaySeconds: 60
exec:
command:
- powershell
- -Command
- if (Test-Path "C:\iislog\W3SVC\*log") { return 0 } else { return 1 }
volumeMounts:
- mountPath: C:\wfgen\data
name: wfgdata
- mountPath: C:\wfgen\licenses
readOnly: true
name: licenses
- mountPath: C:\secrets
readOnly: true
name: secrets
volumes:
- name: wfgdata
persistentVolumeClaim:
claimName: wfgdata-pvc
- name: licenses
secret:
secretName: wfgen-license-secret
items:
# The following must match the name of the license item in
# the license secret, e.g. the name of the license file
- key: WorkflowGen.lic
path: WorkflowGen.lic
- name: secrets
secret:
secretName: wfgen-secnodeSelector:
kubernetes.io/os: windows
tolerations:
- key: os
operator: Equal
value: windows
effect: NoScheduleapiVersion: node.k8s.io/v1beta1
kind: RuntimeClass
metadata:
name: windows-1809
handler: 'docker'
scheduling:
nodeSelector:
kubernetes.io/os: 'windows'
kubernetes.io/arch: 'amd64'
node.kubernetes.io/windows-build: '10.0.17763'
tolerations:
- key: os
operator: Equal
value: windows
effect: NoSchedulekubectl apply -f windows-runtimeclass.yamlruntimeClass: windows-1809Make sure to use a Microsoft 365 user account that has a valid Microsoft 365 license and read/write permissions to the Exchange Online mailbox. This account will be used for the Remote Approval username and default reply-to email settings.
Supported account types: Accounts in this organizational directory only (Default Directory only - Single tenant)
Redirect URI: Leave this blank
Click Register at the bottom of the page.
Click Application permissions.
Expand Other permissions, then check full_access_as_app.
Click Add permissions.
Expires: Select the desired expiration period (e.g. Recommended: 6 months)
Click Add.
Copy and save the value generated by Azure somewhere safe. This is your client secret (referred to as application password), and you won't be able to retrieve it later.
Server address: outlook.office365.com, or your own Exchange Online domain name
Security: SSL
Default reply-to email: Email address of the Remote Approval Office user
Username: Username of the Remote Approval Office user
Application (client) ID: The Remote Approval application (client) ID from the Azure Portal
Client secret: The client secret that was generated in the Remote Approval Certificates & secrets section from the Azure Portal
Scope: https://outlook.office365.com/.default&grant_type=client_credentials (replace outlook.office365.com with your own Exchange Online domain name if needed)
Access token URI: https://login.microsoftonline.com/{directory_tenant_ID}/oauth2/v2.0/token (replace {directory_tenant_ID} with your own directory (tenant) ID from the Azure Portal)
In the Remote Approval section:
Check Activate to enable the Remote Approval service
Update the other fields as needed
Click Save.
Azure Active Directory (Azure AD) has been renamed to Microsoft Entra ID (ME-ID). While the WorkflowGen documentation has been updated to reflect this name change, the WorkflowGen application settings still refer to Azure AD (for example, Azure AD SCIM v2 directory connector).
Likewise, certain ME-ID configuration items in the Azure portal have been renamed and/or moved. The WorkflowGen documentation has been updated accordingly, but still might not be completely accurate in this regard. See the Microsoft Entra ID documentation for more information.
This section provides instructions on how to configure Microsoft Entra ID (ME-ID) with a single-page application (SPA) so that users can authenticate through it and make requests to the WorkflowGen GraphQL API. This configuration is done in three steps: registering your SPA, granting access to the API, and setting some redirect URLs.
Make sure to have a licensed copy of WorkflowGen installed and running on an IIS web server in HTTPS secure connection mode.
Make sure to have administrative access to ME-ID to be able to configure it properly.
Make sure to have provisioned an existing ME-ID user with which you can authenticate to WorkflowGen so that you can use the application afterwards.
In the Azure portal, click App registrations in the Azure services section.
Click New registration, and fill in the properties:
Name: My SPA name
You've now successfully registered your application in ME-ID.
Click Authentication.
Go to the Implicit grant and hybrid flows section.
Check the Access tokens and ID tokens checkboxes.
Now that you've successfully registered your SPA, you need to grant it access to the WorkflowGen GraphQL API application, which should be already registered if you've met the prerequisites.
Click API permissions.
In the Configured permissions section, click Add a permission.
Click My APIs, then select the WorkflowGen GraphQL API application in the list.
You should now see WorkflowGen GraphQL API in the list of your registered SPA's API permissions. Therefore, when requesting an access token to Azure, based on the audience, you should be able to obtain a correct token that you will send to your WorkflowGen instance's GraphQL API in addition to the request.
WorkflowGen GraphQL API application registered as well.Supported account type: Accounts in this organizational directory only (Default Directory only - Single tenant)
✏️ Note: Depending on the context, you should choose the right option for your use case for the supported account type.
Redirect URI:
Platform: Web
Value: https://<my spa login url>
Click Register at the bottom of the page.
Click Delegated permissions and check default under the Permission column.
Click Add permissions.
On the API permissions page, click Grant admin consent for <your tenant name>, then click Yes.
Azure Files is a cloud-based service that provides a file storage backing service for WorkflowGen instances that are hosted on Azure cloud or on-premise via a file share using the standard SMB protocol. This service provides different great options for data access, sharing, synchronization, and redundancy for use in single or multiple WorkflowGen instance scenarios.
For more information about Azure File benefits or use cases, refer to Microsoft's guide.
The following section provides recommendations and instructions on how to configure an Azure Files share to use in WorkflowGen.
Before choosing Azure Files as your primary file storage backing service for your WorkflowGen, there are a few performance configuration scenarios to consider for your data storage:
In a WorkflowGen single instance configuration
Hosted on an Azure Virtual Machine:
For best performance, use an SSD-grade local disk.
For good performance, use an Azure Files share in the same region.
Hosted on-premise:
For best performance, use an SSD-grade local disk.
For basic performance, use an Azure Files share in the region closest to your server for the lowest latency.
In a WorkflowGen web farm configuration
Hosted on an Azure Virtual Machine:
For best performance, use a file share from a file server backed by SSD-grade storage. ✏️ Note: One of the WorkflowGen web servers or a dedicated virtual machine can act as the file server role.
Make sure to have a working WorkflowGen instance with internet access.
Make sure to know the address of the instance.
TCP port 445 must be open for outbound from the instance.
Windows PowerShell version 5.1 or later is required on the instance for one of the steps of the configuration.
An active Azure subscription.
You must have permissions to make changes in Windows of the WorkflowGen instance, e.g. Administrator privileges.
You must have permissions to make changes to the Storage accounts service in the Azure portal.
In the Azure portal, choose the Storage accounts service.
Add a new storage account.
Enter a name.
✏️ Note: The wfgendatastorage storage name will be used as an example throughout this section.
Account kind: Choose Storage (general purpose v1) or StorageV2 (general purpose v2).
Location: Choose a location in the same region as your Azure Virtual machine, or the closest to your on-premise location.
Performance: Choose Standard.
Choose your subscription.
Create a new resource group.
✏️ Note: The wfgenresourcegroup resource group name will be used as an example throughout this section.
You can leave the rest of the settings set to their default values or you can customize them according to your needs.
Click Create.
For more information about storage accounts, see About Azure storage accounts.
To create a storage account via the Azure CLI, first sign in to your Azure account with Azure CLI.
The following script creates a storage account in Azure. The resource group name variable ($resourceGroup) and storage account variable ($storageAccount) should be updated.
In the Storage accounts service, choose wfgendatastorage.
In the Overview or the FILE SERVICE section, choose Files.
Add a new File share.
Enter a name.
✏️ Note: The wfgenshare storage name will be used as an example throughout this section.
Enter a quota according to your needs.
Click OK.
For more information about file share, see Create a file share in Azure Files.
To create a file share via the Azure CLI, first sign in to your Azure account with Azure CLI.
The following script creates a file share in Azure. The storage account variable ($storageAccount) and file share variable ($share) should be updated.
Log in to your WorkflowGen instance with your Administrator account.
Open an instance of Windows PowerShell 5.1 as Administrator.
Test TCP port 445 for outbound by running the following command in PowerShell:
✏️ Note: Remember to replace wfgendatastorage in the above instructions with your storage account name.
If the test result is successful, proceed to the next step. Otherwise, contact your network administrator to open TCP port 445 for outbound.
Install or update the Azure PowerShell module in PowerShell:
For more information, see .
In the Windows Computer Management console, create a local user as the service account that will be used for the WorkflowGen IIS application pool:
Enter a new username and password.
✏️ Note: The wfgen_service username will be used as an example throughout this section.
Check User cannot change password.
Log in to your WorkflowGen instance with the wfgen_service account.
Open an instance of Windows PowerShell 5.1 as Administrator.
Log in to your Microsoft Azure account in PowerShell:
If you encounter any security issues with the Microsoft Azure sign-in process, then you must manually add https://login.microsoftonline.com/ and the URIs of all related websites to the Trusted sites zone in Internet Explorer's Internet Options.
In the Microsoft Azure window, sign in to the Azure account that you used to create your storage account.
If you've successfully signed in to your Azure account, PowerShell will display the following information:
Persist the Azure Files share credential in Windows for the wfgen_service account in PowerShell:
✏️ Note: Remember to replace wfgendatastorage and wfgenresourcegroup in the above instructions with your storage account and resource group names.
The credential needs to be persisted for the wfgen_service account in the event of a Windows server restart.
If the credential is successfully stored then you should see the following message:
Verify if the credential has been stored for the storage account in PowerShell:
If successful, you should then see:
Test the Azure Files share in the Windows File Explorer.
✏️ Note: Remember to replace wfgendatastorage and wfgenshare in the above instructions with your storage account and file share names.
For more information about file share in Windows, see Use an Azure file share with Windows.
Log in to your WorkflowGen instance with your administration account.
Open the Internet Information Services (IIS) manager console.
Change your WorkflowGen application pool to use the custom wfgen_service account with the following settings:
Identity: wfgen_service
Load User Profile: True
Save the changes, then restart IIS.
Log in to your WorkflowGen instance with the wfgen_service account.
Copy all the existing WorkflowGen files to the Azure Files share in PowerShell:
✏️ Note: Remember to replace C:\inetpub\wwwroot\wfgen\App_Data, wfgendatastorage, and wfgenshare in the above instructions with your WorkflowGen instance's app_data folder, storage account, and file share names.
Update the WorkflowGen web configuration file:
✏️ Note: Remember to replace wfgendatastorage and wfgenshare in the above instructions with your storage account and file share names.
Open the WorkflowGen Administration Module or User Portal, then run a new request test.
Use one of the following methods:
In your Azure portal storage account:
Use the Storage Explorer (preview) tool.
or
Browse the wfgenshare file share under the Files section.
OR
Mount the file share wfgenshare in Windows. To do this:
Navigate to the wfgenshare file share under the Files section.
Click Connect to display a tab with connection instructions.
You should now be able to browse the content of the Z drive in the Windows File Explorer.
If you encounter any issues, see Troubleshoot Azure Files problems in Windows.
This section provides instructions on how to create and configure your Azure SQL database.
The Azure SQL database instance has to be created in the . See the Microsoft article for more information on how to create the database. Once you've completed the instructions, you'll have:
The name of the Azure SQL server
The credentials of the administrator account
A server-level firewall rule for your IP address server
The name of the Azure SQL database.
Connect to your Azure SQL database instance with the administrator account you created by using the or .
You have to create a SQL Server user account with db_datareader and db_datawriter permissions. See the Microsoft article, or run the following script in the SQL Database Query Editor or SQL Management Studio (the master database must be selected):
Get the database creation script by downloading the and extracting it to DRIVE:\temp
The Azure SQL database can also be created via Azure CLI scripts. To do this:
.
Copy the WorkflowGen database create.sql script to the C:\Azure\setup\sql folder. If you want to change the path, you'll have to edit the $sqlScriptPath variable in the following script as well.
The following scripts create the SQL Server and SQL Database. The SQL database admin password variable ($sqlAdminPassword) must be updated; the resource group name ($resourceGroup), pricing tier ($sqlServiceObjective), and SQL script path ($sqlScriptPath) should be updated as well. (For more information on the pricing tier, see .)
Option A: Contained database mode
The following script creates the database user (wfgen_user) in a contained database. The SQL database user password variable ($sqlUserPassword) must be updated.
✏️ Note: Do not run the Remove my public IP script if you need access to the database from your desktop or if your WorkflowGen server is not hosted by Azure.
Option B: Standard database mode
The following script creates the database user (wfgen_user
Open the WorkflowGen web.config file and add the following node under <connectionStrings>:
Replace <server name> with the server name (e.g. workflowgen.database.windows.net).
Replace <database name> with the database name (e.g. WFGEN).
Replace <database user>
Test-NetConnection -ComputerName "wfgendatastorage.file.core.windows.net" -Port 445# Configuration variables
$location="East US"
$resourceGroup="wfgenresourcegroup"
$storageAccount="wfgendatastorage"
# Create a Storage account
az storage account create `
--name $storageAccount `
--resource-group $resourceGroup `
--location $location# Configuration variables
$storageAccount="wfgendatastorage"
$share="wfgenshare"
# Create the file shares
az storage share create `
--name $share `
--account-name $storageAccount `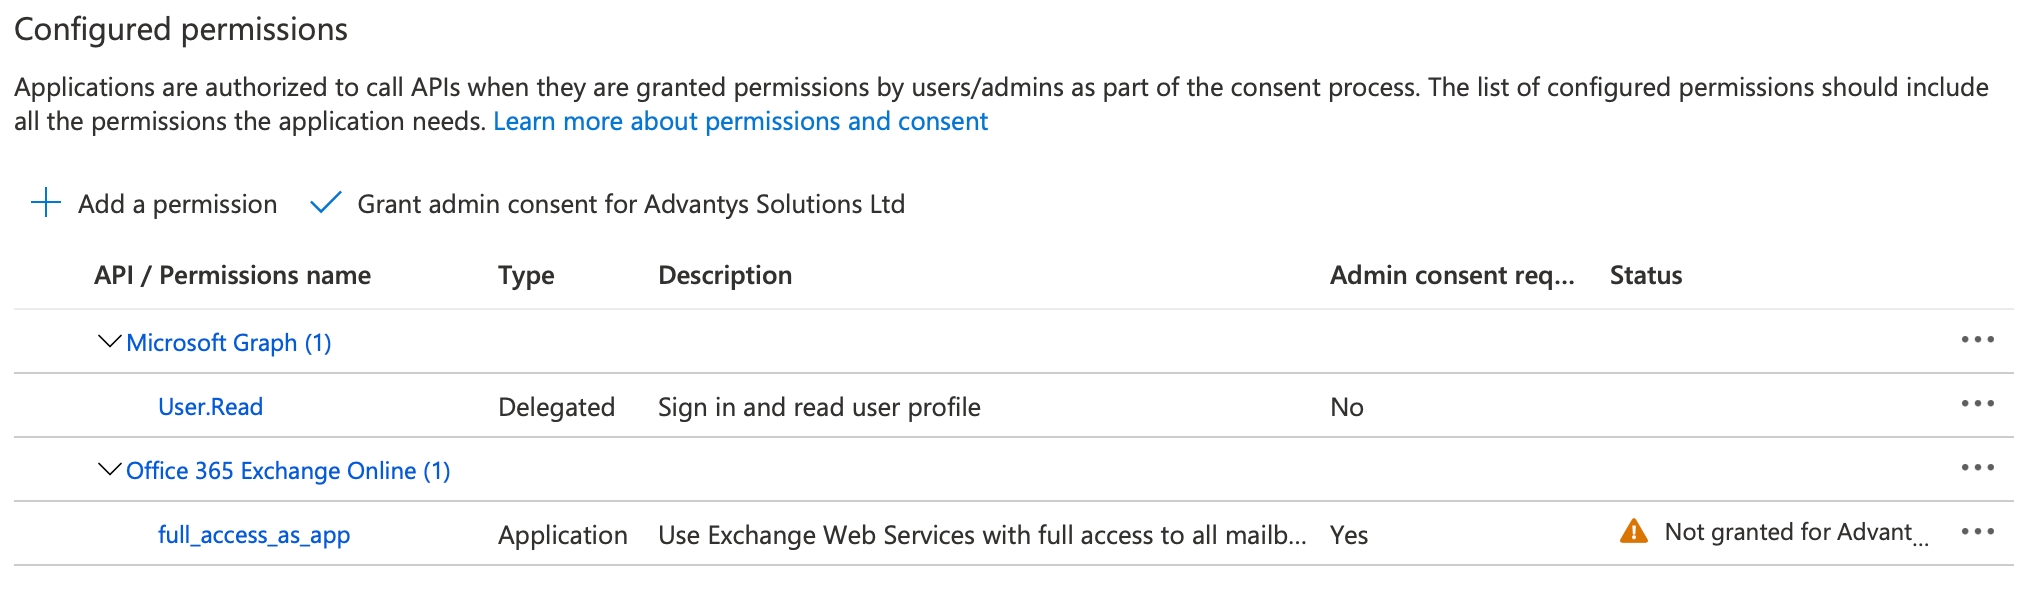
For good performance, use an Azure Files share in the same region.
Hosted on-premise:
For best performance, use a file share from a file server backed by SSD-grade storage. ✏️ Note: One of the WorkflowGen web servers or a dedicated server can act as the file server role.
For basic performance, use an Azure Files share in the region closest to your server for the lowest latency.
Check Password never expires.
Click Create.
Assign the wfgen_service user to the IIS_IUSRS group.
Assign the user to the Remote Desktop Users group if the instance is a remote server.
Z✏️ Note: Remember to replace the key string assigned to $acctKey, wfgendatastorage, and wfgenshare in the above instructions with one of your storage account's Access keys, storage account, and file share names.
Open the DRIVE:\temp\pack\Databases\MsSQLServer source folder and run the create.sql database creation SQL script on the new database instance.
$sqlUserPassword✏️ Note: Do not run the Remove my public IP script if you need access to the database from your desktop or if your WorkflowGen server is not hosted by Azure.
wfgen_userReplace <password> with the database user's password.
 Install-Module -Name Az -AllowClobber
Import-Module -Name Az Connect-AzAccount Account : <your-microsoft-azure-account-name>
SubscriptionName : <your-subscription-name>
TenantId : <your-tenant-id>
Environment : AzureCloud$resourceGroupName = "wfgenresourcegroup"
$storageAccountName = "wfgendatastorage"
$storageAccount = Get-AzStorageAccount -ResourceGroupName $resourceGroupName -Name $storageAccountName
$storageAccountKeys = Get-AzStorageAccountKey -ResourceGroupName $resourceGroupName -Name $storageAccountName
Invoke-Expression -Command "cmdkey /add:$([System.Uri]::new($storageAccount.Context.FileEndPoint).Host) /user:AZURE\$($storageAccount.StorageAccountName) /pass:$($storageAccountKeys[0].Value)"cmdkey /listTarget: Domain:target=wfgendatastorage.file.core.windows.net
Type: Domain Password
User: AZURE\wfgendatastorage\\wfgendatastorage.file.core.windows.net\wfgenshare Copy-Item -Path "C:\inetpub\wwwroot\wfgen\App_Data" -Recurse -Destination "\\wfgendatastorage.file.core.windows.net\wfgenshare" -Container<add key="ApplicationDataPath" value="\\wfgendatastorage.file.core.windows.net\wfgenshare\App_Data" />CMDKEY: Credential added successfully. $acctKey = ConvertTo-SecureString -String "aftEV8YUKljZeiwKP9Ts/kZysDASFVFsvSqAvWVjMb3E+QP4BWpVSNLVyqB2ScZjGtEIg/k0P7WBIg==" -AsPlainText -Force
$credential = New-Object System.Management.Automation.PSCredential -ArgumentList "Azure\wfgendatastorage", $acctKey
New-PSDrive -Name Z -PSProvider FileSystem -Root "\\wfgendatastorage.file.core.windows.net\wfgenshare" -Credential $credential -Persist -- Replace <database name>, <database user>, and <password> with the ones you choose (e.g. WFGEN, wfgen_user, <YourPWD>!)
-- Create SQL Login template for Azure SQL Database and Azure SQL Data Warehouse Database
CREATE LOGIN <database user>
WITH PASSWORD = '<password>'
GO
-- Create SQL Login template for Azure SQL Database and Azure SQL Data Warehouse Database
CREATE USER <database user>
FROM LOGIN <database user>
WITH DEFAULT_SCHEMA = <database name>
GO
-- Add user to the database owner role
EXEC sp_addrolemember N'db_datawriter', N'<database user>'
EXEC sp_addrolemember N'db_datareader', N'<database user>'
GO# Configuration variables
$resourceGroup= "workflowgen"
$location="East US"
$sqlServer="wfgen-sql-server"
$sqlAdminUsername="wfgen_sa"
$sqlAdminPassword="<your(Strong!)password1>"
$sqlDatabase="WFGEN"
$sqlServiceObjective="Basic"
$connectionStringWithSqlAdmin = "Server=tcp:$sqlServer.database.windows.net,1433;Initial Catalog=$sqlDatabase;Persist Security Info=False;User ID=$sqlAdminUsername;Password=$sqlAdminPassword;MultipleActiveResultSets=False;Encrypt=True;TrustServerCertificate=False;Connection Timeout=30;"
$sqlScriptPath = "C:\Azure\setup\sql"
$sqlScriptCreation = Join-Path $sqlScriptPath "create.sql"
# Create the Azure SQL Server
az sql server create `
--resource-group $resourceGroup `
--location $location `
--name $sqlServer `
--admin-user $sqlAdminUsername `
--admin-password $sqlAdminPassword
# Enable Azure internal services access
az sql server firewall-rule create `
--resource-group $resourceGroup `
--server $sqlServer `
--name AllowAzureServices `
--start-ip-address 0.0.0.0 `
--end-ip-address 0.0.0.0
# Azure SQL database creation
az sql db create `
--name $sqlDatabase `
--resource-group $resourceGroup `
--server $sqlServer `
--service-objective $sqlServiceObjective
# Allow my public IP to access the SQL Server
$myPublicIP = (Invoke-WebRequest https://itomation.ca/mypublicip).content
az sql server firewall-rule create `
--resource-group $resourceGroup `
--server $sqlServer `
--name AllowMyTempPublicIP `
--start-ip-address $myPublicIP `
--end-ip-address $myPublicIP
# Initialize the database
Invoke-Sqlcmd `
-ConnectionString $connectionStringWithSqlAdmin `
-InputFile $sqlScriptCreation
# Remove my public IP
az sql server firewall-rule delete `
--resource-group $resourceGroup `
--server $sqlServer `
--name AllowMyTempPublicIP # Database user credentials
$sqlUserUsername = "wfgen_user"
$sqlUserPassword = "<your(Strong!)Password>"
# Allow my public IP to access the SQL Server
$myPublicIP = (Invoke-WebRequest https://itomation.ca/mypublicip).content
az sql server firewall-rule create `
--resource-group $resourceGroup `
--server $sqlServer `
--name AllowMyTempPublicIP `
--start-ip-address $myPublicIP `
--end-ip-address $myPublicIP
# Create the database user in the contained database
$queryVariables = "USERNAME=$sqlUserUsername","PASSWORD='$sqlUserPassword'"
Invoke-Sqlcmd `
-ConnectionString $connectionStringWithSqlAdmin `
-Query '
CREATE USER $(USERNAME) WITH PASSWORD = $(PASSWORD);
ALTER ROLE db_datareader ADD MEMBER $(USERNAME);
ALTER ROLE db_datawriter ADD MEMBER $(USERNAME);
' `
-Variable $queryVariables
# Remove my public IP
az sql server firewall-rule delete `
--resource-group $resourceGroup `
--server $sqlServer `
--name AllowMyTempPublicIP <add name="MainDbSource" connectionString="Data Source=<server name>;Initial Catalog=<database name>;User ID=<database user>;Password=<password>;encrypt=true;trustServerCertificate=false;" providerName="System.Data.SqlClient" /># Master database connection string
$connectionStringMaster = "Server=tcp:$sqlServer.database.windows.net,1433;Persist Security Info=False;User ID=$sqlAdminUsername;Password=$sqlAdminPassword;MultipleActiveResultSets=False;Encrypt=True;"
# Database user credentials
$sqlUserUsername = "wfgen_user"
$sqlUserPassword = "<your(Strong!)Password>"
# Allow my public IP to access the SQL Server
$myPublicIP = (Invoke-WebRequest https://itomation.ca/mypublicip).content
az sql server firewall-rule create `
--resource-group $resourceGroup `
--server $sqlServer `
--name AllowMyTempPublicIP `
--start-ip-address $myPublicIP `
--end-ip-address $myPublicIP
# Create the database login in the master db
$queryVariables = "USERNAME=$sqlUserUsername","PASSWORD='$sqlUserPassword'","DATABASE=$sqlDatabase"
Invoke-Sqlcmd `
-ConnectionString $connectionStringMaster `
-Query '
CREATE LOGIN $(USERNAME) WITH PASSWORD = $(PASSWORD);
' `
-Variable $queryVariables
# Create the user in the WorkflowGen database
Invoke-Sqlcmd `
-ConnectionString $connectionStringWithSqlAdmin `
-Query '
CREATE USER $(USERNAME) FROM LOGIN $(USERNAME) WITH DEFAULT_SCHEMA = $(DATABASE);
ALTER ROLE db_datareader ADD MEMBER $(USERNAME);
ALTER ROLE db_datawriter ADD MEMBER $(USERNAME);
' `
-Variable $queryVariables
# Remove my public IP
az sql server firewall-rule delete `
--resource-group $resourceGroup `
--server $sqlServer `
--name AllowMyTempPublicIPAzure Active Directory (Azure AD) has been renamed to Microsoft Entra ID (ME-ID). While the WorkflowGen documentation has been updated to reflect this name change, the WorkflowGen application settings still refer to Azure AD (for example, Azure AD SCIM v2 directory connector).
Likewise, certain ME-ID configuration items in the Azure portal have been renamed and/or moved. The WorkflowGen documentation has been updated accordingly, but still might not be completely accurate in this regard. See the Microsoft Entra ID documentation for more information.
In some cases, you'll want to perform a specific task that can be automated but needs access to the WorkflowGen GraphQL API; this use case is often in the form of a server-side script or application (e.g. background service, daemon, curl , Postman, etc.). For this, OAuth2 provides a type of grant called Client Credentials that simply exchanges a client ID and client secret for an access token. There is no ID token since it's not part of the OpenID Connect standard and there's no user involved.
This section provides instructions on how to configure Microsoft Entra ID (ME-ID) for a server-side script or application to have access to the WorkflowGen GraphQL API. First, you'll need to register a new web application in ME-ID; then, you'll need to configure a new application in your WorkflowGen web server.
Make sure to have a licensed copy of WorkflowGen installed and running on an IIS web server in HTTPS secure connection mode.
Make sure to have administrative access to WorkflowGen.
Make sure to have administrative access to ME-ID to be able to configure it properly.
In the Azure portal, click App registrations in the Azure services section.
Click New registration, and fill in the properties:
Name: My script, service or application name
You've now successfully registered your application in Microsoft Entra ID.
Click View API permissions.
In the Configured permissions section, click Add a permission.
Click My APIs, then select the WorkflowGen GraphQL API application in the list.
In the application registration's menu, click Certificates & secrets.
In the Client secrets section, click New client secret.
Description: My secret, or something that identifies this as the client secret.
Since the latest Azure portal update, it's no longer possible to set client secrets to never expire. You'll need to manually regenerate a new client secret every two years (if the 730 days (24 months) option was chosen) before it expires. Then, update the client secret used by your server-side script or application.
Here's a review of the information you'll need:
A client ID: This is the application (client) ID in the Overview section of your application registration.
A client secret : This is the value that you generated in the Certificates & secrets section.
A tenant ID: This is the directory (tenant) ID in the Overview section of your application registration.
You've now successfully registered your server-side script or application in Microsoft Entra ID.
As with user provisioning, WorkflowGen needs to know which application is accessing the GraphQL API. Therefore, you have to register the application in WorkflowGen, which consists of your server-side script or application.
On the Applications page in the WorkflowGen Administration module, click New application.
Fill in the form:
Name: My Server Application
Your application should now appear in the list of WorkflowGen applications.
You should now have the necessary components in place to make GraphQL API requests with your server-side script or application by passing the access token that was previously retrieved from the ME-ID OAuth2 token endpoint using the Client Credentials Grant flow.
In order for your server-side script or application to make requests to the WorkflowGen GraphQL API, you must first obtain an access token from your ME-ID OAuth2 token endpoint. The following are examples of how to obtain an access token for your application and how to make a request to the GraphQL API.
If you've configured the section, then the scope parameter value should be api://my-apis/.default instead of https://<workflowgen url>/graphql/.default.
WorkflowGen GraphQL API application registered as well.Supported account types: Accounts in this organizational directory only (Default Directory only - Single tenant)
✏️ Note: Depending on the context, you should choose the right option for your use case for the Supported account type value.
Redirect URI: Leave this blank
Click Register at the bottom of the page.
Click Delegated permissions and check default in the Permission column.
Click Add permissions.
On the API permissions page, click Grant admin consent for <your tenant name>, then click Yes.
Expires: Select 730 days (24 months), or your desired expiration period.
Click Add.
The auto-generated client secret is now displayed in the Value column. Copy the client secret value and save it somewhere safe, since you won't be able to retrieve it afterwards.
A scope: The WorkflowGen GraphQL API application's scope in its Expose an API section.
✏️ Note: You must add a period (.) before the default scope name in the URL when passing the scope as a parameter in the request to retrieve the access token (e.g. https://<workflowgen url>/graphql/.default). See the scope parameter in the cURL example.
Description: A description that clearly identifies your script, service, or application
Type: Non-interactive Client
Impersonate username: Any WorkflowGen username that has the required access to the GraphQL API
Client ID: The client ID you retrieved earlier from your application registration in ME-ID
Active: Check this checkbox
Click Save.
curl --location --request POST 'https://login.microsoftonline.com/<Tenant ID>/oauth2/v2.0/token' \
--header 'Content-Type: application/x-www-form-urlencoded' \
--data-urlencode 'client_id=<Client ID>' \
--data-urlencode 'client_secret=<Client Secret>' \
--data-urlencode 'grant_type=client_credentials' \
--data-urlencode 'scope=https://<workflowgen url>/graphql/.default'
{
    "token_type": "Bearer",
    "expires_in": 3599,
    "ext_expires_in": 3599,
    "access_token": "<access token>"
}curl --location --request POST 'https://mycompany.com/wfgen/graphql' \
--header 'Authorization: Bearer <access token>' \
--header 'Content-Type: application/x-www-form-urlencoded' \
--data-urlencode 'query={
viewer {
userName
}
}'{
"data": {
"viewer": {
"userName": "[email protected]"
}
}
}Azure Active Directory (Azure AD) has been renamed to Microsoft Entra ID (ME-ID). While the WorkflowGen documentation has been updated to reflect this name change, the WorkflowGen application settings still refer to Azure AD (for example, Azure AD SCIM v2 directory connector).
Likewise, certain ME-ID configuration items in the Azure portal have been renamed and/or moved. The WorkflowGen documentation has been updated accordingly, but still might not be completely accurate in this regard. See the documentation for more information.
This section provides instructions on how to configure WorkflowGen delegated authentication with Microsoft Entra ID (ME-ID) authentication via the Microsoft Identity Platform v2.0 or API endpoint v1 providers, and will show you how to set up a working WorkflowGen instance that uses ME-ID to authenticate your users.
Make sure to have a licensed copy of WorkflowGen installed and running on an IIS web server in HTTPS secure connection mode.
You must be a WorkflowGen Administrator.
Make sure to have ME-ID Administrator access to be able to configure ME-ID.
Make sure to have provisioned an existing ME-ID user that you can authenticate with WorkflowGen and that the user has WorkflowGen Administrator permissions. This is important because once you've activated the delegated authentication with ME-ID, you'll still need to be able to manage the WorkflowGen web application.
AES encryption mode and its key are required for the authentication to work.
The configuration of ME-ID is done in two parts. First, you have to register the WorkflowGen web application and link it to your instance of WorkflowGen; then, you have to register the WorkflowGen GraphQL API in order to be able to register other custom applications to access it.
In the Azure portal, click App registrations in the Azure services section.
Click New registration, and fill in the properties form:
Name: WorkflowGen Web app
Supported account type: Account in this organizational directory only (Default Directory only - Single tenant)
✏️ Note: Depending on the context, you should choose the right option for your use case for the Supported account type value.
Redirect URI:
Platform: Web
Value: https://<workflowgen url>/auth/callback
📌 Example: https://mycompany.com/wfgen/auth/callback
Click Register at the bottom of the page.
You should now see the WorkflowGen Web app application registration's overview page.
Now, you have to generate a client secret to be used by the WorkflowGen OIDC authentication module.
Click Add a certificate or secret.
In the Client secrets section, click New client secret.
Description: My secret, or something to know that this is the client secret.
Expires: Choose 730 days (24 months) or your desired expiration period.
Click Add.
The auto-generated client secret is now displayed under the Value column. Copy the client secret value and save it somewhere safe, since you won't be able to retrieve it afterwards.
It's no longer possible to set client secrets to never expire. You'll need to manually regenerate a new client secret every two years (if the 24 months option was selected) before it expires. Then, update the client secret used by WorkflowGen instance in its web configuration file (ApplicationSecurityAuthClientSecret key).
In order for the communication between the WorkflowGen instance and ME-ID to work, you need to add one more authorized redirect URI to the WorkflowGen Web app application registration.
Under Redirect URIs on the application's overview page, click Add a Redirect URI.
Enter the following information:
Redirect URI: https://<workflowgen url>/auth/logout/return
📌 Example: https://mycompany.com/wfgen/auth/logout/return
✏️ Note: You should also see https://<workflowgen url>/auth/callback in this list.
Click Save at the bottom of the section.
In order to expose the WorkflowGen GraphQL API, you need to add a new application registration in ME-ID that will represent it. To do this:
In the Azure portal, click App registrations in the Azure services section.
Click New registration, and fill in the properties form:
Name: WorkflowGen GraphQL API
Supported account type: Account in this organizational directory only (Default Directory only - Single tenant)
Redirect URI: Leave this blank.
Click Register at the bottom of the page.
You've now successfully registered the WorkflowGen GraphQL API application in ME-ID.
Click Expose an API.
To the right of Application ID URI, click Set and enter the URI https://<workflowgen url>/graphql
📌 Example: https://mycompany.com/wfgen/graphql
Click Save.
Click Add a scope and enter the following information:
Scope name: default
Who can consent?: Admins and users
Click Add scope.
You should now have a new scope defined (e.g. https://<workflowgen url>/graphql/default).
On the WorkflowGen Web app application registration page, click API permissions.
Click Add a permission, then select the tab My APIs.
Click the WorkflowGen GraphQL API application in the list.
Click Delegated permissions and check default under the Permission column.
Click Add permissions.
On the API permissions page, click Grant admin consent for <your tenant name>, then click Yes.
You should now have all of the information you need to configure your WorkflowGen instance to delegate authentication to Microsoft Entra ID Here's a review:
A client ID. This is the application (client) ID of the WorkflowGen Web app application registration in ME-ID. You can find it on its Overview page.
A client secret. This is the secret previously generated in step 2 for the WorkflowGen Web app.
An audience. This is the Application ID URI property (e.g. https://<workflowgen url>/graphql) in the Expose an API section of the WorkflowGen GraphQL API application registration.
The metadata endpoint URL. This URL is bound to your ME-ID directory. To find it:
Go to the Overview page and opy the Tenant ID value.
The metadata endpoint URL is built by replacing <Tenant ID> with your Tenant ID as follows:
For Microsoft Identity Platform v2.0 (recommended):
By now, you should have all the information needed to link your WorkflowGen instance to ME-ID.
Now, you have to configure WorkflowGen to delegate its authentication to ME-ID.
Open the WorkflowGen web.config file and add and/or update the following properties under <appSettings>
For Microsoft Identity Platform v2.0 (recommended):
For Azure v1:
✏️ Note: Check session iFrame (e.g. ApplicationSecurityAuthCheckSessionUrl) is not supported in Microsoft Identity Platform v2.0.
Replace <CLIENT ID> with the WorkflowGen Web app application (client) ID from ME-ID.
Replace <CLIENT SECRET> with the WorkflowGen Web app application registration's generated secret from ME-ID.
Replace <METADATA URL> with the metadata endpoint URL that you built earlier from your ME-ID's Tenant ID value.
For Microsoft Identity Platform v2.0, replace <workflowgen url> with your WorkflowGen URL in the value of the ApplicationSecurityAuthAdditionalScopes key (e.g. https://mycompany.com/wfgen/graphql/default) if you have configured the WorkflowGen GraphQL API application registration (steps 4 through 6). Otherwise, remove the ApplicationSecurityAuthAdditionalScopes key completely.
For Azure v1, replace <CHECK SESSION URL> (which is usually https://login.microsoftonline.com/<Tenant ID>/oauth2/checksession) with the value of the metadata endpoint's check_session_iframe property. To do this, you'll have to make an HTTP GET request to your metadata endpoint URL (e.g. https://login.microsoftonline.com/<Tenant ID>/.well-known/openid-configuration), then copy and paste the value. See the examples below on how to request the metadata endpoint.
Linux/macOS request example:
✏️ Note: Remove | python -m json.tool if you don't have Python; this is for pretty printing.
Table of web.config options
Option
Description
ApplicationSecurityAuthProvider
The name of the identity provider supported by WorkflowGen. At this time, there is support only for Microsoft Entra ID, Microsoft Identity Platform v2.0, Auth0, AD FS, and Okta. Value: azure-v1, ms-identity-v2,auth0, adfs, orokta
ApplicationSecurityAuthClientId
Each identity provider generates a code that uniquely identifies your application. In this case, this is the code that uniquely identifies the WorkflowGen Web app application in ME-ID.
ApplicationSecurityAuthClientSecret
Like the client ID, this is also generated by the identity provider, but it is more like what a password is for a user. It's important to keep this secret because malicious software that has access to this can act on the behalf of the application. This value must be explicitly generated in ME-ID.
ApplicationSecurityAuthMetadataUrl
The endpoint provided by the identity provider that supports the standard. It enables WorkflowGen to get some public information about your ME-ID domain. Without this, you'll have to manually enter much more configuration in the web.config. Take note that the metadata endpoint URL is different for Microsoft Identity Platform v2.0 and Azure v1.
ApplicationSecurityAuthAppIdClaim
The name of the claim contained in the access token obtained from the identity provider that uniquely identifies a non-interactive client. This is only used if you have a machine-to-machine application that needs to have access to the GraphQL API. To configure this, see the section. ✏️ Note: It's recommended to keep the default value.
WorkflowGen should now be linked to your ME-ID. The last thing left to do is to configure a few more options in order to finish the internal wiring of WorkflowGen so that it can delegate its authentication.
WorkflowGen uses an internal session token to manage the user session and identify the current user for all the HTTP requests made to the web application after the user has logged in to ME-ID. In order to generate a session token, you need to add a few more settings to the web.config.
Open the WorkflowGen web.config file and add and/or update the following property under <appSettings>:
Replace <SECRET> with a custom value that can't be guessed, such as a UUID or a complex password.
The secret will be only accessible inside your instance of WorkflowGen, so when generating a session token, WorkflowGen will sign it with this secret in order to check the validity of all session tokens passed to it.
You now need to activate the delegation by replacing the authentication system in IIS and pointing WorkflowGen's modules to the correct authentication module.
In IIS Manager, click on the WorkflowGen website in the tree view.
Click the Authentication button.
Enable Anonymous Authentication, and disable all other authentications.
Perform these steps for all sub-applications as well.
Certain sub-applications need to have their authentication checked by the special Advantys.Security.JWTAuthenticationModule WorkflowGen authentication module, but certain other sub-applications (such as /wfgen/auth, /wfgen/hooks and /wfgen/scim) should not because they are either public or aren't part of the global authentication system.
Add the following property to the WorkflowGen web.config file:
If you have developed custom web forms with their own \bin folders, you have to copy the following .NET assemblies and dependency libraries from \wfgen\bin to each custom web form's \bin folder (\wfgen\wfapps\webforms\<custom webform>\bin):
Advantys.My.dll
Advantys.Security.dll
Newtonsoft.Json.dll
jose-jwt.dll
If you skipped the WorkflowGen GraphQL API application registration steps earlier, it is required to apply the configuration in the Configuring the authentication without the GraphQL API section.
You should now have a working WorkflowGen instance with the authentication delegated to Microsoft Entra ID through the OpenID Connect protocol. Make sure to have provisioned your users to WorkflowGen in order for them to successfully access WorkflowGen.
This configuration does have some drawbacks. For example, the WorkflowGen Plus v2 mobile application will not be compatible with this setup.
By default, the only recipient of the access token is the WorkflowGen GraphQL API application. This means that the access token can only be used to send queries to the GraphQL API only. In order to use the same access token to call your own APIs from WorkflowGen (e.g. web forms), you will need to perform the following steps in your Azure portal, and then modify the WorkflowGen web.config file.
In the Azure portal, click App registrations in the Azure services section.
Click New registration, and fill in the properties:
Name: My APIs
Supported account types: Account in this organizational directory only (Default Directory only - Single tenant)
✏️ Note: Depending on the context, you should choose the right option for your use case for the Supported account type value.
Redirect URI: Leave this blank
Click Register at the bottom of the page.
Click Expose an API.
To the right of Application ID URI, click Set and enter the URI api://my-apis.
Click Save.
Click Add a scope and enter the following information:
Scope name: wfgen-graphql-full-access
Who can consent?: Admins and users
Click Add scope.
Add any other scopes that seem necessary for your other APIs.
Click Manifest.
Find the appRoles JSON property and add the following JSON object to the JSON array:
✏️ Note: Replace <NEW ID> with the value generated by the [guid]::NewGuid().ToString() PowerShell command or use any GUID generators.
Click Save.
On the WorkflowGen Web app application registration page, click API permissions.
In the Configured permissions section, click Add a permission.
Click My APIs, then select the My APIs application in the list.
Click Delegated permissions and check wfgen-graphql-full-access under the Permission column.
Click Add permissions.
On the API permissions page, click Grant admin consent for <your tenant name>, then click Yes.
My APIs applicationFor each of your automated applications in Azure (e.g. server-side script, background service, or application) that requires access to the My APIs application, do the following:
Go to the application's registration page, then click API permissions.
In the Configured permissions section, click Add a permission.
Click My APIs, then select the My APIs application in the list.
Click Application permissions and check wfgen-graphql-full-access-role under the Permission column.
Click Add permissions.
On the API permissions page, click Grant admin consent for <your tenant name>, then click Yes.
Open the WorkflowGen web.config file, add and/or update the following application settings, then save the file:
The WorkflowPage class in the WorkflowGen.My library provides a public CurrentUserAccessToken method to easily retrieve the current user's shared access token that can be used to query the GraphQL API and your third-party APIs. See the snippet code below.
WorkflowGen only supports requests to the SOAP API using classic authentication methods. If you still need to use this API, you have to perform some additional steps to configure it properly:
Create a new separate WorkflowGen directory (i.e. users and groups) for the SOAP API users.
Provision it with users and groups as needed.
In IIS Manager, enable the Basic authentication method for the \wfgen\ws application.
In the web.config file (located in \Inetpub\wwwroot\wfgen), add the following under <location path="ws" inheritInChildApplications="false"> :
Microsoft Entra ID supports OpenID Connect Session Management, an extension draft standard, in addition to the core OpenID Connect standard. This standard defines the rules to handle SSO session of the provider from the client. An example use is that if a user logs out of their ME-ID session from any device, a regular web client will receive a message that enables it to remove the same user's local session. WorkflowGen supports this feature when activating delegated authentication with ME-ID.
This table lists all configurable options in WorkflowGen that you can use to customize your authentication experience; these are located in the WorkflowGen web.config file.
Option
Description
ApplicationSecurityAuthSessionTokenCookie
The name of the session cookie that is generated by the authentication module.
Default: wfgen_token
✏️ Note: This is useful when you have multiple instances of WorkflowGen running and you want to have access to both and be authenticated on both instances at the same time.
ApplicationSecurityAuthSessionTimeOut
The duration of the session in seconds. It defaults to the ID token expiration time received. Default: The exp value of the ID token
ApplicationSecurityAuthMobileSessionTimeOut
The duration of the session in seconds when requested from mobile devices on the token endpoint. Default: 7200 seconds
ApplicationSecurityAuthAudience
The intended recipient of the access token (e.g. the target API).
Default: https://<workflowgen url>/graphql
ApplicationSecurityAuthAdditionalScopes
Additional scopes to add to the authentication request. They will appear in the access token content.
✏️ Note: The openid, profile, and email scopes are always in the request.
If the WorkflowGen User Portal or Administration Module is displayed without the main header menu, this feature will not work. For example, this scenario could occur when the portal home page or a request follow-up form is displayed inside an iFrame in an external solution.
If for some reason you can't register the WorkflowGen GraphQL API application and you don't need GraphQL API authentication configured with the provider, you can avoid creating the registration and configure WorkflowGen with the Microsoft Graph API instead, which is included by default in all application registrations. To configure it, you only have to change some configuration options in the web.config file:
Change the ApplicationSecurityAuthAudience key to the Microsoft Graph API URL, e.g.https://graph.microsoft.com.
Set the ApplicationSecurityAuthDecodeAccessToken option to N.
Keep in mind that by setting ApplicationSecurityAuthDecodeAccessToken=N, the expiration date of the session token generated by WorkflowGen will be based on that of the ID token.
You won't be able to use the access token received from ME-ID to query the GraphQL API. This access token will give you access to the Microsoft Graph API and nothing else. To query the GraphQL API, you'll need to configure its authentication with another method, like Basic authentication.
<!-- Microsoft Identity Platform v2 -->
<add key="ApplicationSecurityAuthProvider" value="ms-identity-v2"/>
<add key="ApplicationSecurityAuthClientId" value="<CLIENT ID>" />
<add key="ApplicationSecurityAuthClientSecret" value="<CLIENT SECRET>" />
<add key="ApplicationSecurityAuthMetadataUrl" value="<METADATA URL>" />
<add key="ApplicationSecurityAuthAppIdClaim" value="appid" />
<add key="ApplicationSecurityAuthUsernameClaim" value="preferred_username" />
<add key="ApplicationSecurityAuthClockTolerance" value="60" />
<add key="ApplicationSecurityAuthSessionRefreshEnableIFrame" value="Y"/>
<add key="ApplicationSecurityAuthAccessTokenUsernameClaim" value="upn" />
<add key="ApplicationSecurityAuthAdditionalScopes" value="https://<workflowgen url>/graphql/default" /><!-- Azure v1 auth -->
<add key="ApplicationSecurityAuthProvider" value="azure-v1"/>
<add key="ApplicationSecurityAuthClientId" value="<CLIENT ID>" />
<add key="ApplicationSecurityAuthClientSecret" value="<CLIENT SECRET>" />
<add key="ApplicationSecurityAuthMetadataUrl" value="<METADATA URL>" />
<add key="ApplicationSecurityAuthAppIdClaim" value="appid" />
<add key="ApplicationSecurityAuthUsernameClaim" value="upn" />
<add key="ApplicationSecurityAuthClockTolerance" value="60" />
<add key="ApplicationSecurityAuthSessionRefreshEnableIFrame" value="Y"/>
<add key="ApplicationSecurityAuthCheckSessionUrl" value="<CHECK SESSION URL>" /><add key="ApplicationSecurityAuthSessionTokenSigningSecret" value="<SECRET>" /><configuration>
<system.webServer>
<modules>
<add name="ApplicationSecurityAuthenticationModule" type="Advantys.Security.Http.JWTAuthenticationModule" />
</modules>
</system.webServer>
</configuration>{
"allowedMemberTypes": [
"Application"
],
"description": "Allows the application to get access to WorkflowGen GraphQL API.",
"displayName": "wfgen-graphql-full-access-role",
"id": "<NEW ID>",
"isEnabled": true,
"lang": null,
"origin": "Application",
"value": "wfgen-graphql-full-access-role"
}<add key="ApplicationSecurityAuthAudience" value="api://my-apis"/>
<add key="ApplicationSecurityAuthAdditionalScopes" value="api://my-apis/wfgen-graphql-full-access" />
<add key="ApplicationSecurityAuthGraphQLScope" value="wfgen-graphql-full-access" />
<add key="ApplicationSecurityAuthGraphQLAppRole" value="wfgen-graphql-full-access-role" />protected void Page_Load(object sender, EventArgs e)
{
base.Page_Load(sender, e);
string accessToken = this.CurrentUserAccessToken();
// Use accessToken to query GraphQL API or your third-party APIs...
}<configuration>
<appSettings>
<add key="ApplicationSecurityAuthAudience" value="https://graph.microsoft.com"/>
<add key="ApplicationSecurityAuthDecodeAccessToken" value="N"/>
</appSettings>
</configuration>Admin consent display name: Default access to the WorkflowGen GraphQL API
Admin consent description: Allows the application to get access to WorkflowGen GraphQL API.
User consent display name: Default access to the WorkflowGen GraphQL API
User consent description: Allows the application to get access to WorkflowGen GraphQL API.
Full access to the WorkflowGen GraphQL APIAdmin consent description: Allows the application to get access to WorkflowGen GraphQL API.
User consent display name: Full access to the WorkflowGen GraphQL API
User consent description: Allows the application to get access to WorkflowGen GraphQL API.
ApplicationSecurityAuthUsernameClaim
The name of the claim contained in the access token that identifies the user in WorkflowGen. This is used by WorkflowGen to generate a session token as well as by the GraphQL API when receiving an access token. ✏️ Note: It's recommended to keep the default value.
ApplicationSecurityAuthAccessTokenUsernameClaim
This is used by the GraphQL API when receiving an access token.
✏️ Note: It's recommended to keep the default value.
ApplicationSecurityAuthClockTolerance
This value is used when verifying a token in WorkflowGen. It's essentially to deal with minor differences between servers' clocks. ✏️ Note: It's recommended to keep the default value.
ApplicationSecurityAuthSessionRefreshEnableIFrame
When enabled (Y), this option activates the session auto-refresh feature using an invisible <iframe>. This allows users to enter their password less often by refreshing their session in the background while they're working.
✏️ Note: This option is only available when using WorkflowGen with OIDC authentication.
ApplicationSecurityAuthGraphQLScope
Custom GraphQL scope value that will be verified when validating the authorized scopes in the access token returned from the OIDC provider.
ApplicationSecurityAuthGraphQLAppRole
Custom GraphQL application role value that will be verified when validating the roles in the access token returned from the OIDC provider in a client credentials flow.
✏️ Note: Only available for the ms-identity-v2 provider.
https://login.microsoftonline.com/<Tenant ID>/v2.0/.well-known/openid-configurationcurl "<METADATA URL>" | python -m json.tool<system.webServer>
<modules>
<remove name="ApplicationSecurityAuthenticationModule" />
</modules>
</system.webServer>https://login.microsoftonline.com/<Tenant ID>/.well-known/openid-configurationInvoke-RestMethod -Uri "<METADATA URL>" -Method GET | ConvertTo-JSON