Loading...
Loading...
Loading...
Loading...
Loading...
Loading...
Loading...
Loading...
Loading...
Loading...
Loading...
Loading...
Loading...
Loading...
Loading...
Loading...
Loading...
Loading...
Loading...
This guide describes all of the screens in the WorkflowGen User Portal and provides a complete list of related operating rules. It's an important resource in understanding how the software behaves under various situations. The guide also includes a list of possible errors along with their explanations.
Help is available for processes and actions within processes by clicking next to the process descriptions, or by clicking the Help button in the headers of request or action information forms.
When selecting help at the process level, the help text will describe the purpose of the overall process. Selecting help for a given action in the process will display help for that particular action, rather than for the entire process.
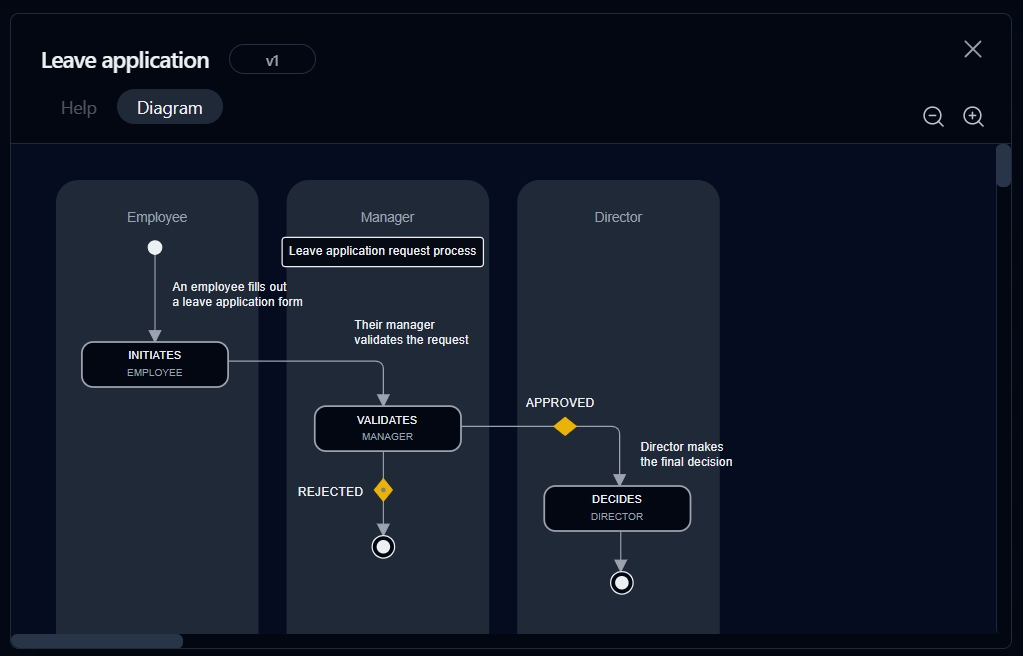
The contents of the Help screen are defined by the process designer and will appear as a blank window unless it has been created. The Diagram screen displays the graphical view of the process to authorized participants.
Link to a help document on the request or the action
Help email
Email address for help on the request or the action
Fields
Remarks
Description
Description of request or action
Help
Display the help text corresponding to the action or process (only if the graphical tab is available)
Diagram
Display the graphical view of the process (only available to participants that have been granted access)
Zoom in / out
Click the magnifying glass icons to zoom in or out on the process graphical view
Help text
Help text associated with the request or the action
Help link
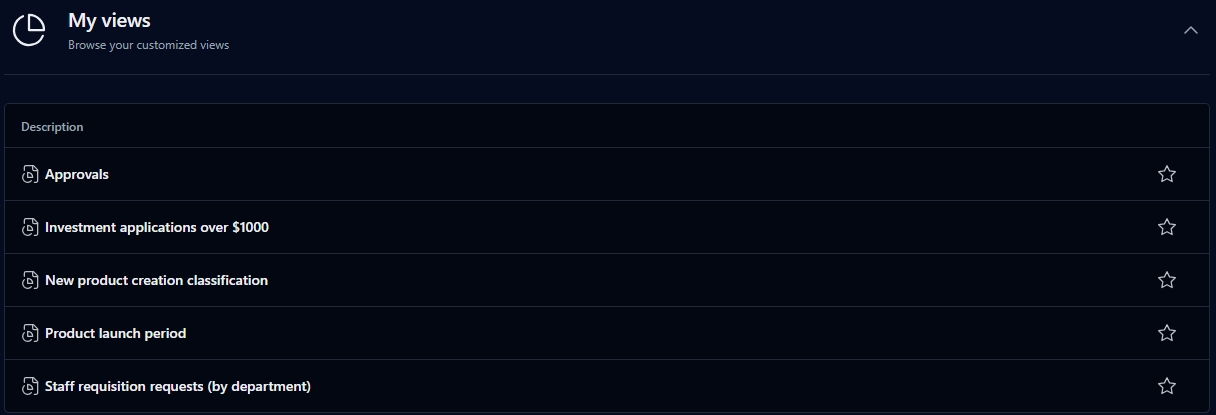
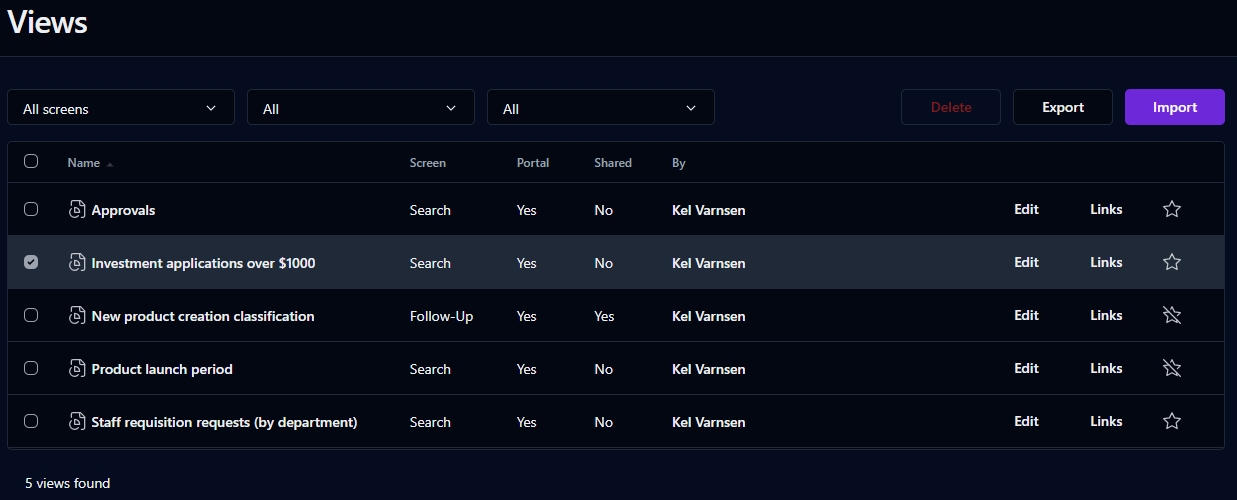
This page displays all of the views you've saved.
To add a view to the My favorites list on the Dashboard, click the star outline. You can then open the view from either the My favorites or My views expandable lists. To remove a view from your favorites, click the star again.
You can sort the list descending or ascending by any of the elements by clicking on the corresponding column header.
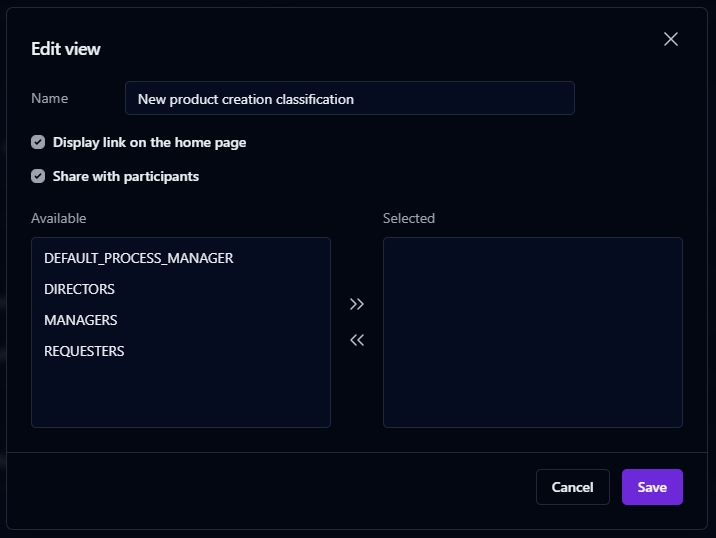
Click Edit to change the view's description, choose whether to include the view as a link available on the Dashboard, and share the view with other process participants.
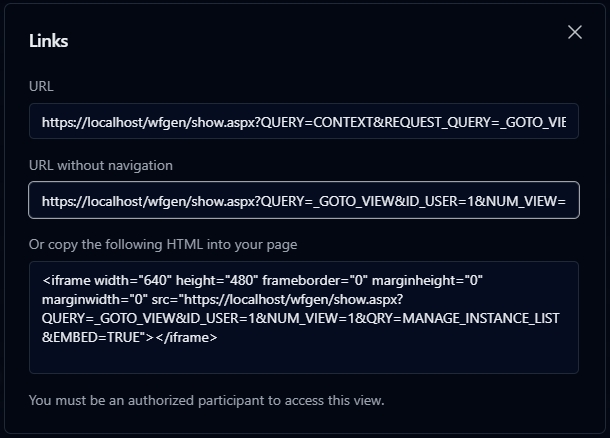
Click Links to display the view's URLs and HTML code, which you can use to embed the view in an external page.
To import a view, click the Import button above the list, select the view's previously exported .xml definition file, then click Import.
To export a view, check the checkbox to the left of the view's name, then click the Export button that appears above the list.
To delete a view, check the checkbox to the left of the view's name, then click the Delete button that appears above the list.
The WorkflowGen User Portal is a web application that allows users to:
Launch and follow up on requests
Perform and follow up on actions
Assign actions
Owner of the shared view
Edit
Edit the view
Link
Display the view's URL and HTML
Filter
Remarks
Screen
Filter by the screen used to save the view
Portal
Filter based on views that have links on the Dashboard
Shared
Filter based on views shared by other users
Columns
Remarks
Checkbox
Select view for export or deletion
Name
Name of the view
Screen
View’s screen type
Portal
Display (or don't display) the view on the Dashboard
Shared
View shared by other users (or not)
By
Filter
Remarks
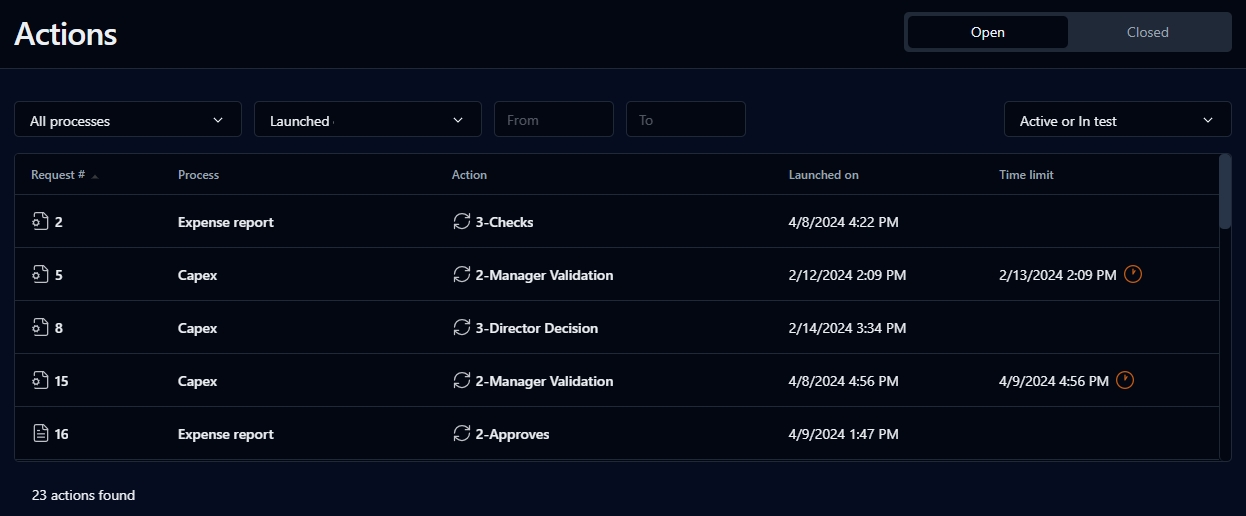
Open
Filter by current requests
Closed
Filter by closed requests
Process drop-down list
Filter by the requests' process names
Launched
Predefined period for launched requests
From / To
User-defined period for launched requests; click the fields to open a date picker
Columns
Remarks
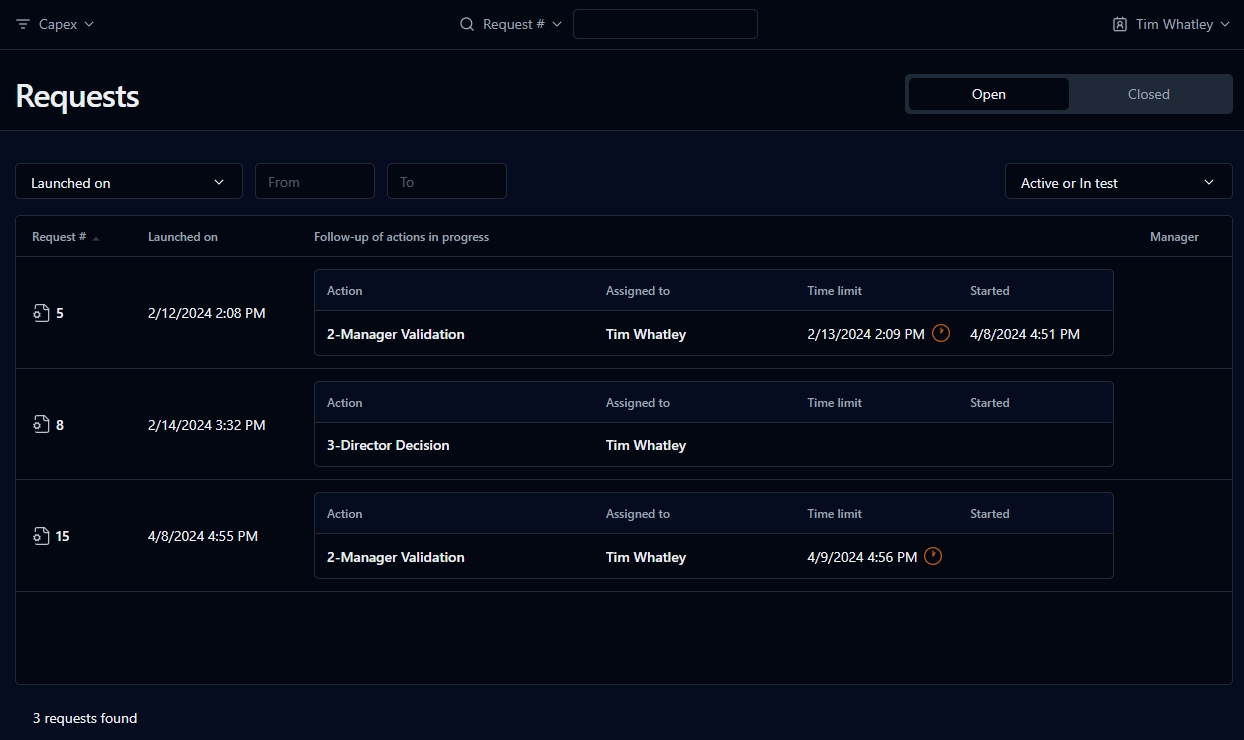
Request #
Request icon and request ID; click the icon to open the form or the request ID to open the
Process
Process name
Description
Process description
Launched
Request launch date
Time limit [1]
Request deadline after which the request is considered late
For requests to be completed.
For closed requests.
You can sort the list ascending or descending by any of the elements by clicking the corresponding column header.
Perform searches on actions and requests
Save searches as custom views, and place the saved views on the home page as floating dashboard panels if desired
Delegate actions
Generate and view analytics
Access the Administration Module (if permitted)
Access to the User Portal is available through the URL http://[yourwebsite]/wfgen/default.aspx.
According to the authentication method chosen by the WorkflowGen Administrators, you may have to specify a username and a password when you log in to WorkflowGen. For Windows users, these are typically the same as those used to log in to Windows.
Your Administrator can set a maximum number of failed connection attempts due to an incorrect password, after which the account will be locked. If this happens, you will be redirected to a password reset page, where you will be prompted to enter an email address to which an email will be sent with a link to reset your password.
You can also change your password at any time by clicking the user icon in the top left of the Dashboard, which opens the user settings panel where you can set a new password.
If you've forgotten your password, you can access the password reset page via the URL http://[yourwebsite]/wfgen/forgotpassword.aspx.
To select a language and, if desired, a language culture, click the circular user icon at the top left of the Dashboard to open the user settings panel.
The language culture (indicated by country) shown beside the language defines the regional settings used in WorkflowGen, in particular when displaying dates and numerical values.
English (United Kingdom) corresponds to English with United Kingdom regional settings (date format dd/mm/yyyy).
English (United States) corresponds to English with United States regional settings (date format m/d/yyyy).
You can select from the following list of languages:
English (Australia)
English (Canada)
English (United Kingdom)
English (United States)
Français (Canada)
Français (France)
Français (Suisse)
Deutsch (Deutschland)
Deutsch (Schweiz)
Italiano (Italia)
Português (Portugal)
Español (España)
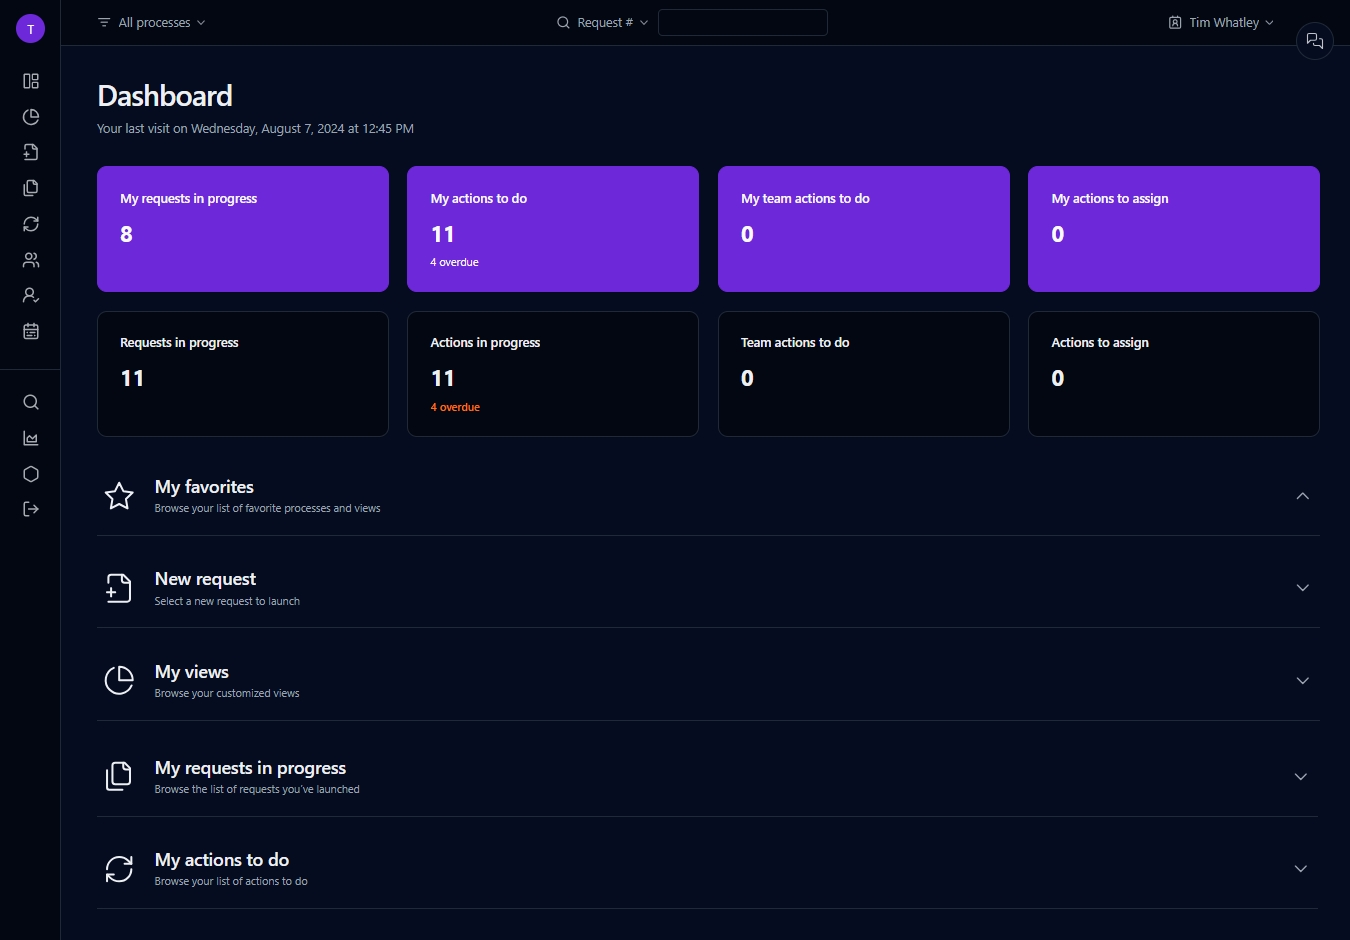
The User Portal's main screens are accessible from the Dashboard left menu.
Returns to the
Opens the screen, which contains a list of the views you've saved
Opens the screen, which contains a list of processes you have access to and can launch
Opens the screen, which contains a list of ongoing and closed requests that you've launched
Opens the screen, which contains a list of your actions to do and the actions you've closed
Opens the screen, which contains a list of team actions you have to do or have closed; these actions are defined with the Self-service assignment method
In the User Portal, access to information is personalized based on users’ profiles and roles in processes.
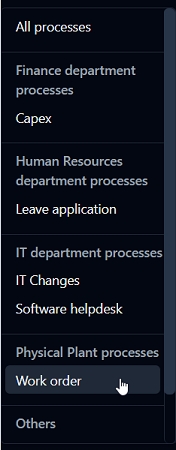
You can switch from the default multi-process mode to single-process mode by selecting a process from drop-down list at the top left of the WorkflowGen application banner.
The list is filtered based on the user’s WorkflowGen profile and process role.
WorkflowGen profile
Process list content
User
List of processes in which the user is a participant (also through a delegation)
User with process manager role
List of processes in which the user is a participant (also through a delegation) plus all the folder processes
Administrator
No filter
In all single-process screens, the associated process data are displayed to the right of the request number and creation date columns, as shown in the screenshot below. The process data that are displayed are determined by the visibility and security options set within the process design in the Administration Module.
You can always search for workflows using the request number (Request #). However, the Portal common process data feature also allows you to display process data that have the same name and data type, such as first or last name, depending on the parameters that have been set in the Administration Module.
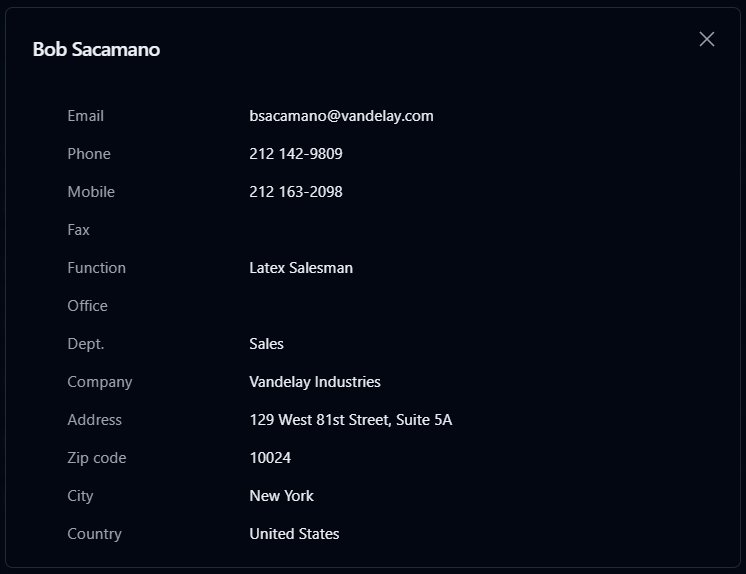
In delegation mode, the user plays the role of another user on delegated process participants. If there's an active delegation defined for you, a user list is displayed in the the top right corner of the Dashboard. You can switch from one user to another using this drop-down list, or using the Act as drop-down list in the General section on the user settings panel. The process list is filtered by the process for which the user has a delegation assigned by the selected user.
Clicking the name of a user displays their calling card, which contains information defined in their user profile.
This gives access to the search function for a user’s own requests and actions. If the user is given the role of requester for a process, access is given to the following functions:
New request
Current requests
If the user is an actor in a process, access is given to the following functions:
Actions to do
Team actions to do
Actions to assign as coordinator to someone
Views created for themselves or shared views (if the user belongs to one or more participants granted access to shared view)
This gives access to follow-up functions for the requests of the process the user manages.
This gives access to follow-up functions for all processes.
Profile
Permissions
Requester
New request
Current requests
Actor
Actions to do
Team actions to do
Actions to assign
Views created by the user or shared views (if the user belongs to one or more participants granted access to shared view)
Process manager or supervisor
Follow-up on the processes of which the user is supervisor or manager
Administrator
Follow-up on all processes
Phone
User’s telephone number
Mobile
User’s mobile telephone number
Fax
User’s fax number
Function
User’s function
Office
User’s office
Dept.
User’s department
Company
User’s company
Address
User’s postal address
Zip code
User’s zip or postal code
City
User’s city
Country
User’s country
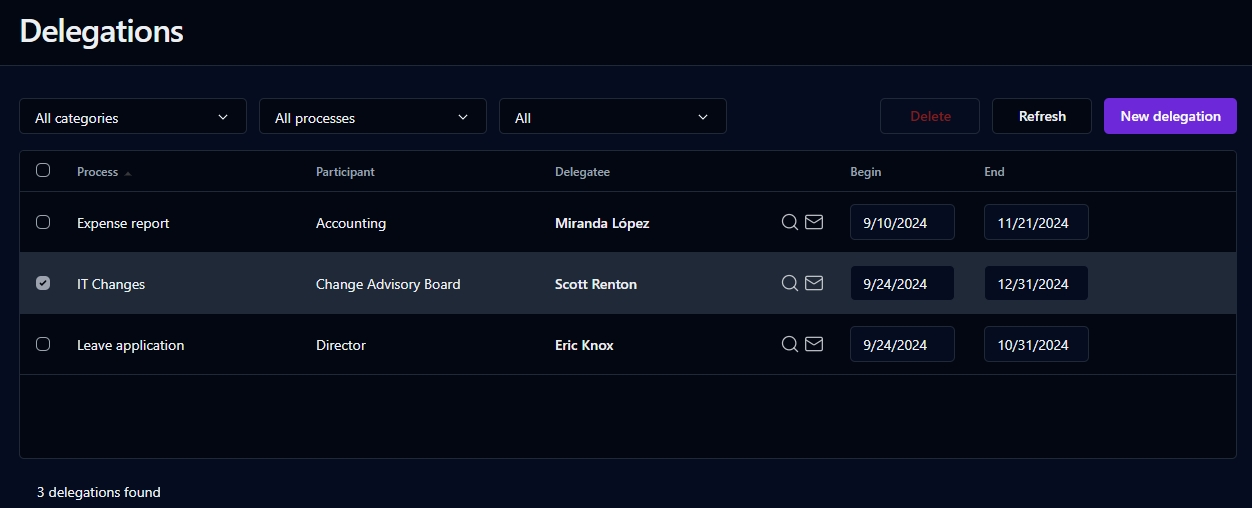
This screen displays participant delegations on active or archived processes. Delegations cannot be added to processes that are under construction or in test.
A user can associate a delegatee with each process participant role displayed in this list. Delegations can be done for an unlimited period of time (if no date range is entered) or for a specific period of time (if a date range is entered).
Two types of delegations are possible: a global delegation of all the user’s roles to a person by selecting All processes and All participants, or a delegation on a role-by-role basis by selecting individual delegatees for each process participant role. Note that a role-based delegation can override the global delegation for that specific role and vice-versa.
To add a new delegation, click the New delegation button. From the drop-down lists, choose All processes and All participants or a specific process and participant. Then, click on the icon to select and define the delegatee. The new delegation will automatically be saved after selecting a delegated user. At any time before choosing a delegate, you can cancel the new delegation by clicking on the Cancel button on the right side of the row.
You can specify the Begin and End dates, or leave them empty for an unlimited delegation period. They will be saved automatically.
To send or resend a notification of a delegation to the delegatee, click the icon next to the delegatee's name in the specific delegation row.
To change the delegated user of a delegation, click the icon, then filter and select a user from the list.
To delete one or more delegations, check the checkbox to the left of the specific delegation row, then click the Delete button that appears above the list.
To refresh the delegation list, click the Refresh link above the list.
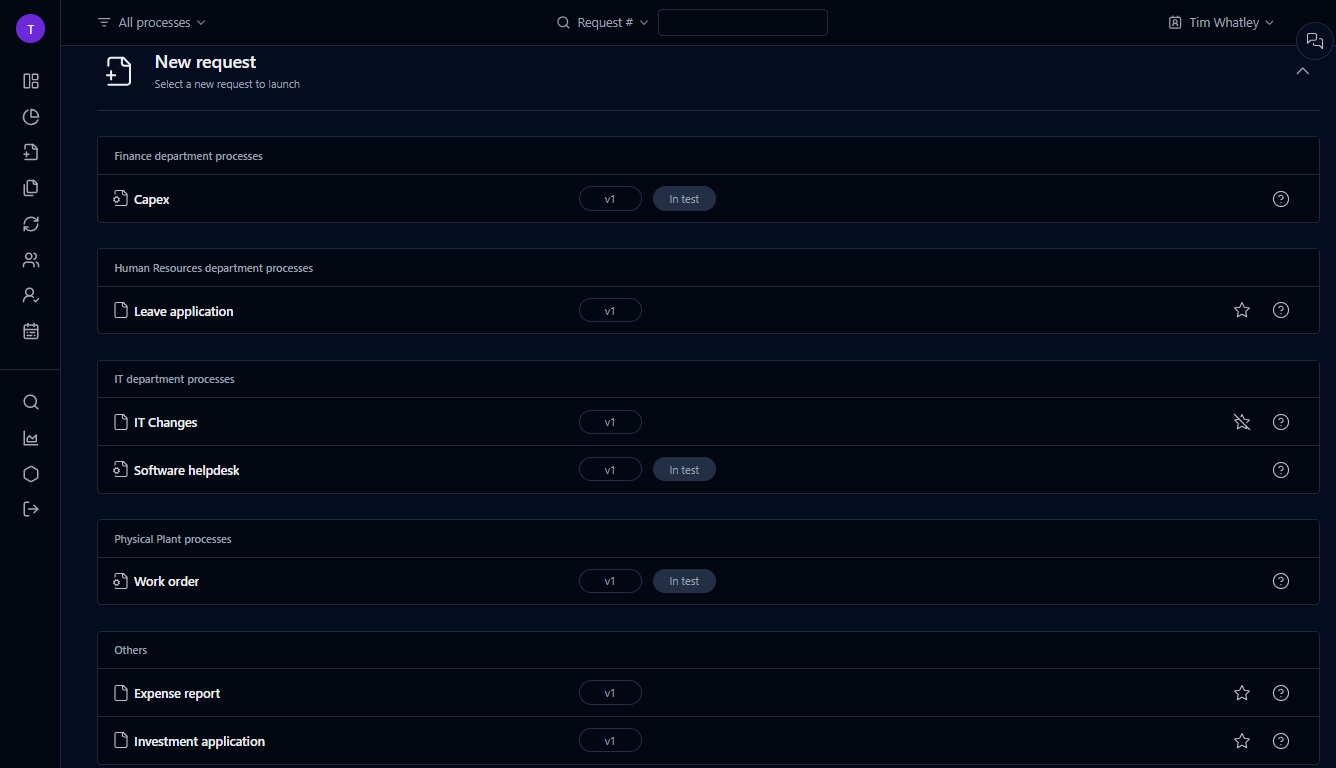
This screen lets you view all the processes you have access to and launch new requests.
To add a process to the My favorites list on your Dashboard, click the star outline. You can then open the process from either the My favorites or New request lists on your Dashboard. To remove a process from your favorites, click the star again.
Send a notification to the delegatee
Begin
Delegation start date (inclusive); required if end date defined
Unlimited delegation period if empty.
End
Delegation end date (inclusive); required if begin date defined
Unlimited delegation period if empty.
Filter
Remarks
Category drop-down list
Filter by process category
Process drop-down list
Filter by process
Active delegations
Filter by Active or All delegations
Search
Launch the search and refresh the delegation list accordingly
Columns
Remarks
Checkbox
Select a delegation to delete
Process
Process name
Participant
Process participant name
Delegatee
Delegatee's name
Search for a user
Filter
Remarks
Category
Filter by process category
Columns
Remarks
Description
Process icon and process name (or process description): identifies processes with In test status identifies processes with Active status
Click the process icon to launch a new request form. If the Quick view functionality has been activated, the form will open in a pop-up window. Otherwise, click the process name to open the request form in its own window.
Click on the right-hand side of the row to open a pop-up help window.
You can sort the list ascending or descending by any of the elements by clicking on the corresponding column header.
When you launch a new request, a new left menu appears.
Icon
Description
Return to the Dashboard
Open the
Open the
Show the process data associated with the request
Display the graphical follow-up pop-up window
Filter
Remarks
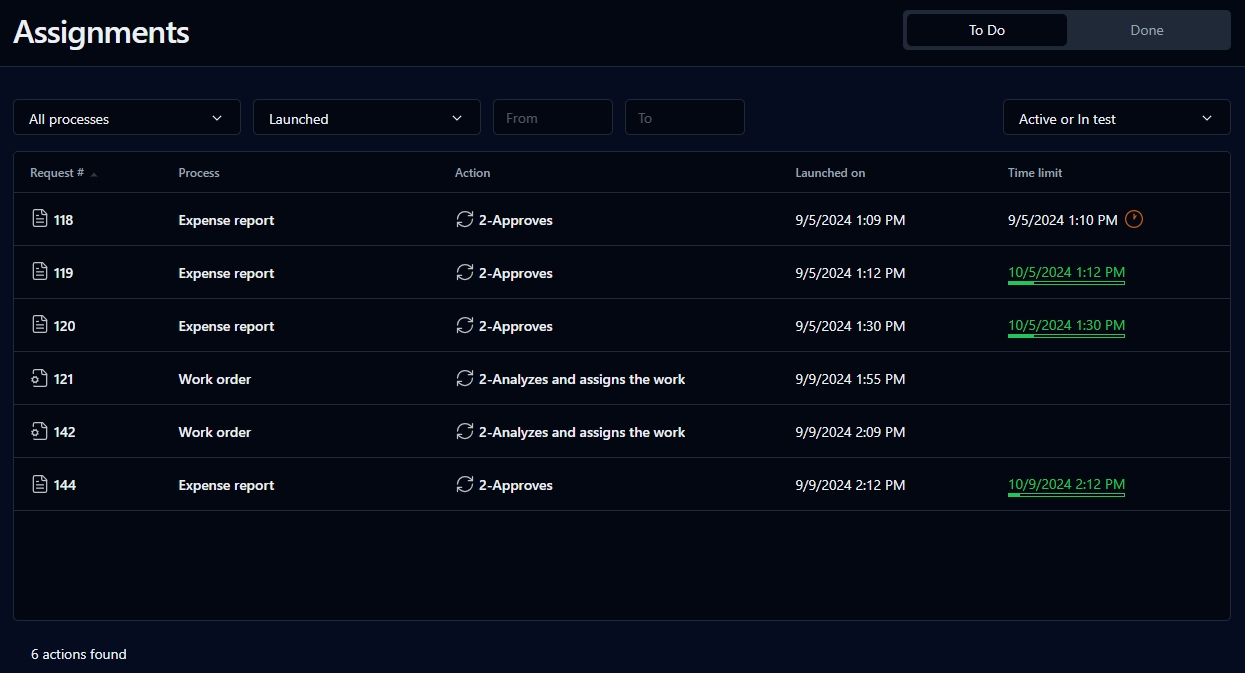
To do
Filter by actions to be assigned
Done
Filter by actions already assigned
Process drop-down list
Filter by process name
Launched
Request creation date
From / To
User-selected deadline date range for the action to be assigned (click the fields to display a calendar date picker)
Columns
Remarks
Request #
Request icon and request ID; a link displays the request follow-up form
Process
Process name
Action
Action name; a link displays the request follow-up form
Launched
Request creation date
Time limit
Deadline after which the request is considered late
* For assignments done.
You can sort the list ascending or descending by any of the elements by clicking the corresponding column header.
Mode
Request mode: Active or In test, Active, or In test
Closed [2]
Request closure date
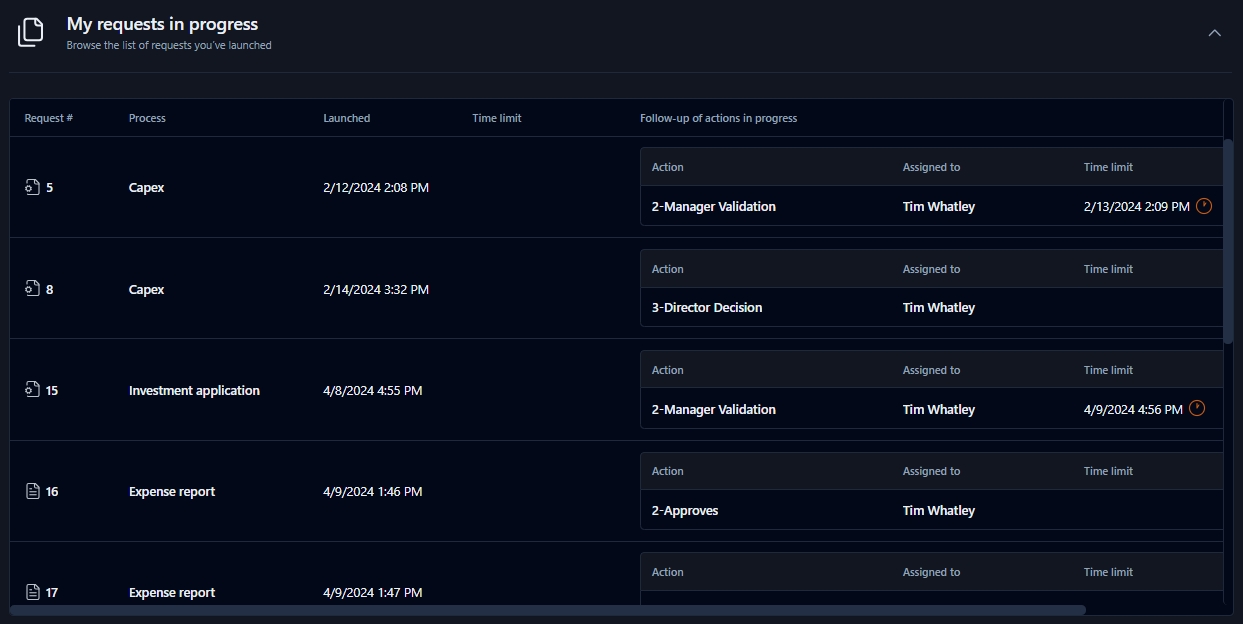
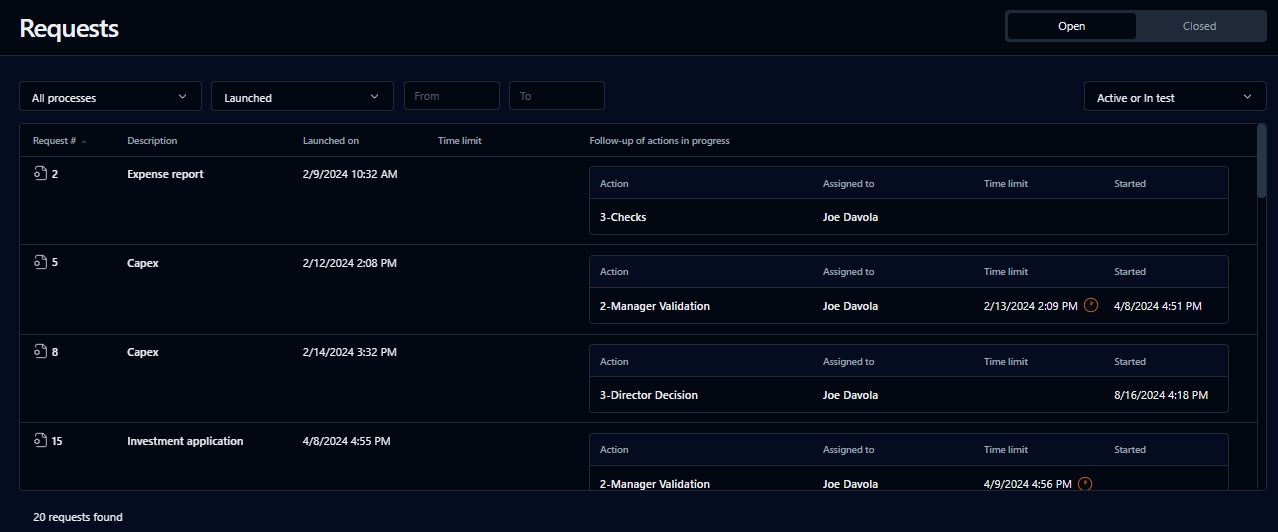
Follow-up of actions in progress
Current request action in progress, its assigned user, the time limit, and when the action was started
Opens the Assignments screen, which contains a list of your actions to assign or that you've already assigned
Opens the Delegations screen, which contains a list of participant delegations on active processes
Opens the Search screen, which contains a form to search requests and actions
Opens the Analytics screen, where you can produce detailed reports on ongoing and closed requests
Opens the Administration Module in a separate browser tab or window, if you have the required permissions
Logs you out of WorkflowGen
Click the request number or the description in the requests list, or click in the request form left menu, to display the request information form.
Action lists include:
My actions to do
My team actions to do
List of actions to assign to a person
Other actions to be done by someone else
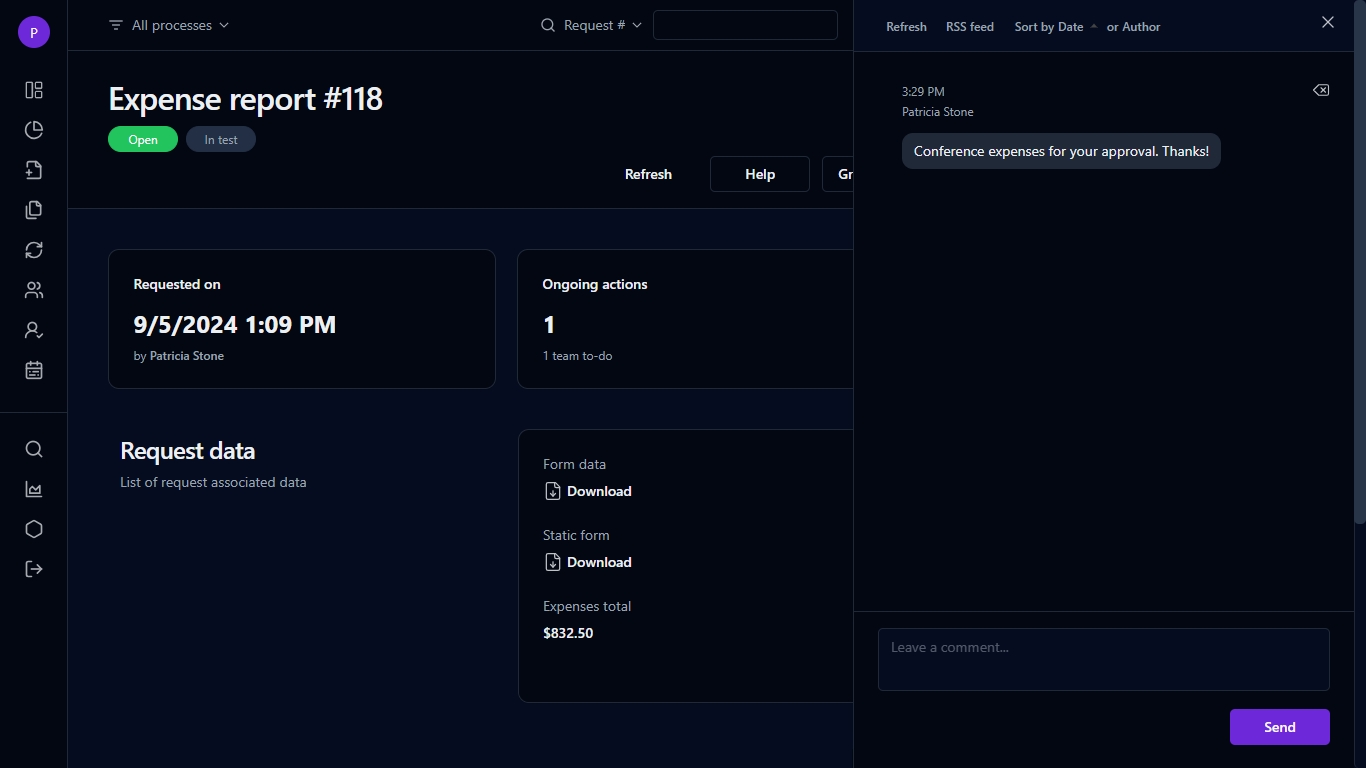
Click in the top right corner of the screen to open a slide-out panel where request participants can post free-form comments. Here, you can:
View, refresh, and sort the comments list by date posted or author in ascending or descending order
Post a new comment
Delete an existing comment of which you're the author or administrator/supervisor
Subscribe to the comments list RSS feeds
The associated users of each process participant can have read, read/write, or no permissions given to them by the process administrator.
WorkflowGen Administrators, process administrators, and supervisors have read/write permissions by default.
A process can be launched if its status is active. Only process managers, process supervisors, and WorkflowGen administrators can launch processes in test mode, and they can only launch those for which they are requesters. A process cannot start if its definition is invalid. A process can be started by any user associated with the requester participant.
An ongoing request can be cancelled by the requester if no action assigned to another user is running, or if the user is the process manager, process supervisor, or a WorkflowGen Administrator.
A request can only be deleted:
If it's in test mode,
By a user if the first open action is assigned to them,
By a WorkflowGen Administrator, or
By the process manager or supervisor if Allow process managers and supervisors to delete requests has been enabled in the Administration Module
Cancel request
Cancel the request (only available in Administrator view)
Delete request
Delete the request (only available in Administrator view)
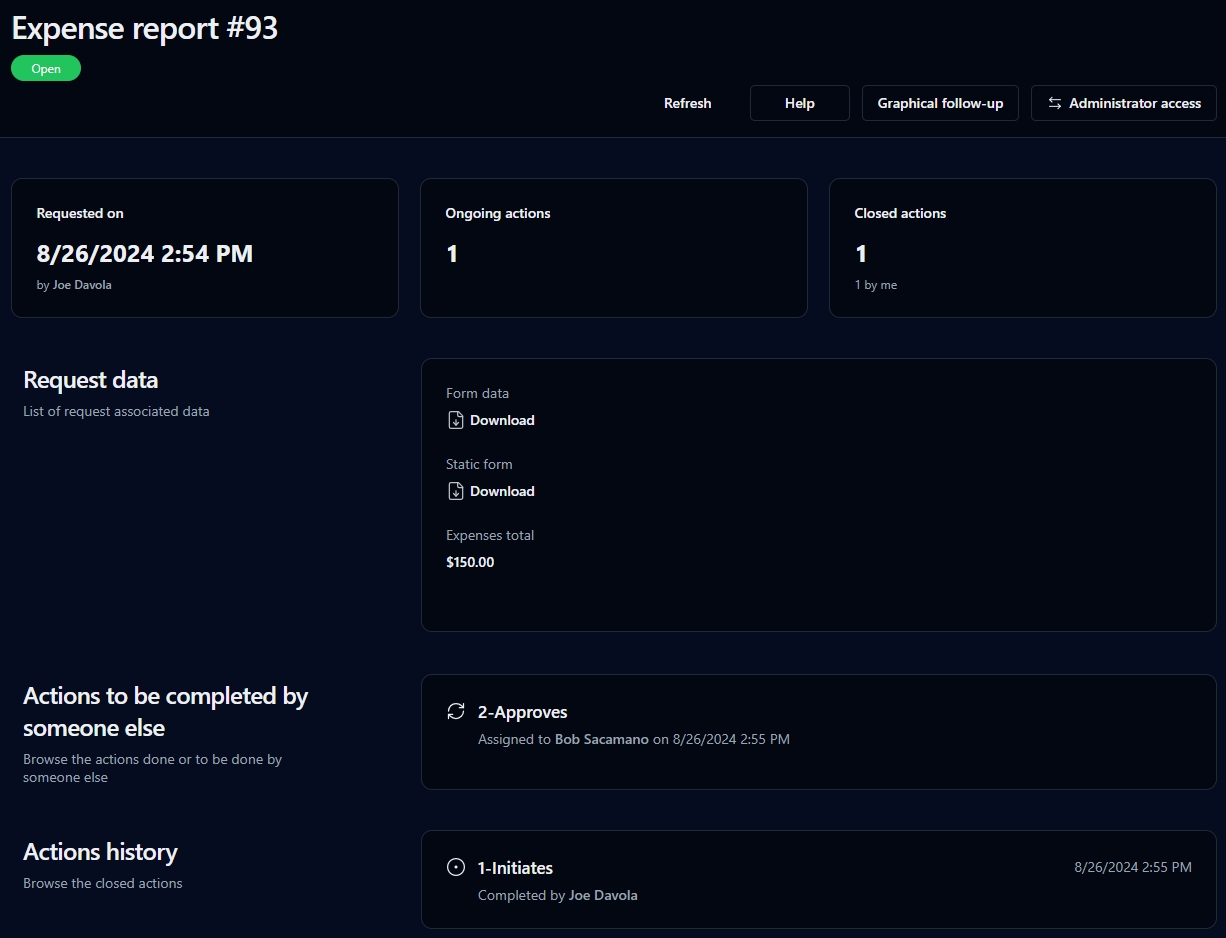
Requested on
Request launch date and name of requester
Request data
List of request-associated data that have been defined as visible by the process designer
File icon
The following file extensions are displayed with a specific icon: PDF, FDF, DOC, XLS, PPT, HTML / HTM / XML, ZIP, TXT, BAT, SYS, Undefined (for other extensions)
Time limit
Request deadline (if applicable)
Comments panel
Click in the top right corner of the screen to open a slide-out panel that displays the list of comments on the request and lets you leave new comments
Fields
Remarks
Status badge
Status of the request:
Open: The request has been launched
Closed – Completed: the request has ended as per the process workflow
Closed – Cancelled: The request has been cancelled
Parent request
Link that goes back to the parent request follow-up form (only available for sub-requests)
Refresh
Click to update the page; this is useful when the process has some actions completed in background mode
Help
Display the process help window, including a diagram of the workflow
Graphical follow-up
Display the graphical follow-up of the request (only available for allowed participants)
User access / Administrator access
Columns
Remarks
Name
Action icon and action name
Click the action icon to display the action information form
Click the action name to launch the action
By default, clicking the action name launches the action, but WorkflowGen can be configured in order to change this behavior and display the action information form instead of launching the action.
Description
Action description
Assigned to
Name of the user to whom the action has been assigned
Time limit
Action deadline (if applicable)
Help
Display the action help window, including a diagram of the workflow
Columns
Remarks
Name
Action icon and action name; click to display the action follow-up form
Description
Action description
Completed by...
Name of the user to whom the action has been assigned
On the...
Date and time of the action completion
Click to toggle between User view and Administrator view (if the user has supervisor rights to the request)
Open a pop-up panel that displays the list of comments on the request
A process participant’s associated users can view, refresh, or sort the comments list, post a new comment, delete an existing comment, and subscribe to the comment list RSS feeds.
Display the help pop-up window
Mode
Request mode: Active or In test, Active, or In test
Assigned to
The person the action was assigned to
On *
The date and time the action was assigned
Click the request number or the description in the actions list, or click in the request form left menu, to open the action information form.
* Displayed only if the action was cancelled by the system due to an action execution error.
A slide-out panel on the right allows the participants of the request to post free-form comments.
User operations and access permissions are the same as in the .
An action assigned in Self-service mode can be accepted without being launched if it has not already started and if the user is part of the team. In this case, the action will move from the team list to the user’s to-do list.
If the user is the requester, a current and unassigned action can be assigned by the Manual by the coordinator assignment method.
If the user is the action initiator, a current and unassigned action can be assigned by the Manual by the action initiator assignment method.
If the user is the action initiator, a current and unassigned action can be assigned in case of error assignment by the Automatic to the person assignment method.
The list of users that can be assigned can be empty if the number of users exceeds the limit (this can be changed in the Administration Module). In this case, you have to filter the list. The filter is applied to last names, first names, and user names.
If the user is the process manager, a process supervisor, or a WorkflowGen administrator, the action can be reassigned.
If the user is the process coordinator and the action assignment method is performed manually by the coordinator, the action can be reassigned.
The user can cancel the assignment of an action if the action was assigned in Self-service mode.
The user can also cancel the assignment of an action if the action was assigned to him or her by the initiator.
Managers (administrators, process managers, and process supervisors) can cancel the assignment of a self-service action in Manager mode.
An action with the Self-service assignment method can be launched by a participant if the action has not been accepted or assigned.
An action that has not been started and whose assignment method is Self-service can be launched by a participant of the process if they have accepted it initially.
A running action can be cancelled if the user is the action assignee, or if the user is a process manager, a process supervisor, or a WorkflowGen administrator, and if an Action cancellation or Default exception transition has been defined by the process designer in the process for this action.
A manual action has to be explicitly closed by the user assigned to the action, or by a process manager, a process supervisor, or a WorkflowGen administrator.
In all other cases, the system closes the action automatically according to its type:
An action using an application is automatically closed when the application sends the result back to WorkflowGen.
An embedded sub-process action is automatically closed when the sub-request has been closed.
An independent sub-process action is automatically closed when the sub-request has been launched.
A synchronization action is automatically closed once it is launched or once the pause delay is over.
You can restart a system action that is in time out by clicking the Restart action button. This option is only available to administrators and process managers in administration mode, and does not support asynchronous (e.g. Web Proc Async) or aborted system actions.
The default timeout delay is 600 seconds (10 minutes). This is configured in the EngineServiceSystemActivitiesTimeOut parameter; see the table in the appendix in the .
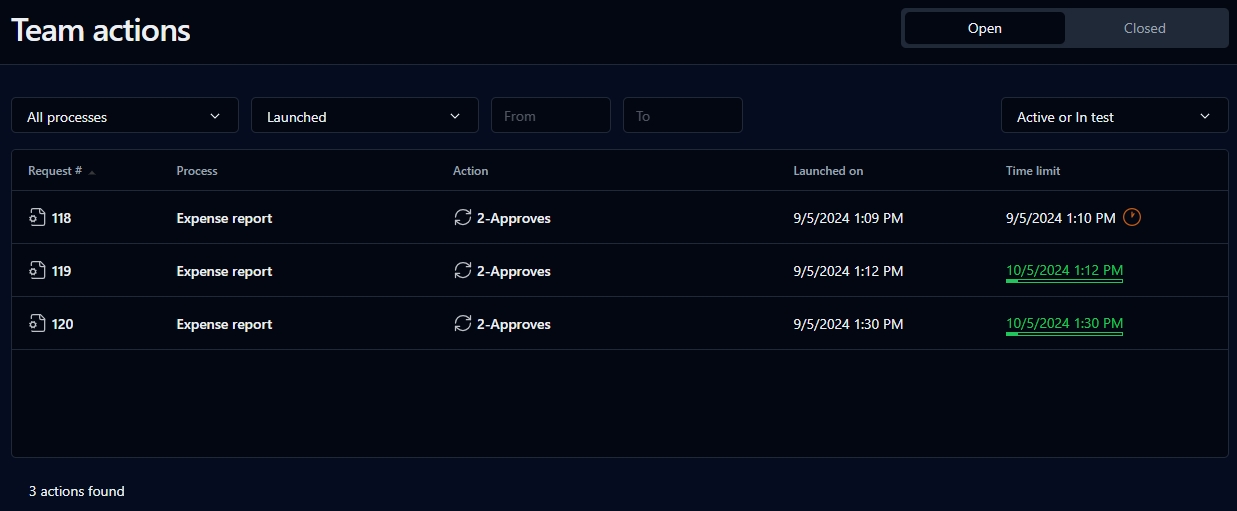
This page displays your team actions to do and the team actions you've closed. These are actions that have been defined with the Self-service assignment method.
* For closed team actions.
You can sort the list descending or ascending by any of the elements (columns) by clicking on the column header.


Action description
Requester
Name of the action initiator
Initiated
Action launch date
Participant
Participant associated with the action
Assigned to / by
Name of the person to whom the action was assigned and name of the person who assigned the action
Error *
Error message displayed when an execution error occurs when the action is launched
Sub-request
Display the follow-up form of the action's sub-request (only displayed when the action is a sub-process)
File icon
The following file extensions are displayed with a specific icon: PDF, FDF, DOC, XLS, PPT, HTML / HTM / XML, ZIP, TXT, BAT, SYS, Undefined (for other extensions)
Associated data
List of data related to the action
Comments panel
Slide-out panel to the right that displays the list of comments of the request
Profile (User or Administrator)
Links that toggle between User view to Administrator view (if the user has supervisor rights to the request)
Fields
Remarks
Status badge
Status of the action:
Not started: The associated application has not been launched
Running: The associated application has been launched
Closed – Completed: The action has ended as per the process workflow
Closed – Cancelled: the action has been cancelled
Refresh
Update the page; this is useful for actions completed in background mode
Help
Display the process help window, including a diagram of the workflow
Graphical follow-up
Display the graphical follow-up of the request (only available for allowed participants)
User access / Administrator access
Click to toggle between User view and Administrator view (if the user has supervisor rights to the request)
Description
User-selected date range for created/closed team actions (click the fields to display a calendar date picker)
Action closure date
Filter
Remarks
Open
Filter by team actions to do
Closed
Filter by team actions closed
Process
Filter by process name
Mode
Request mode: Active or In test, Active, or In test
Launched
Request creation date
Columns
Remarks
Request #
Request icon and request ID; a link displays the request follow-up form
Process
Request name
Action
Action name; a link displays the action follow-up form
Launched
Action creation date
Time limit
Deadline after which the action is considered late
From / To
Closed *

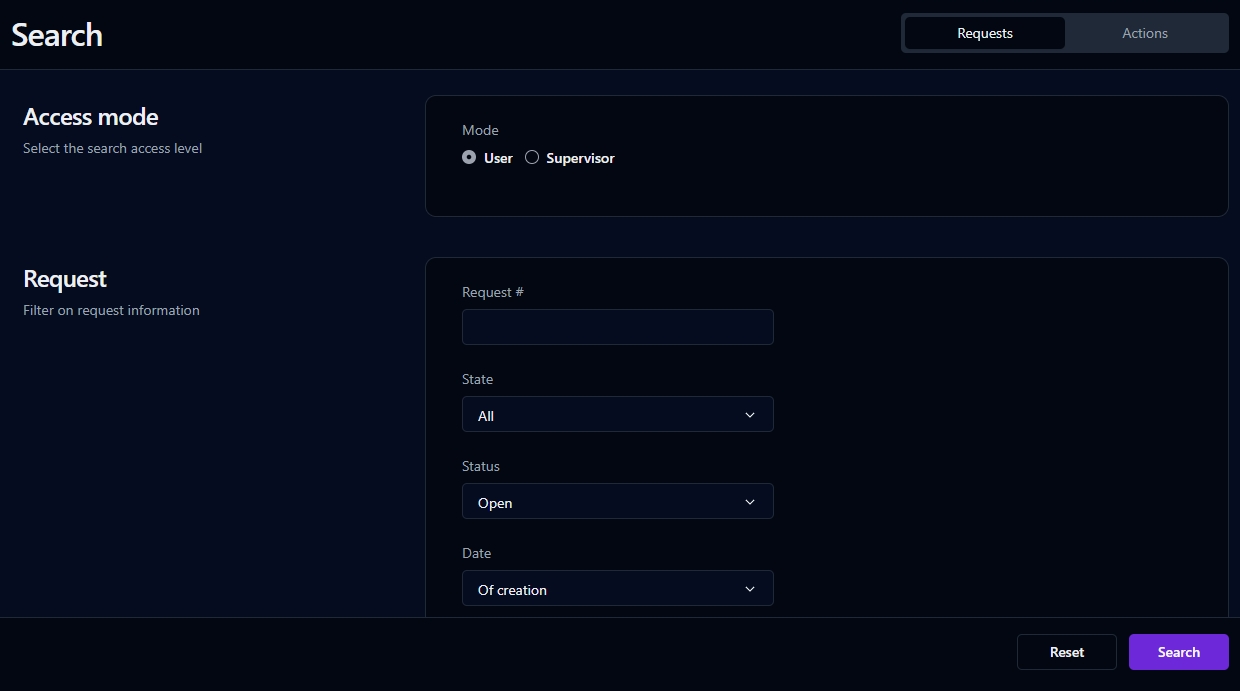
The Search screen allows searches to be conducted on user-accessible requests and actions. The search criteria can be saved as a view so that the user can quickly display the search results without having to repeatedly fill out the search form (see Save as view for more information).
By default, only requests initiated by the user and actions performed by the user will be listed in the search. This applies to all user types, including process supervisors, managers, and administrators.
In Supervisor mode, more search options are available, and the search will be performed for all activities of the processes the user supervises (see the section below for more information).
By checking Customizable report (under Advanced view in the Display section), the search results will be displayed in a customizable format, which gives the user control of how the results are organized.
By checking Display approval buttons, Quick approval buttons will appear next to validation actions if Quick approval has been enabled. This option is only available when searching in User mode.
Click Requests to search requests or Actions to search actions. The search form is in User mode by default and includes the following search filters:
Available when filtering by process or in single-process search mode.
Available when filtering by process or in single-process search mode; available in multi-process mode if common process data has been set up by your WorkflowGen Administrator.
Available when filtering in single-process mode.
In Supervisor mode, the following additional search filters are available:
The current search results can be saved as a view by clicking the Save as view button displayed above the search results. See the section for information on how to use views, and the section to find out how to turn saved views into pop-up panels on your Dashboard.

To a person: to the corresponding user
Self-service: to all users associated with the participant, or to a subset of the participant user list, depending on the process design
Through the coordinator: to the coordinator only
To the requester
To the requester
To the user assigned to the action
To the user who has assigned the action to a person, unless it is the current user
To the user who assigned the person
To the user assigned to the action
When the action has to be performed
When the action is overdue
Prior to when an action is overdue
When the action is completed
When the action is cancelled
When the action assignment was cancelled
When an execution error occurs
When an assignment error occurs
The requester
The action assignee
Some free-form email addresses
The users associated with a process participant
The user who performed an action of the process
Any email address included in the process data
Filter by request or action status: All, All except closed (cancelled), Open, Closed, Closed (completed), or Closed (cancelled)
Date
Filter by date: Of creation, Of closing, or Limit
Period
Filter by a predefined period
Or from... to...
Filter by a date range (click the fields to display a calendar date picker)
Category
Filter by process category
Process
Filter by process name
Version 1
Filter by process version
Action 1 (actions search only)
Filter by action ✏️ Note: By default, the search can filter only by actions in which the user is a participant. In Supervisor mode, the search can filter by any action in the selected process for which the user is a supervisor.
Data filters 2
Filter by process data values
✏️ Note: The does not contain operator excludes NULL values.
Query 1 (requests search only)
Text or keywords used to run the hybrid full-text and similarity search; these vary based on whether your WorkflowGen instance uses SQL Server or PostgreSQL Server
SQL Server
The demonstration invoice would search for a data that contains any of the keywords.
PostgreSQL
unquoted text: The demonstration invoice would search for a data that contains both the words demonstration and invoice
Data 3 (requests search only)
Request data to search: All, Attachment, Description, or Subject
Similarity threshold 1 (requests search only)
Specifies the minimum similarity percentage required for a result to be considered relevant in semantic searches
Advanced view
Display results in a customizable report
Display paging
✏️ Note: The server-side paging feature does not support some of the existing Advanced View functions such as Export grid, View chart, and Column filtering.
Display Quick approval buttons for validation actions (actions search in User mode only)
Action display (actions search only)
Hide action numbers in search results
Filter by requests or actions that are past due by the number of days specified in the drop-down list
Not assigned (actions search only)
Filter by actions not yet assigned
To accept (actions search only)
Filter by actions to accept
Any additional associated data elements (as defined by the process designer) will appear as extra columns in when in single-process view
Action closure date
Time limit
Action deadline
Additional data elements
Any additional associated data elements (as defined by the process designer) will appear as extra columns when in single-process view
Button / Field
Description
Requests
Define a search for requests
Actions
Define a search for actions
Access mode
Switch between User and Supervisor search modes (see the next section, Supervisor mode)
Request #
Filter by request number
State
Filter by request state: All, In test, or Active
Field
Description
Requester’s last name (requests search only)
Filter by the requester’s last name
Requester’s username (requests search only)
Filter by the requester’s username
Assignee’s last name (actions search only)
Filter by the assignee’s last name
Assignee’s username (actions search only)
Filter by the assignee’s username
Participant
Filter by participant (global or process) in all processes the user supervises
Columns
Remarks
Request #
Request number; click the icon to display the request form in Quick view, or click the number to display the form information screen
Process
Process name
Launched
Request creation date
Closed
Request closure date
Time limit
Request deadline
Columns
Remarks
Request #
Request number; click the icon to display the request form in Quick view, or click the number to display the request information form
Process
Process name
Requester
Requester name
Action
Action name; click to open the action information form
Launched
Action creation date
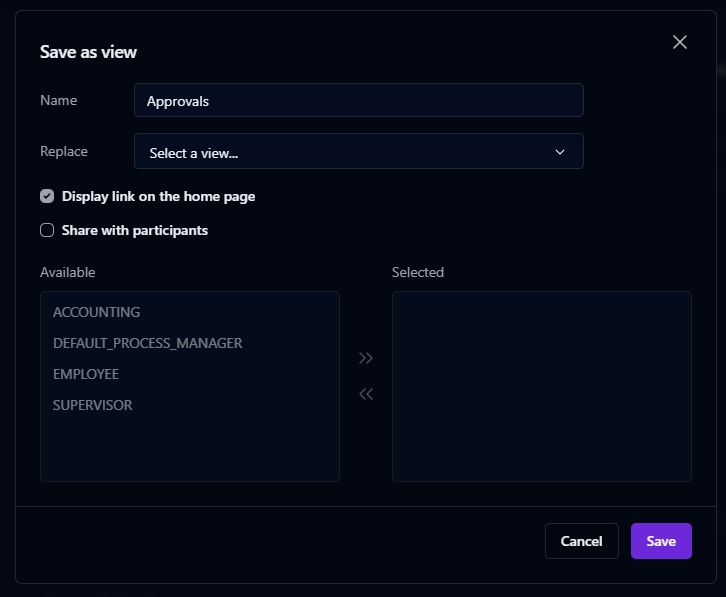
Fields
Remarks
Name
Name of the new view
Replace
Select an existing view to replace
Display link in the home page
Display this view on your home page
Share with participants
Select which participants to share this view with
Status
Past due (days)
Additional data elements
Closed
The Dashboard displays the date of your last visit along with your first and last names. The date and time are displayed according to your current time zone.
The user settings panel is accessed by clicking the user icon in the top left corner of the Dashboard. This panel lets you set your language and time zone and change your password.
By selecting a process name from the drop-down list at the top left of the banner, the Dashboard will display the information for this process only.
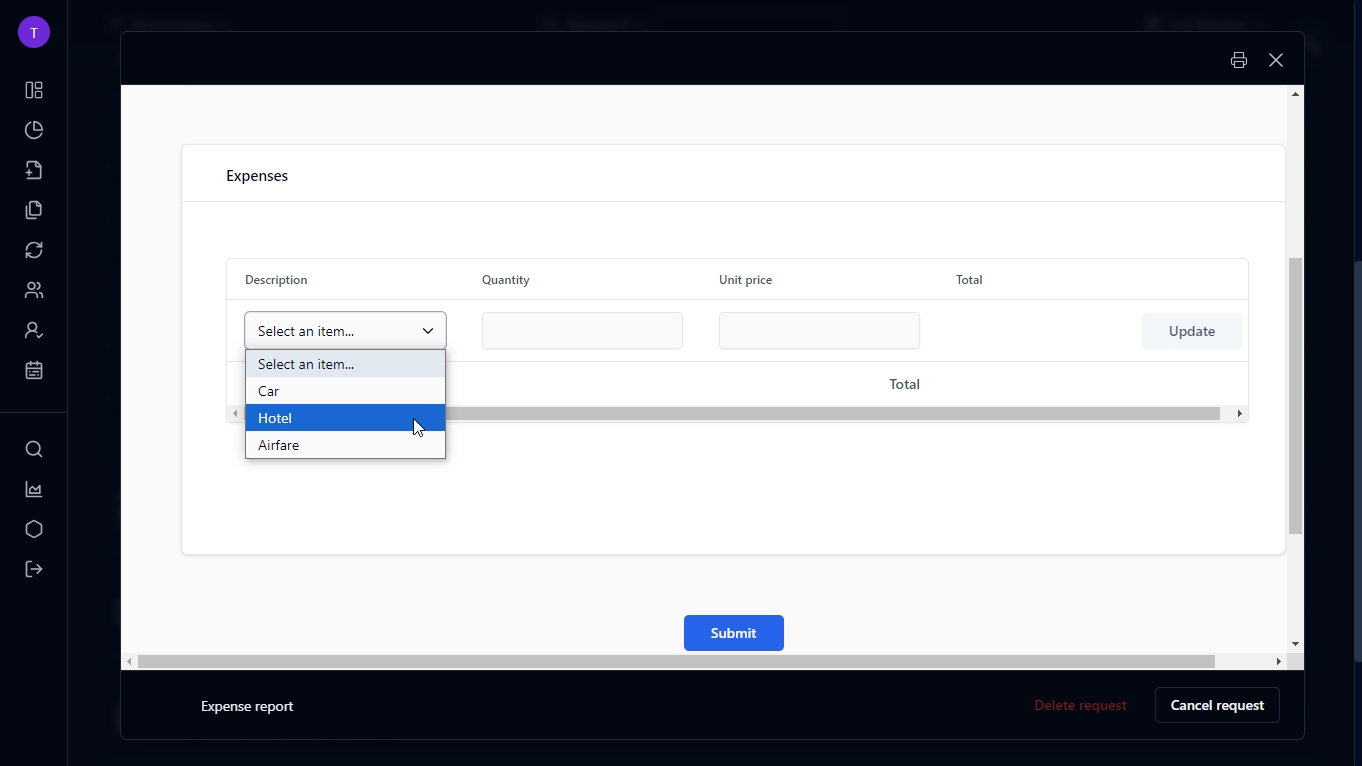
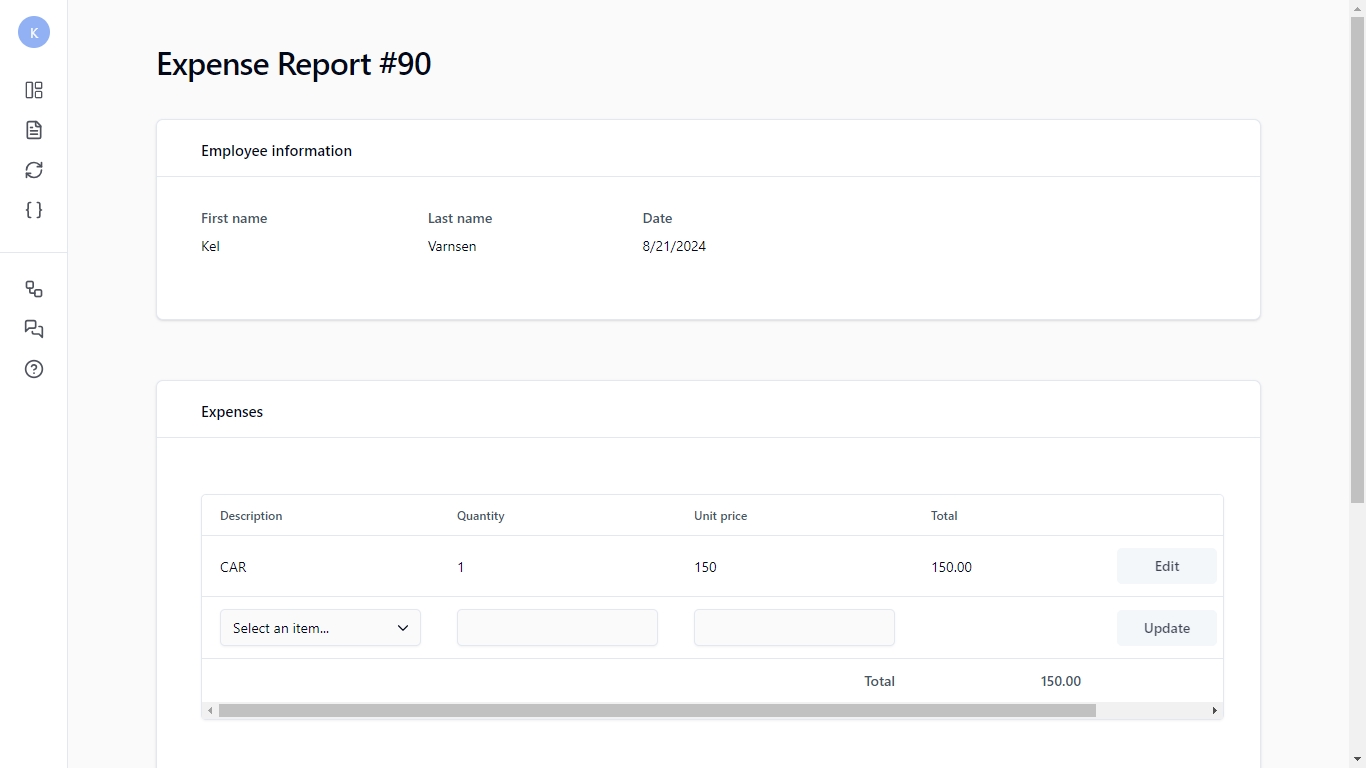
If the Quick view feature has been enabled in the Administration Module, clicking the request icon to the left of the process name opens a pop-up window that displays the process form, including any predetermined process data.
You can fill in and submit information, print the form by clicking the printer icon, navigate to the previous or next request’s Quick view (if applicable) by using the arrows, close the Quick view by clicking the icon, and depending on the status of the process and user security settings, delete or cancel the request.
If you've added processes and/or views to your favorites list, the My favorites section will appear as the top section of your Dashboard, with a list from which you can launch these processes or open these views.
To add or remove a process or view to your favorites list, hover the mouse over the name of the process or view in the New request or My views list and click the star outline on the right-hand side. (You can also remove favorites directly in the My favorites list).
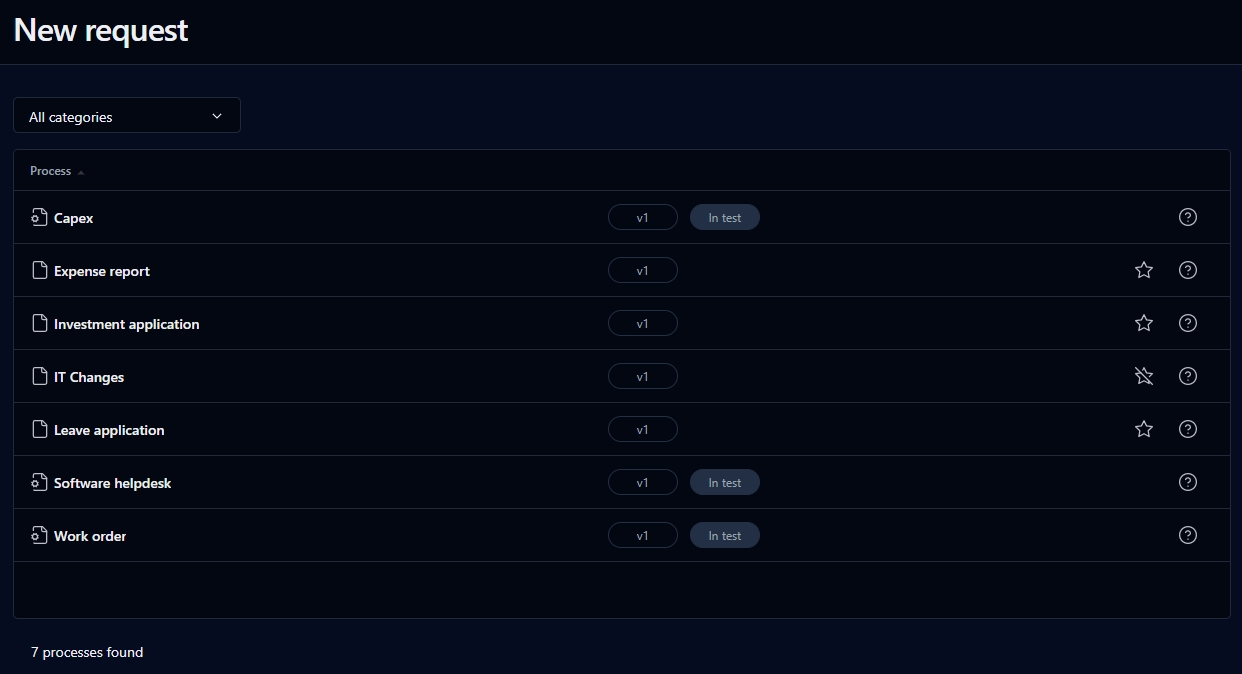
Click New request to display the list of requests that you can launch. New requests can be grouped by category.
To add or remove a process to your favorites list, click the star outline. Only Active status processes can be added to favorites.
Alternately, the system configuration within the Administration Module allows for the display of process and action descriptions instead of code names.
Columns
Remarks
Name
Process icon and process name (or, alternately, process description): identifies processes with In test status identifies processes with Active status
Clicking the process icon will launch a new request. If the Quick view functionality has been activated in the Administration Module, the process request form will displayed in a pop-up window.
Process name: A link allows a new request to be launched.
Description
Process description (instead of code name)
Help
Process help; a link displays the help form about the process and the procss workflow diagram
Click My views to display your customized saved views.
To add or remove a view to your favorites list, click the star outline.
You can display your saved views as floating dashboard panels on your home page. For instructions on how to do this, see the Dashboard pop-up panels section below.
This is the list of current requests of which you are the requester.
Columns
Remarks
Request #
Request icon and request ID:
identifies processes with In test status
identifies processes with Active status
If the Quick view functionality has been activated in the Administration Module, clicking the Request icon will open a pop-up window containing the predefined process data (e.g. FORM_ARCHIVE).
Request ID: A link displays the request follow-up form.
Process
Process name
Launched
Request launch date and time
Time limit
Request deadline; if blank, the request has no deadline
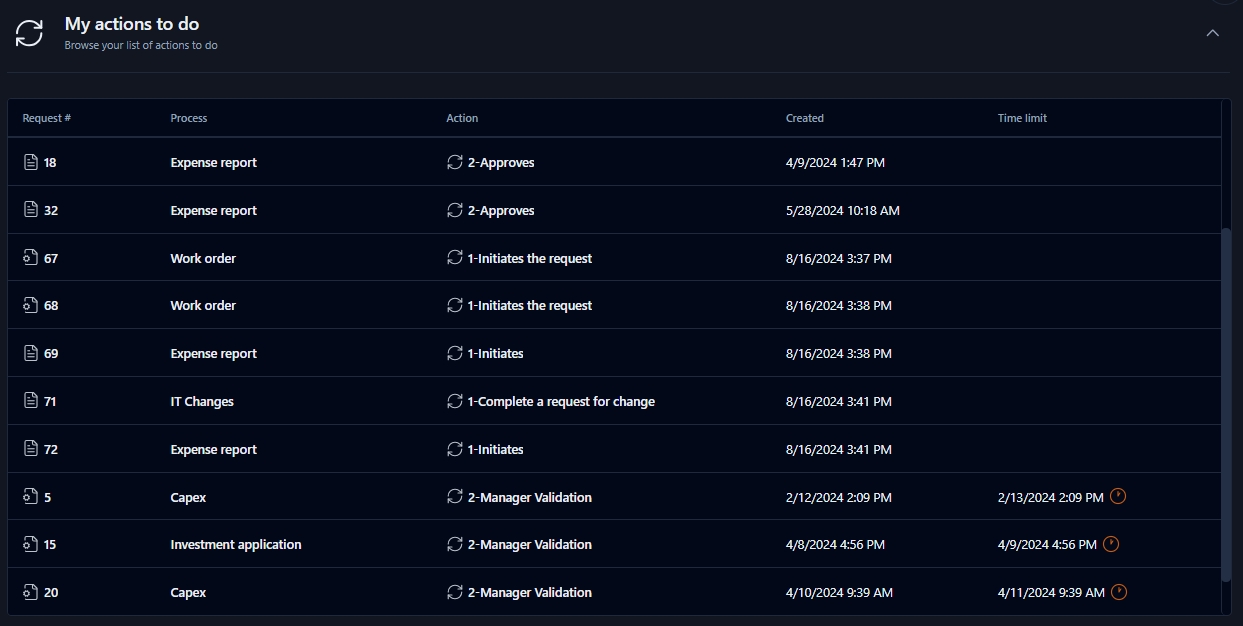
This is the list of actions for you to do.
Columns
Remarks
Request #
Request icon and request ID: identifies processes with In test status identifies processes with Active status
If the Quick view functionality has been activated in the Administration Module, clicking the request icon will open a pop-up window containing the predefined process data (e.g. FORM_ARCHIVE).
Request ID: A link displays the request follow-up form.
Process
Process name
Action
Action icon and action name
Click the icon to display the action follow-up form
Click the action name to launch the action
Created
Action creation date and time
Time limit
Action deadline; if blank, the action has no deadline
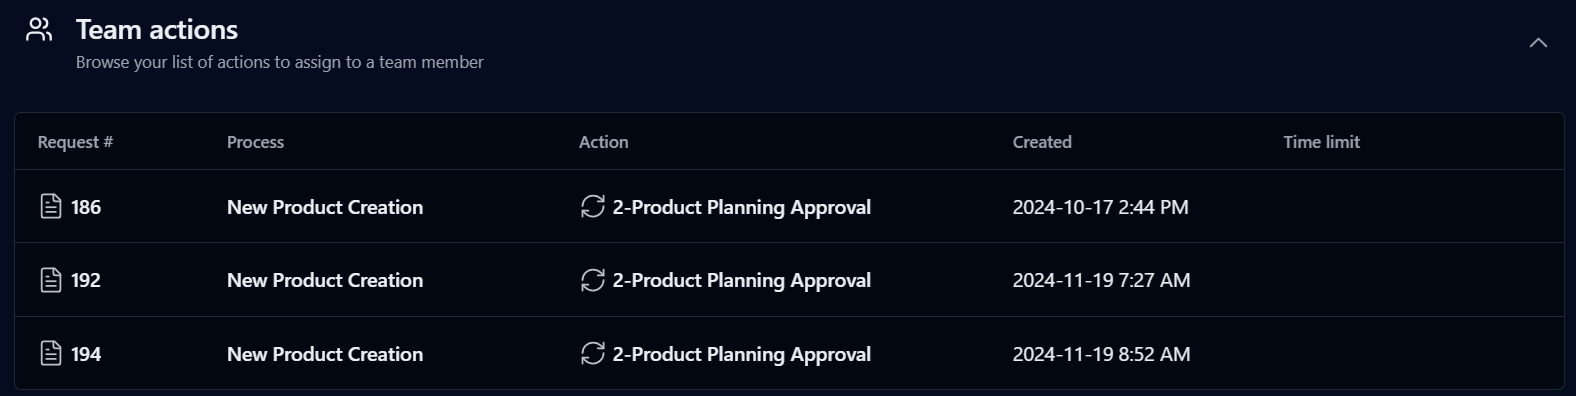
This is the list of team actions.
Since they're in self-service mode, these actions aren't assigned to a single person, so they can be handled by any user associated with the action participant.
Columns
Remarks
Request #
Request icon and request ID: identifies processes with In test status identifies processes with Active status
If the Quick view functionality has been activated in the Administration Module, clicking the request icon will open a pop-up window containing the predefined process data (e.g. FORM_ARCHIVE).
Request ID: A link displays the request follow-up form.
Process
Process name
Action
Action icon and action name
Click the icon to display the action follow-up form
Click the action name to launch the action
Created
Action creation date and time
Time limit
Action deadline; if blank, the action has no deadline
This is the list of actions for the user to assign. This may apply under the following assignment methods:
A participant with a coordinator
A manual assignment by the action initiator
A person (who's not a coordinator) who handles a previous action
Columns
Remarks
Request #
Request icon and request ID: identifies processes with In test status identifies processes with Active status
If the Quick view functionality has been activated in the Administration Module, clicking the request icon will open a pop-up window containing the predefined process data (e.g. FORM_ARCHIVE).
Request ID: A link displays the request follow-up form.
Process
Process name
Action
Action icon and action name
Click the icon to display the action follow-up form
Click the action name to launch the action
Created
Action creation date and time
Time limit
Action deadline; if blank, the action has no deadline
This opens the Search screen. For information on how to use it, see the Search section.
You can access this list of current and overdue requests in progress if you're a process manager or a process supervisor (according to the processes you manage).
If you're an administrator, you can access the list of current requests or overdue requests for all processes. You can save the current view of the list of requests.
You can access this list of current or overdue actions if you're a process manager or a process supervisor (according to the processes you manage). If you're an administrator, you can access the list of current or overdue actions for all of the processes. You can save the current view of the list of actions.
You can add your saved views to your Dashboard as customizable floating pop-up panels you can arrange according to your needs. These will remain on your Dashboard, refreshing automatically each time you return to it, though you can refresh panels manually by clicking in the top right.
To open a pop-up panel, click to the left of the name of a saved view (see Save as view). You can then place it on your home page and resize it as needed.
You can launch an action’s form directly from a pop-up panel. Completing actions this way will refresh the view displayed in the pop-up panel instead of redirecting you to the page configured to display when completing an action (such as the follow-up form or the homepage).
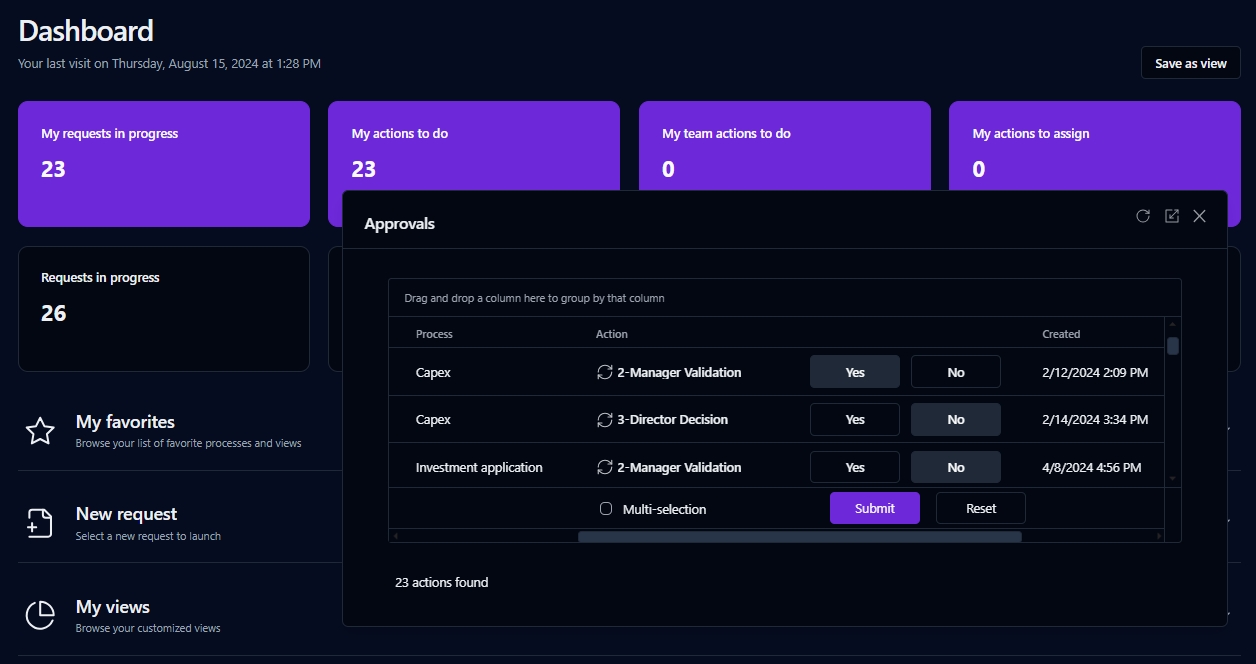
Pop-up panels are also useful with the Quick approval feature as shown in the screenshot below, since this gives you immediate access to your list of validation actions, letting you handle them directly in the dashboard panel using the buttons (see Quick approval for more information).
While the views in pop-up panels will always refresh when you return to your Dashboard, you can manually refresh the pop-up panels by clicking in the top right.
If you navigate away from the view displayed in the pop-up panel, such as when opening a request or action follow-up form, and then click the refresh icon, the panel will return to the view and refresh it. If this happens, you'll lose any information entered into the form but not submitted. As well, if you refresh while performing Quick approval validations, any selected buttons will be reset. Refresh is disabled during drilldown of custom charts in Dashboard panels.
If your WorkflowGen Administrator has enabled the auto refresh feature, the icon will appear, and the panels will refresh according to the preset interval. You can disable and re-enable auto refresh by clicking the icon.
Filter
Remarks
Open
Filter by actions to do
Closed
Filter by actions closed
Process drop-down list
Filter by the the actions' process names
Launched
Predefined period for created actions
From / To
User-defined period for created actions (click the fields to display a calendar date picker)
Columns
Remarks
Request #
Request icon and request ID; a link displays the
Process
Process name
Action
Action icon and action name
Clicking the action icon displays the
Clicking the action name launches the action
By default, clicking the action name launches the action, but you can configure WorkflowGen in order to change this behavior and display the action follow-up form instead of launching the action.
Launched
Action creation date
Time limit [1]
Deadline after which the action is considered late
For actions to do
For closed actions
You can sort the list descending or ascending by any of the elements by clicking the corresponding column header.
Error
Cause
You are not authorized to display this page
The user must be a WorkflowGen user or administrator to access the application.
You are not a participant of the request
A request or an action can only be viewed or modified by a participant, a process manager, or a process supervisor.
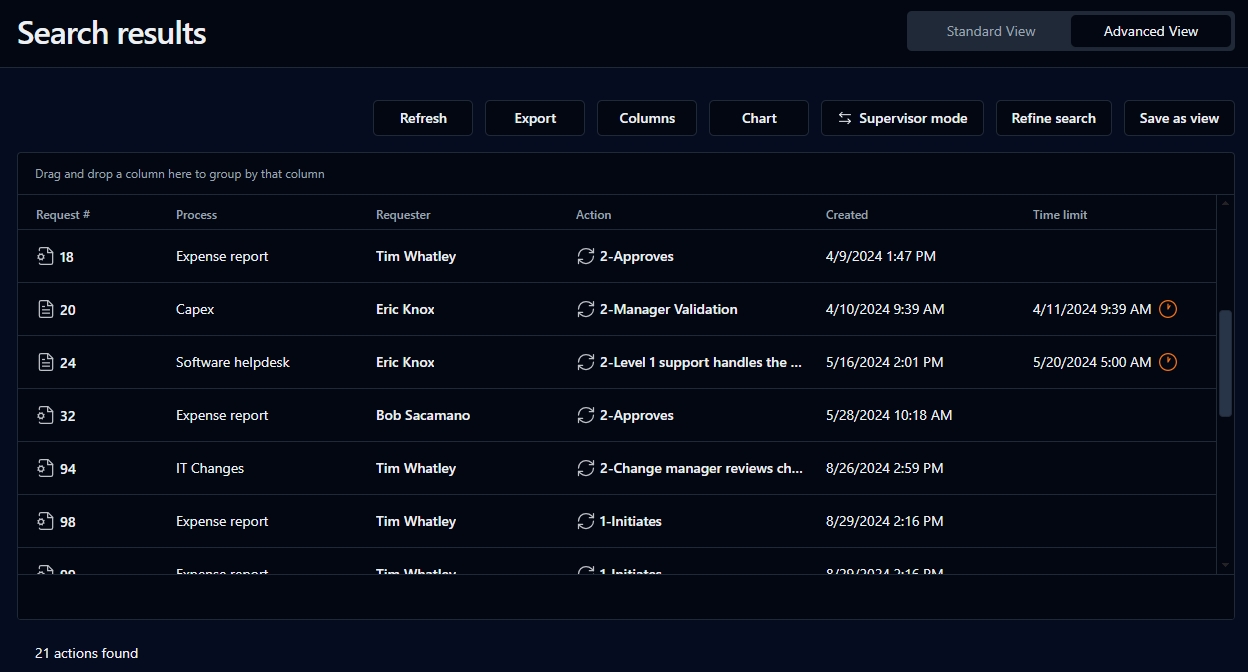
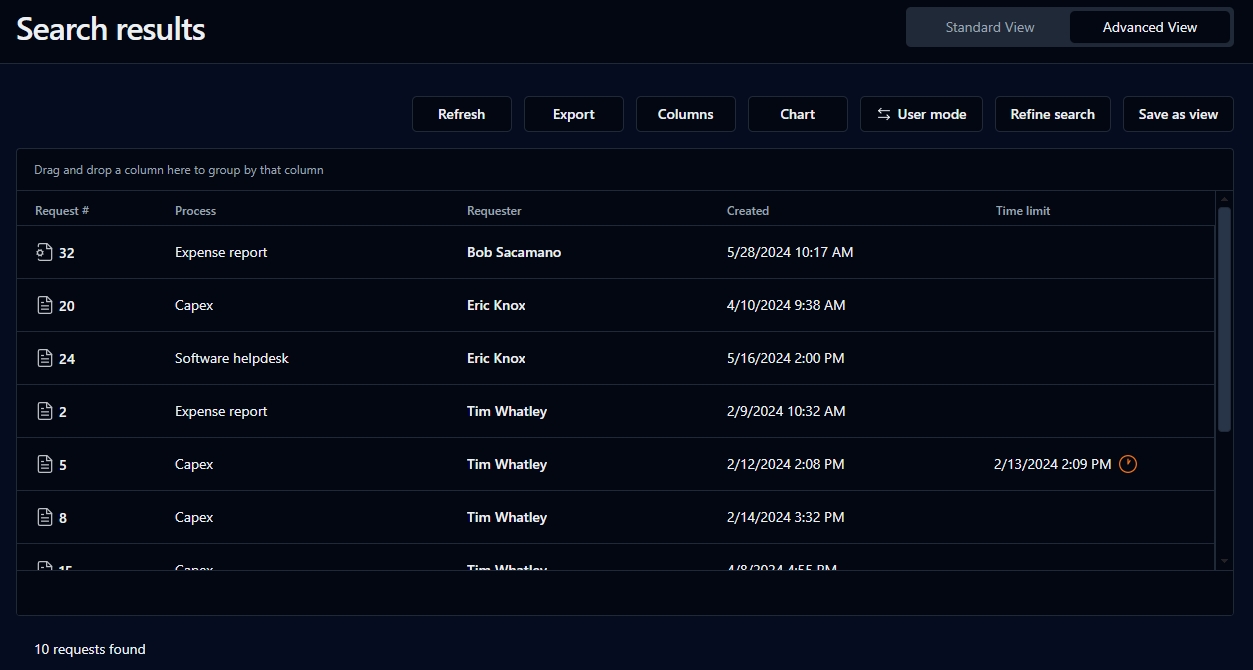
With Advanced view you can view search results in a customizable format. This allows you to view targeted information by filtering and organizing the information to suit your needs. You can also save views, use the Quick approval feature to validate requests, and create and customize charts.
You can access it by clicking the Advanced view button located at the top right of the Search results screen.
Advanced view has several dynamic features:
Adjust column width
Group by column
Sort by column
Edit columns
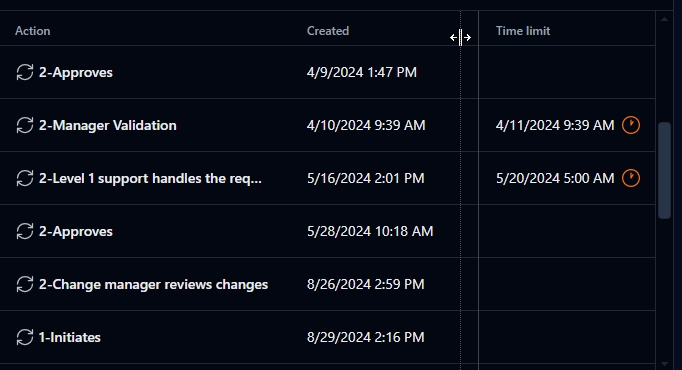
To adjust the column width, place the cursor in between two columns at the header level until the bi-directional arrow appears, then slide left or right to adjust the column size.
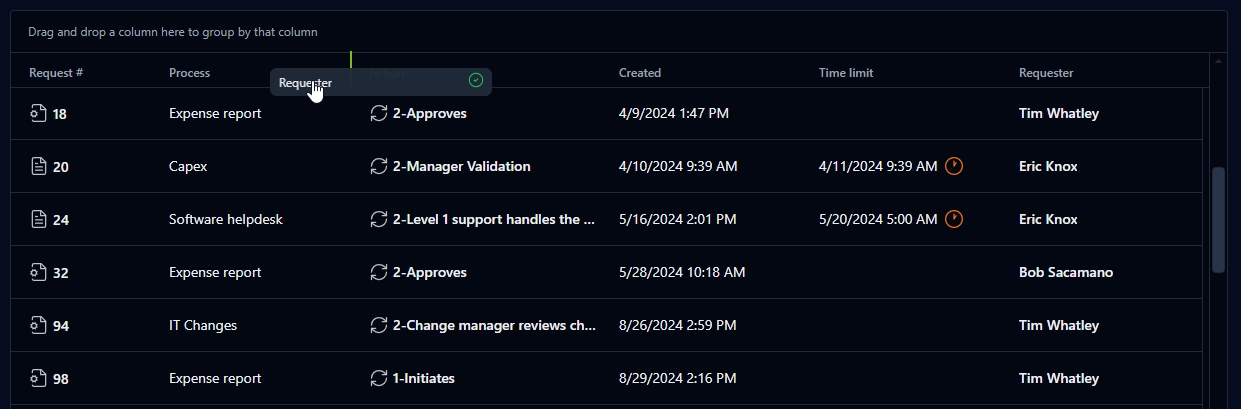
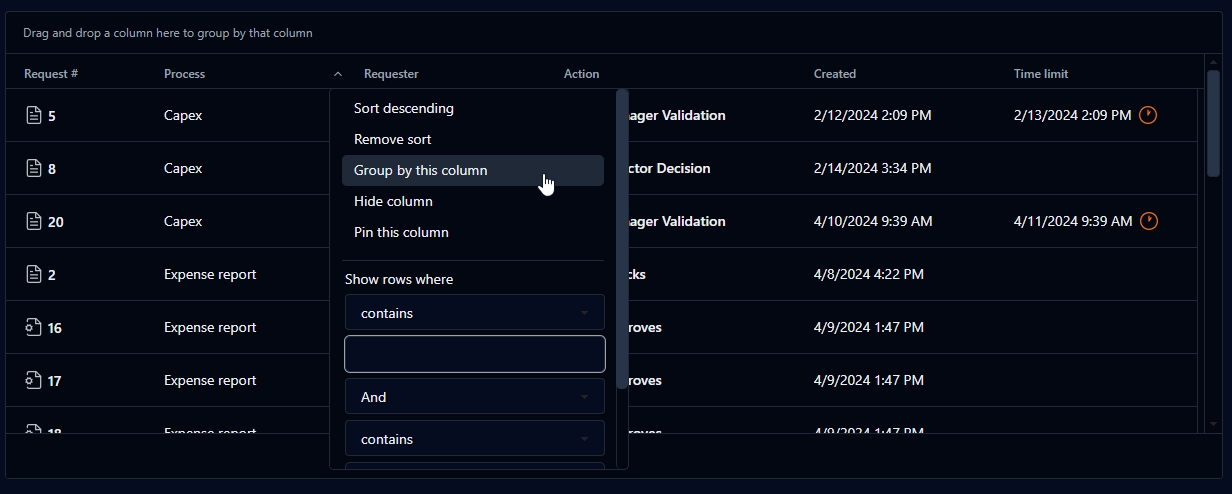
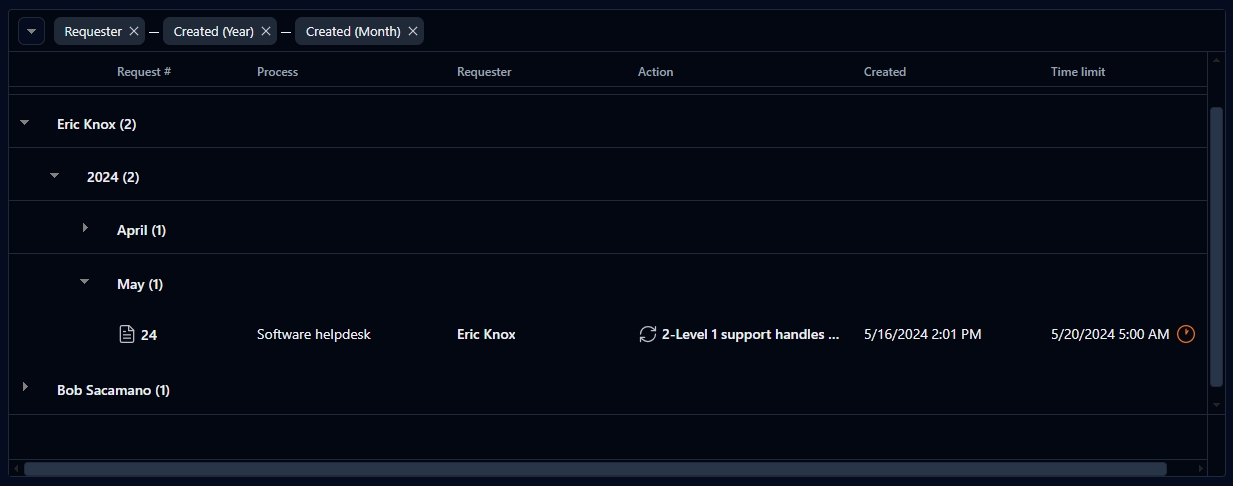
To group the search results by the data in a particular column, drag and drop a column header onto the bar directly above the column headers. You can also hover the mouse over the column header, then click the pencil icon that appears on the right and choose Group by this column from the drop-down panel.
The search results will now be grouped by the data in that column.
You can continue to do this for multiple columns, according to how you want to group the information.
To ungroup a column, click the x next to the column name in the header.
To sort the search results in ascending or descending order, you can either click a column header, or hover the mouse over a header and click the pencil icon on the right side of the column header to open a drop-down panel where you can then choose to add or remove a sort. A triangle will appear in the header of the column by which the results have been sorted; click it to reverse the sort order.
To filter by column, hover over a column header and click the pencil icon that appears on the right to open a drop-down panel. In the Show rows where section, you can filter by combinations of keywords or number configurations, depending on whether you're filtering text or numeric information.
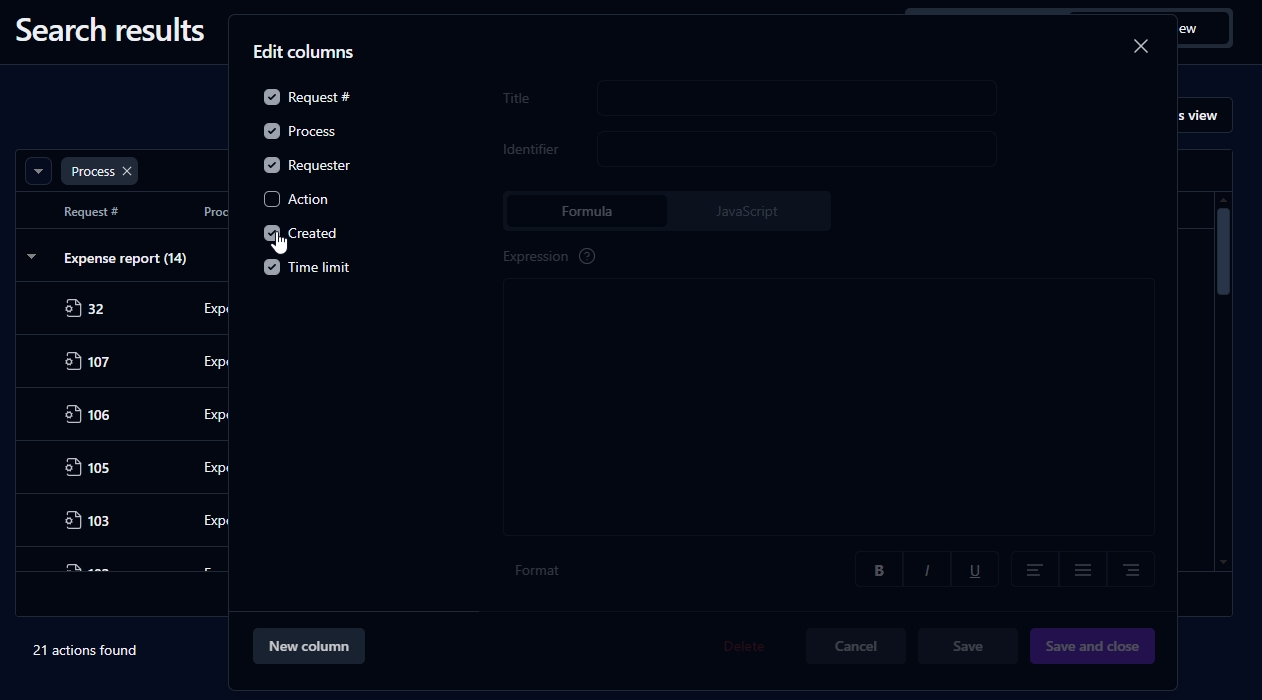
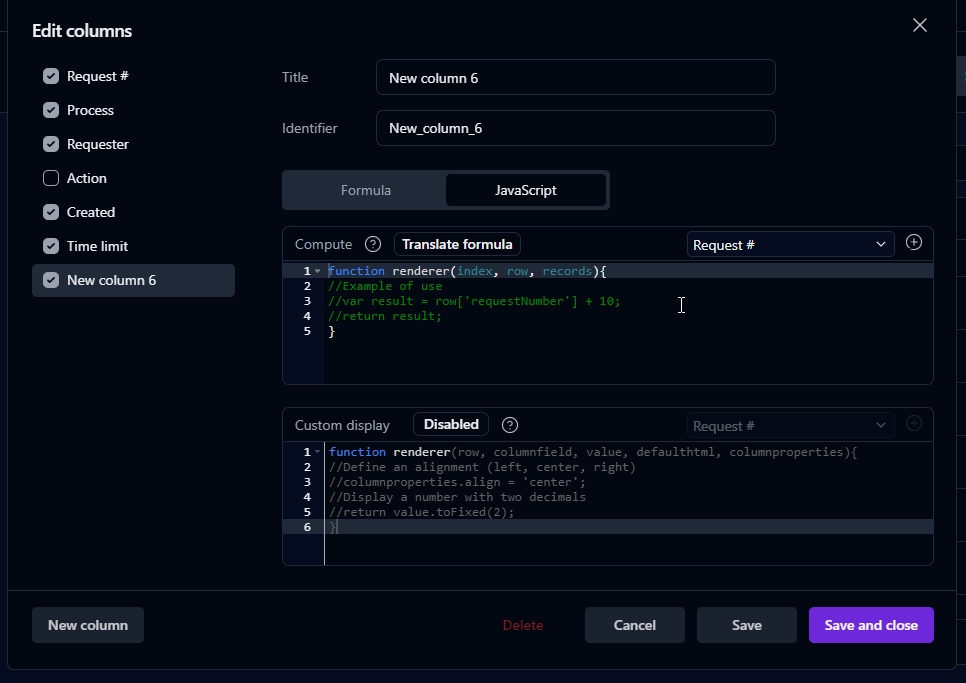
To edit a column, click the Columns button above the search results grid. Here, you can hide a column by unchecking its heading, create a new column, or edit existing column information.
You can create a new column by clicking the New column button. This opens a new window that lets you fill in new information or edit existing information about a column.
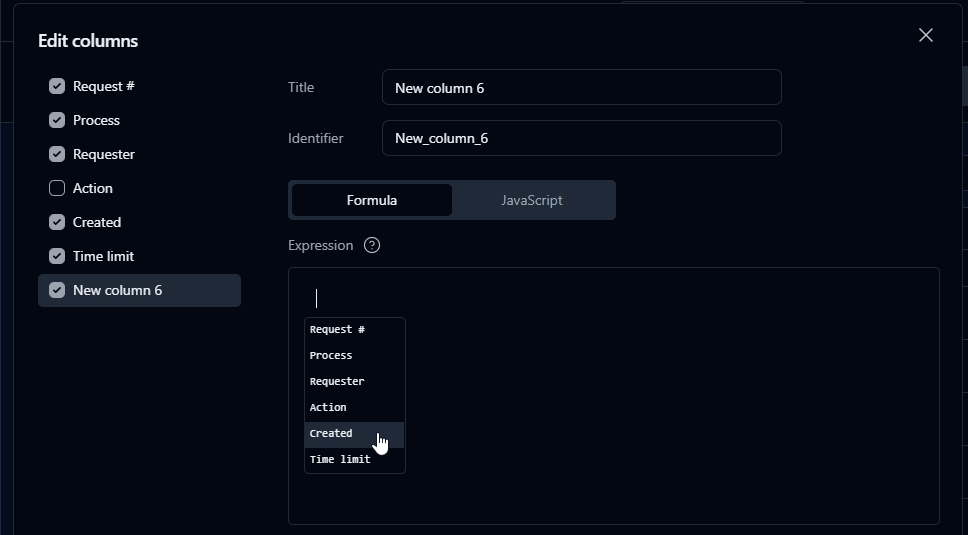
You can enter or edit column information by using either the Formula tab or the JavaScript tab.
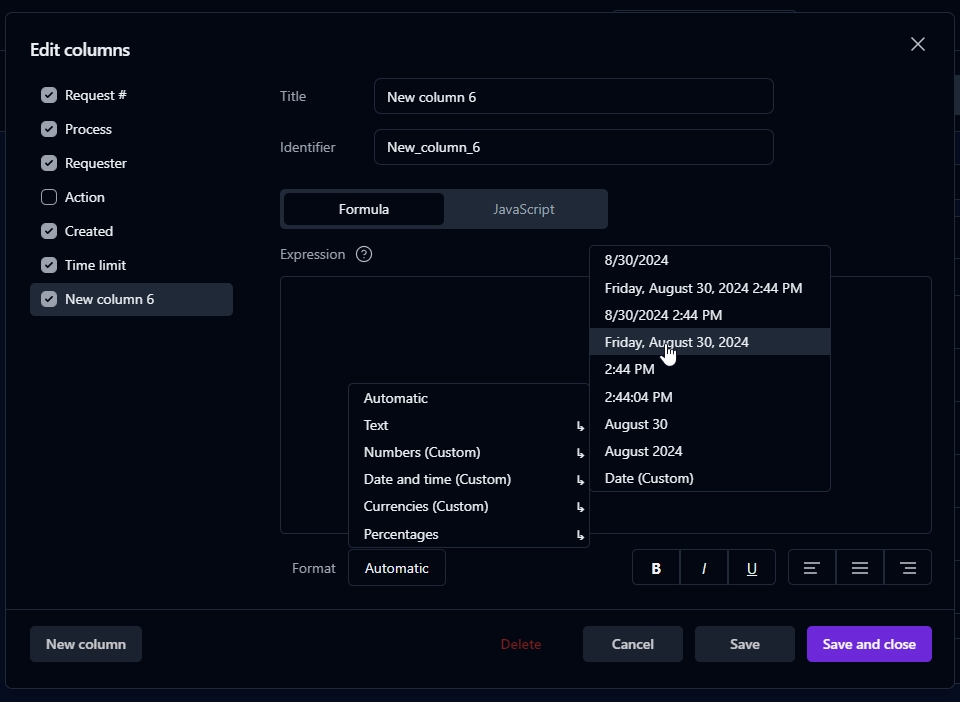
The Formula tab allows you to easily enter column information by clicking inside the Expression editor and entering information or selecting from the list of existing columns displayed.
Text written here must be entered either within quotation marks (" ") or correspond to a column name. Text strings are displayed in yellow and columns are as orange text with an orange border. Invalid text will appear in white underlined in red, indicating an error.
You can also select the format of the information that you enter by clicking the Format button. The default setting is Automatic, which detects the format of the information being entered (numeric, text, date, etc.). You can also choose from a number of other format selections. Hovering the mouse over any of the format selections displays several options, including a Custom option.
The JavaScript tab allows you to write JavaScript functions in order to calculate the values of your custom columns.
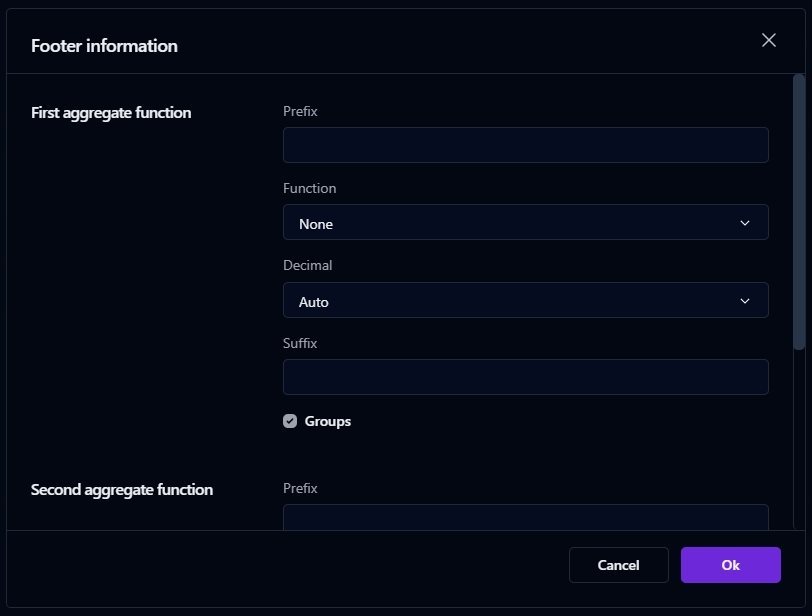
You can add information in the footer of your column if that column contains numerical values (for example, list prices in dollars or another currency).
Hover the mouse over the column footer, then click it to open the Footer information window. From this window you can add various types of information, such as average, minimum and maximum values, etc.
When you check Groups in the Footer information window, the results will appear next to the grouped column data in the Search results list.
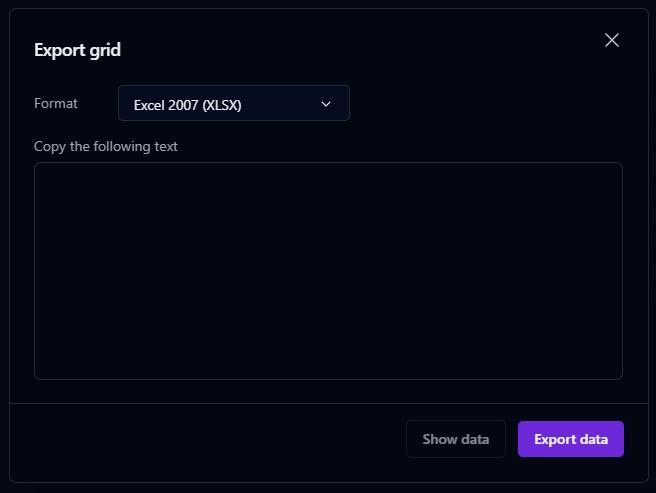
You can export your search results by clicking the Export button located above the column grid. This allows you to export the search data as a downloadable file in a number of formats (Excel 2007 (XLSX), Excel (XLS), XML, CVS, HTML, JSON, TSV), or inside the Copy the following text box, where you can copy the content to another location by clicking the Show data button (not supported by XLSX format).
Excel 2007 (XLSX) format will export all columns, including hidden ones.
Once you've organized the search data in a way that is most convenient to you, you might want to save this view for future reference. To do this, click the Save as view link located above the column grid. This displays a new window that allows you to create a new view or replace an existing one. You can also create a link to this view from your homepage, and share this view with other participants. This option is also available in Standard view.
Since process data security settings apply to views, only those users with the required permissions will be able to see the contents of the views.
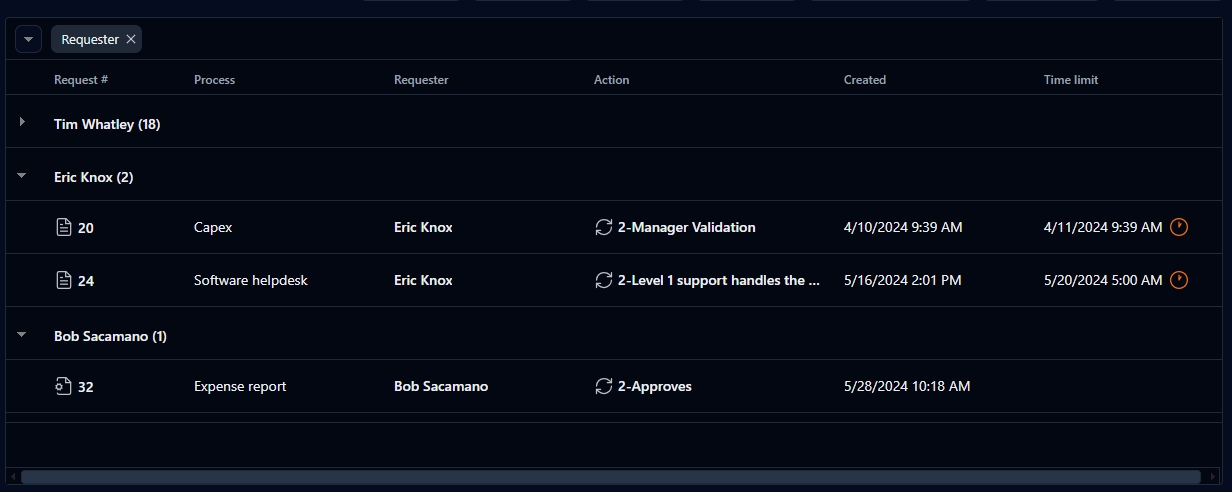
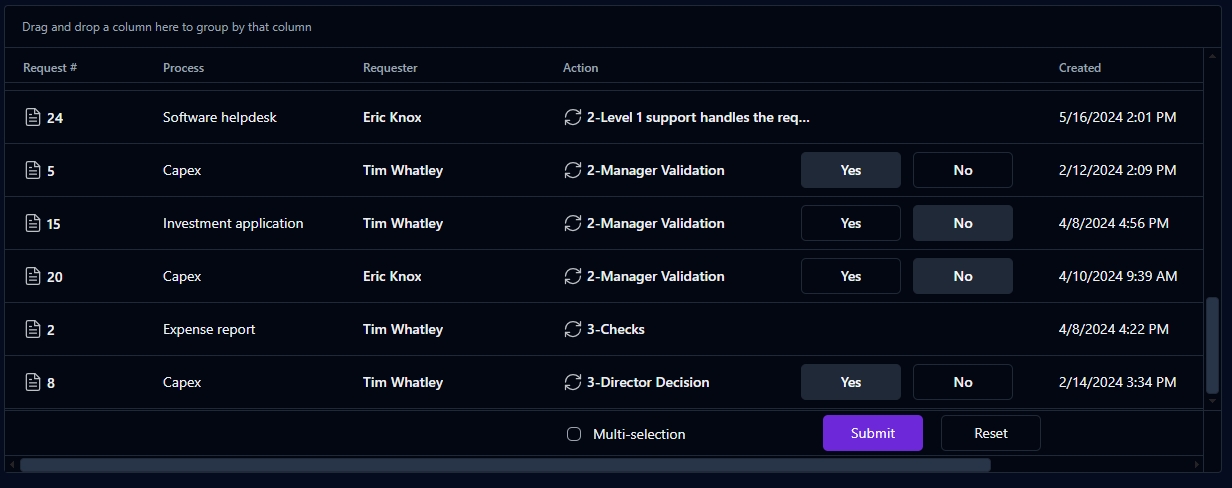
In the search results list, validation actions for which Quick approval has been enabled will display buttons (such as Yes, No, or Modify, as defined in the process form) that let you easily and quickly handle multiple validation requests at once. (If you have actions other than validations, you can group the list by types of action by dragging the Action column header into the blue header bar; this way, all of your validation actions will appear together.)
Checking the Multi-selection box lets you select the same approval answer for all actions of the same process by clicking a single approval button. You can also do this without enabling this option by holding down the Alt key and clicking a single button. However, enabling this setting does not automatically submit any actions, so you still have to click the Submit button to complete the actions.
Once you've finished handling validation actions, click Submit. Click Reset to undo your selections (and delete your comments, if applicable).
You can also save this list as a view, which you can then access in the My views section on your Dashboard without having to perform a new search.
To take full advantage of the Quick approval feature, you can then display the saved view as a pop-up panel on your Dashboard (see ). Whenever you return to or reload your Dashboard, the list will refresh automatically, and you can handle your approvals directly in the pop-up panel using the buttons.
You can create charts (column, bar, line, pie) from Advanced view reports, save them as views, and share them with other users. You can also save the chart as a view and place it on your home page dashboard (see ).
Click the Chart button above the search results grid, then choose the type of chart and the value by which to calculate the chart (e.g. count, average, sum). Only the available options will be displayed in the drop-down menus.
If custom chart editing has been enabled in the Administration Module, the chart panel will prompt you to choose either Standard or Custom. (See below for information on how to use custom charts.)
Click the Chart button above the search results grid to open a panel with options to customize a standard chart (click Custom to edit a custom chart). Only the options available for the type of chart you’ve chosen will be displayed. For example, the Show percentage option is only available for pie charts.
The Custom charts feature lets you create customized charts with your data grid using JavaScript. You can create a chart with any chart library.
Enter your JavaScript code using the following variables:
chartContainer: Draw your chart onto this div object.
grid.getGroups(): This function returns a JSON containing a simplified version of the grid data. The JSON is sorted by group name and contains the following values:
count: This value indicates the number of rows contained in the group filter.
For samples of custom chart JavaScript code, see the article in the .
The file associated with the data is not on the server.
The action transition condition could not be evaluated. Check its syntax.
An error occurred while calling the web procedure
The application is not able to reach the URL of the web procedure or of the web service. Check that the URL is accurate and the username and password are valid.
Depending on the browser you're using, the error message you receive may be slightly different. However, all browsers will return an error message if there is a problem in JavaScript.
You are not authorized to access this file
If downloading is secured, only a WorkflowGen Administrator, process manager, process supervisor, or participant with sufficient reading rights may access the requested files.
Error
Cause
The request was not found
The request you're trying to access is not in the database.
The action was not found
The action you're trying to access is not in the database.
The action has already been done
You're attempting to perform an action that has already been closed.
Error while opening the file
The file you're trying to access is invalid.
The file was not found
The file you're trying to access is not on the server.
Error
Cause
The request is not available
The request you are trying to access does not have an In test or Active status.
The process has reached the maximum number of instances authorized for the action
The number of actions for the process has reached the limit set by the Maximum number of simultaneous instances creation per action parameter in the Administration Module Configuration panel.
The process cannot start because its definition is not valid
The request you're attempting to create is based on a process definition that contains errors.
A file associated with the data is missing
The file associated with the data does not exist or is not accessible. Check the read/write permissions of the WorkflowGen users on the folder that contains the action’s temporary files.
Error
Cause
A parameter required in the process was not found
The value of a parameter required in the process is empty.
The username of the person to be assigned to was not found
If the action assignment is dynamic, the data containing the username is empty.
The username of the person to be assigned to does not correspond to a user
If the action assignment is dynamic, the name of the user contained in the data doesn't correspond to a user of the application.
An error occurred while evaluating the conditions of the transition
The condition specified for the transition has created an error at runtime. Check the syntax of the condition.
An error occurred while evaluating the conditions of the notification
The condition specified for the notification has created an error at runtime. Check the syntax of the condition.
Error
Cause
Missing parameter
Only when launching a sub-process action: One of the parameters required by the sub-process has not been sent by the parent request.
The sub-process was not found
The sub-process you're trying to access is not in the database or its status is not In test or Active.
The user is not declared as process requester
The requester defined for the sub-request is not associated with the sub-process requester participant.
Error
Cause
The action has been cancelled because the timeout delay has expired
The lock of the data for the action has expired. You must set up the action again.
An error occurred while executing the web procedure
The data returned by the web procedure or web service is invalid.
Error
Cause
The number of authorized users is over. Please contact your administrator to upgrade your license.
You cannot create more than the number of users specified in your license file.
Portlet is not supported with your license. Please contact your administrator to upgrade your license.
You cannot access the RSS portal using the WorkflowGen Standard version.
Launching a process remotely is not allowed with your license. Please contact your administrator to upgrade your license.
You cannot launch remote requests using the WorkflowGen Standard version.
This operation is not allowed with your license. Please contact your administrator to upgrade your license.
You cannot change data using the WorkflowGen Archive version.
Error
Cause
This field contains one or more illegal characters
The name you entered in the Save as view window contains one or more of the following illegal characters: < > / \ ;
View’s name can’t be empty
You haven't given the view in the Save as view window a title.
Column identifier contains unexpected characters
The identifier you entered in the Edit columns window contains one or more of the following illegal characters: < > / \ ;
Column identifier must be unique
In the Edit columns window, you gave the column identifier a title that already exists.
Your function doesn’t return a value
Any function you enter in the Save as view or Edit columns windows must compute and return a value.
A file associated with the data is missing
An error occurred while evaluating the transition conditions
The browser returns an error if there is a problem in JavaScript
Insert footer information
Export search results
Save as view
Quick approval
Charts
Select from list to quickly include existing column information in code or comments
Custom display (JavaScript tab)
Enable to include specific column information (for example, date variances by country, or to maintain numeric values in column when adding text)
aggregates: If a footer function is present, this array collection will contain the aggregate values of the group.
subgroups: If defined, this object will contain a collection of JSON objects that represent the subgroups of the current group. The JSON objects will have identical objects to their parent.
grid.getGroups(true): This function returns the JSON containing all of the grid data. The JSON is sorted by group name and can contain the following values:
subrows: This object returns an array containing all the rows in the corresponding group. The row object is a JSON with values sorted by the column ID.
subgroups: If defined, this object will contain a collection of JSON objects that represent the subgroups of the current group. The JSON objects will have identical objects to their parent.
grid.getRows(): This function returns an Array containing all of the rows in the grid from top to bottom.
created
Closed date
closed
Name
Function
Title
Add a custom column title
Identifier
Add a unique identifier for the column; only letters, numbers, and the underscore symbol (_) can be used.
Expression editor (Formula tab)
Enter formulas in order to define your columns
Format list (Formula tab)
Choose from a list of existing columns
Compute (JavaScript tab)
Use JavaScript to perform arithmetical operations to customize columns and create values for the column grid
Name
Function
Prefix
Place a word, symbol, number, etc., before the numerical amount
Function
Options to display numerical information in a variety of ways (sum, average, minimum, maximum, etc.)
Decimal
Determine the number of decimal points to place after the numerical amount
Suffix
Place a word, symbol, number, etc., after the numerical amount
Groups
Check to view footer information for results grouped together by column
Name
Function
Name
Enter the name of the view
Replace
Selects and replaces an existing view with the current view
Display link on the home page
Display a link to the current view on your home page
Share with participants
Share a link to the current view with other participants and select the participants you want to share the view with
Column
Column ID
Requester
requester
Time limit
timeLimit
Participant
participant
Action
action
Request #
requestNumber
Compute drop-down window (JavaScript tab)
Created date
"quoted text": "demonstration invoice" would search for a data that contains the word demonstration followed by the word invoice.
OR: demonstration or invoice would search for a data that contains either of the keywords.
-: The demonstration -invoice would search for a data that contains the word demonstration and doesn’t contain the word invoice.
For more information and examples, see the PostgreSQL documentation: https://www.postgresql.org/docs/current/textsearch-controls.html#TEXTSEARCH-PARSING-QUERIES
Mode
Request mode: Active or In test, Active, or In test
Closed [2]
Action closure date

Data analytics that detail the data information per process with filtering capabilities
Analytics settings (such as the number of items to display in a report) are configured in the Analytics section on the Portal tab in the Administration Module Configuration panel (see Analytics in the WorkflowGen Administration Guide for more information).
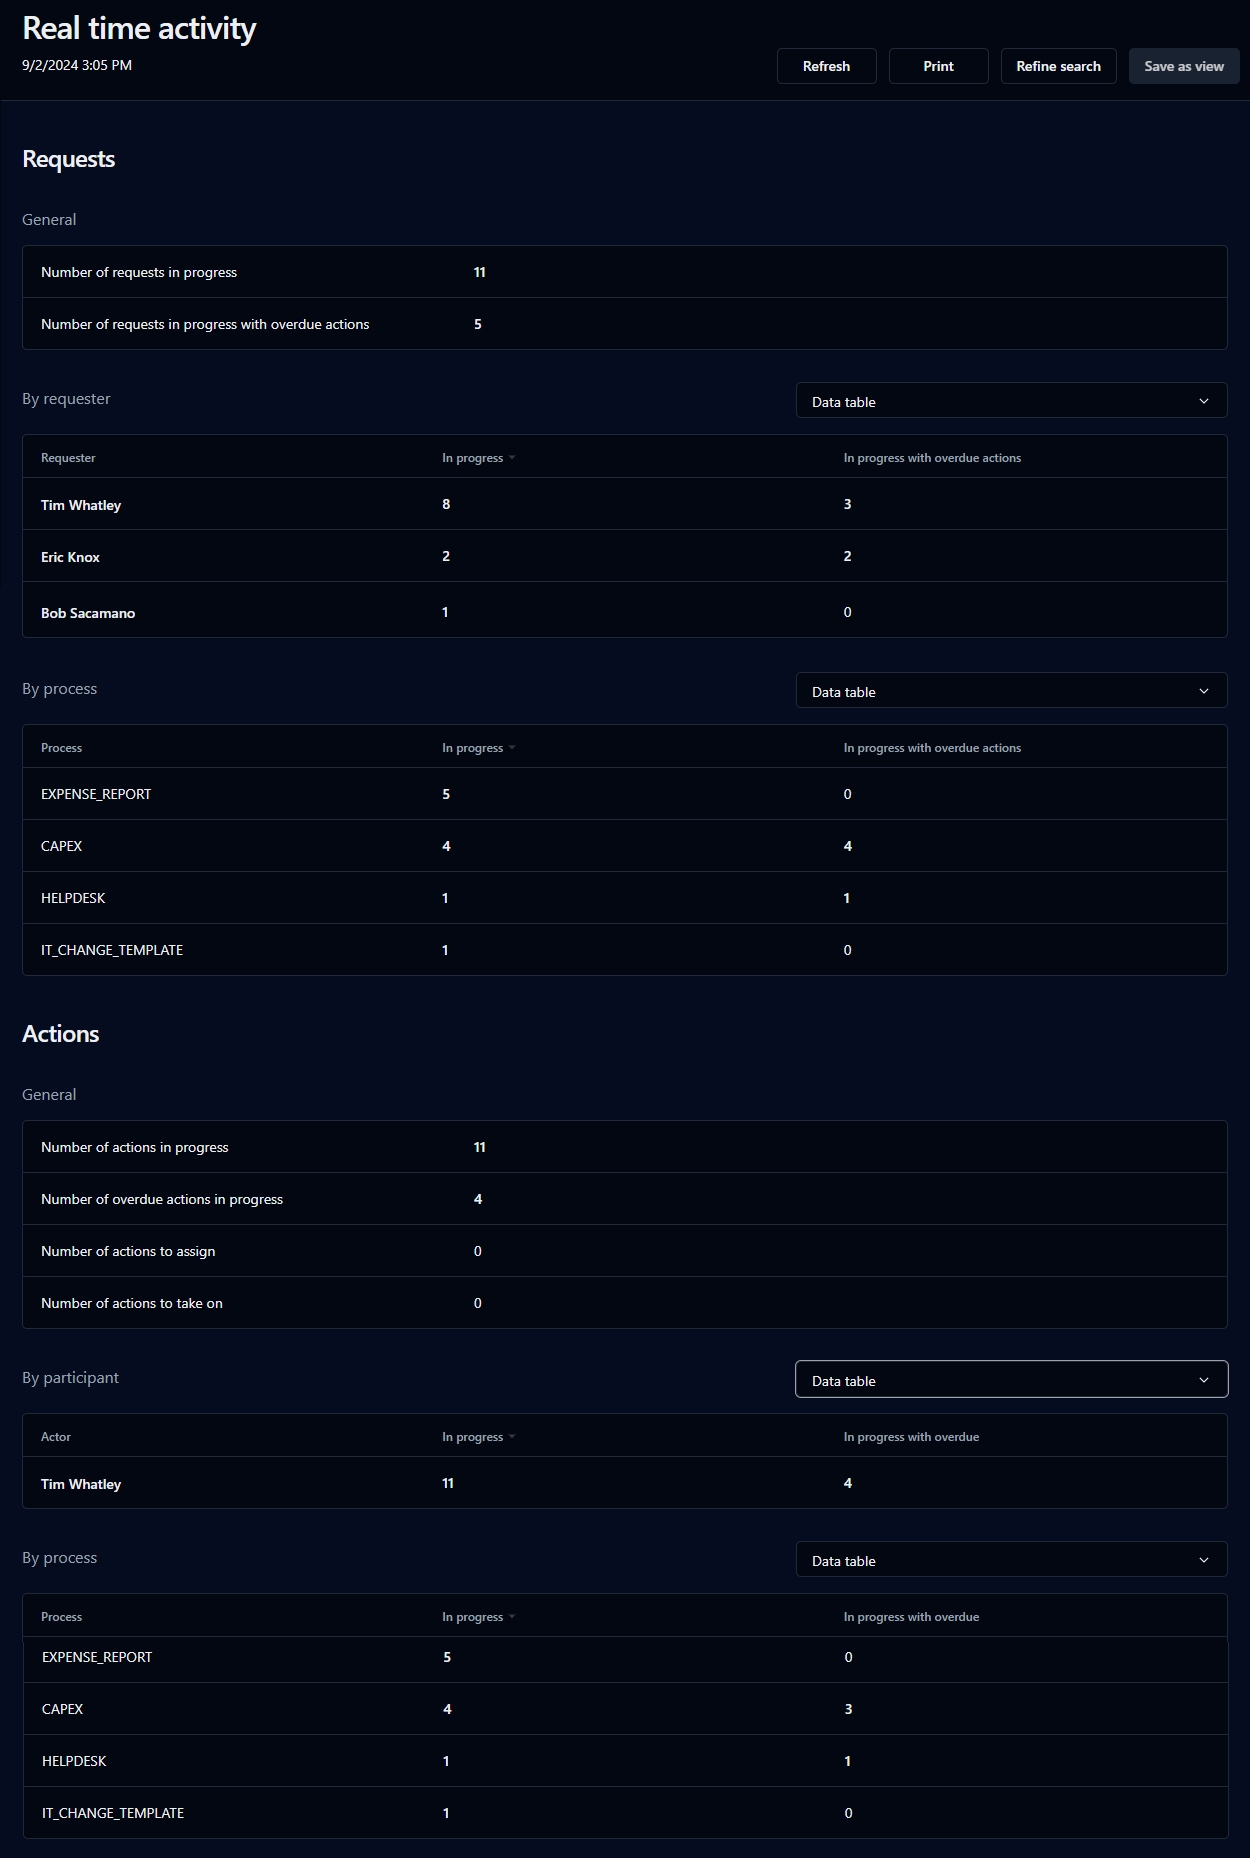
The Activity form lets you create views and reports related to the requests in progress (in real time), as well as requests in any previous timeframe.
Fields
Description
Period
Filter by a predefined period
from... to...
Filter by user defined period
Folder
Filter by process folder
Category
Filter by process category
Process
Filter by process name
* Displayed only when a single process is chosen from the Process drop-down list.
You can generate an activity report, either real time or for a specified period.
Functions
Description
Refine search
Start a new statistics search
Save as view
Save the current report as a view (see )
Print the report
Number of requests in progress
Number of overdue requests in progress
Number of requests in progress with overdue actions
In progress
In progress with overdue
In progress with overdue actions
Displays available (select from drop-down list): data table, bar chart, donut
In progress
In progress with overdue
In progress with overdue actions
Displays available (select from drop-down list): data table, bar chart, donut
Number of actions in progress
Number of overdue actions in progress
Number of actions to assign
Number of actions to take on (team actions to do but not yet assigned)
In progress
In progress with overdue
Displays available (select from drop-down list): data table, bar chart, donut
In progress
In progress with overdue
In progress with overdue actions
Displays available (select from drop-down list): data table, bar chart, donut
Functions
Description
Refine search
Start a new statistical search
Save as view
Save the current report as a view
Print the report
Number of different requesters
Number of requests in progress
Number of overdue requests in progress
Number of requests in progress with overdue actions
Number of closed requests
Number of closed requests with overdue
Number of closed requests with overdue actions
Average of realization duration (all requests)
Average of realization duration (except overdue)
Number of requests per day
Request (number of requests per process)
Displays available (select from drop-down list): data table, bar chart, donut
Started
In progress
In progress and overdue
In progress with overdue actions
Closed
Closed and overdue
Closed with overdue actions
Displays available (select from drop-down list): data table, bar chart, donut
In progress
In progress and overdue
Closed
Closed and overdue
To assign
To accept (team actions to do but not yet assigned)
Displays available (select from drop-down list): data table, bar chart, donut
Completion
Completion except overdue
Accepted
Accepted except overdue
Displays available: table, bar chart, pie chart
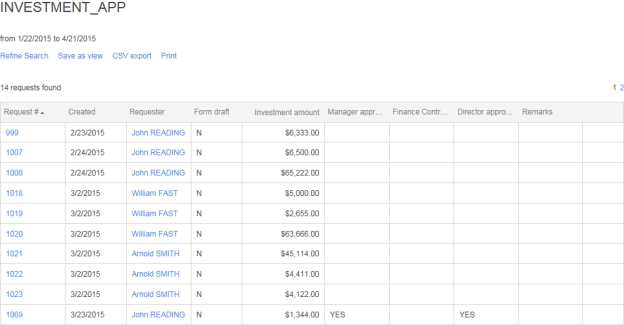
The data statistics form lets you create reports based on the data of a current process.
Fields
Description
Period
Filter by a predefined period
from... to...
Filter by user defined period
Requester
Filter by the requester
Process
Filter by process name
Version *
Filter by process version
* Displayed only when a single process is chosen from the Process drop-down list.
Functions
Description
Refine search
Start a new statistical search
Save as view
Save the current report as a view
CSV export
Export the report to a comma-separated value formatted file
✏️ Note: You can use a different separator based on your language and/or culture if needed, but this must be configured by a WorkflowGen Administrator.
Print the report
Columns
Description
Request #
Request number
Created
Request creation date
Requester
Requester
Data
Associated data elements (as defined by the process designer)

Version *
Filter by process version
State
Filter by request state: In Test, Active, or All
Data *
Filter by process data values
State
Filter by request in Test mode, Active mode, or all modes
Status
Filter by request status
Displayed data
Choose data items to display in the report (with data selector)
Data *
Filter by process data values