Loading...
Loading...
Loading...
Loading...
Loading...
Loading...
Loading...
Loading...
Loading...
Loading...
Loading...
Loading...
Loading...
Loading...
Loading...
Loading...
Loading...
Loading...
Loading...
Loading...
Loading...
Loading...
Loading...
Loading...
Loading...
Check the following URLs with the wfgen_admin user account:
User Portal: http://[yoursite]/wfgen
Administration Module: http://[yoursite]/wfgen/admin
If you're unable to log in, verify the web.config file in the root folder of the WorkflowGen application (usually DRIVE:\Inetpub\wwwroot\wfgen) and validate that the MainDbSource connection string contains the correct database connection information including server, database name, user, and password.
You can create processes using the list of built-in process samples.
You can change the security configuration (such as the authentication method) by following the instructions in the section.
The New User Time Zone settings can be changed on the General tab in the Configuration Panel.
The New User Default Language can be changed on the Administration tab in the Configuration Panel.
This guide covers all of the procedures involved in the installation and maintenance of WorkflowGen. It's intended mainly for system administrators who'll be required to install or carry out maintenance of the application.
You must be administrator of the web server. Using a local administrator account is recommended. You must know:
The physical path on the web server where the WorkflowGen web application will be installed.
The physical path on the web server where WorkflowGen Windows services will be installed.
The URL of the web server where WorkflowGen will be installed.
MS SQL Server database:
The name of the MS SQL Server.
The credentials of the SA account.
The file path of the SQL Server database files on the SQL server machine.
The name or IP address of the SMTP gateway (it's recommended to use the IIS SMTP gateway; see ).
The default sender email address for notifications.
The authentication method you want to use for WorkflowGen web applications.
Using a local IIS SMTP gateway is strongly recommended to improve performance. A local SMTP gateway is configured to forward emails to the enterprise SMTP gateway ("smart host") only, so the current enterprise security will be applied.
There are several advantages to using an SMTP relay at the IIS WorkflowGen server:
Better performance, since messages are sent directly to the relay.
Local SMTP acts as a buffer to avoid loss of emails if the main SMTP server is not available.
Connection problems are reduced because the relay manages communication problems.
The relay traces email deliveries in its own log files.
The relay allows you to limit access to WorkflowGen.
The relay supports SMTP authentication and TLS encryption to connect to your Exchange SMTP (or other mail server).
Make sure the SMTP service is installed on the Windows server used as the SMTP gateway.
In IIS, edit the properties of the Default SMTP virtual server.
On the Access tab, click Relay.
Click the All except the list below radio button.
Click Apply and close this window. (For an increased security level, grant access only to the web server IP.)
On the Delivery tab, click the Advanced button.
In the Smart host field, enter your SMTP gateway address (IP or hostname).
Click Apply.
Alternatively, WorkflowGen also supports pickup directories. Notifications are created in a pickup directory managed by the SMTP server. The path to the pickup directory is set in the SMTP server section on the General tab in the Administration Module Configuration Panel. (Alternately, you can set the path to the pickup directory as the value of the ApplicationSmtpPickupDirectory parameter in the WorkflowGen web.config file.) The default pickup directory path is C:\inetpub\mailroot\Pickup.
Once you've properly configured the pickup directory in WorkflowGen, you need to configure your external SMTP service (such as IIS SMTP Server or Exchange) to process the emails that are created by WorkflowGen in the pickup directory.
*.sql) in the manual installation procedure.You can customize WorkflowGen according to your language and, if applicable, the required language layout.
To customize the resource files for your language, first make copies of the .resx files in the following folders:
\wfgen\App_GlobalResources
\wfgen\WfApps\WebForms\App_GlobalResources
\wfgen\ws\App_GlobalResources
Append the file name with the language code and, if needed, a hyphen followed by the country code; for example, .ar-AE for Arabic and United Arab Emirates. Then, customize the resource files as needed.
If the custom language requires a different layout, such as right-to-left text, customize the CSS files as needed using the method in the previous section.
Automatic task execution (e.g. overdue exceptions and notifications management) is provided by this Windows Service. This service is installed by the setup and is started automatically after installation. (Refer to WorkflowGen Windows Services installation if the manual installation procedure was used.)
If errors occurred while the service is running, those errors will appear in the Event Viewer (source: WorkflowGenEngineService) accessible in the Windows Administrative Tools. All the messages related to this service will be displayed in the Windows Logs / Application section.
To manage this Windows service execution, open Administrative Tools / Services, then select and open WorkflowGen Engine (WorkflowGenEngineService).
The automatic user and group synchronization is provided by this Windows Service, which is installed by the setup and started automatically after installation. (Refer to if the manual installation procedure was used.)
If errors occurred while the service is running, those errors will appear in the Event Viewer (source: WorkflowGenDirSyncService) accessible in Windows Administrative Tools. All messages related to this service will be displayed in the Windows Logs / Application section.
To manage this Windows service execution, open Administrative Tools / Services, then select and open WorkflowGen Directory Sync (WorkflowGenDirSyncService).
After a WorkflowGen version upgrade or system change (such as a server update or configuration change), the automatic directory synchronization can fail with the error message The license file is missing, invalid or your trial period has expired.
To resolve this issue, perform the following checks on your WorkflowGen system:
Verify that there is only one license file (.lic) in the wfgen\bin folder.
Verify that the license file (.lic) is not locked; if so, unlock it.
Verify that the two WorkflowGen service execution files (WfgDirectoriesSyncService.exe
You must have a trial, Developer, or Enterprise license to activate WorkflowGen.
You must have a serial number to activate the Developer and Enterprise versions of WorkflowGen. If you don't have one, contact your vendor.
Remove all current .lic files from the DRIVE:\Inetpub\wwwroot\wfgen\bin folder.
Copy your .lic file to the DRIVE:\Inetpub\wwwroot\wfgen\bin folder.
Make sure the license file inherits the security settings.
web.config fileFor the Developer and Enterprise editions of WorkflowGen, you must edit the web.config file located in the DRIVE:\Inetpub\wwwroot\wfgen folder.
Edit the \Inetpub\wwwroot\wfgen\web.config file.
Set your serial number as the value of the ApplicationSerialNumber parameter.
If you have a license per user, you cannot exceed the maximum number of users supported by your license, otherwise you will receive an error message when you try to launch a new request. However, user management will still be accessible.
If you want to import several users from your enterprise directory (Active Directory, LDAP, etc.), and since only active users are considered, you can choose between the following cases:
If your enterprise directory has fewer users than the maximum number of users supported by your WorkflowGen license, then you can import all of your users with the option New user default status set to Active.
If your enterprise directory has more users than the maximum number of users supported by your WorkflowGen license, then you should import all your users with New user default status set to Inactive and set the Self activation option as follows:
If you want to manually activate users authorized to use WorkflowGen, uncheck the
The WorkflowGen Administration Module and User Portal are fully web-based applications. The requirements are as follows:
Windows 11
macOS
Chrome
Firefox
Edge
Safari
1280 × 800 or higher resolution
For form design, the suggested minimum resolution is 1366 × 768
The system requirements for the web server hosting WorkflowGen are as follows:
Windows Server 2012 or later (all releases)
Windows 11 (recommended for development environments only)
Microsoft IIS 10 or higher
.NET Framework 4.8
(requires IIS)
Web server (IIS)
.NET Framework 4.8 features:
.NET Framework 4.8
ASP.NET 4.8
Web Server role (IIS) / Role services
Security:
Basic Authentication
Integrated Windows Authentication (optional)
Application development:
Quad-core processor
8 GB RAM
SATA hard disk with 40 GB free
See the guide for up-to-date server specifications based on your planned usage of the system.
To use the optional GraphQL, incoming webhooks, OpenID Connect Auth, and SCIM APIs, you must first install the following requirements:
✏️ Note:
The system requirements for the database server hosting the WorkflowGen database are as follows:
Quad-core processor
8 GB RAM
SATA hard disk with 40 GB free
Microsoft SQL Server 2016 and Express Edition
Microsoft SQL Server 2017 and Express Edition
Microsoft SQL Server 2019 and Express Edition
Microsoft SQL Server 2022 and Express Edition
See the guide for up-to-date server specifications based on your planned usage of the system.
Integrated Windows or IIS Basic (Active Directory)
Applicative (WorkflowGen)
Forms
Custom (SSO: single sign-on)
Active Directory (supports all releases of Windows Server 2012 and later)
LDAP-compatible directory
Text files
SCIM
Email notifications are sent via SMTP protocols (Exchange and Lotus Notes are compatible).
Any email client can receive WorkflowGen notifications.
Email layout and content can be customized in HTML or plain text.
For best performance, the IIS SMTP gateway should be used (see ).
WorkflowGen provides an XML RSS feed (called the Portlet) to embed WorkflowGen data into existing web portals. See the for more information.
WfgWorkflowEngineService.exeVerify that the account that executes the WorkflowGen services has read/write access to the \wfgen folder.
Verify that the account that executes the WorkflowGen services is a local administrator.
In the WfgDirectoriesSyncService.exe.config file, replace <add key="WebConfigPath" value="..." /> with <add key="webConfigPath" value="..." />.
If you don’t want to worry about account activation, keep the Self activation option checked. New users connecting for the first time will be activated until the maximum number of users supported by your WorkflowGen license is reached.
ASP.NET 4.8
.NET Extensibility 4.8
ISAPI extensions
ISAPI filters
The specified module could not be foundedgeedge-js/wfgen/graphql/wfgen/hooks/wfgen/scimMicrosoft Azure SQL Database
SQL Server 2008 is no longer supported as of WorkflowGen 7.10.0.
SQL Server 2005 is no longer supported as of WorkflowGen 6.2.0.
OpenID Connect
WorkflowGen stores files (such as attachments to a request) in a folder tree structure. By default these files are stored on the web server in the folder specified in the ApplicationDataPath parameter in the configuration file (web.config), e.g. <add key="ApplicationDataPath" value="\\SERVER\SHARE$\wfgen\App_Data" />.
The default value is empty and thus will point to the physical directory DRIVE:\Inetpub\wwwroot\wfgen\App_Data. The default is to keep all the files on the web server.
You might need to move this storage folder location to a dedicated file server for the following reasons:
High volume (large attachments, document archiving, high usage level)
Web Farm architecture implementation (see )
Basic configuration allows you to easily move these files, but with a low security level.
The following steps must be followed to configure your web server:
Create the storage folder on the file server DRIVE:\FOLDER (e.g. D:\filepub).
Re-create the folder tree structure relative to the file storage location:
DRIVE:\FOLDER\wfgen\App_Data
This feature allows process file data (including attachments) to be stored in the database. It allows you to perform WorkflowGen data backup without interrupting service, so that WorkflowGen can still be used during the backup.
Set the ApplicationDefaultProcessDataFileStorageMethod parameter to File to store process data files in the file system, or set it to Database to store process data files in the database.
This parameter will define the default process data file storage method when creating a new process or importing a process XPDL of previous version.
Each process version can have the process data file storage method set independently. This will allow different processes using the file system or database storage method.
On the Process information tab:
Check the Process data storage option Store file content in database to enable the database file storage method.
Uncheck the Process data storage option to disable the database file storage method. This will then use the file system storage method.
On the Process information tab:
Uncheck the Process data storage option to disable the database file storage method. This will then use the file system storage method.
When changing the process data storage method, the following rules must be applied:
There should be no existing requests using the previous process data storage method. You can either delete existing requests or create a new version of the process.
There should be no existing FILE type process data with the default file value using the previous process data storage method. You can delete all default file values, change the process data storage method, and re-upload the default file values into the process data.
For a Web Farm architecture, file storage must be centralized in a common shared storage path. The settings in the section must be applied for temporary files.
In the database file storage method, WorkflowGen will still create temporary files in the \wfgen\App_Data folder (ApplicationDataPath) to be used by requests and actions at runtime.
These temporary files will be automatically deleted when the requests or actions are completed.
To ensure data integrity and 24-hour / 7-days-a-week operation time in database file storage method, your custom asynchronous system action that uses FILE IN parameters must also save the file content in your custom application database when the file is referenced later by your action.
This will ensure that the file will still exist and can be used later by your asynchronous system action, since only the WorkflowGen database and your custom application database are backed up.
These sections contain instructions on how to set up certain advanced WorkflowGen configurations.
DRIVE:\FOLDER\wfgen\App_Data\Files\API
DRIVE:\FOLDER\wfgen\App_Data\Files\DataSet
DRIVE:\FOLDER\wfgen\App_Data\Files\EFormASPX
DRIVE:\FOLDER\wfgen\App_Data\Files\MergeForm
DRIVE:\FOLDER\wfgen\App_Data\Files\RemoteApproval
DRIVE:\FOLDER\wfgen\App_Data\Files\RestApiClient
DRIVE:\FOLDER\wfgen\App_Data\Files\XmlToDatabase
DRIVE:\FOLDER\wfgen\App_Data\Files\XmlTrans
DRIVE:\FOLDER\wfgen\App_Data\LogFiles\auth
DRIVE:\FOLDER\wfgen\App_Data\LogFiles\CancelRequest
DRIVE:\FOLDER\wfgen\App_Data\LogFiles\CompleteAction
DRIVE:\FOLDER\wfgen\App_Data\LogFiles\CopyData
DRIVE:\FOLDER\wfgen\App_Data\LogFiles\Dir
DRIVE:\FOLDER\wfgen\App_Data\LogFiles\Engine
DRIVE:\FOLDER\wfgen\App_Data\LogFiles\GetFormData
DRIVE:\FOLDER\wfgen\App_Data\LogFiles\GetProcessData
DRIVE:\FOLDER\wfgen\App_Data\LogFiles\GetUsersFromDir
DRIVE:\FOLDER\wfgen\App_Data\LogFiles\MergeForm
DRIVE:\FOLDER\wfgen\App_Data\LogFiles\Notifications
DRIVE:\FOLDER\wfgen\App_Data\LogFiles\Portal
DRIVE:\FOLDER\wfgen\App_Data\LogFiles\RaiseException
DRIVE:\FOLDER\wfgen\App_Data\LogFiles\RemoteApproval
DRIVE:\FOLDER\wfgen\App_Data\LogFiles\RestApiClient
DRIVE:\FOLDER\wfgen\App_Data\LogFiles\SendHttpPost
DRIVE:\FOLDER\wfgen\App_Data\LogFiles\SendMessage
DRIVE:\FOLDER\wfgen\App_Data\LogFiles\StartProcess
DRIVE:\FOLDER\wfgen\App_Data\LogFiles\UpdateProcessData
DRIVE:\FOLDER\wfgen\App_Data\LogFiles\XmlToDatabase
DRIVE:\FOLDER\wfgen\App_Data\LogFiles\XmlTrans
Copy the existing files and folders from their original locations to the new locations, which should still follow the same structure.
Create a share on the folder DRIVE:\FOLDER. This folder should then be accessible by a \\SERVER\SHARE$ type UNC name.
Give NTFS modify permissions on the share as well as all of its folders and sub-folders for all users of WorkflowGen.
Edit the ApplicationDataPath parameter in DRIVE:\Inetpub\wwwroot\wfgen\web.config to <add key="ApplicationDataPath" value="\\SERVER\SHARE$\wfgen\App_Data" />. This is because WorkflowGen will use the specified path in ApplicationDataPath to store the \Files, \LogFiles, and \Templates folders.
See the WorkflowGen for Azure guide for instructions on:
Microsoft Entra ID synchronization: How to configure WorkflowGen users and groups synchronization using Microsoft Entra ID (formerly Azure Active Directory).
Microsoft Entra ID authentication: How to configure WorkflowGen authentication using OpenID Connect and Microsoft Entra ID.
Microsoft Entra ID configuration for WorkflowGen Plus v2: How to authorize access to the WorkflowGen Plus v2 mobile app using OpenID Connect and Microsoft Entra ID.
Microsoft Entra ID configuration for server-side scripts: How to authorize WorkflowGen access to server-side scripts using OpenID Connect and Microsoft Entra ID.
Microsoft Entra ID configuration for single-page applications: How to authorize WorkflowGen access to single-page applications using OpenID Connect and Microsoft Entra ID.
Azure SQL database configuration: How to configure the WorkflowGen database using Azure SQL database.
Read Scale-Out: How to configure the optional Read Scale-Out feature.
Azure Load Balancer: How to configure Azure Load Balancer for higher availability and greater scalability.
Azure Files: How to configure an Azure Files share to use in WorkflowGen.
Azure SendGrid SMTP configuration: How to configure an Azure SendGrid SMTP with WorkflowGen.
Generating a universal link for WorkflowGen Plus v2: How to generate a universal link to simplify the WorkflowGen Plus v2 mobile app user login.
WorkflowGen version 7.12.0 or later
SQL Server 2014 or later
The SQL reporting module setup files are located in the \Databases\MsSQLServer\Reporting folder in the manual WorkflowGen installation pack:
To install the SQL views:
Open SQL Server Management Studio (SSMS) or Azure Data Studio.
Connect to your WorkflowGen database (e.g. WFGEN).
Run each of the VIEW_PUB_*.sql files to create the SQL views.
For better performance without overloading the main WorkflowGen database, you can create a dedicated SQL reporting database and replicate the SQL views data to their specific tables.
This requires the SQL Server replication service and SSMS. The SQL views must be created as described in the Installing the SQL views section above.
In SSMS, run CreateReportingDatabase.sql to create the SQL reporting database on another SQL Server database instance.
Set up your WorkflowGen database as a Publisher and a Distributor to publish all the SQL views (e.g. VIEW_PUB_*).
Set up the dedicated SQL reporting database as a Subscriber to retrieve the data from the Publisher in real-time data replication. For each of the SQL views, configure the respective table to receive the data from the view. For example:
The DIR_V100 table gets data from the VIEW_PUB_DIR_V100 view
The REQ_FILE_V100 table gets data from the VIEW_PUB_REQ_FILE_V100 view
The dedicated SQL reporting database should now be ready to use for custom data reports.
VIEW_PUB_DIR_V100.sql
VIEW_PUB_DIR_USERS_V100.sql
VIEW_PUB_DIR_GROUPS_V100.sql
VIEW_PUB_DIR_USERS_GROUPS_V100.sql
VIEW_PUB_REQ_DATA_V100.sql
VIEW_PUB_REQ_DATA_V100T.sql
VIEW_PUB_REQ_FILE_V100.sql
VIEW_PUB_REQ_FILE_V100T.sql
VIEW_PUB_REQ_COMMENT_V100T.sql
VIEW_PUB_REQ_ACTION_V100.sql
VIEW_PUB_REQ_ACTION_V100T.sql
VIEW_PUB_REQ_ACTION_DATA_V100.sql
VIEW_PUB_REQ_ACTION_DATA_V100T.sql
VIEW_PUB_REQ_ACTION_FILE_V100.sql
VIEW_PUB_REQ_ACTION_FILE_V100T.sql
CreateReportingDatabase.sql.css, .js, .gif and .jpg files
.NET assemblies (.dll files)
A relational database (MS SQL Server)
A Windows service used for directory synchronization, overdue actions management, etc.
The WorkflowGen application is hosted on a new or existing IIS website and is separated into two distinct modules:
The User Portal for end-users
The Administration Module for process designers, administrators, and process managers
Process actions can be handled by WorkflowGen applications such as EFORMASPX, which displays .NET web forms and stores the filled-out data once the forms are submitted. These applications are built-in, but you can develop custom applications using the SDK requirements and specifications.
This application contains the core application. The User Portal and Administration Module are both in that main application.
\wfgen: User Portal
\wfgen\admin: Administration Module
\wfgen\bin: Contains all the core assembly files that are needed to run WorkflowGen.
\wfgen\App_Data: Contains design, runtime, log, and temporary files, and template files for processes, notifications, and forms.
\wfgen\App_GlobalResources: Contains the .resx files that are needed for globalization. If you want to add a new language support to WorkflowGen, you'll have to create the new .resx files in this folder.
\wfgen\js: Used to store the different JavaScript files that are needed to run WorkflowGen.
\wfgen\wfapps: Contains all the SDKs, web forms, and web services used by your WorkflowGen processes.
\wfgen\ws: Contains the WorkflowGen web service API.
\wfgen\App_Themes: Contains the styles of the User Portal and the Administration Module. The styles are completely customizable for both modules, since each module has its own corresponding CSS file. To create your own skins, see the section in the . You can change the currently selected skin on the tab in the Administration Module Configuration Panel.
Use the \wfgen\wfapps\webservices folder to store your own SDK web applications. See the WorkflowGen Integration Guide for more information.
The \wfgen\wfapps\webforms folder is used to store the web forms used in the process workflows.
The following automatic task executions are provided by this Windows service:
Action overdue exceptions
Notification management
Deletion of inactive delegations
Deletion of ghost activities (a list of activities initialized but never started)
This service is installed by the setup pack and is started automatically after installation. The default suggested installation path is DRIVE:\Program Files\Advantys\WorkflowGen\Services\bin\WfgWorkflowEngineService.exe.
Automatic user and group synchronization is provided by this Windows service. This service is installed by the setup pack and started automatically after installation.
The default suggested installation path is DRIVE:\Program Files\Advantys\WorkflowGen\Services\bin\WfgDirectoriesSyncService.exe.
The synchronization service can also be executed from a command line (see Synchronizing a directory in command line for more information).
\wfgen\App_Data\files\runtime: This folder contains the data that are related to each process instance. Data generated by the workflows are stored in this folder. If the Process data storage option is selected to store file content in the database, then FILE type data are stored directly in the database and not in the directory structure.
\wfgen\App_Data\files\design : This folder contains the data that are uploaded directly in the process definition, and when the process is instantiated, those data are copied to the runtime folder. If the Process data storage option is selected to store file content in the database, then FILE type data will be stored directly in the database and not in the directory structure.
\wfgen\App_Data\files\charts\images: This folder contains the temporary files of the graphical charts.
\wfgen\App_Data\LogFiles : This folder contains the logs created by WorkflowGen (directory synchronization, WorkflowGen authentication module).
\wfgen\App_Data\Templates : This folder contains the templates used by WorkflowGen (notifications, charts, portlet, form designer styles and tools, processes).
The WorkflowGen database contains:
Users and groups that can be synchronized with an existing directory
Process definitions and runtime data
Information on the follow-up of ongoing and completed requests, as well as associated data (approvals, amounts, documents, etc.)
Statistics on ongoing and completed requests
Processes can be imported from or exported to an XML file that contains the process definition based upon the XPDL 1.0 standard format of the WfMC (Workflow Management Coalition).
All data files, including the web form projects with their XML data and other attachments, are stored on the server disk and auto-archived chronologically.
The following software is distributed with WorkflowGen (Apache 2.0, BSD, MIT, and other compatible licenses):
Ajax Cloud 9 Editor (see https://github.com/ajaxorg/ace/blob/master/LICENSE)
bluebird (see https://github.com/petkaantonov/bluebird/blob/master/LICENSE)
busboy (see https://github.com/mscdex/busboy/blob/master/LICENSE)
body-parser (see https://github.com/expressjs/body-parser/blob/master/LICENSE)
chai/chai-http/chai-fs/chai-things/chai-date-string (see )
change-case (see )
cookie-parser (see )
cors (see )
dataloader (see )
edge-js (see )
eml-format (see )
express (see )
express-graphql (see )
file-uri-to-path (see )
file-url (see )
format (see )
fs (see )
got (see )
graphiql (see )
graphql-js (see )
graphql-relay-js (see )
graphql-tools (see )
iisnode (see )
json-server (see )
jsonwebtoken (see )
jwks-rsa (see )
lodash (see )
mem (see )
mocha (see )
mockery (see )
Node.js (see )
nyc (see )
parse5 (see )
proper-lockfile (see )
pug ()
request (see )
request-promise-native (see )
rimraf (see )
seriate (see )
sinon (see )
supertest (see )
uuid (see )
valid-url (see )
xml-js (see )
yargs (see )
This section contains instructions on how to to configure WorkflowGen delegated authentication with Gardian.
The Gardian configuration process closely mirrors that of Okta. To set up Gardian, begin by following the instructions in the section, substituting the values with Gardian service provider specifications where needed. After completing those steps, return to this section for configuration details specific to Gardian.
Now, you need need to configure WorkflowGen to delegate its authentication to Gardian.
Open the WorkflowGen web.config file and add the following properties:
Replace <ACR VALUES> with ACR values as specified by your Gardian service provider.
<?xml version="1.0" encoding="UTF-8"?>
<configuration>
<appSettings>
<!-- Gardian auth -->
<add key="ApplicationSecurityAuthProvider" value="gardian"/>
<add key="ApplicationSecurityAuthAcrValues" value="<ACR VALUES>" />
</appSettings>
</configuration>DRIVE:\Program Files\Advantys\WorkflowGen\Services\bin\WfgDirectoriesSyncService.exe.The synchronization service can also be executed from a command line.
You must specify the /c or /console parameter.
Parameter
Definition
/p[ath]:location
Location of the web.config file used to synchronize (usually the WorkflowGen web.config file)
/d[irectories]:list
List of directories to synchronize; use , (comma) or ; (semicolon) as separator
/s[ilence]
No output will be generated in the console
/t[est]
Launch a synchronization test
/h[elp] or /?
Displays the help for console execution
This will launch the directory synchronization of the WorkflowGen instance installed in the D:\inetpub\wwwroot\wfgen folder:
This will force the synchronization of the MyDir directory of the WorkflowGen instance installed in the D:\inetpub\wwwroot\wfgen folder:
WfgDirectoriesSyncService.exe /c /p:D:\inetpub\wwwroot\wfgen\web.configWfgDirectoriesSyncService.exe /c /p:D:\inetpub\wwwroot\wfgen\web.config /d:MyDirTo allow higher availability and scalability, you can install WorkflowGen in a Web Farm architecture. The application is therefore installed on several servers, but the database and file storage directory are centralized on one dedicated server.
User requests are automatically routed to different servers depending on their load and availability. You can choose between different methods of load balancing such as DNS Round Robin or set up a hardware load balancer.
To configure multiple instances of WorkflowGen on a single server, perform the steps outlined below. While more than two installations are possible, the following steps assume only two instances are installed.
Before modifying the service, it must be uninstalled using the winsvc-uninstall.cmd file found in the \bin folder of the application installation (for example, DRIVE:\Program Files\Advantys\WorkflowGen\Services\bin\winsvc-uninstall.cmd). Be sure to run it as the administrator of the server.
For both instances of WorkflowGen, edit the parameter name in the WfgDirectoriesSyncService.exe.config WorkflowGen directory synchronization service configuration file as shown in the following examples.
Instance 1:
Edit the DRIVE:\Program Files\Advantys\WorkflowGen1\Services\bin\WfgDirectoriesSyncService.exe.config file as follows:
Instance 2:
Edit the DRIVE:\Program Files\Advantys\WorkflowGen2\Services\bin\WfgDirectoriesSyncService.exe.config file as follows:
For both instances of WorkflowGen, edit the parameter name in the WfgWorkflowEngineService.exe.config WorkflowGen engine service configuration file.
Instance 1:
Edit the DRIVE:\Program Files\Advantys\WorkflowGen1\Services\bin\WfgWorkflowEngineService exe.config file as follows:
Instance 2:
Edit the DRIVE:\Program Files\Advantys\WorkflowGen2\Services\bin\WfgWorkflowEngineService exe.config file as follows:
For both instances of WorkflowGen you need to modify the Windows shell scripts that are used to install and uninstall the WfgDirectoriesSyncService and WfgWorkflowEngineService Windows services as described above.
Instance 1:
Install script: DRIVE:\Program Files\Advantys\WorkflowGen1\Services\bin\winsvc-install.cmd
Based on the value given for the ServiceName parameter defined in the WorkflowGen directory synchronization service section above, your winsvc-install.cmd file should appear as follows:
Uninstall script: DRIVE:\Program Files\Advantys\WorkflowGen1\Services\bin\winsvc-uninstall.cmd
Based on the value given for the ServiceName parameter defined in the WorkflowGen directory synchronization service section above, your winsvc-uninstall.cmd file should appear as follows:
Instance 2:
Install script: DRIVE:\Program Files\Advantys\WorkflowGen2\Services\bin\winsvc-install.cmd
Based on the value given for the ServiceName parameter defined in the WorkflowGen directory synchronization service section above, your winsvc-install.cmd file should appear as follows:
Uninstall script: DRIVE:\Program Files\Advantys\WorkflowGen2\Services\bin\winsvc-uninstall.cmd
Based on the value given for the ServiceName parameter defined in the WorkflowGen directory synchronization service section above, your winsvc-uninstall.cmd file should appear as follows:
For both instances, you must run the install scripts that have been modified as described above using administrator permissions.
Instance 1:
DRIVE:\Program Files\Advantys\WorkflowGen1\Services\bin\winsvc-install.cmd
Instance 2:
DRIVE:\Program Files\Advantys\WorkflowGen2\Services\bin\winsvc-install.cmd
<add key="ServiceName" value="WorkflowGenDirSyncService1" /><add key="ServiceName" value="WorkflowGenDirSyncService2" /><add key="ServiceName" value="WorkflowGenEngineService1" /><add key="ServiceName" value="WorkflowGenEngineService2" />%windir%\Microsoft.NET\Framework64\v4.0.30319\InstallUtil.exe /i "C:\Program Files\Advantys\WorkflowGen1\Services\bin\WfgDirectoriesSyncService.exe"
net start WorkflowGenDirSyncService1
%windir%\Microsoft.NET\Framework64\v4.0.30319\InstallUtil.exe /i "C:\Program Files\Advantys\WorkflowGen1\Services\bin\WfgWorkflowEngineService.exe"
net start WorkflowGenEngineService1
pause%windir%\Microsoft.NET\Framework64\v4.0.30319\InstallUtil.exe /u "C:\Program Files\Advantys\WorkflowGen1\Services\bin\WfgDirectoriesSyncService.exe" /LogFile=
%windir%\Microsoft.NET\Framework64\v4.0.30319\InstallUtil.exe /u "C:\Program Files\Advantys\WorkflowGen1\Services\bin\WfgWorkflowEngineService.exe" /LogFile=
pause%windir%\Microsoft.NET\Framework64\v4.0.30319\InstallUtil.exe /i "C:\Program Files\Advantys\WorkflowGen2\Services\bin\WfgDirectoriesSyncService.exe"
net start WorkflowGenDirSyncService2
%windir%\Microsoft.NET\Framework64\v4.0.30319\InstallUtil.exe /i "C:\Program Files\Advantys\WorkflowGen2\Services\bin\WfgWorkflowEngineService.exe"
net start WorkflowGenEngineService2
pause%windir%\Microsoft.NET\Framework64\v4.0.30319\InstallUtil.exe /u "C:\Program Files\Advantys\WorkflowGen2\Services\bin\WfgDirectoriesSyncService.exe" /LogFile=
%windir%\Microsoft.NET\Framework64\v4.0.30319\InstallUtil.exe /u "C:\Program Files\Advantys\WorkflowGen2\Services\bin\WfgWorkflowEngineService.exe" /LogFile=
pauseWindows Server 2012 R2, Windows Server 2016, and Windows 10 x64
For other versions of Windows, use the manual installation procedure.
You'll need an active internet connection to perform this installation, unless all of the dependencies have already been downloaded by running the script with the -DownloadOnly script flag.
If you're using Azure SQL database, you'll need to create and configure the database manually; see the Azure SQL database configuration section in the WorkflowGen for Azure guide for instructions on how to do this.
If you're using MS SQL Server with the WorkflowGen database creation, the installation will require the SQL Server PowerShell module.
If your Windows has SQL Server and SQL Server Management Studio installed, the SQL Server PowerShell module comes pre-installed.
If your Windows has PowerShell version 5 or later installed (e.g. Windows Server 2016/Windows 10), the installation script will auto-detect and install the SQL Server module from the .
If your Windows has PowerShell version 4 or earlier installed (e.g. Windows Server 2012 R2), you'll need to manually install the PowerShell Extensions from the SQL Server Feature Pack according to your SQL Server version below:
✏️ Note: If the PowerShell Extensions aren't available for your SQL Server version or the installation script still doesn't detect the SQL Server PowerShell module, then try installing the PowerShell Extensions from the SQL Server 2016 Feature Pack, or try installing SQL Server 2016 Management Studio.
Ensure that the PowerShell Execution Policy is correctly set (see https://technet.microsoft.com/en-us/library/ee176961.aspx). To do this, run Set-ExecutionPolicy Unrestricted in the PowerShell command window.
✏️ Note: If you want to avoid modifying the Execution Policy, you can bypass it by running the WorkflowGen installation script as follows: PowerShell.exe -ExecutionPolicy Bypass -File .\install.ps1.
Clicking on the shell while it's running will pause the output; you can change this option in the PowerShell options, or press ENTER to resume the output (this won't pause the script, which will continue to run in the background).
In JSON format, backslashes (\) must be escaped as follows:
You can abort the script at any point by pressing CTRL+C. If this is done during a download or extraction process, the folders created might need to be deleted (e.g. \package\); otherwise, the script will detect their presence and assume that they're complete.
The PowerShell installation will also install , , and .
✏️ Note: is required in some particular Windows Server versions and/or configurations, otherwise you might encounter the error The specified module could not be found regarding the edge and edge-js libraries when accessing the /wfgen/graphql, /wfgen/hooks, or /wfgen/scim web apps. You'll need to download and install this manually.
To install a previous version of WorkflowGen, use that version's PowerShell installation, available in the section of the .
Open config.json in a text editor and configure the parameters for your installation of WorkflowGen (see PowerShell installation configuration parameters below for information on each parameter).
Open a PowerShell instance as Administrator.
Run .\install.ps1 (with the optional script flags listed below, if desired).
Parameter
Description
DownloadOnly
This option will terminate the scripts after all necessary packages have been downloaded. This is useful if you want to install WorkflowGen on a network that's not connected to the internet.
📌 Example: .\install.ps1 -DownloadOnly
SkipParamInput
This option will skip the prompts to review the parameters before launching the installation script, for example if you want to run the install.ps1 script via another script.
📌 Example: .\install.ps1 -SkipParamInput
Parameter
Description
LicenseType
Possible values: trial or full (default: trial)
Describes the type of license under which you're installing WorkflowGen: full will populate the SerialNumber parameter in the web.config file; trial will include the trial license (6 months).
✏️ Note: If you're installing under the full WorkflowGen license, you'll need to manually copy your license file to the WorkflowGen \bin folder (e.g. C:\Inetpub\wwwroot\wfgen\bin).
SerialNumber
If you're installing under the full license, enter the serial number you were provided with
WebAppPath
The physical location where the WorkflowGen site will be located (default: C:\Inetpub\wwwroot\wfgen)
ServicesPath
The physical location where the WorkflowGen services will be installed (default: C:\Program Files\Advantys\WorkflowGen\Services)
NodeJSPath
The physical location where Node.js will be installed; this package is required for WorkflowGen features such as GraphQL and webhooks
WorkflowGen on all web servers
File storage centralized in one location
Common WebForms folder for all web servers
Identical configuration on all WorkflowGen servers
Apply the basic configuration explained in the Basic configuration section before modifying the WorkflowGen configuration.
If you've configured multiple instances of WorkflowGen on different web servers in a Web Farm setup, you must share the same WebForms folder for all servers. To do this:
Share your WebForms folder. This can be either your primary WorkflowGen site’s local WebForms folder, or a WebForms folder on a network file server.
If you're using a network file server and you have content in your primary WorkflowGen site’s local WebForms folder, we suggest copying the content of this folder to the shared WebForms folder.
Once you've shared the folder, copy the UNC path.
Do the following for each instance of WorkflowGen:
In IIS, navigate to the WebForms application folder.
Right-click on the folder, then choose Manage Application / Advanced Settings.
Replace the physical path with the UNC path you copied in step 3.
Ensure that the required permissions (modify, read and execute, list folder contents, read, write) are correctly applied to the shared WebForms folder for the IIS application pool used by the WebForms application.
Verify that all web servers have the same configuration for the WorkflowGen application and for all workflow applications. The \wfgen\web.config files must be identical.
The WorkflowGen engine service is a Windows Service that is installed with WorkflowGen and should only be run from one web server. The other servers should only run this service as a backup if the main service fails to run.
Data and application backup is done in the same way except that it only affects the file server (for file type data) and one web server since they have identical configurations (with regards to the applications).
The data and database files should be backed up regularly to preserve the reliability of the processes and their associated data.
Back up the DRIVE:\Inetpub\wwwroot\wfgen folder.
If you've applied file storage, back up the folder as indicated in the ApplicationDataPath parameter in the web.config file.
Perform a standard SQL database backup using your DBMS tools.
Perform a standard SQL database backup using your DBMS tools.
Back up the DRIVE:\Inetpub\wwwroot\wfgen\App_Data folder.
To move the WorkflowGen SQL Server database from one server to another:
Stop IIS services on the production server.
Detach the WorkflowGen database.
Copy the .mdf and .ldf files to the new location.
To move the WorkflowGen installation from one server to another:
Stop IIS services on the production server.
Set up the same version of WorkflowGen on the new server.
Copy the DRIVE:\Inetpub\wwwroot\wfgen\App_Data folder from the old server to the new one if you haven’t applied file storage externalization.
The only folder that you need to monitor for storage space is DRIVE:\Inetpub\wwwroot\wfgen\App_Data. The other folders should always keep the same size because everything that is generated over the time is placed in this directory.
The database size can be determined by checking the .mdf and .ldf files if you're using SQL Server, or using your DBMS tools.
Storage space needs may vary depending on whether or not the Store file content in database process data storage option is selected during the process definition.
The directory synchronization log files can be found in the \wfgen\App_Data\LogFiles\Dir\Synchro directory. Alternately, you can consult and manage the logs history directly in the WorkflowGen Administration Module.
Windows Services should be set to run automatically when the server starts. Periodically, Windows Services will perform the following necessary tasks:
Raise overdue exceptions
Send overdue notifications
Delete inactive delegations
Delete ghost activities (activities initialized but never started)
A statistics module and charting functions are provided in the User Portal to generate detailed reports on the requests and actions. You can customize reports using filters.
Attachments to requests submitted using web forms are saved in the DRIVE:\Inetpub\wwwroot\wfgen\App_Data\Files\EFormASPX temporary folder and are automatically deleted 24 hours after their creation.
WorkflowGen will copy those runtime files to a permanent location. If the Store file content in database process data storage option is enabled, then they are stored directly in the database. Otherwise, they're stored in the file system as determined by the ApplicationDataPath configuration parameter (e.g. \App_Data\Files\DataSet\runtime).
If you know that a process takes too much space on the disk because of the process data, or too much space in the database because of file attachments, you can turn off the Archive action associated data option in the process definition. This will prevent the attached file from being stored for each action of every request. Only the data after the last action will be kept on the disk or in the database.
Add the <add key="ApplicationWebFormsPath" value="" /> parameter with the UNC path as the value to the web.config file.
✏️ Note: This parameter is currently only used by the SOAP Web Service API to manage processes and requests with the built-in form designer enabled.
Update the connection string in the Administration Module Configuration Panel.
Restart your IIS services.
Copy their folders in the corresponding tree structure of the new server. For example, if you have created a web service named MyWebService located in DRIVE:\wfgen\wfapps\WebServices\MyWebServices then you need to copy the entire folder to the same place on the new server.
Create the IIS application with the same directory security options on the new server for the applications you have copied.
For web services or SDK Applications, make sure to update the application URL in the Administration Module.
For web forms, be sure to update the FORM_URL data in the process definition to point to the new URL.
Repeat this process for every custom application you've created.
Update the application URL from the Administration Module Configuration Panel.
Download and install the following packages from the feature pack:
ENU\x64\SQLSysClrTypes.msi
ENU\x64\SharedManagementObjects.msi
ENU\x64\PowerShellTools.msi
SQLServerInstance
The name or location (IP) of the SQL Server database instance
✏️ Note: If the database server is the same as the WorkflowGen application server, you can use (local).
SQLLoginID & SQLPassword
The login credentials used exclusively for the creation of the WorkflowGen database; these must have the appropriate access level
✏️ Note: These parameters can be left empty if the SQLServerInstance provided already has a fully-functional (including SQL login users) and up-to-date WorkflowGen database.
DBName
The name of the WorkflowGen database to use or create (default: WFGEN)
✏️ Note: If the database name is already in use, no database will be created, and the installation will assume that the database provided is fully functional (including SQL login users) and up-to-date.
DBFilePath & DBLogPath
The physical location where the new database will be created (only applicable when creating a new database); leaving this path empty will create the database in the default path in the environment ✏️ Note: If these parameters are specified, the identity for SQL Server must also have permission for this folder.
DBLoginID & DBPassword
Standard database user (with read and write permissions) used by the WorkflowGen application (default: WFGEN_USER); the database user is created only if a new database is created
✏️ Notes:
Make sure the DBPassword matches the password policy of the SQL Server when creating a new database user.
If you're creating a new database, make sure that this login is not already used (by another database, for example).
IISSiteName
The name of the IIS website under which the WorkflowGen application will exist; an IIS website will be created if it doesn't already exist (default: WorkflowGen)
IISAppPoolName
The name of the IIS application pool for WorkflowGen; an application pool will be created if it doesn't already exist (default: WorkflowGenAppPool)
IISBinding
The IP address to be bound to WorkflowGen; the * value represents all unassigned IP addresses (default: *)
✏️ Note: This option is not supported on Windows Server 2012 R2.
IISPort
The TCP/IP port for WorkflowGen (default: 80)
IISAuthentication
Specifies which IIS authentication mode to use for the initial WorkflowGen installation; the possible values are Windows, WorkflowGen, and Basic
WorkflowGen uses WorkflowGen's custom authentication module, which stores the credentials in the WorkflowGen database. If this option is selected, the initial password for the account specified in WFGAdminUsername will be set to Passw0rd! and should be changed immediately.
Basic uses IIS authentication based on the current Windows setup. With this option, you can create a new Windows user (WFGAdminUsername) with a specific password, or use an existing Windows account.
Windows uses IIS authentication based on the current Windows setup, similar to Basic; however, you'll need to be logged in as the account specified in WFGAdminUsername.
WFGAdminUsername & WFGAdminPassword & WFGAdminDomain
The first WorkflowGen administrator account (default: wfgen_admin); depending on the authentication method, this may require a corresponding Windows account. A password is only required if the account is being created.
✏️ Note: Make sure the WFGAdminPassword matches the password policy of the Windows Server when creating a new account.
WebsiteURL
The URL where WorkflowGen will be accessible; this value is populated in the web.config (default: http://localhost/wfgen)
SMTPServer
The location of the SMTP server for WorkflowGen; this value is populated in the web.config (default: smtp.mycompany.com)
DefaultEmailSender
The default email used as the sender for WorkflowGen notifications; this value is populated in the web.config (default: [email protected])
{
"param" : "C:\\valid\\windows\\path"
}You can set up your SQL Server connection to use Windows Authentication (SSPI) instead of SQL Server Authentication for the WorkflowGen back-end database and other external databases. This SQL authentication mode provides additional security, since no credentials are stored in the web.config file.
To configure Windows Authentication, use one of the following connection strings in the WorkflowGen web.config file, located in the DRIVE:\Inetpub\wwwroot\wfgen folder:
OR
You'll also need to modify the WorkflowGen application pool identity for a service account. To do this:
In IIS Manager, right-click on the WorkflowGen application pool, then select Advanced Settings.
In the Process Model section, select Identity, then click the ... button.
Select Custom Account, then click Set...
For more information on SQL Server connection strings, see .
The database scaling feature allows for the addition of database servers in order to dramatically improve server performance and response times. The additional read-only replica database servers will be used as dedicated read-only servers (SELECT SQL queries). The read-only database servers are replicated from the existing primary database using the SQL Server Replication service.
SQL Server 2014 or later for all database servers
SQL Server Replication feature must be installed on all SQL Server instances
SQL Server Agent must be installed and configured on all SQL Server instances
This section provides a general procedure for configuring the SQL Server Replication service on all the SQL Server instances and enabling the WorkflowGen web server in database scaling mode. This procedure is an example based on one WorkflowGen instance and two database server instances architecture.
If your current architecture differs from this example, you can adapt the procedure and some specific configuration options according to your needs.
Your current WorkflowGen environment must meet the following prerequisites:
The initial WorkflowGen database is already installed on the primary database instance.
The read-only database instance does not contain an existing WorkflowGen database.
The WorkflowGen web server is fully configured and allows access to the Administration Module with a WorkflowGen administrator account.
It is mandatory to update the SQL Server's max text repl size configuration option with a higher value in order for the database replication to function properly. We recommend setting this to the maximum value of 2147483647 instead of the default value of 65536.
Run the following SQL statements in the source (primary) and destination (read-only) SQL Server database instances (this example uses SQL Server 2008):
For more information, see and select your version of SQL Server from the drop-down menu.
To set up a publication on the primary database:
Open SQL Server Management Studio.
Connect to the primary database instance.
Open the Replication node.
Right-click on Local Publications and choose New Publication. The New Publication Wizard will open. Click Next.
To set up a subscription on the read-only database:
Open SQL Server Management Studio.
Connect to the read-only database instance.
Open the Replication node.
Right-click on Local Subscriptions and choose New Subscription. The New Subscription Wizard will open. Click Next.
In the WorkflowGen Administration Module, open the Configuration Panel and select the General tab.
In the Read-only database connection string field, enter the WorkflowGen connection string of the read-only database instance.
Check Enable on Multi-database to turn on the database scaling feature.
For more information on SQL Server replication, see and select your version of SQL Server from the drop-down menu.
For more information on the SQL Server max text repl size option, see and select your version of SQL Server from the drop-down menu.
Enter your credentials, then click OK.
Make sure the application pools for the other WorkflowGen web applications (auth, graphql, hooks, scim,ws, and webforms) match the wfgen application pool.
Make sure the custom account has read/write and modify permissions for the WorkflowGen SQL database and the WorkflowGen files and folders.
Use the same account as the application identity to run the WorkflowGen engine and directory synchronization services.
Select WFGEN in the Publication Database list. Click Next.
Select Transactional publication in the Publication type list. Click Next.
Check all Tables and Views (optional if the WorkflowGen Reporting Module is installed in the current database instance) in the Articles list. Click Next.
The Article Issues dialog box will open if you selected Views in the previous step. Click Next.
The Filter Table Rows dialog box will open. There is no need to filter the data in the publication. Click Next.
The Snapshot Agent dialog box will open. Check Create a snapshot immediately and keep the snapshot available to initialize subscriptions. Click Next.
In Snapshot Agent Security, provide valid service or administrator credentials for the Windows account. Click Next.
Check Create the publication. Click Next.
Enter the Publication name WFGEN_PUB.
Click Finish. If all is successful, close the New Publication Wizard.
Select <Find SQL Server Publisher...>.
Connect to the primary database instance.
Select WFGEN_PUB in the Databases and publications list. Click Next.
Select Run each agent at its Subscriber (pull subscriptions). Click Next.
In the Subscription Database column, select <New database...>.
Enter the WFGEN as the Database name and click OK. Click Next.
In Distribution Agent Security, provide valid service or administrator credentials for the Windows account. Click Next.
In Synchronization Schedule, select Run continuously. Click Next.
In Initialize Subscriptions, select Immediately. Click Next.
Select Create the subscription(s). Click Next.
Click Finish. If all is successful, close the New Subscription Wizard.
Create and add the SQL user WFGEN_USER to the WFGEN read-only database security with db_datareader and db_datawriter permissions.
If unchecked, it will use the primary database.
If checked, it will use the read-only replica database.
Save and close.
Data Source=myServerAddress;Initial Catalog=myDataBase;Integrated Security=SSPI; Server=myServerAddress;Database=myDataBase;Trusted_Connection=True;EXEC sp_configure "max text repl size", 2147483647;
GO
RECONFIGURE;
GOThe following procedure applies to the setup using the WorkflowGen manual installation pack.
The web server and database server requirements must be met before proceeding with the following installation.
Start by extracting the manual installation pack (.zip) to a temporary folder on the WorkflowGen web server (e.g. DRIVE:\temp).
The installation pack contains these folders:
Databases: The MS SQL Server database creation scripts
Inetpub: The WorkflowGen application files
Program Files: The WorkflowGen Windows services application file
The recommended physical directory structure for WorkflowGen web application files and folders should be under DRIVE:\Inetpub\wwwroot\wfgen. This folder contains static resources such as images, HTML files and process data, and the applications used by WorkflowGen.
Copy the source \Inetpub folder to your destination DRIVE:\ (e.g. DRIVE:\Inetpub\wwwroot\wfgen).
Copy the source Advantys folder (\Program Files\Advantys) to your destination DRIVE:\Program Files (e.g. DRIVE:\Program Files\Advantys\WorkflowGen\Services\bin).
WorkflowGen does not support case sensitive collation, so you must set up the database to be case insensitive to avoid errors.
create.sql SQL scriptOpen the SQL Server Management Studio tool and connect to your database server with an administrator account (e.g. SA).
Create a new database (e.g. WFGEN).
Create a new SQL Server user account (e.g. WFGEN_USER).
Open the SQL Server Management Studio tool and connect to your database server with an administrator account (e.g. SA).
Create a new database (e.g. WFGEN).
Create a new SQL Server user account (e.g. WFGEN_USER).
Azure SQL database needs to be created and configured manually; see the section in the guide for instructions on how to do this.
WorkflowGen requires a valid Windows NT or Active Directory account. This account will be used by the WorkflowGen Administrator, but it's not necessary to define it as an NT or Active Directory Administrator.
Open and edit the DRIVE:\Inetpub\wwwroot\wfgen\web.config WorkflowGen web configuration file.
Update the database connection string:
MS SQL Server: <add name="MainDbSource" connectionString="Data Source=localhost;Initial Catalog=WFGEN;User ID=WFGEN_USER;Password=Admin123!;" providerName="System.Data.SqlClient" />
For more information about the other configuration settings, see the appendix.
Open and edit the DRIVE:\Program Files\Advantys\WorkflowGen\Services\bin\WfgWorkflowEngineService.exe.config Engine service configuration file.
Update the WorkflowGen web configuration path (e.g. <add key="WebConfigPath" value="DRIVE:\inetpub\wwwroot\wfgen\web.config" />).
Open and edit the DRIVE:\Program Files\Advantys\WorkflowGen\Services\bin\WfgDirectoriesSyncService.exe.config Directory Synchronization service configuration file.
It's recommended that WorkflowGen be isolated from other applications by creating its own application pool and associating all declared applications with the new application pool.
In IIS Manager, click Application pools. In the right-hand pane, right-click and choose Add application pool, then give it a name (e.g. WorkflowGen).
Select the .NET Framework 4 version.
Select Integrated pipeline mode.
Launch IIS Manager and expand the tree structure under the IIS server name where you want to create the new site.
Right-click on the Sites icon and choose Add Web Site. Enter the name of the site, select its application pool (if other than the default), and enter the physical path of the root (click Browse and select the \wwwroot folder, usually DRIVE:\inetpub\wwwroot\).
The default.aspx default document type must be created if it doesn't exist. By default, this default document should exist on an IIS server running .NET.
To verify this, click the site's icon and ensure that the pane on the right-hand side shows the Features view (the tab at the bottom of the pane allows you to switch between Features and Content). Double-click the Default document icon. If default.aspx is missing from the list, add it to the beginning of the comma-separated list displayed. To improve performance, you can move default.aspx to the beginning of the list if it's not already there.
Click the site's icon and ensure that the pane on the right-hand side shows the Features view.
Double-click the Authentication icon.
Right-click on Anonymous authentication and choose Disable.
In IIS Manager, right-click on wfgen under the \wwwroot folder and select Convert to application.
Select the WorkflowGen application pool if it's not the default, then click OK.
The \wfgen\ws and \wfgen\WfApps\WebForms applications within WorkflowGen must be created. To do this, repeat the same steps you performed for \wfgen in the previous section.
If you're using IIS 8 and above and your application pool is set to use Classic Managed Pipeline Mode, make sure ASP.NET v4.0.30319 is set to Allowed in the IIS manager ISAPI and CGI Restrictions list.
File permission settings can be configured as follows for the WorkflowGen application identity:
DRIVE:\Inetpub\wwwroot\wfgen: Modify all
According to your authentication method (see ), the WorkflowGen application identity can be:
The corresponding Windows users
The ASP.NET or IIS application pool identity
wfgen web appIf you'd like your WorkflowGen root website (e.g. https://server) to auto-redirect to the https://server/wfgen web app, follow the procedure below.
Make sure the tool is installed on your WorkflowGen server.
Create or update the web.config file in your website's root folder (e.g. DRIVE:\inetpub\wwwroot\web.config).
⚠️ Warning: This is not the same web.config file as the main WorkflowGen web.config file (located in DRIVE:\inetpub\wwroot\wfgen\web.config).
To use the optional GraphQL, incoming webhooks, OpenID Connect Auth, and SCIM APIs, you must first install the following requirements:
In IIS, convert /wfgen/graphql to an application with a .NET 4 application pool (integrated pipeline).
Configure the GraphQL application authentication mode:
For Windows or Basic authentication: Enable Basic authentication.
In IIS, convert /wfgen/hooks to an application with a .NET 4 application pool (integrated pipeline), and configure the webhook application in Anonymous authentication mode.
In IIS, convert /wfgen/auth to an application with a .NET 4 application pool (integrated pipeline), and configure the application in Anonymous authentication mode.
In IIS, convert /wfgen/scim to an application with a .NET 4 application pool (integrated pipeline), and configure the application in Anonymous authentication mode.
This section details the different methods to authenticate WorkflowGen users. Choose one of them according to your needs and apply the required settings to implement it with your WorkflowGen instance.
(formerly Azure Active Directory)
(ensured by IIS)
(ensured by IIS)
(ensured by HttpModule)
(ensured by HttpModule)
The WorkflowGen server and mobile applications can be configured to use OpenID Connect (OIDC) compliant or classic authentication methods. The following table shows the authentication methods supported by the different WorkflowGen applications:
* Except Microsoft Identity Platform v2.0.
See below for information and instructions on how to configure the classic non-OIDC , , , , and authentication methods.
If you don’t know which authentication method to choose, follow the procedures below based on your situation:
If all WorkflowGen users are managed in Active Directories, which is accessible from the web server hosting WorkflowGen, then you can choose one of these authentication methods:
Integrated Windows authentication (ensured by IIS)
IIS HTTP Basic authentication (ensured by IIS)
If item 1 above applies to your situation, and you want to provide transparent authentication by using the current Windows session of the users, choose the following authentication method:
Open the WorkflowGen Configuration Panel. In the Authentication section on the General tab, select IIS mode.
Enable Integrated Windows authentication access on the WorkflowGen website and disable all built-in access mechanisms. Apply this setting on all sub-applications except the graphql and ws applications.
Open the WorkflowGen Configuration Panel. In the Authentication section on the General tab, select IIS mode.
Enable Basic authentication access on the WorkflowGen website and disable all built-in access mechanisms. Apply this setting to all sub-applications as well.
To use WorkflowGen authentication, ensure that the directories have the Passwords are managed by WorkflowGen option selected, which allows you to set up a password for each user. Ensure that your current user has a WorkflowGen password associated with it, or you'll be locked out.
Open the WorkflowGen Configuration Panel and change the settings in the Authentication section on the General tab as follows:
Set Mode to WorkflowGen.
Using the sample code in the section in the , create a new class for the HTTP module you're creating.
Modify the sample code to validate the credentials passed over HTTP Basic against the external configuration repository.
Build your module and copy the assembly DLL into the \wfgen\bin and \wfgen\wfapps\webforms\bin folders.
Modify the login.aspx code to validate the credentials passed over HTTP Basic against the external configuration repository. If you don’t have any external configuration repository, you can add users directly in the web.config of WorkflowGen (refer to the .NET documentation).
The login.aspx file must be copied to all of your webforms folders. This should only be applied to webforms. Web services must continue to use either Basic or Integrated authentication and therefore the login.aspx page cannot be used for them.
In the WorkflowGen web.config
As of version 7.10.0, WorkflowGen is FIPS compliant and compatible with Windows FIPS compliant mode. If you want to enable FIPS compliance in your Windows environment, you have to configure the configuration password management and user password management modes beforehand.
In the Security section on the Configuration Panel General tab, set Configuration password management mode to AES (FIPS Compliant) and enter a 32-character encryption key. When you click Save, the application passwords will automatically be converted to the new symmetric encryption mode.
In the Authentication section on the Configuration Panel General tab, set Password management mode to One-way Hashing (SHA256 FIPS Compliant) mode.
If you're using applicative authentication in Version 5 (Legacy) password management mode, users' passwords will automatically be converted into One-way Hashing (SHA256 FIPS Compliant) the next time they log in to WorkflowGen.
If you're using applicative authentication in One-way Hashing (SHA256) password management mode:
Select IIS authentication mode.
This section describes how to configure WorkflowGen to use SSL connection security level on the website.
Activate SSL authentication for your WorkflowGen website.
You must update the following parameter in the WorkflowGen configuration (click on the Configuration Panel from the Administration Module home page):
Web application URL: you must update the protocol of the base URL of the application to https://.
Change the links to WorkflowGen to use https:// instead of http://.
In order to allow a client application (such as front-end JavaScript code from an outside domain) to access and request data, you must enable and configure the (CORS) settings. To do this:
Install the on the WorkflowGen web server.
Add the cors node with the list of external domains and their methods and headers (where HTTP requests will be allowed) to the WorkflowGen web configuration settings (located in \wfgen\web.config). See some common examples below.
📌 Example 1: Allow all origins
📌 Example 2: Allow specific origins
For more information about the CORS configuration, see the .
Gardian
Form authentication (ensured by .NET)
✔️*
✔️
✔️
✔️
✔️
❌
WorkflowGen Plus v1.x.x (Android)
✔️*
✔️
✔️
✔️
✔️
❌
WorkflowGen legacy mobile app v2.x.x (iOS)
❌
✔️
✔️
✔️
✔️
❌
WorkflowGen legacy mobile app v2.x.x (Android)
❌
✔️
❌
✔️
✔️
❌
Integrated Windows authentication (ensured by IIS)
If item 1 above doesn't apply to your situation, and all WorkflowGen users are managed in an external application such a database or authenticated by a SSO solution, choose one of these authentication methods:
Custom HTTP Basic authentication (ensured by HttpModule)
Form authentication (ensured by .NET)
If neither item 1 nor item 3 applies to your situation because you don't have any directory or other authentication solutions, you can choose only the following authentication method:
WorkflowGen HTTP Basic authentication (ensured by HttpModule)
Choose your password management mode: Version 5 uses the same password management mode as earlier versions of WorkflowGen, while One-way Hashing stores hashed account passwords in the WorkflowGen database, which provides enhanced security.
Set the maximum number of failed login attempts before a user’s account is locked.
Set the minimum number of characters for a password.
In IIS, enable anonymous access on the WorkflowGen website and disable all built-in access mechanisms. Apply this setting to all sub-applications.
The Advantys.My.dll and Advantys.Security.dll assemblies must be copied to the \bin folders of your web forms. Your web services must continue to use Basic or Integrated Authentication.
Optionally, you can activate the user logout link in the User Portal and Administration Module menus by setting an application session timeout in the web.config file. This will expire the user session in case of inactivity after a period of time (in minutes) as specified by the value of the ApplicationSessionTimeOut configuration parameter.
For example, to set the user session to expire after 30 minutes of inactivity, modify the parameter as follows: <add key="ApplicationSessionTimeOut" value="30" />.
\bin folders of your web forms. Your web services can use Basic or Integrated authentication, or your custom HTTP Module.
Open the WorkflowGen Configuration Panel and change the settings in the Authentication section as follows:
Set Mode to Applicative.
Set Method to Custom.
Enter the assembly full name (namespace and class name) of the HTTP module (e.g. MyCompany.Hosting.Samples.CustomAuthModule).
Enable anonymous access on the WorkflowGen website and disable all built-in access mechanisms. Apply this setting on all sub-applications.
✏️ Note: Set the protection="None" or protection="All" attribute under the "forms" node. If "All" is used, the machineKey attribute and value must be added as well. (For more information about form-based authentication, see http://quickstarts.asp.net/QuickStartv20/aspnet/doc/security/formsauth.aspx.)
Set the authentication to Windows for each WorkflowGen web service application web.config file and reset the security settings to Basic or Integrated in IIS for these folders.
Enable anonymous access on the WorkflowGen website and disable all built-in access mechanisms. Apply this setting on all sub-applications.
Select One-way Hashing (SHA256 FIPS Compliant) password management mode, then click Save.
Re-enter all user passwords.
Reset the authentication mode to applicative.
OIDC
IIS HTTP basic
IIS Windows Integrated
WorkflowGen HTTP basic
Custom HTTP basic
Form
WorkflowGen v8.x.x
✔️
✔️
✔️
✔️
✔️
✔️
WorkflowGen Plus v1.x.x (iOS)
<configuration>
<system.web>
<httpModules>
<add name="ApplicationSecurityAuthenticationModule" type="Advantys.Security.Http.AuthenticationModule" />
</httpModules>
</system.web>
</configuration><configuration>
<system.webServer>
<modules>
<add name="ApplicationSecurityAuthenticationModule" type="Advantys.Security.Http.AuthenticationModule" />
</modules>
</system.webServer>
</configuration><configuration>
<system.web>
<httpModules>
<add name="ApplicationSecurityAuthenticationModule" type="MyCompany.Hosting.Samples.CustomAuthModule" />
</httpModules>
</system.web>
</configuration><configuration>
<system.webServer>
<modules>
<add name="ApplicationSecurityAuthenticationModule" type="MyCompany.Hosting.Samples.CustomAuthModule" />**
</modules>
</system.webServer>
</configuration><configuration>
<system.webServer>
<cors enabled="true">
<add origin="*">
<allowMethods>
<add method="GET" />
<add method="POST" />
<add method="OPTIONS" />
<add method="HEAD" />
</allowMethods>
<allowHeaders>
<add header="Accept" />
<add header="Origin" />
<add header="Authorization" />
<add header="Content-Type" />
</allowHeaders>
</add>
</cors>
</system.webServer>
</configuration><configuration>
<system.webServer>
<cors enabled="true">
<add origin="https://domain.b.com" allowCredentials="true">
<allowMethods>
<add method="GET" />
<add method="POST" />
<add method="OPTIONS" />
<add method="HEAD" />
</allowMethods>
<allowHeaders>
<add header="Accept" />
<add header="Origin" />
<add header="Authorization" />
<add header="Content-Type" />
</allowHeaders>
</add>
<add origin="https://domain.c.com" allowCredentials="true">
<allowMethods>
<add method="GET" />
<add method="POST" />
<add method="OPTIONS" />
<add method="HEAD" />
</allowMethods>
<allowHeaders>
<add header="Accept" />
<add header="Origin" />
<add header="Authorization" />
<add header="Content-Type" />
</allowHeaders>
</add>
</cors>
</system.webServer>
</configuration><configuration>
<system.web>
<authentication mode="Forms">
<forms name="401kApp" timeout="30" loginUrl="/wfgen/login.aspx" cookieless="AutoDetect" defaultUrl="/wfgen/default.aspx" protection="None" />
</authentication>
<authorization>
<deny users="?" />
</authorization>
</system.web>
</configuration>DRIVE:\Program Files\Advantys\WorkflowGen v8\Services\bin).Give this user db_datawriter and db_datareader permissions for the WFGEN database.
Open the DRIVE:\temp\manual\Databases\MsSQLServer source folder and run the create.sql script on the new database instance.
Give this user db_datawriter and db_datareader permissions for the WFGEN database.
Open the DRIVE:\temp\manual\Databases\MsSQLServer source folder and run the create.sql database creation script on the new database instance.
wfgen_adminAzure SQL Database: See the Azure SQL database configuration section in the WorkflowGen for Azure guide.
Update the WorkflowGen Administrator username to allow access to the Configuration Panel (e.g. <add key="ApplicationConfigAllowedUsersLogin" value="wfgen_admin" />).
Update the application URL (e.g. <add key="ApplicationUrl" value="http://yoursite/wfgen" />).
Add a 32-character alphanumeric encryption key (e.g. <add key="ApplicationSecurityPasswordSymmetricEncryptionKey" value="XXXXXXXXXXXXXXXXXXX....." />).
%windir%\Microsoft.NET\Framework\v4.0.30319\InstallUtil.exe /i "C:\Program Files\Advantys\[Custom WorkflowGen]\Services\bin\WfgDirectoriesSyncService.exe"If you're installing these services along with previous WorkflowGen services on the same server, you'll need to provide a new service name (e.g. WorkflowGenEngineServiceV7) for both the Engine and Directory services in their configuration files ([WfgWorkflowEngineService.exe].config: <add key="ServiceName" value="WorkflowGenEngineServiceV7"></add>) and script files (winsvc-install.cmd: rename all [WorkflowGenEngineService] to [WorkflowGenEngineServiceV7]). (See the Configuring multiple instances of WorkflowGen section for information and instructions on how to configure multiple WorkflowGen services on the same server.)
Update the WorkflowGen web configuration path (e.g. <add key="WebConfigPath" value="DRIVE:\inetpub\wwwroot\wfgen\web.config" />).
✏️ Note: WfgWorkflowEngineService.exe and WfgDirectoriesSyncService.exe might be blocked. To check this, right-click on them and choose Properties. If the Security section is displayed at the bottom of the General tab, these executables have been blocked; in this case, click Unblock.
Run DRIVE:\Program Files\Advantys\WorkflowGen\Services\bin\winsvc-install.cmd as Administrator.
Click OK.
httphttpshttps80Define the rewrite rule node as shown below (configuration / system.webServer / <rewrite> / <rules> / <rule>):
The specified module could not be found regarding the edge and edge-js libraries when accessing the /wfgen/graphql, /wfgen/hooks, or /wfgen/scim web apps. For WorkflowGen Applicative authentication:
Make sure the /wfgen web application already has WorkflowGen Applicative authentication enabled.
Enable Anonymous authentication.
<?xml version="1.0" encoding="UTF-8"?>
<configuration>
<system.webServer>
<rewrite>
<rules>
<rule name="Rewrite to wfgen" stopProcessing="true">
<match url="(^$|^wfgen$|^wfgen/$)" />
<action type="Rewrite" url="/wfgen/show.aspx?QUERY=CONTEXT&REQUEST_QUERY=WELCOME&NO_REDIR=Y" />
</rule>
</rules>
</rewrite>
</system.webServer>
</configuration><location path="hooks" inheritInChildApplications="false">
<system.webServer>
<modules>
<remove name="ApplicationSecurityAuthenticationModule" />
</modules>
</system.webServer>
</location><location path="hooks" inheritInChildApplications="false">
<system.webServer>
<modules>
<remove name="MyCustomAuthModule" />
</modules>
</system.webServer>
</location><location path="auth" inheritInChildApplications="false">
<system.webServer>
<modules>
<remove name="ApplicationSecurityAuthenticationModule" />
</modules>
</system.webServer>
</location><location path="auth" inheritInChildApplications="false">
<system.webServer>
<modules>
<remove name="MyCustomAuthModule" />
</modules>
</system.webServer>
</location><location path="scim" inheritInChildApplications="false">
<system.webServer>
<modules>
<remove name="ApplicationSecurityAuthenticationModule" />
</modules>
</system.webServer>
</location><location path="scim" inheritInChildApplications="false">
<system.webServer>
<modules>
<remove name="MyCustomAuthModule" />
</modules>
</system.webServer>
</location>This section provides instructions on:
AD FS 2016 authentication: How to configure WorkflowGen authentication using AD FS OpenID Connect.
: How to authorize WorkflowGen access to mobile apps using AD FS OpenID Connect.
: How to authorize WorkflowGen access to server-side scripts using AD FS OpenID Connect.
: How to authorize WorkflowGen access to single-page applications using AD FS and OpenID Connect.
: How to generate a universal link to simplify the WorkflowGen Plus mobile app user login.
This section provides instructions on how to configure WorkflowGen delegated authentication with Active Directory Federation Services (AD FS) OpenID Connect, and will show you how to set up a working WorkflowGen instance using AD FS OpenID Connect to authenticate your users.
Make sure to have a licensed copy of WorkflowGen installed and running on a server. You must be a WorkflowGen administrator.
Make sure to have installed and configured AD FS 2016 or later on a server.
Make sure to have AD FS administrator access to be able to configure AD FS.
Make sure to have provisioned an existing Active Directory user that you can authenticate with to WorkflowGen and that the user has administrator privileges. This is important because once you've activated the delegation, you'll still need to be able to manage the application.
WorkflowGen supports the synchronization of Active Directory users and groups; for instructions on how to configure this, see the section in the .
Configuring AD FS is very simple: you just need to add a new application group within which you then configure a server application and a web API.
In the server manager, open AD FS Management.
Click the Application Groups directory in the left-hand pane, then click Add Application Group in the right-hand pane.
In the Add Application Group Wizard screen that opens:
You should now have an application group containing two applications: the WorkflowGen server application (which is the web application) and the WorkflowGen GraphQL API.
By default, a user UPN isn't included in the access token returned by AD FS, so you have to configure an Issuance Transform Rule for the GraphQL API that passes through the UPN. To do this:
In AD FS Management, click the Application Groups directory to the left, then double-click the WorkflowGen group.
You should now see all of the group's applications in a new window. Double-click WorkflowGen GraphQL API in the list.
On the Issuance Transform Rules tab, click Add Rule.
AD FS is now configured for WorkflowGen to delegate its authentication to it.
Now, you need to configure WorkflowGen to delegate its authentication to AD FS.
web.configOpen the WorkflowGen web.config file and add the following properties under <appSettings>:
Replace <CLIENT ID> with the client identifier generated by AD FS for the WorkflowGen application.
Replace <CLIENT SECRET> with the shared secret generated for the WorkflowGen application.
Replace <METADATA URL> with the AD FS server's metadata URL. By default, it should look something like https://<adfs url>/adfs/.well-known/openid-configuration
If your server blocks browsers from embedding web content in iFrames (by returning the X-Frame-Options: DENY header), it is strongly recommended that you set the value of ApplicationSecurityAuthSessionRefreshEnableIFrame to N. Otherwise, when the session expires and a user submits a form, they will be redirected for authentication and lose the data they entered in the form.
WorkflowGen is now linked to AD FS and back. The last thing left to do is configure a few more options in order to finish the internal wiring of WorkflowGen so that it can delegate its authentication.
In order to generate a session token, you need to add a few more settings to the web.config.
Open the WorkflowGen web.config file and add the following property under <appSettings>:
Replace <SECRET> with a value that can't be guessed, such as a UUID.
The secret will be only accessible inside your instance of WorkflowGen, so when generating a session token, WorkflowGen will sign it with this secret in order to check the validity of all session tokens passed to it.
You now need to activate the delegation by replacing the authentication system in IIS and pointing WorkflowGen's modules to the correct authentication module.
Configure IIS
In IIS Manager, click the WorkflowGen application in the tree view.
Click the Authentication button.
Enable Anonymous Authentication and disable all other authentications.
Perform these steps for all sub-applications as well.
Add properties to the web.config files of certain modules
Certain modules need to have their authentication checked by the special Advantys.Security.JWTAuthenticationModule WorkflowGen authentication module, but certain other modules shouldn't because they're either public or aren't part of the global authentication system.
In the WorkflowGen web.config, add the following property:
In the auth module's web.config, add the following property:
This line removes the authentication Node.js module from the global authentication system, because this Node.js application encapsulates the OpenID Connect authentication mechanisms.
You should now have a working WorkflowGen instance with the authentication delegated to AD FS through the OpenID Connect protocol. Make sure to have provisioned your users to WorkflowGen in order for them to successfully access WorkflowGen.
This feature isn't supported for AD FS. It is necessary to configure the GraphQL API on the provider.
Mobile applications must use an approach similar to that of regular web applications, which is called Authorization Code Flow with Proof Key for Code Exchange (PKCE). The main difference between this and the classic Authorization Code Flow is that the mobile application doesn't get a client secret, but instead exchanges a pair of codes to prove the origin of the authentication attempt. The issue is that a mobile application can't be trusted with a client secret because it's distributed directly to users and is therefore no longer under the developer's control, and the sources can be decompiled and analyzed to find secrets like this.
This section provides instructions on how to configure AD FS for the WorkflowGen Plus mobile application so that your mobile users can benefit from delegated authentication as well.
For instructions on how to generate a universal link to simplify the AD FS login process for your users, see the section.
Make sure to have a licensed copy of WorkflowGen installed and running on a server.
Make sure to have administrative access to the AD FS to be able to configure it properly.
Make sure to have provisioned an existing Active Directory user with which you can authenticate to WorkflowGen so that you can use the application afterwards.
This configuration is done in several steps. First, you have to register a new native application in AD FS. Then, you have to give the application the necessary permissions to access the WorkflowGen GraphQL API.
In the AD FS Management window, navigate to the Application Groups folder, and double-click on the WorkflowGen group.
Click Add application.
Configure the application:
You've now added the WorkflowGen Plus native application in your AD FS WorkflowGen application group.
In the AD FS Management window, navigate to the Application Groups folder, and double-click on the WorkflowGen group.
Double-click on the WorkflowGen GraphQL API application.
On the Client Permissions tab, click the WorkflowGen Plus application, then click Add.
You've now configured WorkflowGen Plus within AD FS.
In some cases, you'll want to perform a specific task that can be automated but needs access to the WorkflowGen GraphQL API; this use case is often in the form as a server-side script. For this, OAuth2 provides a type of grant called Client Credentials that simply exchanges a client ID and secret for an access token. There is no ID token since it's not part of the OpenID Connect standard and there's no user involved.
This section provides instructions on how to configure AD FS with a server-side script that has access to the GraphQL API.
Make sure to have a licensed copy of WorkflowGen installed and running on a server.
Make sure to have administrative access to WorkflowGen.
Make sure to have administrative access to AD FS to be able to configure it properly.
Make sure to have successfully configured delegated authentication to AD FS on your WorkflowGen instance following the instructions in the
In the AD FS Management window, navigate to the Application Groups folder, and double-click on the WorkflowGen group.
In the WorkflowGen Properties window, click Add application.
Select the Server application type, then click Next.
You should now see your new server application listed in the WorkflowGen application group.
Now that you've created your server application, you need to grant it access to the GraphQL API. To do this:
In the AD FS Management window, navigate to the Application Groups folder, and double-click on the WorkflowGen group.
In the WorkflowGen Properties window, double-click WorkflowGen GraphQL API.
On the Client Permissions tab in the WorkflowGen GraphQL API Properties window, click Add.
You've now registered your server application in AD FS and granted it access to the WorkflowGen GraphQL API.
As with user provisioning, WorkflowGen needs to know which application is accessing the GraphQL API. Therefore, you have to register the application, which consists of your script.
On the Applications page in the WorkflowGen Administration Module, click New application.
Fill in the form:
Name: My Server Application
Your application should now appear in the list of applications.
You should now have the necessary components in place to make GraphQL API requests with your script by passing the access token received from AD FS from a Client Credentials Grant flow.
JavaScript applications running in a browser are often hard to secure due to the open nature of the Web. Secure storage is nonexistent, and everything is in clear text (for HTTP version 1.1). Here's a quote from the Azure Active Directory team that summarizes the state of authentication with single-page applications:
The OAuth2 implicit grant is notorious for being the grant with the longest list of security concerns in the OAuth2 specification. And yet, that is the approach implemented by ADAL JS and the one we recommend when writing SPA applications. What gives? It’s all a matter of tradeoffs: and as it turns out, the implicit grant is the best approach you can pursue for applications that consume a Web API via JavaScript from a browser.
(Source: )
It's therefore important that you make all of the necessary checks to verify the validity of your requests and the responses.
This section provides instructions on how to configure AD FS with a single-page application (SPA) so that users can authenticate through it and make requests to the WorkflowGen GraphQL API.
Make sure to have a licensed copy of WorkflowGen installed and running on a server.
Make sure to have administrative access to AD FS to be able to configure it properly.
Make sure to have provisioned an existing Active Directory user with which you can authenticate to WorkflowGen so that you can use the application afterwards.
Currently, AD FS only supports three types of applications: Native, Server, and Web API. As you can see, there's nothing for single-page applications in browsers or even regular web applications that renders pages on the server. However, you can use the supported types to get what you need. The Native application type enables you to retrieve a client ID and to specify a callback URI that can be used to perform an implicit grant flow with a single-page application; AD FS will answer as expected since it supports the OpenID Connect protocol.
This configuration is done in several steps. First, you have to register a new native application in AD FS. Then, you have to give the application the necessary permissions to access the WorkflowGen GraphQL API.
In the AD FS Management window, navigate to the Application Groups folder, and double-click on the WorkflowGen group.
Click Add application.
Configure the application:
In the AD FS Management window, navigate to the Application Groups folder, and double-click on the WorkflowGen group.
Double-click on the WorkflowGen GraphQL API application.
On the Client Permissions tab, click the WorkflowGen Plus application, then click Add.
You've now configured your single-page app within AD FS.
As of WorkflowGen server version 7.11.2, you can generate a universal link to simplify the AD FS 2016 login process for your WorkflowGen Plus mobile app users.
protocol: workflowgenplus://
hostname: auth.init
You'll need to specify the following parameters:
provider: adfs
server_address: Your WorkflowGen application URL, whose value must be URL encoded (e.g. https://mycompany.com/wfgen)
client_id: Use the client ID you created earlier in the configuration (e.g. 6g909d00-8580-49a4-9003-a30f6b87ae86
The universal link should follow this format:
Once you've generated the universal link, give it to your users, who can use it to sign in to WorkflowGen Plus with the preset sign-in method.
WorkflowGen only supports requests to the SOAP API using classic authentication methods. If you still need to use this API, you have to perform some additional steps to configure it properly.
Create a new separate WorkflowGen directory for the SOAP API users.
Provision it with users and groups as needed.
In the IIS Manager, enable the Basic authentication method for the \ws\wfgen application.
This table lists all configurable options in WorkflowGen that you can use to customize your authentication experience; these are located in the WorkflowGen web.config file.
AES encryption mode and its key are required for the authentication to work.
Enter the name of the group: WorkflowGen
Select the template: Server application accessing a web API.
Click Next.
On the Server application screen:
Enter the name of the application: WorkflowGen - Server application.
Copy the client identifier, which you'll need in the WorkflowGen configuration later.
Enter the redirect URI: https://<workflowgen url>/auth/callback
Click Add. You should now see the redirect URI in the list below the Redirect URI field.
Click Next.
On the Configure Application Credentials screen, you'll generate a client secret:
Check only the Generate a shared secret checkbox.
Copy the generated secret; you won't be able to retrieve it afterwards.
Click Next.
On the Configure Web API screen, you'll configure the WorkflowGen GraphQL API name and identifier:
Enter the name of the application: WorkflowGen GraphQL API.
Enter the API identifier: https://<workflowgen url>/graphql.
Click Add.
Click Next.
On the Configure Application Permissions screen, you'll configure GraphQL access to the WorkflowGen web application:
Make sure the WorkflowGen web application (WorkflowGen - Server application) is in the Client application list.
Check the openId, profile, and email checkboxes.
Click Next.
Review the summary section and complete the application group.
On the Select Rule Template screen, select the Pass Through or Filter an Incoming Claim claim rule template, then click Next.
On the Configure Rule screen:
Enter Pass through UPN in the Claim rule name field.
Select UPN in the Incoming claim type drop-down list.
Make sure that Pass through all claim values is selected.
Click Finish.
X-Frame-Options header to allow specified origins to embed AD FS content in an iFrame. In this case, you can set the value of ApplicationSecurityAuthSessionRefreshEnableIFrame to Y, because the automatic refresh will work as expected.hooks and scim modules as well.
Copy the following .NET assemblies and dependency libraries from \wfgen\bin to each custom webform's \bin folder (\wfgen\wfapps\webforms\<custom webform>\bin):
Advantys.My.dll
Advantys.Security.dll
Newtonsoft.Json.dll
jose-jwt.dll
Make sure to have successfully configured delegated authentication to AD FS on your WorkflowGen instance following the instructions in the AD FS authentication section.
WorkflowGen Plus
Copy the client identifier, which you'll need in the application.
Redirect URI: workflowgenplus://oidc
Click Add, then click Next.
Review the configuration; once you've finished, click Next and then Close.
Make sure that the openid, profile, and email scopes are checked.
Click OK, then click OK in the WorkflowGen application group menu.
Configure the server application:
Name: My Server Application
Copy the client identifier, which you'll need for the client credentials grant flow. You won't be able to retrieve it afterwards.
Add a redirect URI. Here, it doesn't matter what you enter because the client credentials grant doesn't use this value.
Click Add, then click Next.
In the Configure Application Credentials window, generate a client secret for the server application:
Check the Generate a shared secret checkbox.
Copy the value; you'll need it for the client credentials grant flow.
Click Next.
Review the configuration; once you've finished, click Next.
Click Close.
Click the server application that you created in the previous section, then click Add.
You should now see your server application in the list of client applications; make sure it's selected.
Make sure that the openid, profile, and email scopes are checked.
Click OK.
Description: A description that clearly identifies the script.
Type: Non Interactive Client
Impersonate username: Any username that has the required access to the GraphQL API.
Client ID: The client ID you copied earlier.
Active: Check this checkbox.
Click Save.
My Single-Page AppCopy the client identifier, which you'll need in the application.
Redirect URI: https://mysinglepageapp.com/callback
Click Add, then click Next.
Review the configuration; once you've finished, click Next and then Close.
Make sure that the openid, profile, and email scopes are checked.
Click OK, then click OK in the WorkflowGen application group menu.
domain: The AD FS domain name without URL protocol (e.g. mycompany.com)
audience: Your WorkflowGen GraphQL API URL, whose value must be URL encoded (e.g. https://mycompany.com/wfgen/graphql)
web.config file (located in \Inetpub\wwwroot\wfgen), add the following under <location path="ws" inheritInChildApplications="false"> :
Option
Description
ApplicationSecurityAuthSessionTokenCookie
The name of the session cookie that is generated by the authentication module. Default: wfgen_token
✏️ Note: This is useful when you have multiple instances of WorkflowGen running and you want to have access to both and be authenticated on both instances at the same time.
ApplicationSecurityAuthSessionTimeOut
The duration of the session in seconds. It defaults to the ID token expiration time received. Default: the exp value of the ID token
ApplicationSecurityAuthMobileSessionTimeOut
The duration of the session in seconds when requested from mobile devices on the token endpoint. Default: 7200 seconds
<!-- ADFS auth -->
<add key="ApplicationSecurityAuthProvider" value="adfs"/>
<add key="ApplicationSecurityAuthClientId" value="<CLIENT ID>" />
<add key="ApplicationSecurityAuthClientSecret" value="<CLIENT SECRET>" />
<add key="ApplicationSecurityAuthMetadataUrl" value="<METADATA URL>" />
<add key="ApplicationSecurityAuthAppIdClaim" value="appid" />
<add key="ApplicationSecurityAuthUsernameClaim" value="upn" />
<add key="ApplicationSecurityAuthClockTolerance" value="60" />
<add key="ApplicationSecurityAuthSessionRefreshEnableIFrame" value="Y"/> <!-- Auth -->
<add key="ApplicationSecurityAuthSessionTokenSigningSecret" value="<SECRET>" /><?xml version="1.0" encoding="UTF-8"?>
<configuration>
<system.webServer>
<modules>
<add name="ApplicationSecurityAuthenticationModule" type="Advantys.Security.Http.JWTAuthenticationModule" />
</modules>
</system.webServer>
</configuration><?xml version="1.0" encoding="UTF-8"?>
<configuration>
<system.webServer>
<modules>
<remove name="ApplicationSecurityAuthenticationModule"/>
</modules>
</system.webServer>
</configuration>workflowgenplus://auth.init?provider=adfs&server_address=https%3A%2F%2Fmycompany.com%2Fwfgen&client_id=6g909d00-8580-49a4-9003-a30f6b87ae86&domain=mycompany.com&audience=https%3A%2F%2Fmycompany.com%2Fwfgen%2Fgraphql<system.webServer>
<modules>
<remove name="ApplicationSecurityAuthenticationModule" />
</modules>
</system.webServer>This section provides instructions on:
Auth0 authentication: How to configure WorkflowGen authentication using Auth0.
: How to create a directory with the self-provisioning connector.
: How to authorize WorkflowGen access to mobile applications using Auth0.
: How to authorize WorkflowGen access to server-side scripts using OpenID Connect and Auth0.
: How to authorize WorkflowGen access to single-page applications using Auth0.
: How to authorize Auth0 access to the WorkflowGen command line interface.
: How to generate a universal link to simplify the WorkflowGen Plus mobile app user login.
It also provides additional information on and .
Make sure to have a licensed copy of WorkflowGen installed and running on a server.
Make sure to have administrative access to Auth0 to be able to configure it properly.
Make sure to have provisioned an existing Auth0 user with which you can authenticate to WorkflowGen so that you can use the application afterwards.
Make sure to have a licensed copy of WorkflowGen installed and running on a server. You must be a WorkflowGen administrator.
Make sure to have Auth0 administrator access.
Make sure to have provisioned an existing Auth0 user that you can authenticate with to WorkflowGen and that the user has administrator privileges. This is important because once you activate the delegation, you'll need to still be able to manage the application. The Auth0 user is in fact a user of an identity provider that's linked to Auth0, such as GitHub or Google. You have to have provisioned at least one user.
The configuration of Auth0 is done in several steps. First, you have to register the WorkflowGen web application and link it to your instance of WorkflowGen; then, you have to register the WorkflowGen GraphQL API to be able to register custom applications to access it.
Go to the Auth0 portal Applications section.
Click Create Application, and fill in the form:
Name: WorkflowGen Web App
Your WorkflowGen Regular Web App is now configured.
Now, you need to register the WorkflowGen GraphQL API module so that applications external to WorkflowGen can use the API by authentication through Auth0 using the OpenID Connect protocol.
Classic usage:
Go to the Auth0 portal APIs section.
Click Create API, and fill in the form:
Name: WorkflowGen GraphQL API
With multi-audience support:
Go to the Auth0 portal APIs section.
Click Create API, and fill in the form:
Name: My APIs
The GraphQL API is now registered in Auth0.
In order to get a proper username from the access token when receiving one in the GraphQL API, you need to use a special feature of Auth0 called an action. Actions act as middleware between the linked cloud provider and Auth0 in order to get the correct values when needed.
Go to the Auth0 portal and select Actions in the left menu, then select Library in the sub-menu.
Click Create Action, then choose the Build from scratch template.
Give the action a name (e.g. WorkflowGen (Action)). Trigger should be set to Login / Post Login and Runtime set to Node 18 (Recommended).
This step will ensure that WorkflowGen and the GraphQL API always get a username through the same claim instead of having to make a lot of conditional statements. However, this doesn't apply to machine-to-machine authentication since there's no human user involved.
If you use a different claim from the Auth0 mapping than the one specified in the function above (e.g. user.username, user.email, user.nickname), just modify this rule or add your own. Make sure to populate https://api.workflowgen.com/username with the value or to configure the ApplicationSecurityAuthUsernameClaim option in your web.config with the correct claim to take. Note that this option is used both in the authentication application and the GraphQL API.
Now, you have to configure WorkflowGen to delegate its authentication to Auth0.
web.configOpen the WorkflowGen web.config file and add the following properties under <appSettings>:
Classic usage:
With multi-audience support:
Replace <CLIENT ID> with the client ID of the WorkflowGen Regular Web App in Auth0.
Note that the ApplicationSecurityAuthUsernameClaim key is set to the value entered in the rule earlier. Therefore, you can use any value here as long as you also modify the rule.
WorkflowGen is now linked to Auth0 and back. The last thing left to do is configure a few more options in order to finish the internal wiring of WorkflowGen so that it can delegate its authentication.
In order to generate a session token, you need to add a few more settings to the web.config.
Open the WorkflowGen web.config file and add the following properties under <appSettings>:
Replace <SECRET> with a value that can't be guessed, such as a UUID.
The secret will be only accessible inside your instance of WorkflowGen, so when generating a session token, WorkflowGen will sign it with this secret in order to check the validity of all session tokens passed to it.
You now need to activate the delegation by replacing the authentication system in IIS and pointing WorkflowGen's modules to the correct authentication module.
Configure IIS
In IIS Manager, click on the WorkflowGen application in the tree view.
Click the Authentication button.
Enable Anonymous Authentication, and disable all other authentications.
Add properties to the web.config files of certain modules
Certain modules need to have their authentication checked by the special Advantys.Security.JWTAuthenticationModule WorkflowGen authentication module, but certain other modules should not because they are either public or aren't part of the global authentication system.
In the WorkflowGen web.config, add the following property:
In the auth module's web.config, add the following property:
This line removes the authentication Node.js module from the global authentication system, because this Node.js application encapsulates the OpenID Connect authentication mechanisms.
You should now have a working WorkflowGen instance with the authentication delegated to Auth0 through the OpenID Connect protocol. Make sure to have provisioned your users to WorkflowGen in order for them to successfully access WorkflowGen.
This feature is not supported for Auth0. It is necessary to configure the GraphQL API on the provider.
The self-provisioning connector is a directory connector that automatically creates and synchronizes a user based on the user's session token claims that contain claims from the OpenID Connect provider ID token. This feature is only compatible with an OpenID Connect authentication.
Make sure to have a working WorkflowGen instance.
Make sure to know the instance's IP address or its fully qualified name.
Make sure to know the address of the instance.
Make sure to have configured Auth0 or one of the other OIDC-compliant authentication methods (, formerly Azure Active Directory;
This section will guide you through the WorkflowGen configurations necessary to set up the self-provisioning feature with a directory.
This directory will contain all of the users that are not provisioned elsewhere. To create a self-provisioning directory, do the following:
On the Directories page in the WorkflowGen Administration Module, click New directory.
Fill in the form:
Name: SELF_PROVISIONING(or something else)
Now that you've created a new directory with the self-provisioning connector, you need to define which claims are mapped to which WorkflowGen user field. To do this:
On the new directory's page, click Edit mapping.
To the right of the name of a WorkflowGen user's field, enter the name of the claim in the session token that you want to map.
Here's an example of a session token generated by the auth node application from the Auth0 ID token connected with Google Apps:
These claims could be mapped in WorkflowGen like this:
You've now activated the self-provisioning feature, and unknown users can be automatically provisioned and synchronized to WorkflowGen without any external actions required.
Mobile applications must use an approach similar to that of regular web applications, which is called Authorization Code Flow with Proof Key for Code Exchange (PKCE). The main difference between this and the classic Authorization Code Flow is that the mobile application doesn't get a client secret, but instead exchanges a pair of codes to prove the origin of the authentication attempt. The issue is that a mobile application can't be trusted with a client secret because it's distributed directly to users and is therefore no longer under the developer's control, and the sources can be decompiled and analyzed to find secrets like this.
This section provides instructions on how to configure Auth0 for the WorkflowGen Plus mobile application so that your mobile users can benefit from delegated authentication as well.
Make sure to have a licensed copy of WorkflowGen installed and running on a server.
Make sure to have administrative access to Auth0 to be able to configure it properly.
Make sure to have provisioned an existing Auth0 user with which you can authenticate to WorkflowGen so that you can use the application afterwards.
This configuration is done in several steps. First, you have to register a new native application in Auth0. Then, you have to give the application the necessary permissions to access the WorkflowGen GraphQL API. Finally, you have to register the correct callback URLs that will redirect within the native application.
In the Auth0 portal, click Create Application in the Applications section.
Fill in the form:
Name: WorkflowGen Plus
You've now registered a new native application in Auth0.
On the Settings tab, scroll down to the Allowed Callback URLs and add the URL workflowgenplus://oidc.
Scroll down further to the Allowed Logout URLs section and add the URL workflowgenplus://oidc.
You don't need to give the application access to the GraphQL API since all applications (except for machine-to-machine applications) have access to all registered APIs within a domain. Here's a review of the information you need:
A client ID, which can be found on the native application page's Settings tab.
An Auth0 domain name, which can be found directly to the left of your profile picture on the top right corner of the page.
All of this information must be given to the users who will be using the mobile application; they'll need to copy them directly into the app.
In some cases, you'll want to perform a specific task that can be automated but needs access to the WorkflowGen GraphQL API; this use case is often in the form as a server-side script. For this, OAuth2 provides a type of grant called Client Credentials that simply exchanges a client ID and secret for an access token. There is no ID token since it's not part of the OpenID Connect standard and there's no user involved.
This section provides instructions on how to configure Auth0 with a server-side script that has access to the GraphQL API. First, you'll need to configure a new web application in the Auth0 portal; then, you'll need to configure a new application in WorkflowGen.
Make sure to have a licensed copy of WorkflowGen installed and running on a server.
Make sure to have administrative access to WorkflowGen.
Make sure to have administrative access to Auth0 to be able to configure it properly.
Make sure to have successfully configured delegated authentication to Auth0 on your WorkflowGen instance following the instructions in the
In the Auth0 portal Applications section, click Create Applications.
Fill in the form:
Name: Your script name
You've now successfully registered your script in Auth0.
In the Auth0 portal APIs section, click WorkflowGen GraphQL API.
On the Machine-to-Machine tab, authorize the application that you just created.
You've now successfully granted the GraphQL API access to your script.
Here's a review of the information you need:
A client ID, which can be found on the registered application's General tab.
A client secret, which can be found on the registered application's General tab.
The WorkflowGen GraphQL API identifier, which can be found on its settings page.
You're now ready to register your script in WorkflowGen.
As with user provisioning, WorkflowGen needs to know which application is accessing the GraphQL API. Therefore, you have to register the application, which consists of your script.
On the Applications page in the WorkflowGen Administration Module, click New application.
Fill in the form:
Name: My Server Application
Your application should now appear in the list of applications.
You should now have the necessary components in place to make GraphQL API requests with your script by passing the access token received from Auth0 from a Client Credentials Grant flow.
JavaScript applications running in a browser are often hard to secure due to the open nature of the Web. Secure storage is nonexistent, and everything is in clear text (for HTTP version 1.1). Here's a quote from the Azure Active Directory team that summarizes the state of authentication with single-page applications:
The OAuth2 implicit grant is notorious for being the grant with the longest list of security concerns in the OAuth2 specification. And yet, that is the approach implemented by ADAL JS and the one we recommend when writing SPA applications. What gives? It’s all a matter of tradeoffs: and as it turns out, the implicit grant is the best approach you can pursue for applications that consume a Web API via JavaScript from a browser.
(Source: )
It's therefore important that you make all of the necessary checks to verify the validity of your requests and the responses.
This section provides instructions on how to configure Auth0 with a single-page application (SPA) so that users can authenticate through it and make requests to the WorkflowGen GraphQL API. This configuration is done in three steps: registering your SPA, granting access to the API, and setting some redirect URLs.
Make sure to have a licensed copy of WorkflowGen installed and running on a server.
Make sure to have administrative access to Auth0 to be able to configure it properly.
Make sure to have provisioned an existing Auth0 user with which you can authenticate to WorkflowGen so that you can use the application afterwards.
In the Auth0 portal, click Create Application in the Applications section.
Fill in the form:
Name: Your SPA name
You should now be on the registered application page.
On the Settings tab, scroll down to the Allowed Callback URLs section and add your application's login callback URL (for example, https://localhost/login/callback).
If you support logout from Auth0, scroll down to the Allowed Logout URLs section and add your post logout redirect URL (for example, https://localhost/logout/return).
You need a client ID, which can be found on the application page's Settings tab.
You need your Auth0 domain name, which can be found next to your Auth0 profile picture in the top right corner of the portal.
Your application should now be successfully linked to the Auth0 infrastructure and users can login through it. If you have met the prerequisites, your application will receive an access token that it can send to the WorkflowGen GraphQL API to make authorized requests as a Bearer token via the Authorization header.
In the Auth0 portal Applications section, click Create Application.
Fill in the form:
Name: WorkflowGen CLI
You've now registered a new native application in Auth0.
On the Settings tab, scroll down to the Allowed Callback URLs and add the URL http://127.0.0.1:8888/callback.
In Settings > Advanced Settings > Grant Types, make sure that the Implicit, Authorization Code, and Refresh Token checkboxes are checked.
Since all applications in a domain can automatically access each other, your native application inherits access to the GraphQL API. Here's a review of all the information you need:
A client ID, which can be found on the native application's Settings tab.
An Auth0 domain name, which can be found on the native application's Settings tab.
All of this information must be given to the users who will be using the WorkflowGen CLI.
The configuration of non-interactive mode is the same as in the section.
Here's a review of the information you'll need:
A client ID, which can be found on the registered application's parameters page.
A client secret, which can be found on the registered application's parameters page.
The domain, which can be found on the registered application's parameters page.
You can now use the WorkflowGen CLI in Client credentials mode.
As of WorkflowGen server version 7.11.2, you can generate a universal link to simplify the Auth0 login process for your WorkflowGen Plus mobile app users.
protocol: workflowgenplus://
hostname: auth.init
You'll need to specify the following parameters:
provider: auth0
server_address: Your WorkflowGen application URL, whose value must be URL encoded (e.g. https://mycompany.com/wfgen)
client_id: Use the client ID you created earlier in the configuration (e.g. 7gdj4hs92y)
The universal link should follow this format:
Once you've generated the universal link, give it to your users, who can use it to sign in to WorkflowGen Plus with the preset sign-in method.
WorkflowGen only supports requests to the SOAP API using classic authentication methods. If you still need to use this API, you have to perform some additional steps to configure it properly.
Create a new separate WorkflowGen directory for the SOAP API users.
Provision it with users and groups as needed.
In the IIS Manager, enable the Basic authentication method for the \ws\wfgen application.
There's no automatic way to provision your users and groups from the identity providers you use behind Auth0 with WorkflowGen. You'll have to synchronize them using one of the .
AES encryption mode and its key are required for the authentication to work.
Type: Regular Web Application
Click Create. You should now see the application's Quick Start page:
On the Settings tab, scroll down to the Allowed Callback URLs section and add https://<workflowgen url>/auth/callback to it.
Scroll down to the Allowed Logout URLs section and add https://<workflowgen url>/auth/logout/return to it.
Identifier: https://<workflowgen url>/graphql
Signing algorithm: RS256
Your form should look like this:
Click Create.
Identifier: my-apis
Signing algorithm: RS256
Click Create.
Click Permissions.
In the Define all the permissions (scopes) that this API uses section, enter the following information:
Permission: wfgen-graphql-full-access
Description: Full access to the WorkflowGen GraphQL API
Click ADD.
Replace the code with the following:
Click Deploy.
Go to the Auth0 portal and select Actions in the left menu, then select Flows in the sub-menu.
On the Flows page, click the Login icon.
In the right panel of the graphical view, select the Custom tab, where your custom action should appear.
Drag and drop your action between the Start and Complete actions.
Click the Apply button in the top right.
Replace <CLIENT SECRET> with the client secret of the WorkflowGen Regular Web App in Auth0.
Replace <METADATA URL> with the URL that you built earlier from your domain name in Auth0. The METADATA URL is https://[YOUR_AUTH0_DOMAIN].auth0.com/.well-known/openid-configuration.
Perform these steps for all sub-applications as well.
hooks and scim modules as well.
Copy the following .NET assemblies and dependency libraries from \wfgen\bin to each custom webform's \bin folder (\wfgen\wfapps\webforms\<custom webform>\bin):
Advantys.My.dll
Advantys.Security.dll
Newtonsoft.Json.dll
jose-jwt.dll
Description: A good description of the directory
Directory connector: Self-provisioning
Click Save.
Click Save.
Make sure to have the latest WorkflowGen Plus version installed on your device and that your device is supported.
Make sure to have successfully configured delegated authentication to Auth0 on your WorkflowGen instance following the instructions in the Auth0 authentication section.
Type: Native
Click Create at the bottom of the page.
Application Type: machine-to-machine
Click Create.
Description: A description that clearly identifies the script
Type: Non-interactive Client
Impersonate username: Any username that has the required access to the GraphQL API
Client ID: The client ID you retrieved earlier
Active: Check this checkbox
Click Save.
Type: Single Page Web Applications
Click Create at the bottom of the page.
Type: Native
Click Create at the bottom of the page.
domain: The Auth0 domain name without URL protocol (e.g mydomain.auth0.com)
audience: Your WorkflowGen GraphQL API URL, whose value must be URL encoded (e.g. https://mycompany.com/wfgen/graphql)
web.config file (located in \Inetpub\wwwroot\wfgen), add the following under <location path="ws" inheritInChildApplications="false"> :
exports.onExecutePostLogin = async (event, api) => {
const username = event.user.username || event.user.email || event.user.nickname;
api.accessToken.setCustomClaim('https://api.workflowgen.com/username', username);
api.idToken.setCustomClaim('https://api.workflowgen.com/username', username);
return;
} <!-- Auth0 auth -->
<add key="ApplicationSecurityAuthProvider" value="auth0"/>
<add key="ApplicationSecurityAuthClientId" value="<CLIENT ID>" />
<add key="ApplicationSecurityAuthClientSecret" value="<CLIENT SECRET>" />
<add key="ApplicationSecurityAuthMetadataUrl" value="<METADATA URL>" />
<add key="ApplicationSecurityAuthUsernameClaim" value="https://api.workflowgen.com/username" />
<add key="ApplicationSecurityAuthAppIdClaim" value="azp" />
<add key="ApplicationSecurityAuthClockTolerance" value="60" />
<add key="ApplicationSecurityAuthSessionRefreshEnableIFrame" value="Y"/> <!-- Auth0 auth -->
<add key="ApplicationSecurityAuthProvider" value="auth0"/>
<add key="ApplicationSecurityAuthClientId" value="<CLIENT ID>" />
<add key="ApplicationSecurityAuthClientSecret" value="<CLIENT SECRET>" />
<add key="ApplicationSecurityAuthMetadataUrl" value="<METADATA URL>" />
<add key="ApplicationSecurityAuthUsernameClaim" value="https://api.workflowgen.com/username" />
<add key="ApplicationSecurityAuthAppIdClaim" value="azp" />
<add key="ApplicationSecurityAuthClockTolerance" value="60" />
<add key="ApplicationSecurityAuthSessionRefreshEnableIFrame" value="Y"/>
<add key="ApplicationSecurityAuthAudience" value="my-apis"/>
<add key="ApplicationSecurityAuthAdditionalScopes" value="wfgen-graphql-full-access"/>
<add key="ApplicationSecurityAuthGraphQLScope" value="wfgen-graphql-full-access"/><!-- Auth -->
<add key="ApplicationSecurityAuthLogoutUrl" value="https://<your auth0 domain>.auth0.com/v2/logout"/>
<add key="ApplicationSecurityAuthSessionTokenSigningSecret" value="<SECRET>" /><?xml version="1.0" encoding="UTF-8"?>
<configuration>
<system.webServer>
<modules>
<add name="ApplicationSecurityAuthenticationModule" type="Advantys.Security.Http.JWTAuthenticationModule" />
</modules>
</system.webServer>
</configuration> <?xml version="1.0" encoding="UTF-8"?>
<configuration>
<system.webServer>
<modules>
<remove name="ApplicationSecurityAuthenticationModule"/>
</modules>
</system.webServer>
</configuration> {
"sub": "[email protected]",
"iss": "https://<workflowgen_url>/auth",
"aud": "https://<workflowgen_url>",
"exp": 1535627127,
"https://api.workflowgen.com/username": "[email protected]",
"given_name": "Some",
"family_name": "User",
"nickname": "some-user",
"name": "Some User",
"picture": "https://lh4.googleusercontent.com/path/to/photo.jpg",
"gender": "male",
"locale": "en",
"updated_at": "1970-01-01T00:00:00Z",
"email": "[email protected]",
"email_verified": true,
"nonce": "ffdd6d95-31e6-4466-84c4-43f8c0fbaae7",
"iat": 1535591128
}workflowgenplus://auth.init?provider=auth0&server_address=https%3A%2F%2Fmycompany.com%2Fwfgen&client_id=7gdj4hs92y&domain=mydomain.auth0.com&audience=https%3A%2F%2Fmycompany.com%2Fwfgen%2Fgraphql<system.webServer>
<modules>
<remove name="ApplicationSecurityAuthenticationModule" />
</modules>
</system.webServer>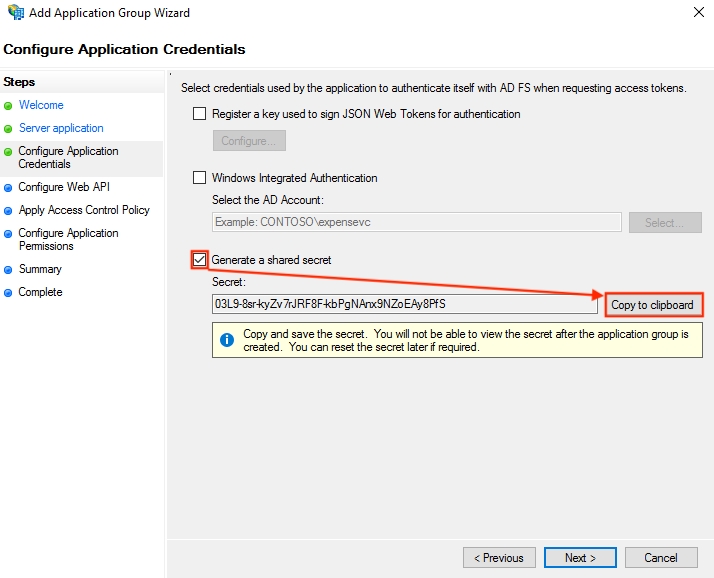
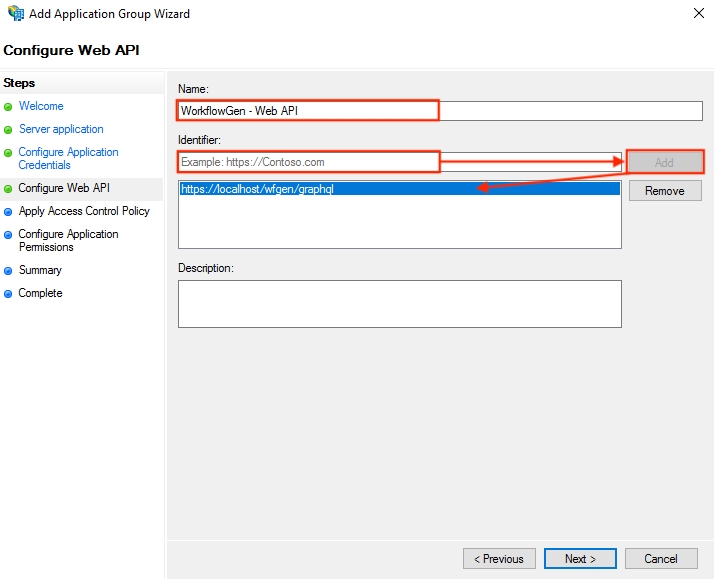
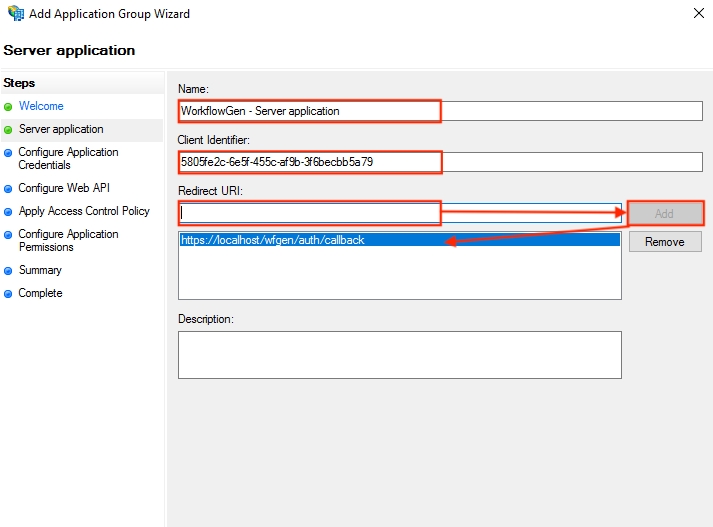
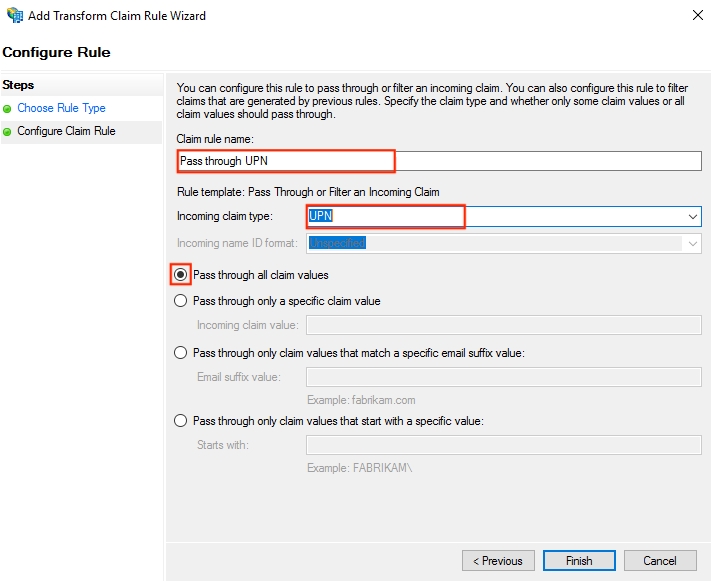

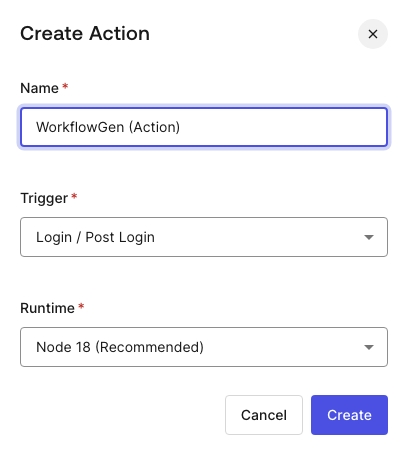
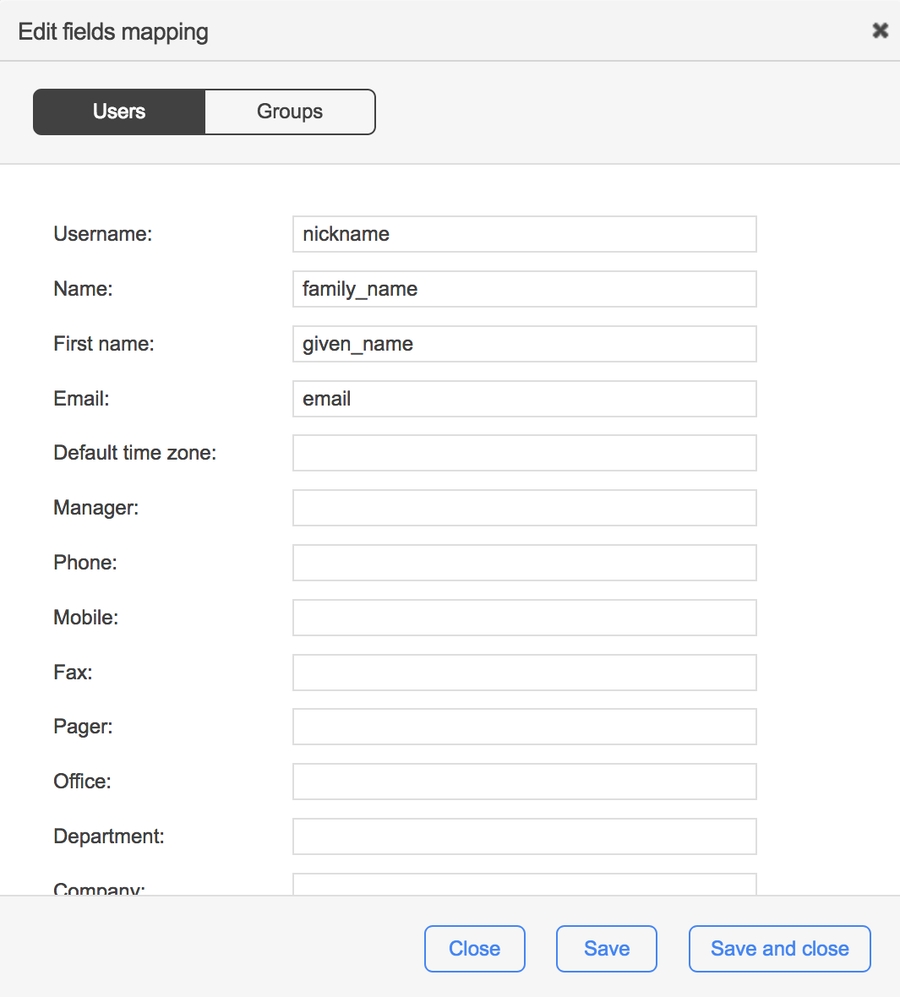
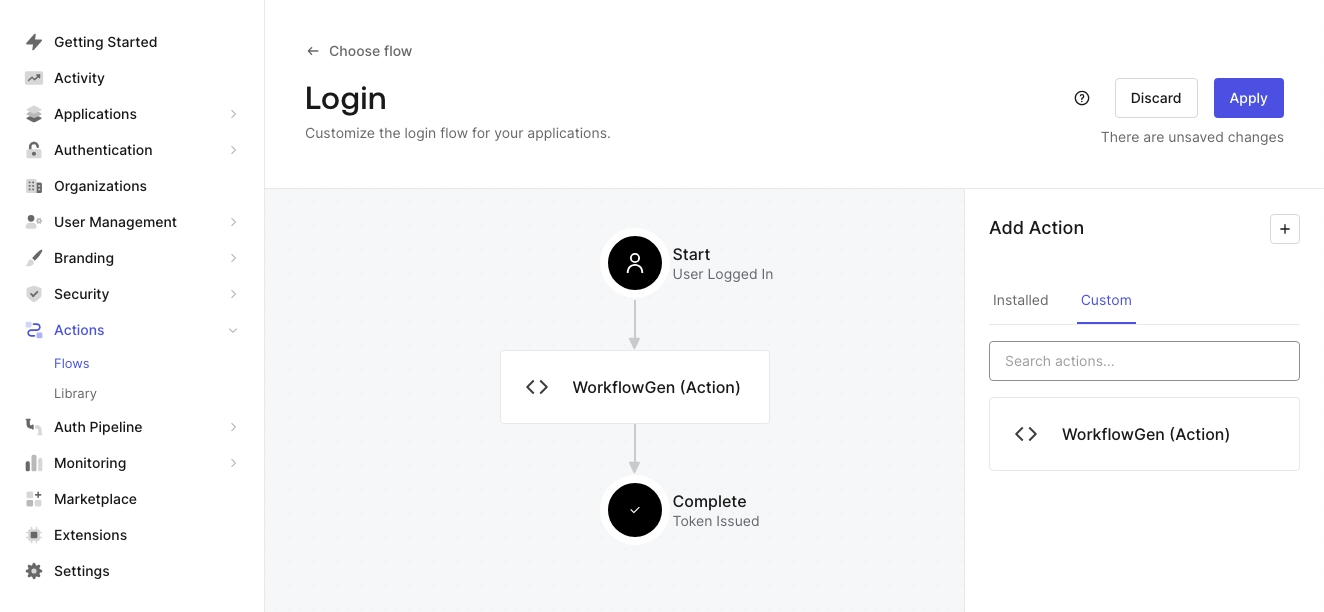
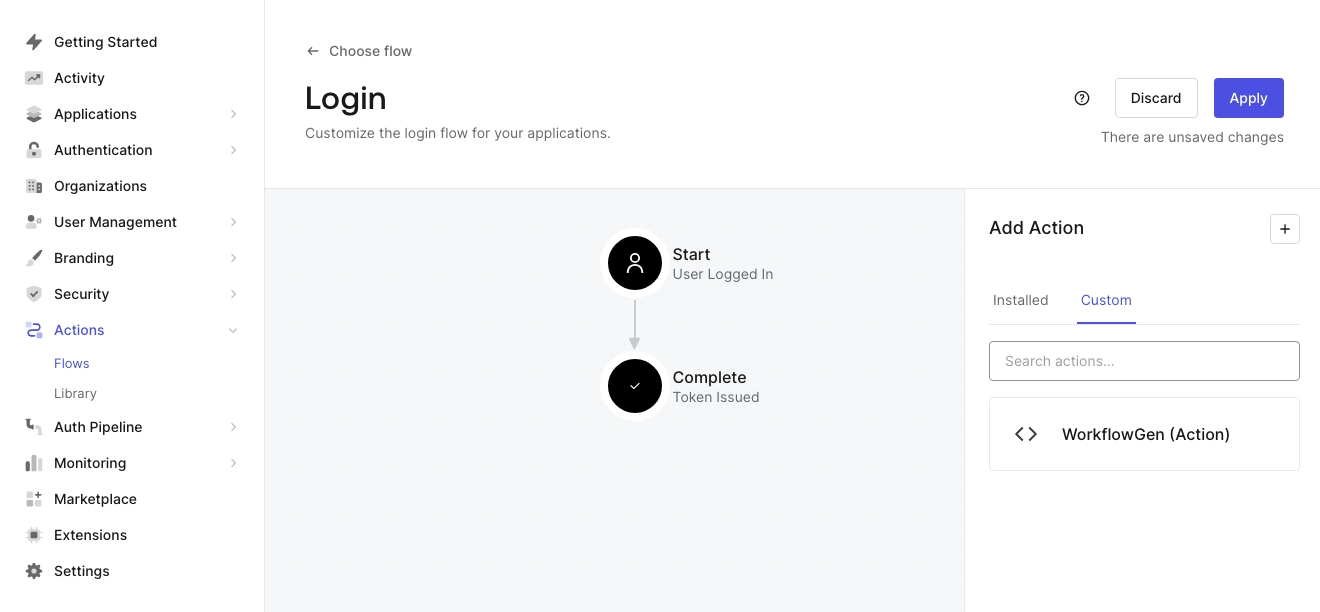
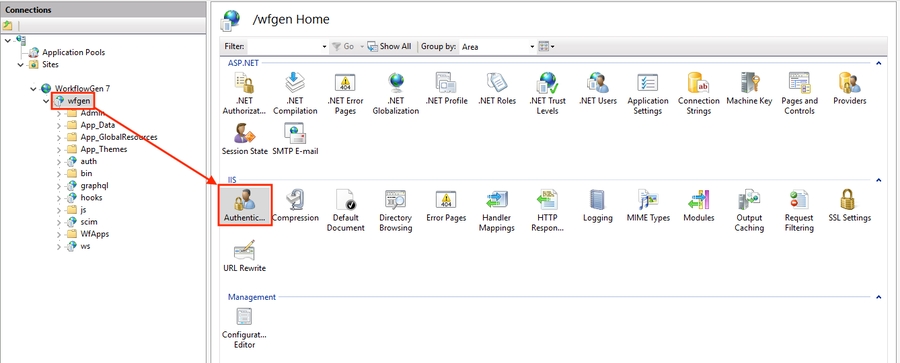
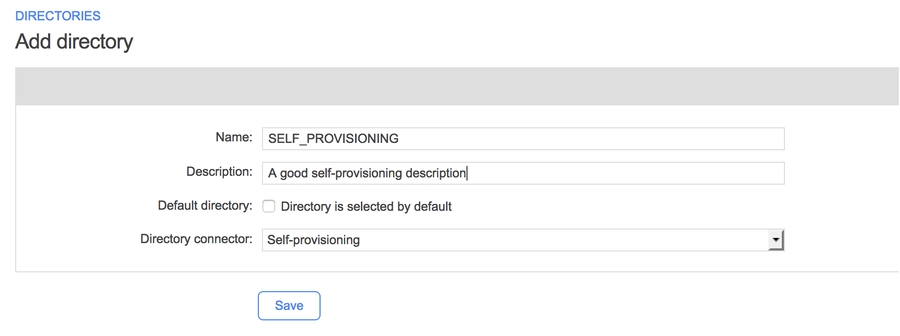
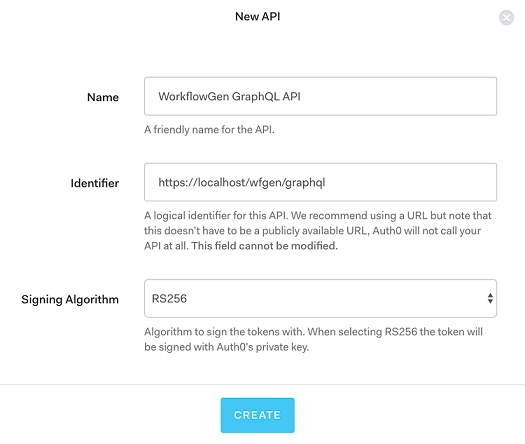
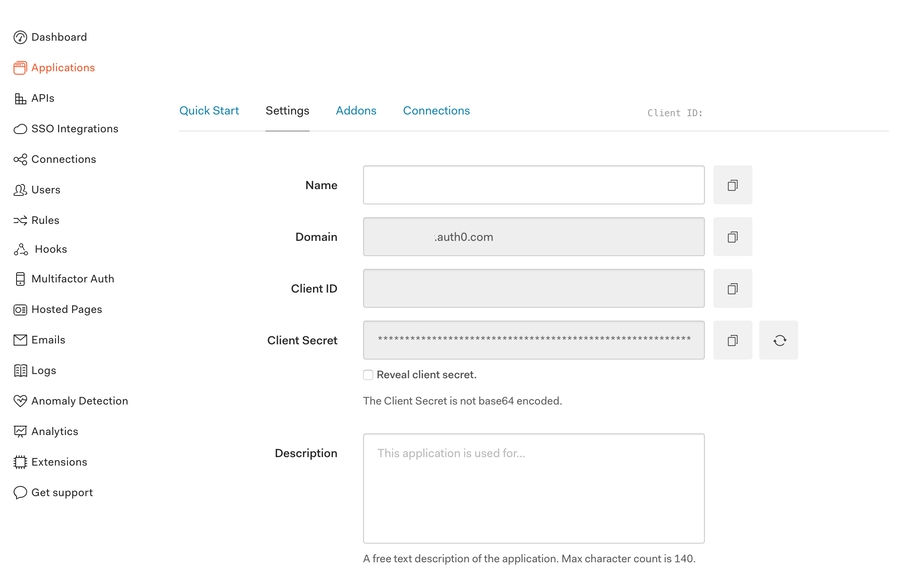
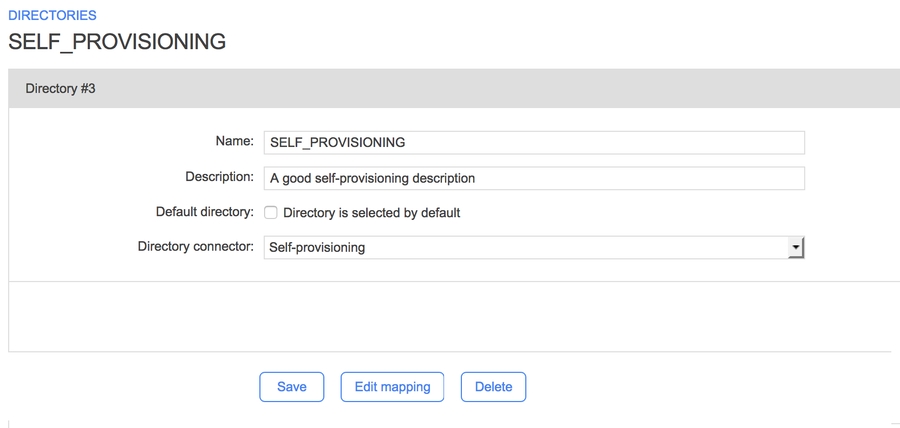
This section provides instructions on:
Okta authentication: How to configure WorkflowGen authentication using Okta.
: How to create a directory with the self-provisioning connector.
: How to authorize WorkflowGen access to mobile applications using Okta.
: How to authorize WorkflowGen access to server-side scripts using OpenID Connect and Okta.
: How to authorize WorkflowGen access to single-page applications using Okta.
: How to authorize Okta access to the WorkflowGen command line interface.
: How to generate a universal link to simplify the WorkflowGen Plus mobile app user login.
It also provides additional information on and .
In the instructions, substitute <workflowgen url> with the domain and path to your WorkflowGen instance; for example, localhost/wfgen or mycompany.com/wfgen.
This section provides instructions on how to configure WorkflowGen delegated authentication with Okta. At the end of this section, you'll have a working WorkflowGen instance using Okta to authenticate your users.
Make sure to have a licensed copy of WorkflowGen installed and running on a server. You must be a WorkflowGen administrator.
Make sure to have an Okta administrator access to be able to configure it properly.
Make sure to have provisioned an existing Okta user that you can authenticate with to WorkflowGen and that the user has administrator privileges. This is important because once you've activated the delegation, you'll still need to be able to manage the application. (The Okta user is in fact a user of an identity provider that's linked to Okta, such GitHub or Google. You have to provision at least one of the users.)
The WorkflowGen user's username must match their Okta user's username in order to identify and authenticate the correct user from Okta.
To test your configuration after the steps below, you can add an Okta user in the Okta portal's Users section.
The configuration of Okta will be done in several steps. First, you have to configure an authorization server in the web interface; then, you have to add a regular web application.
The WorkflowGen GraphQL API (authorization server) configuration is required if you want to use the WorkflowGen Plus v2 mobile app.
An Okta authorization server is a logic element that defines the security boundaries of your system when an application wants to access your resources via an API.
An authorization server defines your security boundary, and is used to mint access and identity tokens for use with OIDC clients and OAuth 2.0 service accounts when accessing your resources via API. Within each authorization server you can define your own OAuth scopes, claims, and access policies. Source: Information sidebar in Okta's administrative panel
You can find more information on authorization servers on the .
To create an authorization server with a classic usage:
Go to the Okta Developer portal and log in to your account.
In the left panel, choose API under the Security menu.
Click the Add Authorization Server button on the Authorization Servers tab.
To create an authorization server with multi-audience support:
Go to the Okta Developer portal and log in to your account.
In the left panel, choose API under the Security menu.
Click the Add Authorization Server button on the Authorization Servers tab.
For classic usage:
Go to the WorkflowGen GraphQL API authorization server's Scopes tab.
Click the Add Scope button.
Enter the following information:
For multi-audience support:
Go to the WorkflowGen GraphQL API authorization server's Scopes tab.
Click the Add Scope button.
Enter the following information:
You've now properly configured your Okta authorization server for the WorkflowGen GraphQL API.
Go to the Claims section, then click the Add Claim button.
Enter the following information:
Name: com.workflowgen.api.username
You now need to configure the authorization server access policy.
Go to the WorkflowGen GraphQL API authorization server's Access Policies tab.
Click the Add Policy button.
Enter the following information:
You've now successfully configured the authorization server access policy. There's just one more step needed in order for the client credentials flow to work, which will enable you to use machine-to-machine authentication with Okta and the WorkflowGen GraphQL API.
Go to the Okta Developer portal.
In the Applications item under the Applications menu, click the Create App Integration button.
Select the following options in Create a new app integration, then click Next:
You've now successfully configured Okta for your WorkflowGen instance.
You should now have all the information you need to configure WorkflowGen to delegate the authentication to Okta. Here's a review:
A client ID and a client secret which can be found on the Okta WorkflowGen web application's General tab.
An audience and a metadata endpoint (Metadata URI) which can be found on the Okta WorkflowGen GraphQL API authorization server page.
Now, you need to configure WorkflowGen to delegate its authentication to Okta.
web.configOpen the WorkflowGen web.config file and add/update the following properties:
Classic usage:
With multi-audience support:
Replace <CLIENT ID> with the client ID of the WorkflowGen web application from Okta.
Replace <CLIENT_SECRET> with the client secret of the WorkflowGen web application from Okta.
Replace <METADATA_URL> with the Metadata URI
You've probably noticed that the setting with the ApplicationSecurityAuthUsernameClaim key is set to the value entered in a rule earlier. Therefore, you could use any value here provided that you also modify the rule.
WorkflowGen is now linked to Okta and back. The last thing left to do is configure a few more options in order to finish the internal wiring of WorkflowGen so that it can delegate its authentication.
In order to generate a session token, you need to add a few more settings to the web.config file.
Open the WorkflowGen web.config file and add/update the following property:
Replace <SECRET> with a value that can't be easily guessed, such as a UUID.
The secret will be only accessible inside your instance of WorkflowGen, so when generating a session token, WorkflowGen will sign it with this secret in order to check the validity of all session tokens passed to it.
You now need to activate the delegation by replacing the authentication system in IIS and pointing WorkflowGen's modules to the correct authentication module.
Configure IIS
In IIS Manager, click on the WorkflowGen application in the tree view.
Click the Authentication button.
Enable Anonymous Authentication, and disable all other authentications.
Perform these steps for all sub-applications as well.
Add properties to the web.config files of certain modules
Certain modules need to have their authentication checked by the special Advantys.Security.JWTAuthenticationModule WorkflowGen authentication module, but certain other modules should not because they are either public or aren't part of the global authentication system.
Open the WorkflowGen web.config file and add/update the following property:
In the auth module's web.config, add/update the following property:
This line removes the authentication Node.js module from the global authentication system, because this Node.js application encapsulates the OpenID Connect authentication mechanisms.
You should now have a working WorkflowGen instance with the authentication delegated to Okta through the OpenID Connect protocol. Make sure to have provisioned your users to WorkflowGen in order for them to successfully access WorkflowGen.
If for some reason you can't add an authorization server in your Okta account and you don't need GraphQL API authentication configured with the provider, you can avoid creating the server and configure WorkflowGen with the default Okta authorization server.
Go to the Okta Developer portal.
In the Applications item under the Applications menu, click the Create App Integration button.
Select the following options in Create a new app integration, then click Next:
You've now successfully configured Okta for your WorkflowGen instance.
Add or update the following configuration options in the WorkflowGen web.config file.
Change MetadataUrl to https://<YOUR OKTA DOMAIN>/.well-known/openid-configuration.
Change UsernameClaim to preferred_username.
Change AuthAudience
Keep in mind that by setting ApplicationSecurityAuthDecodeAccessToken=N, the expiration date of the session token generated by WorkflowGen will be based on that of the ID token.
You won't be able to use the access token received from Okta to query the GraphQL API. This access token will give you access to the Okta API and nothing else. To query the GraphQL API, you'll need to configure its authentication with another method, like Basic authentication.
Classic usage:
In order to generate a session token, you need to add a few more settings to the web.config file.
Open the WorkflowGen web.config file and add/update the following property:
Replace <SECRET> with a value that can't be easily guessed, such as a UUID.
The secret will be only accessible inside your instance of WorkflowGen, so when generating a session token, WorkflowGen will sign it with this secret in order to check the validity of all session tokens passed to it.
You now need to activate the delegation by replacing the authentication system in IIS and pointing WorkflowGen's modules to the correct authentication module.
Configure IIS
In IIS Manager, click on the WorkflowGen application in the tree view.
Click the Authentication button.
Enable Anonymous Authentication, and disable all other authentications.
Perform these steps for all sub-applications as well.
Add properties to the web.config files of certain modules
Certain modules need to have their authentication checked by the special Advantys.Security.JWTAuthenticationModule WorkflowGen authentication module, but certain other modules should not because they are either public or aren't part of the global authentication system.
Open the WorkflowGen web.config file and add/update the following property:
In the auth module's web.config, add/update the following property:
This line removes the authentication Node.js module from the global authentication system, because this Node.js application encapsulates the OpenID Connect authentication mechanisms.
You should now have a working WorkflowGen instance with the authentication delegated to Okta through the OpenID Connect protocol. Make sure to have provisioned your users to WorkflowGen in order for them to successfully access WorkflowGen.
The self-provisioning connector is a directory connector that automatically creates and synchronizes a user based on the user's session token claims that contain claims from the OpenID Connect provider ID token. This feature is only compatible with an OpenID Connect authentication.
Make sure to have a working WorkflowGen instance.
Make sure to know the instance's IP address or its fully qualified name.
Make sure to know the address of the instance.
Make sure to have configured Okta or one of the other OIDC-compliant authentication methods (, formerly
This section will guide you through the WorkflowGen configurations necessary to set up the self-provisioning feature with a directory.
This directory will contain all of the users that are not provisioned elsewhere. To create a self-provisioning directory, do the following:
On the Directories page in the WorkflowGen Administration Module, click New directory.
Fill in the form:
Name: SELF_PROVISONING(or something else)
Now that you've created a new directory with the self-provisioning connector, you need to define which claims are mapped to which WorkflowGen user field. To do this:
On the new directory's page, click Edit mapping.
To the right of the name of the WorkflowGen user field, enter the name of the claim in the session token that you want to map.
Here's an example of a session token generated by the auth node application from the Okta ID token connected with Google Apps:
These claims could be mapped in WorkflowGen like this:
Mobile applications must use an approach similar to that of regular web applications, which is called Authorization Code Flow with Proof Key for Code Exchange (PKCE). The main difference between this and the classic Authorization Code Flow is that the mobile application doesn't get a client secret, but instead exchanges a pair of codes to prove the origin of the authentication attempt. The issue is that a mobile application can't be trusted with a client secret because it's distributed directly to users and is therefore no longer under the developer's control, and the sources can be decompiled and analyzed to find secrets like this.
This section provides instructions on how to configure Okta for mobile apps so that your mobile users can benefit from delegated authentication as well.
Make sure to have a licensed copy of WorkflowGen installed and running on a server.
Make sure to have administrative access to Okta to be able to configure it properly.
Make sure to have provisioned an existing Okta user with which you can authenticate to WorkflowGen so that you can use the application afterwards.
Make sure to have the WorkflowGen Plus mobile application installed on a device that you have access to.
In your Okta developer portal, go to the Applications item under the Applications menu, then click the Create App Integration button.
Select the following options under Create a new app integration, then click Next:
Sign-in method: OIDC - OpenID Connect
On your Okta WorkflowGen Plus native application page, go to the General Settings section on the General tab, then click the Edit button.
Enter the following information:
Initiate login URI: workflowgenplus://oidc
If you've set up delegated authentication to Okta on your WorkflowGen server, you should have an access policy on your Okta WorkflowGen GraphQL API authorization server that will let any configured client access it. Therefore, there's nothing left to do on the Okta side. Here's a review of the information you need:
A client ID, which can be found on the Okta WorkflowGen Plus native application page's Settings tab.
Your Okta domain name, which can be found directly to the left of your profile picture on the top right corner of the page.
All of this information must be given to the users who will be using the mobile application; they'll need to copy them directly into the app.
In some cases, you'll want to perform a specific task that can be automated but needs access to the WorkflowGen GraphQL API; this use case is often in the form of a server-side script. For this, OAuth2 provides a type of grant called Client Credentials that simply exchanges a client ID and secret for an access token. There's no ID token since it's not part of the OpenID Connect standard and there's no user involved.
This section provides instructions on how to configure Okta with a server-side script that has access to the GraphQL API. First, you'll need to configure a new web application in the Okta portal; then, you'll need to configure a new application in WorkflowGen.
Make sure to have a licensed copy of WorkflowGen installed and running on a server.
Make sure to have administrative access to WorkflowGen.
Make sure to have administrative access to Okta to be able to configure it properly.
Make sure to have successfully configured delegated authentication to Okta on your WorkflowGen instance following the instructions in the
In the Applications item under the Applications menu in your Okta developer portal, click the Create App Integration button.
Select the API Services sign-in method, then click Next.
Enter the name of your application, then click Save.
Here's a review of the information you need:
A client ID and a client secret, which can be found on the newly registered service application's general tab.
The WorkflowGen GraphQL API identifier, which can be found on its settings page.
As with user provisioning, WorkflowGen needs to know which application is accessing the GraphQL API. Therefore, you have to register the application, which consists of your script.
On the Applications page in the WorkflowGen Administration Module, click New application.
Fill in the form:
Name: My API Services App
Your application should now appear in the list of applications.
You should now have the necessary components in place to make GraphQL API requests with your script by passing the access token received from Okta from a Client Credentials Grant flow.
JavaScript applications running in a browser are often hard to secure due to the open nature of the Web. Secure storage is nonexistent, and everything is in clear text (for HTTP version 1.1). Here's a quote from the Azure Active Directory team that summarizes the state of authentication with single-page applications:
The OAuth2 implicit grant is notorious for being the grant with the longest list of security concerns in the OAuth2 specification. And yet, that is the approach implemented by ADAL JS and the one we recommend when writing SPA applications. What gives? It’s all a matter of tradeoffs: and as it turns out, the implicit grant is the best approach you can pursue for applications that consume a Web API via JavaScript from a browser.
(Source: )
It's therefore important that you make all of the necessary checks to verify the validity of your requests and the responses.
This section provides instructions on how to configure Okta with a single-page application (SPA) so that users can authenticate through it and make requests to the WorkflowGen GraphQL API. This configuration is done in two steps: registering your SPA, then setting some redirect URLs.
Make sure to have a licensed copy of WorkflowGen installed and running on a server.
Make sure to have administrative access to Okta to be able to configure it properly.
Make sure to have provisioned an existing Okta user with which you can authenticate to WorkflowGen so that you can use the application afterwards.
Make sure to have successfully configured delegated authentication to Okta on your WorkflowGen instance following the instructions in the
In your Okta developer portal, go to the Applications item under the Applications menu, then click the Create App Integration button.
Select the OIDC - OpenID Connect sign-in method, select Single-Page Application as the application type, then click Next.
Enter the following information:
You need a client ID, which can be found on the General tab on your single-page application page.
Your application should now successfully linked to the Okta infrastructure and users can log in through it. If you have met the prerequisites, your application will receive an access token that it can send to the WorkflowGen GraphQL API to make authorized requests as a Bearer token via the Authorization header.
In your Okta developer portal, go to the Applications item under the Applications menu, then click Create App Integration.
Select the OIDC - OpenID Connect sign-in method, select Native Application as the application type, then click Next.
Enter the following information:
If you've configured delegated authentication to Okta on your WorkflowGen server, you should have an access policy on your Okta authorization server from the WorkflowGen GraphQL API that will allow all configured users to access it; there's nothing left to do on the Okta side. Here's a summary of the information you'll need:
A client ID, which can be found on the General tab on the WorkflowGen CLI native application's page.
A metadata endpoint, which consists of the value of Metadata URI property from the Settings tab of your WorkflowGen GraphQL API authorization server with /.well-known/oauth-authorization-server replaced by /.well-known/openid-configuration.
All of this information must be given to users who will be using the WorkflowGen CLI.
The configuration of non-interactive mode is the same as in the section.
Here's a review of the information of the information you'll need:
A client ID, which can be found on the registered application's parameters tab.
A client secret, which can be found on the registered application's parameters tab.
The domain, which can be found on the registered application's parameters tab.
You can now use the WorkflowGen CLI in Client credentials mode.
As of WorkflowGen server version 7.14.0, you can generate a universal link to simplify the Okta login process for your WorkflowGen Plus mobile app users.
protocol: workflowgenplus://
hostname: auth.init
You'll need to specify the following parameters:
provider: okta
server_address: Your WorkflowGen application URL, whose value must be URL encoded (e.g. https://mycompany.com/wfgen)
client_id: Use the client ID you created earlier in the configuration (e.g.
The universal link should follow this format:
Once you've generated the universal link, give it to your users, who can use it to sign in to WorkflowGen Plus with the preset sign-in method.
WorkflowGen only supports requests to the SOAP API using classic authentication methods. If you still need to use this API, you have to perform some additional steps to configure it properly.
Create a new separate WorkflowGen directory for the SOAP API users.
Provision it with users and groups as needed.
In the IIS Manager, enable the Basic authentication method for the \wfgen\ws application.
Web service type applications only support requests using classic authentication methods. If you still need to use these APIs, you have to perform some additional steps to configure it properly.
Make sure you have a local or domain account provisioned on your WorkflowGen server. (This can be the account you used prior to changing your authentication method to Okta.)
In the IIS Manager, enable either the Basic or Windows authentication method for your application (e.g. wfapps/webservices/myWebService).
In the web.config file (located in \Inetpub\wwwroot\wfgen), add the following new location under the last location:
AES encryption mode and its key are required for the authentication to work.
When importing users into WorkflowGen from the Okta database, make sure to set the username as the email (e.g. [email protected]).
Enter the following information:
Name: WorkflowGen GraphQL API
Audience: <workflowgen url>/graphql
Description: WorkflowGen GraphQL API (or whatever description you want)
Click the Save button.
Enter the following information:
Name: My APIs
Audience: my-apis
Description: Authorization server for all my APIs (or whatever description you want)
Click the Save button.
defaultDisplay phrase: default
Description: Use the default scope if no other scope is specified
Default scope: Check Set as a default scope
Click the Create button.
wfgen-graphql-full-accessDisplay phrase: wfgen-graphql-full-access
Description: Full access to the WorkflowGen GraphQL API
Click the Create button.
Include in token type: Select Access Token
Value Type: Select Expression
Value: Enter the following Okta code:
Include in: Select Any scope
✏️ Note: This step will ensure that WorkflowGen and the GraphQL API will always get a username through the same claim instead of having to make a lot of conditional statements.
Click the Create button.
Add a second claim with the same information, but this time, set the Include in token type property to ID Token.
Click the Create button.
Name: All Clients Policy
Description: Enables all clients to have access to this application server›.
Assign to: All clients
Click the Create Policy button.
Click the Add Rule button.
Enter the following information:
Rule Name: All Grant Types; Any Scopes; Any User assigned
Leave the other settings set to their defaults.
Click the Create Rule button.
Sign-in method: OIDC - OpenID Connect
Application type: Web Application
Enter the following information:
App integration name: WorkflowGen
Grant type: Check Authorization Code
Sign-in redirect URIs: <workflowgen url>/auth/callback
Sign-out redirect URIs: <workflowgen url>/auth/logout/return
Base URIs: <workflowgen url> without any path (just the base URL); for example, https://localhost, if <workflowgen url> is https://localhost/wfgen
Controlled access: Check Allow everyone in your organization to access
Leave the remaining properties set to their defaults.
Click the Save button.
On the General tab of your WorkflowGen web application page, click the Edit button in the General Settings section.
Enter the following information:
Initiate login URI: <workflowgen url>/auth/callback
Click Save.
/.well-known/oauth-authorization-server/.well-known/openid-configurationhttps://{YOUR_OKTA_DOMAIN}/oauth2/{AUTH_SERVER_ID}/.well-known/openid-configurationhooks and scim modules as well.
Copy the following .NET assemblies and dependency libraries from \wfgen\bin to each custom webform's \bin folder (\wfgen\wfapps\webforms\<custom webform>\bin):
Advantys.My.dll
Advantys.Security.dll
Newtonsoft.Json.dll
jose-jwt.dll
Sign-in method: OIDC - OpenID Connect
Application type: Web Application
Enter the following information:
App integration name: WorkflowGen
Grant type: Check Authorization Code
Sign-in redirect URIs: <workflowgen url>/auth/callback
Sign-out redirect URIs: <workflowgen url>/auth/logout/return
Base URIs: <workflowgen url> without any path (just the base URL); for example, https://localhost, if <workflowgen url> is https://localhost/wfgen
Controlled access: Check Allow everyone in your organization to access
Leave the remaining properties set to their defaults.
Click the Save button.
On the General tab of your WorkflowGen web application page, click the Edit button in the General Settings section.
Enter the following information:
Initiate login URI: <workflowgen url>/auth/callback
Click Save.
Set the ApplicationSecurityAuthDecodeAccessToken option to N.
hooks and scim modules as well.
Copy the following .NET assemblies and dependency libraries from \wfgen\bin to each custom webform's \bin folder (\wfgen\wfapps\webforms\<custom webform>\bin):
Advantys.My.dll
Advantys.Security.dll
Newtonsoft.Json.dll
jose-jwt.dll
Description: A good description of the directory
Directory connector: Self-provisioning
Click Save.
✏️ Note: The Username and Name fields are required.
Click Save.
Make sure to have the latest WorkflowGen Plus version installed on your device and that your device is supported.
Make sure to have successfully configured delegated authentication to Okta on your WorkflowGen instance following the instructions in the Okta authentication section.
Application type: Native Application
Enter the following information:
App integration name: WorkflowGen Plus
Grant type: Check Authorization Code and Refresh Token
Sign-in redirect URIs: workflowgenplus://oidc
Sign-out redirect URIs: workflowgenplus://oidc
Controlled access: Check Allow everyone in your organization to access
Click the Save button.
Click Save.
Description: A description that clearly identifies the script
Type: Non-interactive Client
Impersonate username: Any username that has the required access to the GraphQL API
Client ID: The client ID you retrieved earlier from your registered service app (e.g. My API Services App)
Active: Check this checkbox
Click Save.
App integration name: My SPA, or the name of your single-page application
Grant type: Check Authorization Code
Sign-in redirect URIs: The login redirect URI for your single-page application
Sign-out redirect URIs: The logout redirect URI for your single-page application
Base URIs: The base URI of your single-page application
Controlled access: Check Allow everyone in your organization to access
Click Save.
Name: WorkflowGen CLI
Grant type: Check Authorization Code and Refresh token
Sign-in redirect URIs: Define the URL as http://127.0.0.1:8888/callback
✏️ Note: Port 8888 is defined by default; you can change it if it's already in use on your computer.
Sign-out redirect URIs: Don't define a URL. Clear the field if there's a default value.
Controlled access: Check Allow everyone in your organization to access
Click the Save button.
0o7gdj4hs92yh7metadata_url: The metadata URL, which consists of the value of Metadata URI property from the Settings tab of your WorkflowGen GraphQL API authorization server with /.well-known/oauth-authorization-server replaced by /.well-known/openid-configuration (e.g. https://{YOUR_OKTA_DOMAIN}/oauth2/{AUTH_SERVER_ID}/.well-known/openid-configuration). The value must be URL encoded.
audience: Your WorkflowGen GraphQL API URL, whose value must be URL encoded (e.g. https://mycompany.com/wfgen/graphql)
web.config file (located in \Inetpub\wwwroot\wfgen), add the following under <location path="ws" inheritInChildApplications="false"> :
<location path="wfapps/webservices/myWebService" inheritInChildApplications="false">appuser.username != null ? appuser.username : appuser.email != null ? appuser.email : appuser.nickname != null ? appuser.nickname : null<?xml version="1.0" encoding="UTF-8"?>
<configuration>
<appSettings>
<!-- Okta auth -->
<add key="ApplicationSecurityAuthProvider" value="okta"/>
<add key="ApplicationSecurityAuthClientId" value="<CLIENT ID>" />
<add key="ApplicationSecurityAuthClientSecret" value="<CLIENT SECRET>" />
<add key="ApplicationSecurityAuthMetadataUrl" value="<METADATA URL>" />
<add key="ApplicationSecurityAuthUsernameClaim" value="com.workflowgen.api.username" />
<add key="ApplicationSecurityAuthAppIdClaim" value="sub" />
<add key="ApplicationSecurityAuthClockTolerance" value="60" />
<add key="ApplicationSecurityAuthSessionRefreshEnableIFrame" value="Y"/>
</appSettings>
</configuration><?xml version="1.0" encoding="UTF-8"?>
<configuration>
<appSettings>
<!-- Okta auth -->
<add key="ApplicationSecurityAuthProvider" value="okta"/>
<add key="ApplicationSecurityAuthClientId" value="<CLIENT ID>" />
<add key="ApplicationSecurityAuthClientSecret" value="<CLIENT SECRET>" />
<add key="ApplicationSecurityAuthMetadataUrl" value="<METADATA URL>" />
<add key="ApplicationSecurityAuthUsernameClaim" value="com.workflowgen.api.username" />
<add key="ApplicationSecurityAuthAppIdClaim" value="sub" />
<add key="ApplicationSecurityAuthClockTolerance" value="60" />
<add key="ApplicationSecurityAuthSessionRefreshEnableIFrame" value="Y"/>
<add key="ApplicationSecurityAuthAudience" value="my-apis"/>
<add key="ApplicationSecurityAuthAdditionalScopes" value="wfgen-graphql-full-access"/>
<add key="ApplicationSecurityAuthGraphQLScope" value="wfgen-graphql-full-access"/>
</appSettings>
</configuration><?xml version="1.0" encoding="UTF-8"?>
<configuration>
<appSettings>
<!-- Auth -->
<add key="ApplicationSecurityAuthSessionTokenSigningSecret" value="<SECRET>" />
</appSettings>
</configuration><?xml version="1.0" encoding="UTF-8"?>
<configuration>
<system.webServer>
<modules>
<add name="ApplicationSecurityAuthenticationModule" type="Advantys.Security.Http.JWTAuthenticationModule" />
</modules>
</system.webServer>
</configuration><?xml version="1.0" encoding="UTF-8"?>
<configuration>
<system.webServer>
<modules>
<remove name="ApplicationSecurityAuthenticationModule"/>
</modules>
</system.webServer>
</configuration><?xml version="1.0" encoding="UTF-8"?>
<configuration>
<appSettings>
<!-- Okta auth -->
<add key="ApplicationSecurityAuthProvider" value="okta"/>
<add key="ApplicationSecurityAuthClientId" value="<CLIENT ID>" />
<add key="ApplicationSecurityAuthClientSecret" value="<CLIENT SECRET>" />
<add key="ApplicationSecurityAuthMetadataUrl" value="https://<YOUR OKTA DOMAIN>/.well-known/openid-configuration" />
<add key="ApplicationSecurityAuthUsernameClaim" value="preferred_username" />
<add key="ApplicationSecurityAuthAppIdClaim" value="sub" />
<add key="ApplicationSecurityAuthClockTolerance" value="60" />
<add key="ApplicationSecurityAuthSessionRefreshEnableIFrame" value="Y"/>
<add key="ApplicationSecurityAuthAudience" value="<CLIENT ID>"/>
<add key="ApplicationSecurityAuthDecodeAccessToken" value="N"/>
</appSettings>
</configuration><?xml version="1.0" encoding="UTF-8"?>
<configuration>
<appSettings>
<!-- Auth -->
<add key="ApplicationSecurityAuthSessionTokenSigningSecret" value="<SECRET>" />
</appSettings>
</configuration><?xml version="1.0" encoding="UTF-8"?>
<configuration>
<system.webServer>
<modules>
<add name="ApplicationSecurityAuthenticationModule" type="Advantys.Security.Http.JWTAuthenticationModule" />
</modules>
</system.webServer>
</configuration><?xml version="1.0" encoding="UTF-8"?>
<configuration>
<system.webServer>
<modules>
<remove name="ApplicationSecurityAuthenticationModule"/>
</modules>
</system.webServer>
</configuration> {
"sub": "[email protected]",
"iss": "https://<workflowgen_url>/auth",
"aud": "https://<workflowgen_url>",
"exp": 1535627127,
"https://api.workflowgen.com/username": "[email protected]",
"given_name": "Some",
"family_name": "User",
"nickname": "some-user",
"name": "Some User",
"picture": "https://lh4.googleusercontent.com/path/to/photo.jpg",
"gender": "male",
"locale": "en",
"updated_at": "1970-01-01T00:00:00Z",
"email": "[email protected]",
"email_verified": true,
"nonce": "ffdd6d95-31e6-4466-84c4-43f8c0fbaae7",
"iat": 1535591128
}workflowgenplus://auth.init?provider=okta&server_address=https%3A%2F%2Fmycompany.com%2Fwfgen&client_id=0o7gdj4hs92yh7&metadata_url=https%3A%2F%2F{YOUR_OKTA_DOMAIN}%2Foauth2%2F{AUTH_SERVER_ID}%2F.well-known%2Fopenid-configuration&audience=https%3A%2F%2Fmycompany.com%2Fwfgen%2Fgraphql<system.webServer>
<modules>
<remove name="ApplicationSecurityAuthenticationModule" />
</modules>
</system.webServer><location path="wfapps/webservices/myWebService" inheritInChildApplications="false">
<system.webServer>
<modules>
<remove name="ApplicationSecurityAuthenticationModule" />
</modules>
</system.webServer>
</location>
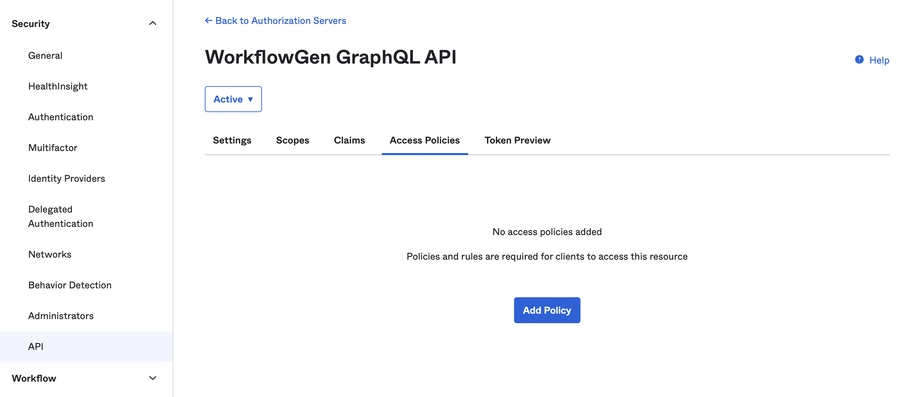
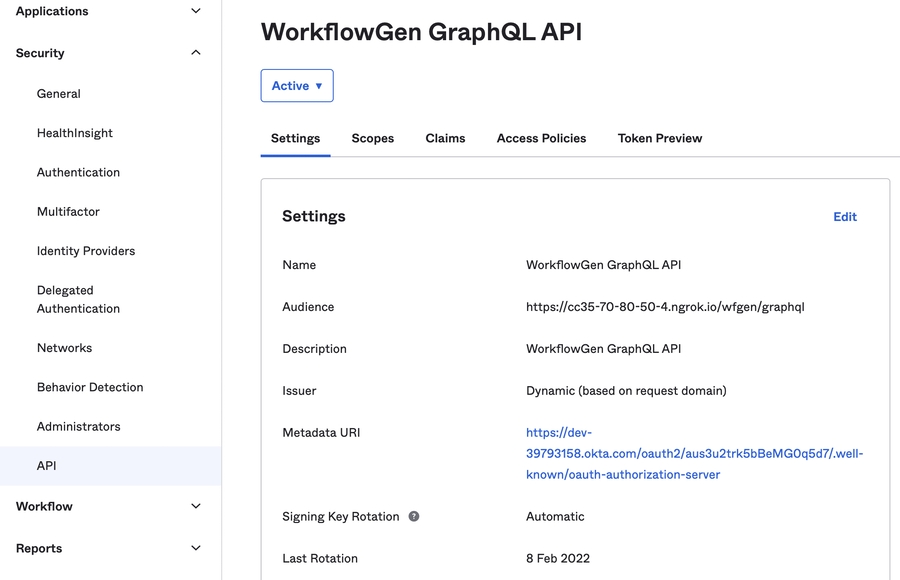
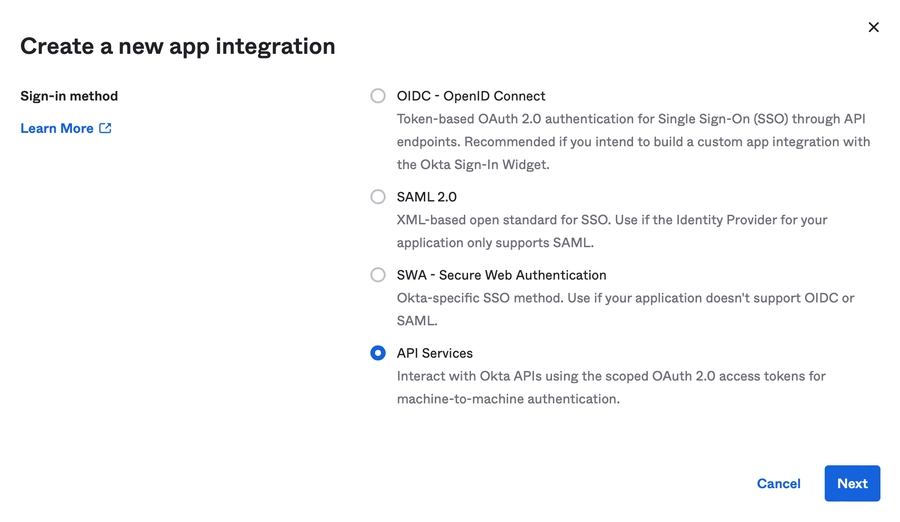

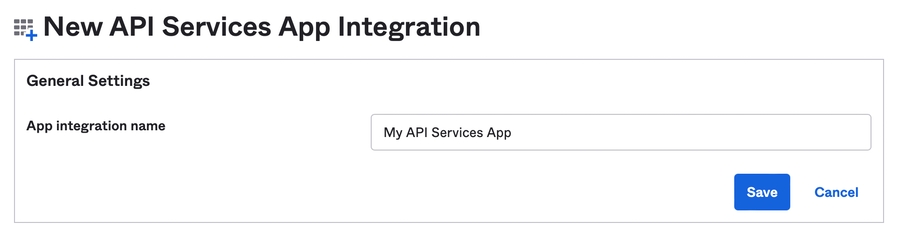
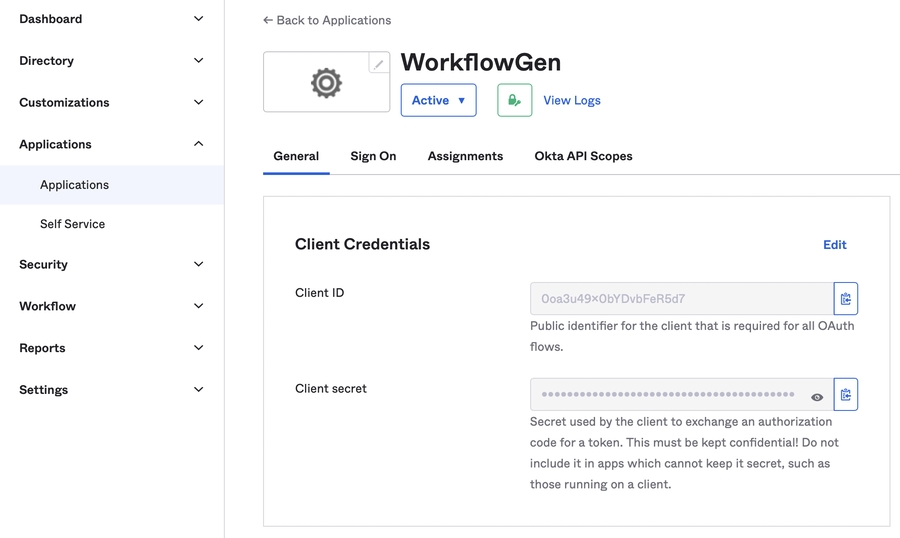
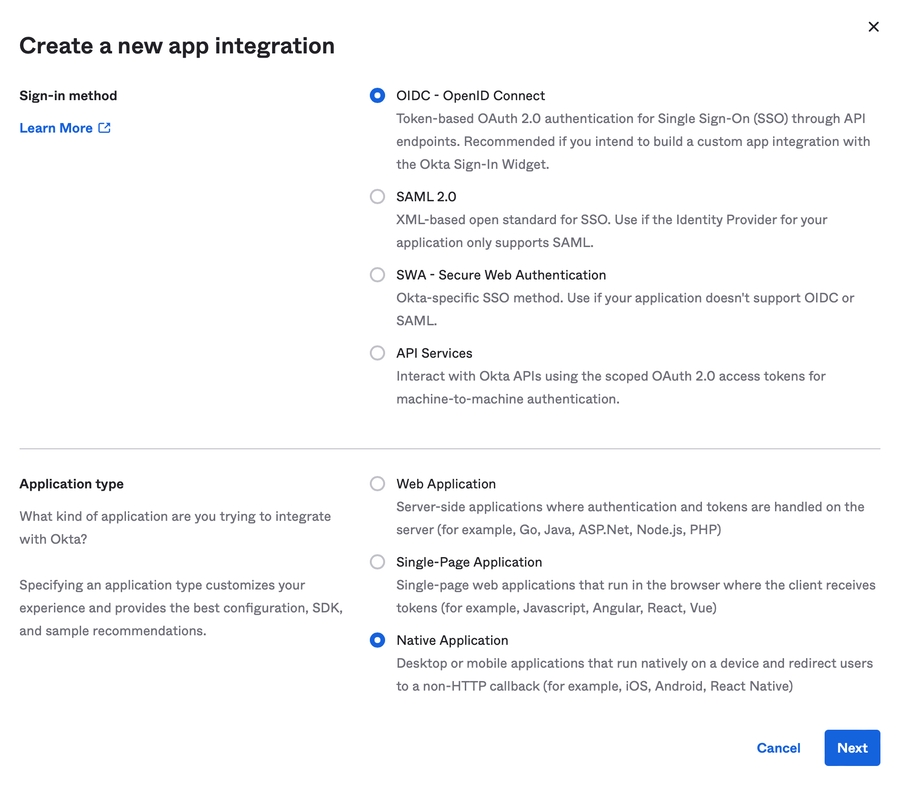
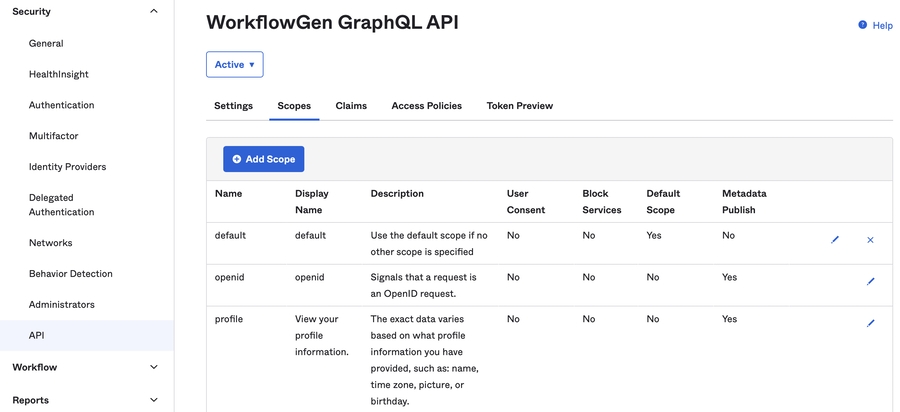


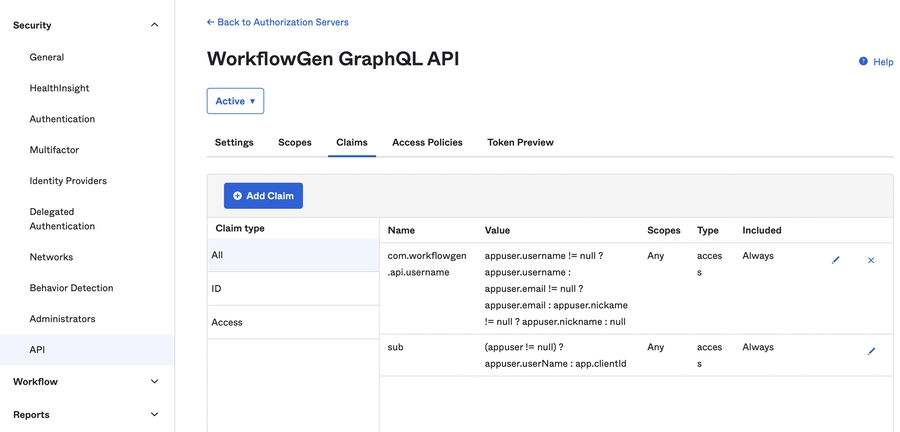
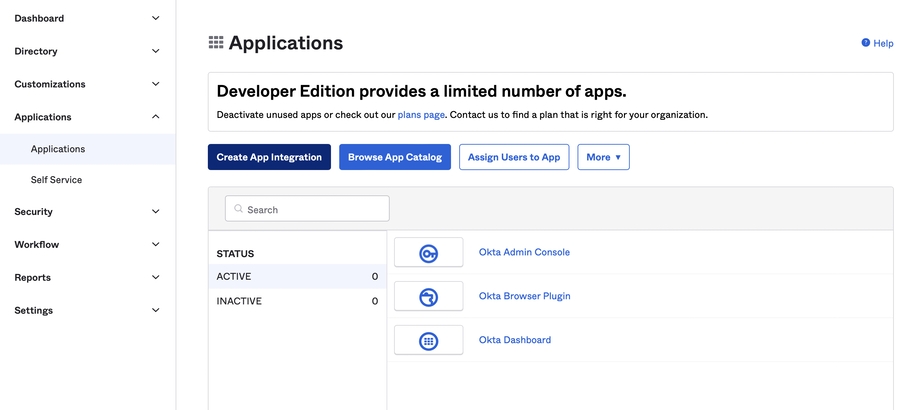
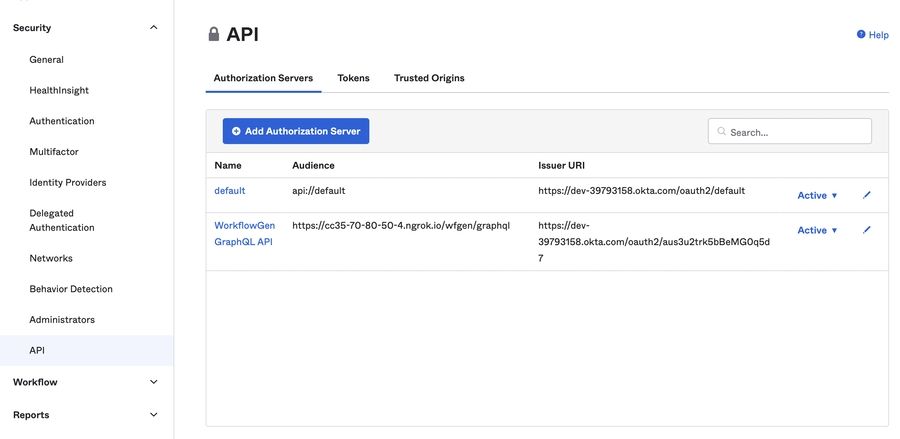
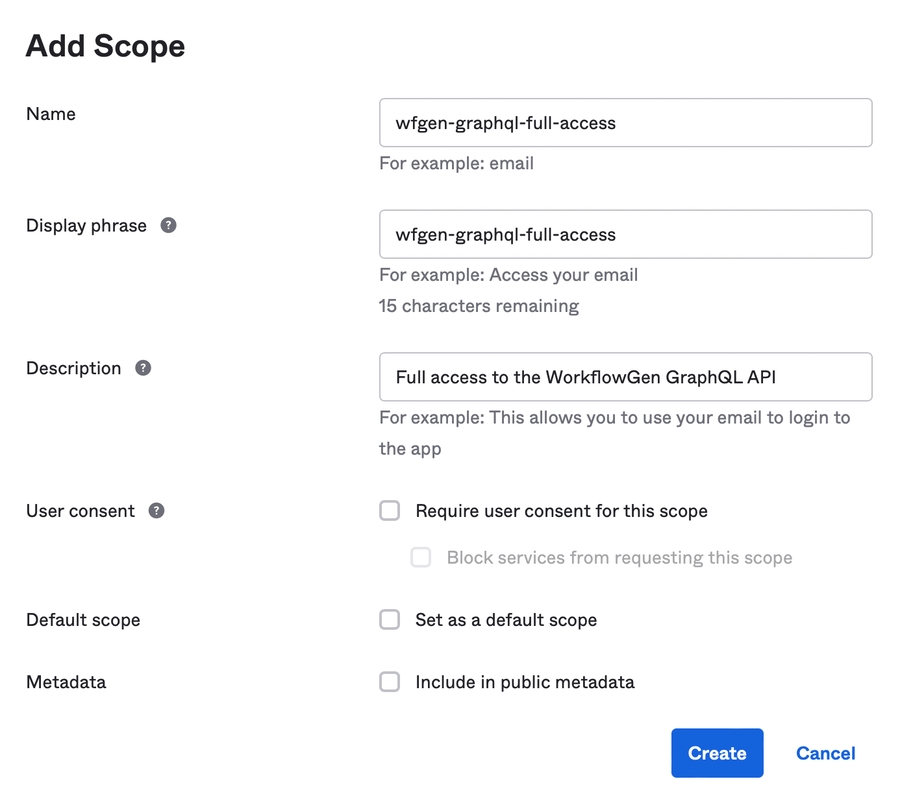
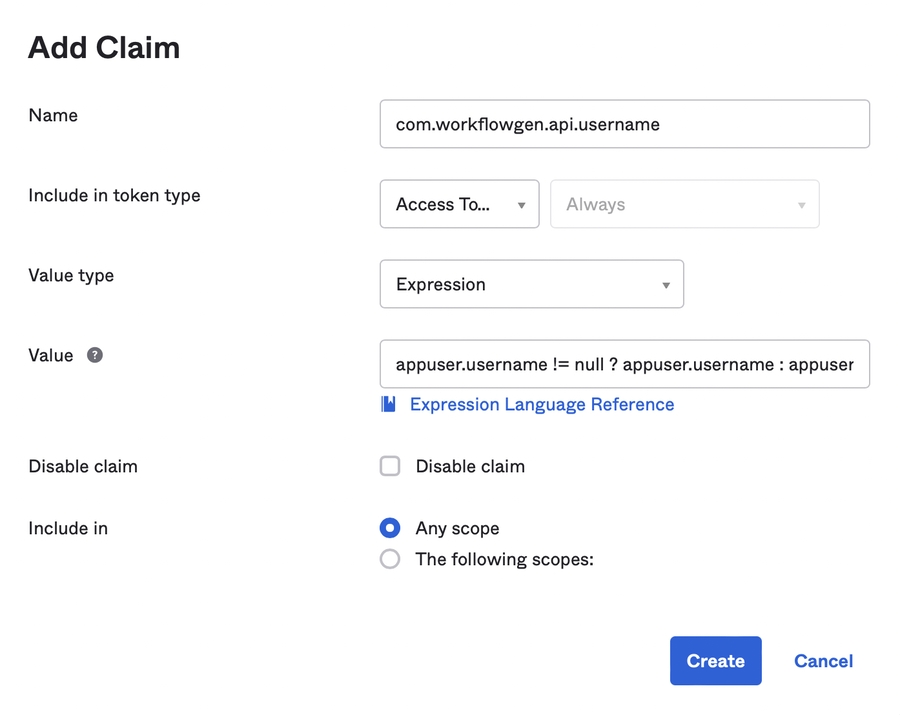

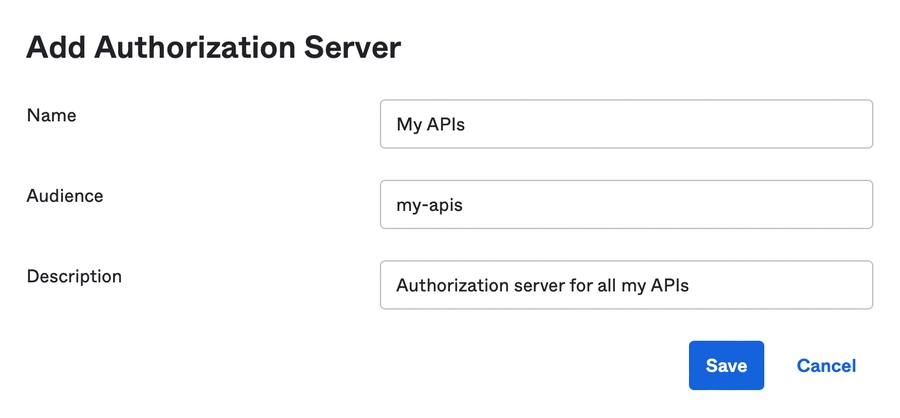
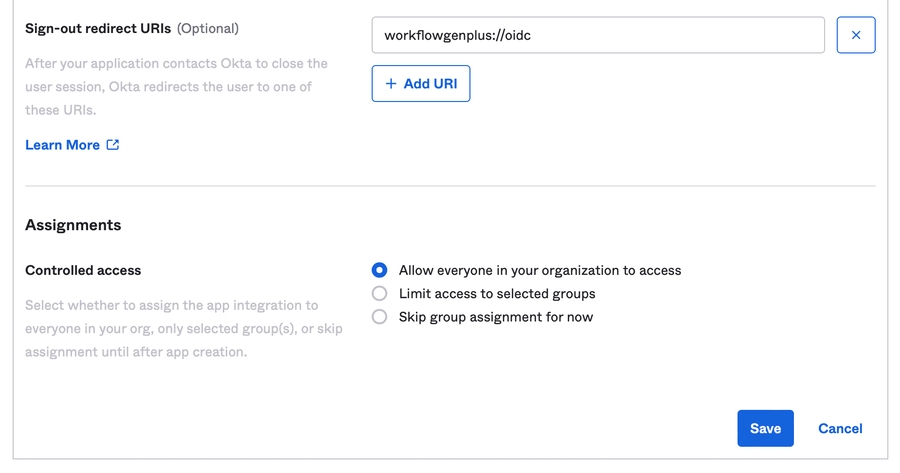
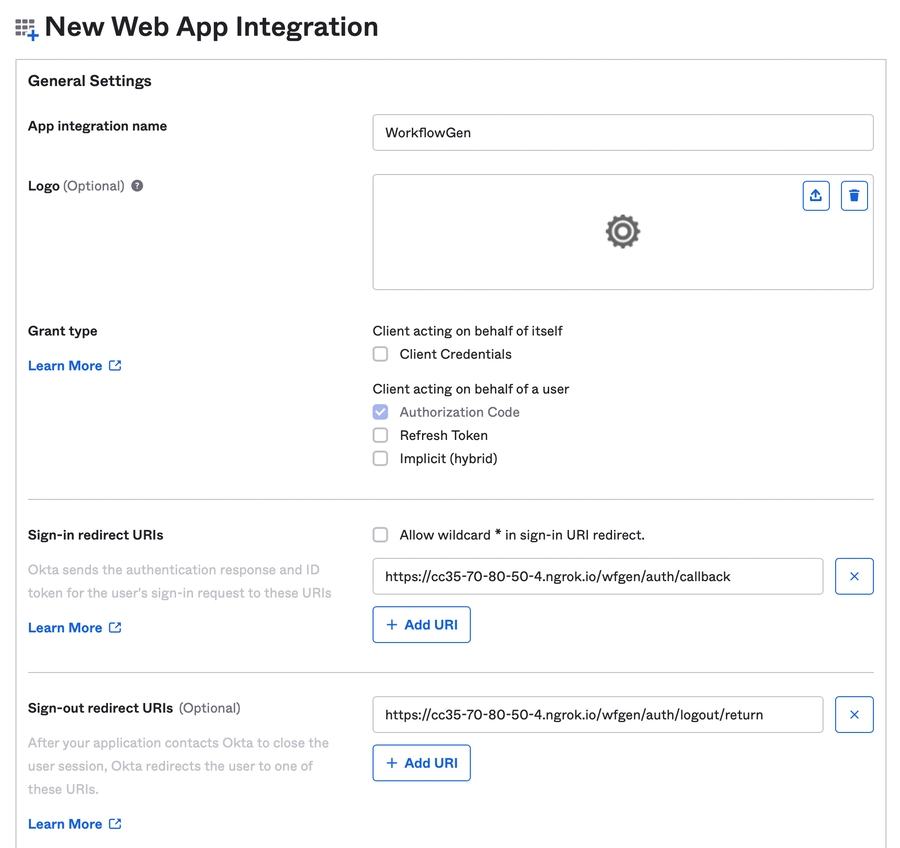
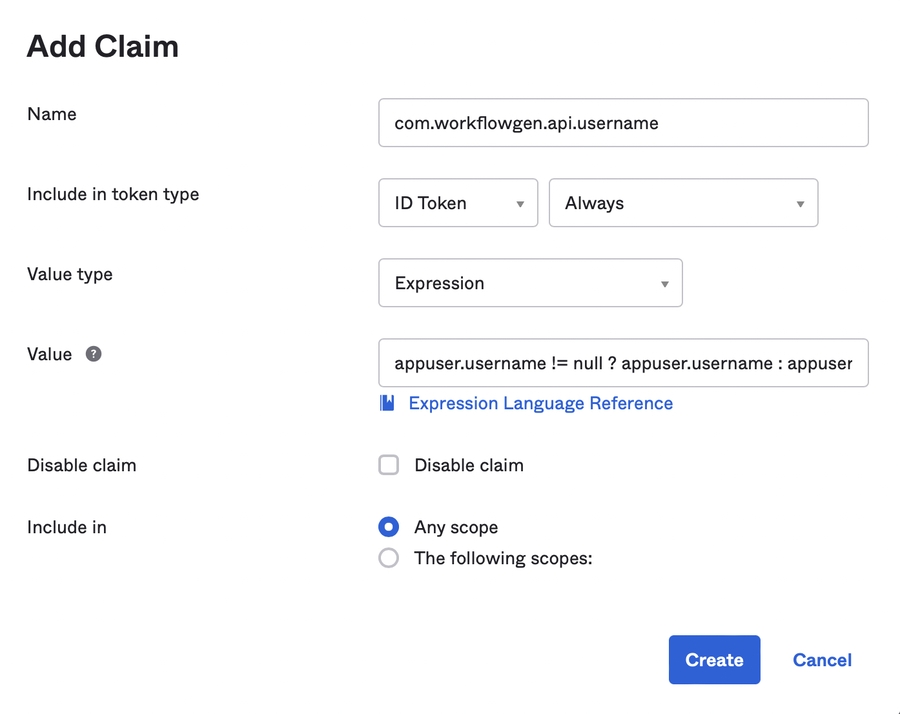
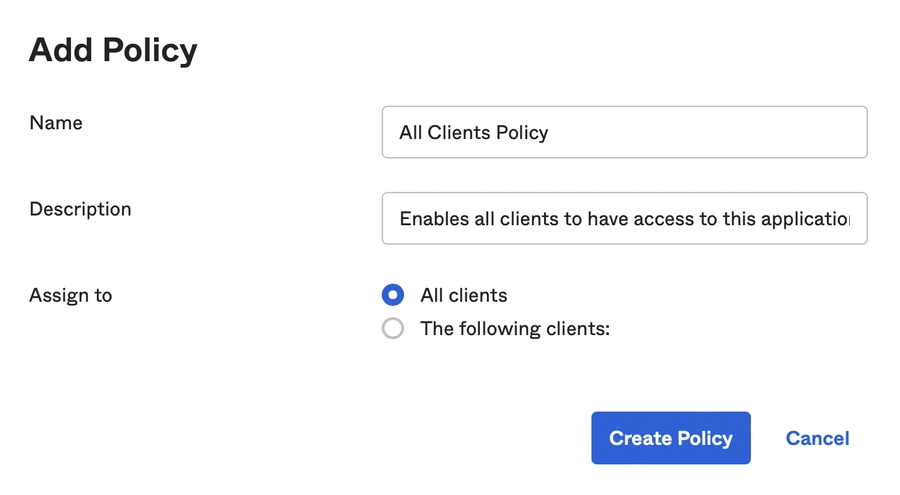
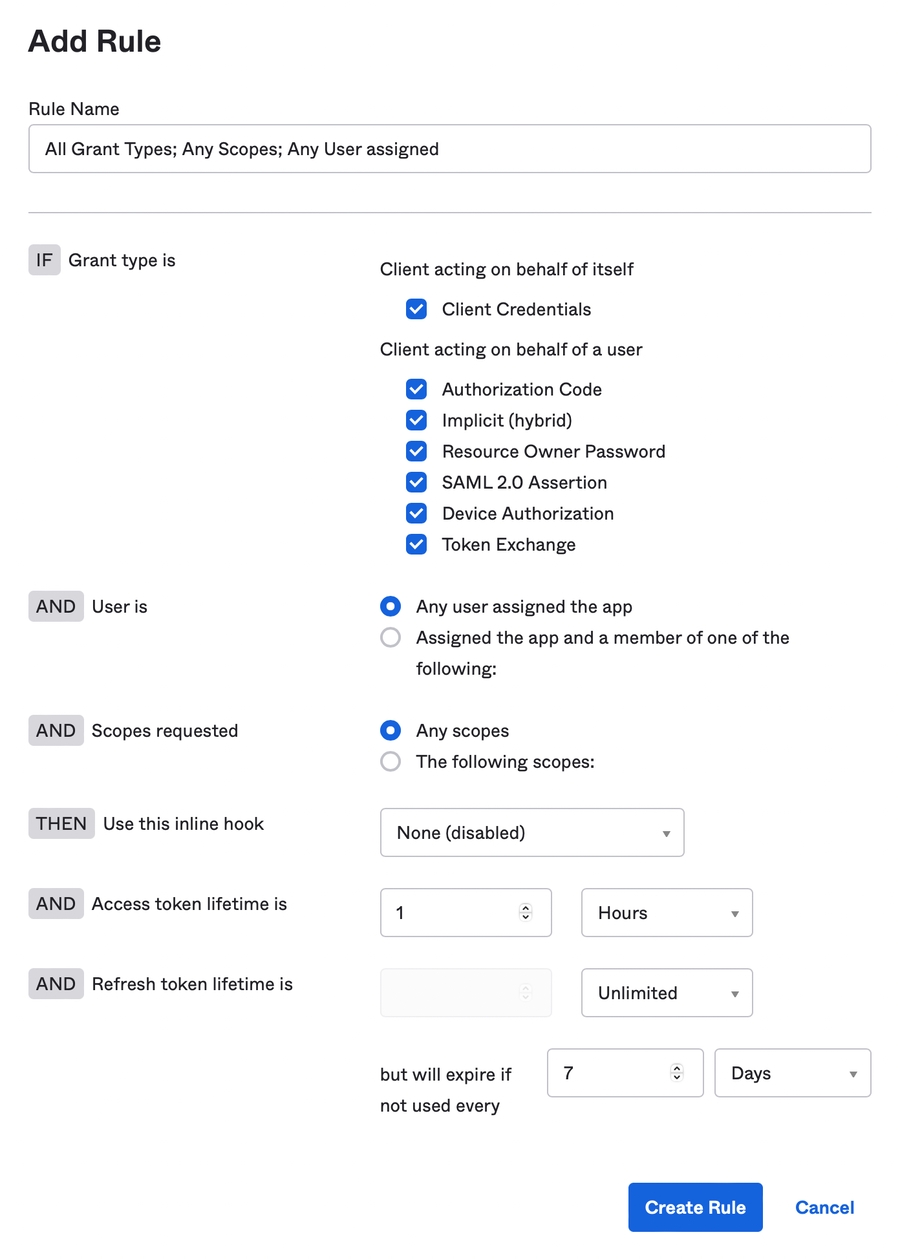

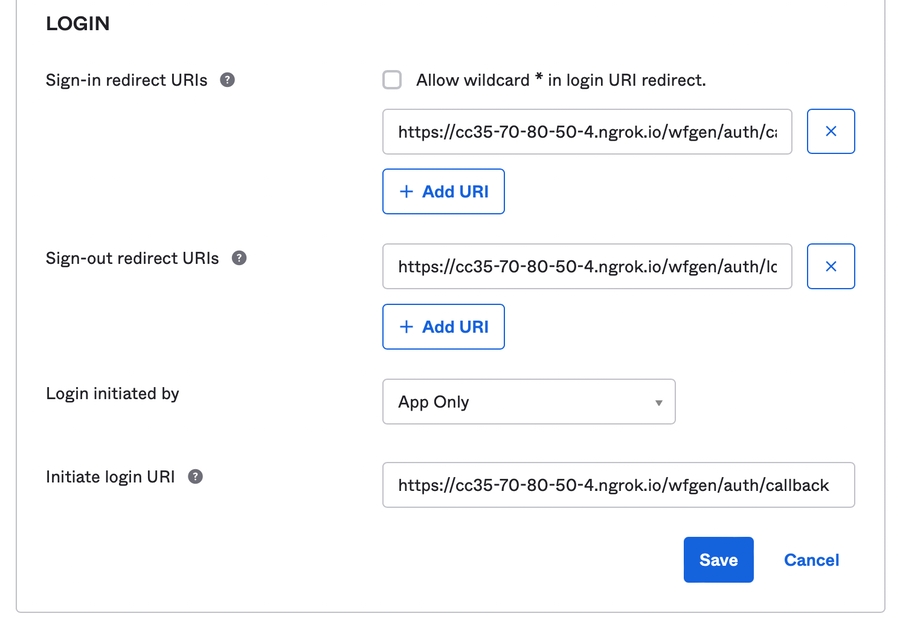

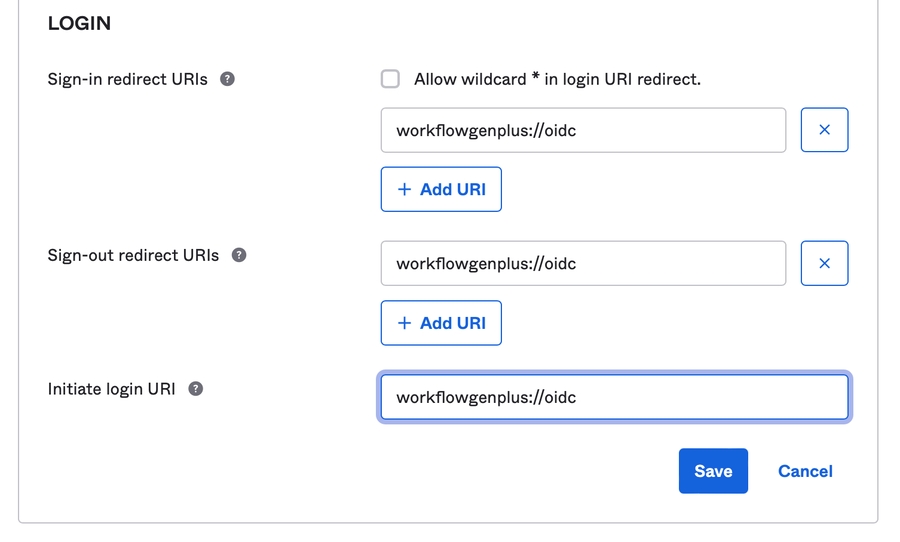
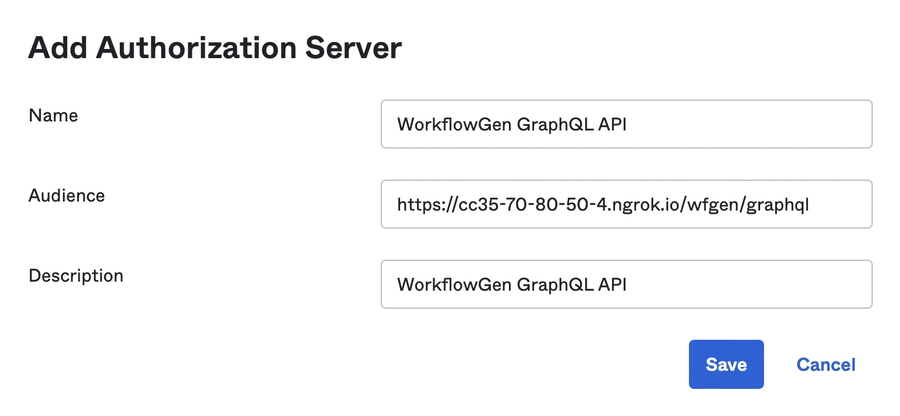
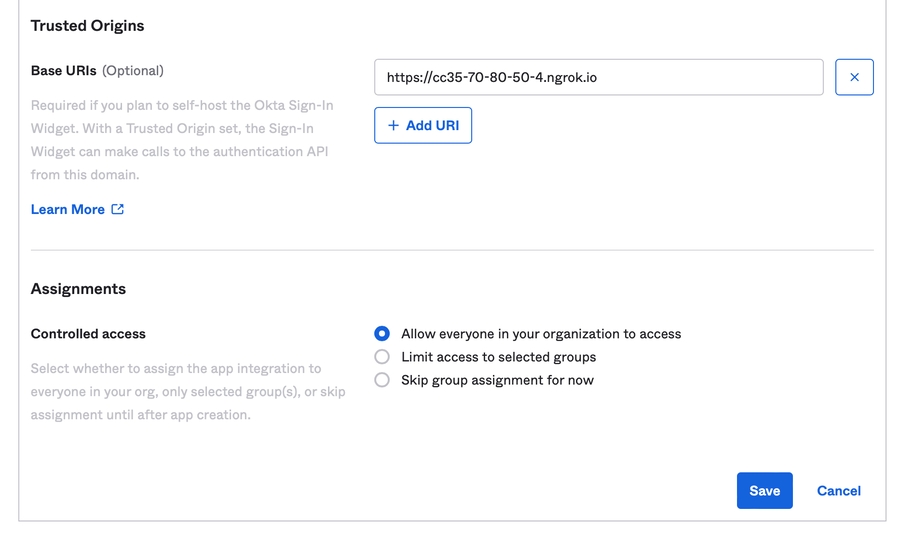
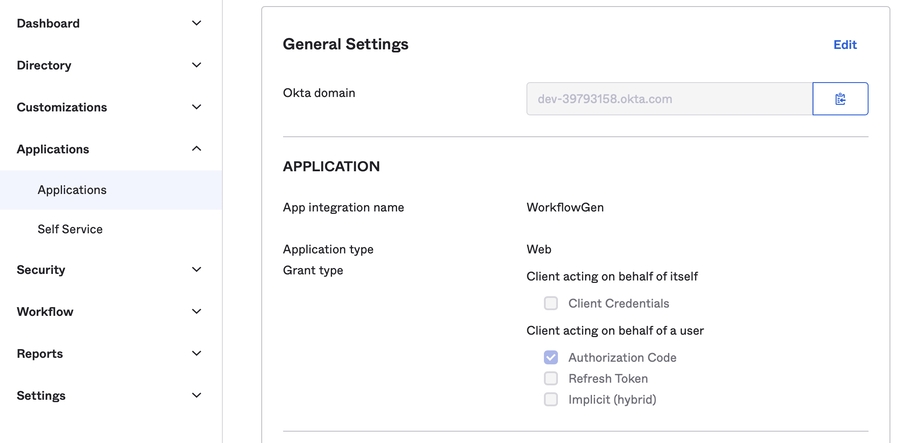
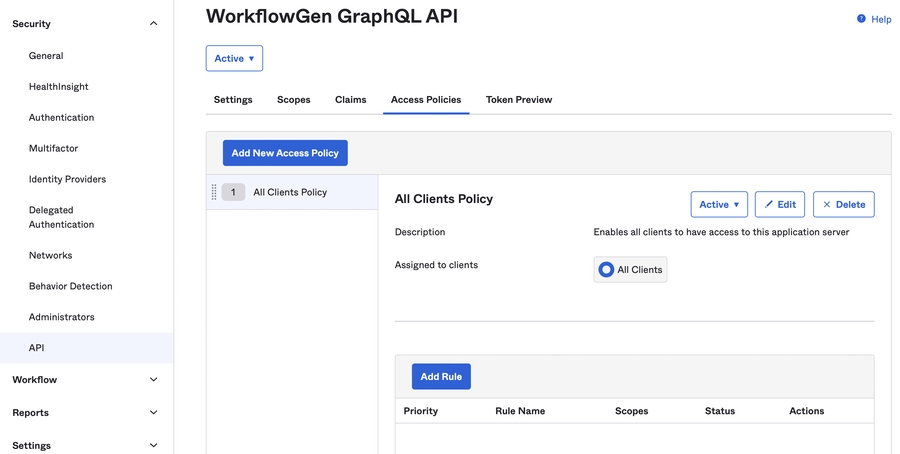
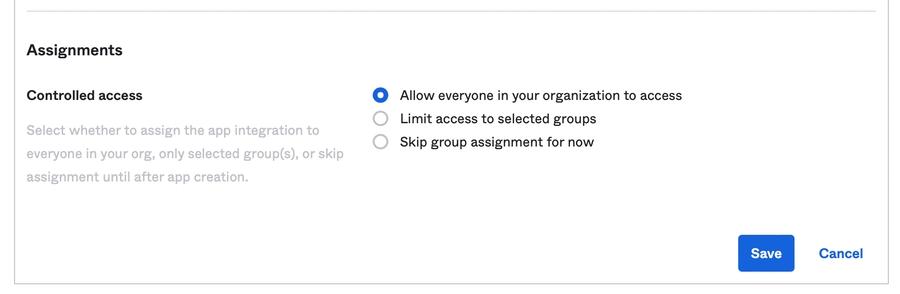
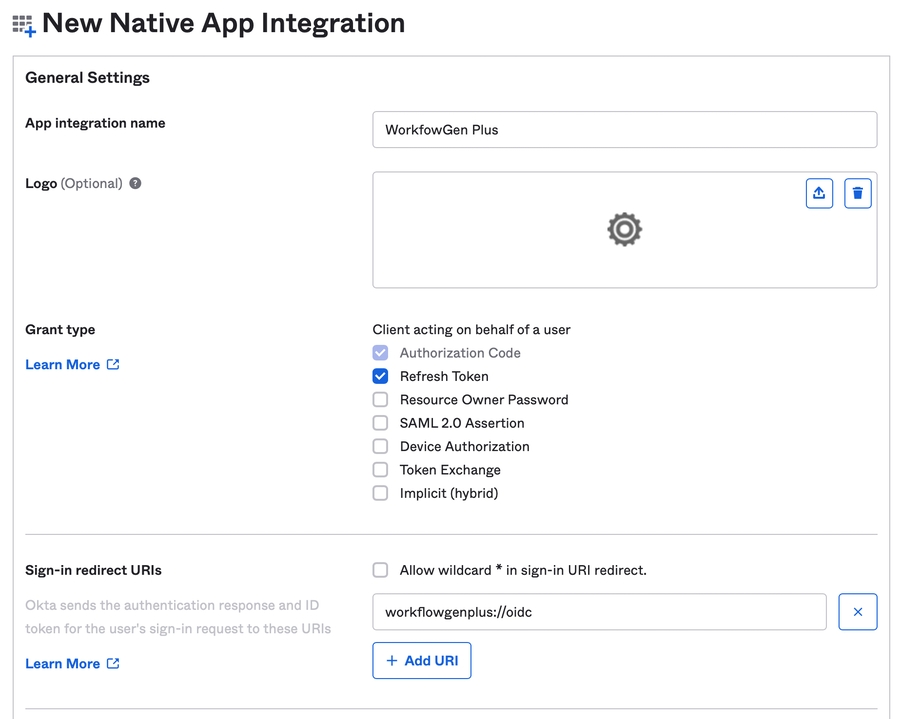
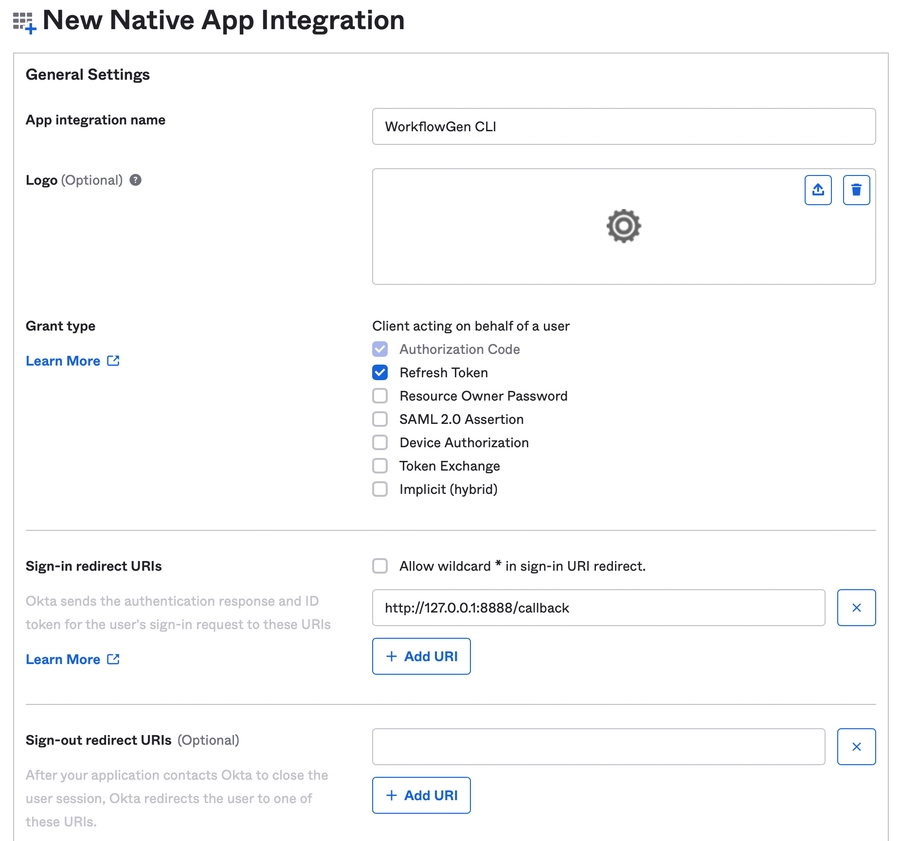
The following tables list the WorkflowGen web and application configuration parameters with their descriptions and values.
These parameters are located in the web.config file in the DRIVE:\Inetpub\wwwroot\wfgen folder.
These parameters are located in the WfgWorkflowEngineService.exe.config file in the DRIVE:\Program Files\Advantys\WorkflowGen\Services\bin\ folder.
These parameters are located in the WfgDirectoriesSyncService.exe.config file in the workflowgen\src\wfg\Program Files\Advantys\WorkflowGen\Services\bin\ folder.
Restricts name fields to ANSI characters
Default: Y
AdministrationTruncateValue
Default: 30
AdministrationUniqueLanguage
Defines Administration Module language
Default: Not set
AdministrationFormDataProviderName
Databind data providers, separated by commas
Default: System.Data.SqlClient,System.Data.OleDb,System.Data.Odbc,System.Data.OracleClient
AdministrationEnableDeletionRulesCheck
Enable the deletion rules check for users, groups, and directories
Default: N
AdministrationRestrictManagerToModifyGlobalParticipant
Disable process managers' permissions to modify a global participant's information (either via the process participants or while importing a process) such as name, descriptionvali, and user/group/directory associations
Default: N
AdministrationFormDesignUndoLimit
Maximum number of undo operations in the Form Designer
Default: 30
AdministrationAssociatedActivitiesToSwimlane
When enabled, this option keeps actions in their respective participants' swim lanes in the Workflow Designer
Default: Y
AdministrationDefaultConditionLanguage
Default language for conditions
JS: JavaScript (default)
VBS: VBScript
AdministrationMaxHelpTextSize
Maximum length in characters of help text associated with a request or action
Default: 10000
AdministrationProcessQuickListSize
Default: 0
Path of the web forms folder
Default: Not set
ApplicationDefaultProcessDataFileStorageMethod
Storage method for process data files
FILE: Store process data in the file system (default)
DATABASE: Store process data in the database
ApplicationDistributedDatabaseSourceMode
Default: 0
ApplicationEnableArchiveSiteRedirectConfirmation
Default: Y
ApplicationEnableDistributedDatabaseSource
Default: N
ApplicationHostUrl
URL of the host application
Default: Not set
ApplicationSessionTimeOut
Sets the application user session timeout in minutes and displays a logout link (this setting applies to WorkflowGen Applicative authentication only)
Default: 0 (no timeout)
ApplicationSerialNumber
WorkflowGen serial number Default: Not set
ApplicationSkinName
WorkflowGen Administration Module skin
Default: Default
SMTP server port; if not set, the SMTP connection will use the default SMTP port 25
Default: Not set
ApplicationSmtpUsername
Username used for the SMTP connection
Default: Not set
ApplicationSmtpPassword
Password used for the SMTP connection
Default: Not set
Configuration password management mode
AES: AES (FIPS Compliant) (default)
V5: Version 5 (Legacy)
ApplicationSecurityPasswordSymmetricEncryptionKey
Password symmetric encryption key
Default: Not set
ApplicationSecurityMaxLoginAttempts
Maximum number of unsuccessful user login attempts before an account is locked (set to 0 for unlimited attempts)
Default: 5
ApplicationSecurityMinimumPasswordLength
Minimum length of user passwords
Default: 8
ApplicationSecurityAuthGraphQLAppRole
Custom GraphQL application role value verified when validating roles in an access token returned from an OIDC provider in a client credentials flow
ApplicationSecurityAuthAcrValues
ACR values as specified by the Gardian service provider
Hour of the day to perform automatic monthly synchronization (in 24-hour format)
Default: 00:00
DirectorySynchronizationTimeOut
Default: 10800
DirectorySynchronizationTextGroupPrefix
Group name prefix
Default: GROUP_
DirectorySynchronizationTextUserPrefix
Username prefix
Default: USER_
DirectorySynchronizationWeekDay
Day of the week to perform the automatic weekly synchronization
0: Sunday
1: Monday (default)
2
DirectorySynchronizationWarningLogs
Enable display of warnings in log files
Default: N
DirectorySynchronizationMaxUserDeletionCount
Maximum number of account deletions per synchronization run
Default: 0
DirectorySynchronizationSyncGroupMembersUsedInParticipantOnly
Enable synchronization of a group's members only if the group is associated to at least one participant
Default: N
Custom days off (d/m separated by commas) Default: Not set
EngineTraceMode
Default: N
EngineWeekDaysOff
Weekdays normally off
Default: 7,1
EngineWorkHourEnd
Hour the workday ends based on the current server time zone
Default: 18:00
EngineWorkHourStart
Hour the workday begins based on the current server time zone
Default: 9:00
EngineXpdlSchemaUrl
Default: http://www.workflowgen.com/xsd/xpdl/schema-v1-0.xsd
Maximum number of users to send email notifications to per notification
Default: 100
EngineNotificationDefaultLanguage
Language to use for email notification texts if the user has no default or preferred language selected
Default: en-US
EngineNotificationMaxFileAttSize
Maximum size of file attachments to requests in megabytes
Default: 10
EngineNotificationTextDetection
Display URLs and email addresses as clickable links
Default: Y
EngineNotificationLogLevel
Type of information stored in the notification log file
Default: 1
EngineNotificationNotifyDelegator
Send email notifications to delegator in addition to delegatee
Default: Y (enabled)
EnginePushNotificationSendExpoApiUrl
Default: https://exp.host/--/api/v2/push/send
Time in milliseconds
Default: 120000 (2 minutes)
EngineServiceCleanupFrequency
Time in milliseconds
Default: 180000 (3 minutes)
EngineServiceMaxPausedSynchroActions
Maximum number of concurrent paused synchro actions to process
Default: 25
EngineServiceMaxScheduledSystemActions
Maximum number of concurrent scheduled system actions to process
Default: 25
EngineServiceMaxTimeoutSystemActions
Maximum number of concurrent timeout system actions to process
Default: 25
EngineServiceInactiveDelegationLifespan
Number of days
Default: 15
EngineServiceInactiveRequestLifespan
Maximum number of days, hours, or minutes before ghost requests are deleted
Default: 3
EngineServiceInactiveRequestLifespanUnit
Time unit of ghost request deletion value
d: days (default)
h: hours
m
EngineServiceTempApiFilesLifespan
Number of days
Default: 2
EngineServiceImpersonificationUsername
Default: wfgen_admin
EngineServiceSystemActivitiesTimeOut
Total execution time allowed for a system action in seconds
Default: 600 (10 minutes)
Enable logs for the XMLTODATABASE application in the \wfgen\App_Data\LogFiles\XmlToDatabase directory
Default: N
XmlTransEnableFilesCleanUp
Enable file clean-up for the XMLTRANS workflow app
Default: Y
XmlTransEnableTrace
Enable logs for the XMLTRANS workflow app
Default: N
SendMessageProvider
SMS provider
Default: TWILIO
SendMessageAccountSID
Twilio account security identifier
Default: Not set
SendMessageAuthToken
Twilio authorization token
Default: Not set
SendMessageFrom
Telephone number of the instant message sender to display
Default: Not set
SendMessageApiUrl
Twilio API URL
Default: https://api.twilio.com/2010-04-01/Accounts/
SendMessageEnableLogs
Enable instant messaging logs
Default: Y
SendHttpPostMaxResponseLength
Maximum response length in characters
Default: 4194304 (4 MB)
SendHttpPostLogLevel
Enable and define the log level of the SENDHTTPPOST workflow app
0: No logs (default)
2: Information
3
MergeFormEnableFilesCleanUp
Enable file clean-up for the MERGEFORM workflow app
Default: Y
MergeFormLogLevel
Enable and define the log level of the MERGEFORM workflow app
0: No logs (default)
2: Information
3
RestApiClientLogLevel
Enable and define the log level of the RESTAPICLIENT workflow app
0: No logs (default)
2: Information
3
RestApiClientRequestTimeout
Request timeout in milliseconds
Default: 30000 (30 seconds)
RestApiClientMaxResponseLength
Maximum response length in characters
Default: 4194304 (4 MB)
RestApiClientEnableFilesCleanUp
Enable file clean-up for the RESTAPICLIENT workflow app
Default: Y
ExecSqlLogLevel
Enable and define the log level of the EXECSQL workflow app
0: No logs (default)
1: Errors
2
DocuSignSendLogLevel
Enable and define the log level of the DOCUSIGNSEND workflow app
0: No logs (default)
1: Errors
2
DocuSignClientId
DocuSign client ID
Corresponds to your DocuSign application's Integration Key value
DocuSignUserGuid
DocuSign user GUID
Corresponds to the API Username value in the DocuSign configuration panel
DocuSignAuthServer
DocuSign Auth server
DocuSign values:
account.docusign.com (production)
account-d.docusign.com (demo)
DocuSignHostServer
DocuSign host server
DocuSign values:
https://docusign.net (production)
https://demo.docusign.net (demo)
DocuSignCheckLogLevel
Enable and define the log level of the DOCUSIGNCHECK workflow app
0: No logs (default)
1: Errors
2
AdobeSignSendLogLevel
Enable and define the log level of the ADOBESIGNSEND workflow app
0: No logs (default)
1: Errors
2
AdobeSignClientId
Adobe Sign client ID
AdobeSignClientSecret
Adobe Sign client secret
AdobeSignRefreshToken
Adobe Sign refresh token
AdobeSignRefreshUrl
Adobe Sign refresh URL
Default: /oauth/v2/refresh
AdobeSignHostServer
Adobe Sign host server (e.g.: https://api.naX.adobesign.com , where X is the server ID)
AdobeSignCheckLogLevel
Enable and define the log level of the ADOBESIGNCHECK workflow app
0: No logs (default)
1: Errors
2
DocaposteUsername
Docaposte username
DocapostePassword
Docaposte password
DocaposteHostServer
Docaposte host server
DocaposteOfferCode
Docaposte offer code
DocaposteOrganizationalUnitCode
Docaposte organizational unit code
DocaposteSendLogLevel
Enable and define the log level of the DOCAPOSTESEND workflow app
0: No logs (default)
1: Errors
2
DocaposteCheckLogLevel
Enable and define the log level of the DOCAPOSTCHECK workflow app
0: No logs (default)
1: Errors
2
YousignApiKey
Yousign API key
YousignHostServer
Yousign host server
YousignSendLogLevel
Enable and define the log level of the YOUSIGNSEND workflow app
0: No logs (default)
1: Errors
2: Information
YousignCheckLogLevel
Enable and define the log level of the YOUSIGNCHECK workflow app
0: No logs (default)
1: Errors
2: Information
Customized banner URL
Default: /wfgen/App_Themes/Default/portal/banner/banner.htm
PortalDefaultProcessDataColumnSize
Default width in pixels of columns that display associated data when the end-user's UI is in single-process view
Default: 150
PortalDisplayName
Application name to display in the User Portal
Default: WorkflowGen
PortalEnableDelegation
Enable task delegation by end-users
Default: Y
PortalFilterProcessGroupByCategory
Enable grouping of processes in the drop-down list used to switch to single-process view
Default: Y
PortalHideRequestFormActionsBySomeoneElse
Hide actions performed by other users in request forms
Default: N
PortalHomePageDisplayMode
Disable counters on User Portal home page
0: Display all section counters according to their results (default)
1: Display a link for the My requests in progress section only
PortalHomePageListSize
Maximum number of records in lists on the User Portal home page before showing pages
Default: 200
PortalDisplayCodeNames
Display code names instead of process and action descriptions
Default: N
PortalListPageCount
Number of pages to be displayed in User Portal lists Default: 10
PortalListPageSize
Number of records to be displayed in User Portal lists
Default: 25
PortalMaxListSize
Maximum number of records to be displayed in search or statistics results lists
Default: 1000
PortalMaxMaptoUsers
Maximum number of users in a list before filtering by name
Default: 100
PortalNewRequestGroupByCategory
Displays requests grouped by category in the New request list
Default: Y
PortalPortletXslUrl
Path of XSL sheet used to transform RSS content in Portlet module
Default: Not set
PortalProcessStartAction
Action when a new request is launched
NO: Display the request follow-up form
PRE: Display the follow-up form of the first action
PortalProcessStartConfirmation
Require the user to confirm the launch of a new request
Default: N
PortalUniqueLanguage
User Portal language
Default: Not set
PortalEnableComments
Enable User Portal comments
Default: N
PortalCommentsRefreshFrequency
Auto-refresh rate of follow-up form comments lists in milliseconds
Default: 300000 (5 minutes)
PortalCommentsPopUpWidth
Width of action runtime menu comments list pop-up window in pixels
Default: 380
PortalCommentsPopUpHeight
Height of action runtime menu comments list pop-up window in pixels
Default: 550
PortalCommentsSortBy
Default comments list sort field
Default: DATE_POST
PortalCommentsSortOrder
Default comments list sort order
Default: ASC
PortalCommentsExpandView
Expand comments list the first time a follow-up form is displayed
Default: N
PortalCommentsListSize
Maximum number of comments to display on User Portal home page
Default: 25
PortalQuickViewEnabled
Enable the Quick View functionality in the User Portal
Default: Y
PortalQuickViewDataName
Process data value to display in Quick View pane
Default: FORM_ARCHIVE
PortalQuickViewDisplayOnMouseEvent
Mouse event that triggers the Quick View pane to open
MOUSEENTER: Hover
CLICK: Click (default)
PortalTextDetection
Display URLs and email addresses as clickable links
Default: Y
PortalEnableSearchResultAutoRedirect
Redirect search results to follow-up form when only one item is found
Default: N
PortalReportAdvancedViewDefault
Display search results as a customizable report by default
Default: Y
PortalReportEnableCustomColumns
Enable custom column editing for process managers and supervisors only
Default: Y
PortalReportAllowUserToCreateCustomColumns
Enable custom column editing for standard users
Default: Y
PortalReportEnableCustomCharts
Enable custom chart editing for process managers and supervisors only
Default: Y
PortalReportAllowUserToCreateCustomCharts
Enable custom chart editing for standard users
Default: Y
PortalReportEnableQuickMassApproval
Enable the Quick Approval feature in reports
Default: N
PortalCommonProcessDataNameList
Enable User Portal common process data lists
Default: Not set
PortalEnableCallingCard
Enable user calling cards
Default: Y
PortalDashboardAutoRefreshInterval
User Portal dashboard auto-refresh rate
Default: 0
PortalRedirectAllowedHttpUrls
Default: Not set
PortalReportAdvancedViewPaging
Enable pagination in Advanced View search results
Default: N (disabled)
PortalDisplayAssignedTeamAction
Display assigned team actions
Default: N
Number of process actors displayed in statistics reports
Default: 10
ReportsTopRequestersNumber
Number of requesters displayed in statistics reports
Default: 10
ReportsTopProcessesNumber
Number of processes displayed in statistics reports
Default: 10
ReportsTextDetection
Display URLs and email addresses as clickable links
Default: Y
Enable Quick mode approval replies
Default: Y
RemoteApprovalCaseSensitiveAnswer
Enforce case sensitivity on email answers
Default: N
RemoteApprovalMailServerType
Incoming mail server type
POP: POP (default)
IMAP: IMAP
EXCHANGE2007
RemoteApprovalMailServerPort
Port number for IMAP or POP connection
Default: 995
RemoteApprovalMailServerSecurity
Mail server security
none: None
SSL: SSL (default)
RemoteApprovalIncomingServerAddress
Address of the server to receive emails
RemoteApprovalIncomingServerUsername
Username used to log in to POP, IMAP, or Exchange server
RemoteApprovalIncomingServerPassword
Password used to log in to the POP, IMAP, or Exchange server
RemoteApprovalIncomingServerDomain
Domain name of incoming Exchange server account
RemoteApprovalAuthClientId
Application (client) ID for Exchange Online
RemoteApprovalAuthClientSecret
Client secret for Exchange Online
RemoteApprovalAuthScope
Scope of the application for Exchange Online
RemoteApprovalAuthAccessTokenUrl
Access token URI for Exchange Online
Enable data caching
Default: Y
GraphqlDebugEnabled
Enable debug mode
Default: N
GraphqlQueryTimeout
Query execution timeout in milliseconds
Default: 90000 (90 seconds)
GraphqlOperationTimeout
Operation execution timeout in milliseconds
Default: 30000 (30 seconds)
GraphqlMaxAllowedContentLength
Maximum GraphQL query content length in bytes
Default: 30000000
GraphqlMaxOperationCount
Maximum number of operations per query
Default: 10000
GraphqlMaxInputFileSize
Maximum file size limit in kilobytes for FILE type parameter URLs
Default: 10240 (10 MB)
GraphqlMaxInputFileContentSize
Maximum content size limit in kilobytes of FILE type parameters encoded in base64
Default: 0
GraphqlInputFileDownloadTimeout
Timeout in milliseconds
Default: 100000 (100 seconds)
GraphqlInputFileAllowedFolders
Local or remote folders where files used by FILE type parameters are stored
Default: Not set
GraphqlInputFileAllowedHttpUrls
Allowed HTTP/HTTPS URLs for file uploads
Default: Not set
GraphqlApiKeyEnabled
Enable GraphQL API key feature
Default: N (disabled)
GraphqlApiKey
GraphQL API key; the value sent in the x-wfgen-graphql-api-key header must match this key
Default: Not set
Local or remote folders where files used by FILE type parameters are stored
Default: Not set
HooksInputFileAllowedHttpUrls
Allowed HTTP/HTTPS URLs for file uploads
Default: Not set
HooksAllowImpersonateUser
Allow user impersonation for webhooks
Default: N (disabled)
HooksApiKeyEnabled
Enable webhooks API key feature
Default: N (disabled)
HooksApiKey
Webhooks API key; the value sent in the x-wfgen-hooks-api-key header must match this key
Default: Not set
URL the application calls to verify the current user's authentication status
Default: Not set
ApplicationSecurityAuthUsernameClaim
Name of the claim contained in the access token that identifies the user in WorkflowGen
Default: Not set
ApplicationSecurityAuthGraphQLUsernameClaim
Value used by the GraphQL API when receiving an access token
ApplicationSecurityAuthAudience
Intended recipient of the access token (e.g. the target API)
Default: https://<workflowgen url>/graphql
ApplicationSecurityAuthAdditionalScopes
Additional scopes to add to the authentication request; these will appear in the access token content
✏️ Note: The openid, profile, and email scopes are always in the request.
ApplicationSecurityAuthGraphQLScope
Custom GraphQL scope value verified when validating authorized scopes in an access token returned from an OIDC provider
ApplicationSecurityAuthAppIdClaim
Name of the claim contained in the access token obtained from the identity provider that uniquely identifies a non-interactive client
Default: Not set
ApplicationSecurityAuthClockTolerance
Value used when verifying a token in WorkflowGen to deal with minor differences between servers' clocks
ApplicationSecurityAuthSessionRefreshEnableIFrame
Activate session auto-refresh feature using an invisible <iframe>
Default: Y
ApplicationSecurityAuthSessionTokenCookie
Name of the session cookie that is generated by the authentication module.
Default: wfgen_token
ApplicationSecurityAuthSessionTimeOut
Duration of the session in seconds
Default: Not set
ApplicationSecurityAuthMobileSessionTimeOut
Duration of the session in seconds when requested from mobile devices on the token endpoint
Default: 7200
ApplicationSecurityAuthResponseMode
Determines the provider's response mode for the authentication process
Possible values: form_post (default) or query
ApplicationSecurityAuthDecodeAccessToken
Indicates whether or not the access token should be decoded by the authentication module
Possible values: Y (default) or N
Parameter
Description & values
AdministrationDefaultProcessView
Workflow Designer process view
GRAPH: Graphical view (default)
LIST: List view
AdministrationDisplayName
Text to display in the top left corner of the Administration Module banner
Default: WorkflowGen Administration
AdministrationListPageCount
Number of pages to display in Administration Module lists
Default: 10
AdministrationListPageSize
Number of records per page to display in Administration Module lists
Default: 100
AdministrationMaxMapToUsers
Maximum number of users in a list before filtering by name
Default: 100
Parameter
Description & values
ApplicationUrl
Base URL of the web application
Default: http://localhost/wfgen
ApplicationShowAssociatedDataWithEmptyValue
Show or hide data with empty values in the follow-up form
Default: Y
ApplicationArchiveSiteUrl
Default: Not set
ApplicationConfigAllowedUsersLogin
Usernames (separated by commas) of users who have permissions to perform system or sensitive administration operations through the API
Default: wfgen_admin
ApplicationDataPath
Path of the folder on the web server in which WorkflowGen stores files (such as attachments to requests)
Default: Not set
Parameter
Description & values
ApplicationSmtpServer
SMTP server address
Default: Not set
ApplicationSmtpPickupDirectory
Pickup directory path
Default: C:\inetpub\mailroot\Pickup
ApplicationSmtpServerTimeout
Time in milliseconds allowed before server connection timeout
Default: 3000 (3 seconds)
ApplicationSmtpDeliveryMethod
Delivery method
SmtpServer: Server (default)
PickupDirectory: Pickup directory
ApplicationSmtpEnableSsl
Enable SSL/TLS
Default: N
Parameter
Description & values
ApplicationSecurityAuthenticationRealm
Default: Not set
ApplicationSecurityEnableLogs
Default: N
ApplicationSecurityRemoveDomainPrefix
Remove domain names from usernames
Default: _all
ApplicationSecurityEnableWebAppsSecureMode
Enable data encryption in the communication between WorkflowGen and the web form
Default: Y
ApplicationSecurityPasswordManagementMode
Password management mode for directories, applications, the SMTP server, and the Remote Approval incoming mail server
OWH_FIPS: One-way Hashing (SHA256 FIPS Compliant) (default)
OWH: One-way Hashing (SHA256)
V5: Version 5 (Legacy)
Parameter
Description & values
ChartServiceAvoidColorCollision
Default: True
ChartServiceMaxSliceInPie
Maximum number of slices in pie charts
Default: 6
Parameter
Description & values
DirectoryNameMaxLength
Maximum directory name length in characters
Default: 30
DirectoryNewUserDefaultLanguage
Default language for new users
Default: en-US
DirectoryNewUserDefaultProfile
Default profile for new users
1: Administrator
2: Standard user (default)
DirectoryNewUserDefaultTimezone
Default time zone for new users
Default: 9
See the Time Zone IDs & GMT Values Mapping section in the WorkflowGen Integration Guide for a list of time zones and their corresponding numeric IDs.
Parameter
Description & values
DirectorySynchronizationDeleteTempFiles
Enable automatic deletion of temporary XML log files once synchronization is complete
Default: Y
DirectorySynchronizationDetailedLogs
Enable logging of each action performed on directory data
Default: Y
DirectorySynchronizationHistoryLogs
Number of days before deleting log files
Default: 31
DirectorySynchronizationMonthDay
Date of the month to perform synchronization
Default: 1
DirectorySynchronizationQueryPageSize
Number of records to display in directory synchronization queries
Default: 1000
Parameter
Description & values
EngineAllowManagerToDeleteRealProcessInstances
Allow managers to delete real (active) process instances
Default: Y
EngineCountryDaysOff
Country to be used to calculate legal public holidays
en-AU: Australia (English)
en-CA: Canada (English)
fr-CA: Canada (French)
fr-FR: France (French)
de-DE: Germany (German)
it-IT: Italy (Italian)
pt-PT: Portugal (Portuguese)
es-ES: Spain (Spanish)
fr-CH: Switzerland (French)
de-CH: Switzerland (German)
en-GB: United Kingdom (English)
en-US: United States (English) (default)
EngineDataProtectionLockTimeout
Lock request data for the specified time period (minutes) to avoid competition for access to the same data
Default: 5
EngineEnableSelfServiceDataAssignException
Force WorkflowGen to throw an assignment exception error when a self service action is assigned to an invalid user
Default: N
EngineMaxActivityInstancePerProcessInstance
Default: 1000
Parameter
Description & values
EngineNotificationEnabled
Enable email notifications
Default: Y
EngineNotificationAllowSelfNotify
Send email notifications even if the sender and recipient email addresses are the same
Default: Y
EngineNotificationDefaultSender
Default email sender for email notifications
Default: Not set
EngineNotificationDefaultSenderName
Default sender name for email notifications
Default: Not set
EngineNotificationDefaultReplyTo
Default email address for replies to email notifications
Default: Not set
Parameter
Description & values
EngineServiceCheckTimeLimitFrequency
Time in milliseconds
Default: 180000 (3 minutes)
EngineServiceNotificationFrequency
Time in milliseconds
Default: 60000 (1 minute)
EngineServiceCancellationFrequency
Time in milliseconds
Default: 120000 (2 minutes)
EngineServiceSynchroActionFrequency
Time in milliseconds
Default: 15000 (15 seconds)
EngineServiceScheduledSystemActionFrequency
Time in milliseconds
Default: 15000 (15 seconds)
Parameter
Description & values
EFormAspxPreviousFilesCleanUp
Enable file clean-up for the EFORMASPX workflow app
Default: Y
EFormAspxAcceptEmptyInputTextParam
Default: Y
GetUsersFromDirMaxResultNb
Maximum number of records that can be returned by a query
Default: 100
GetUsersFromDirLogLevel
Enable and define the log level of the GETUSERSFROMDIR workflow app
0: No logs (default)
2: Information
3: Debug
XmlToDatabaseTestMode
Enable testing of transactions before being executed on the database
Default: N
Parameter
Description & values
PortalActivityOnClickAction
Specifies whether to display the action follow-up form or launch the action when clicking on an action to do
ACTION_FORM: Display the action
APP_LAUNCH: Launch the action (default)
PortalActivityOnCloseAction
Specifies what to display when an action is completed
REQUEST_FORM_FORCE: Display follow-up form of the request
REQUEST_FORM: Display the follow-up form of the request or the next action (default)
REQUEST_FORM_EXCEPT_TOASSIGN: Display the follow-up form of the request (except if action to assign)
REQUEST_FORM_EXCEPT_TODO: Display the follow-up form of the request (except if action to do)
TODO_LIST_FORCE: Display the list of the actions to do
TODO_LIST: Display the list of the actions to do or the next action
TODO_LIST_EXCEPT_TOASSIGN: Display the list of the actions to do (except if action to assign)
TODO_LIST_EXCEPT_TODO: Display the list of the actions to do (except if action to do)
HOME_COLLAPSE_FORCE: Display the homepage
HOME_COLLAPSE: Display the homepage or the next action
HOME_COLLAPSE_EXCEPT_TOASSIGN: Display the homepage (except if action to assign)
HOME_COLLAPSE_EXCEPT_TODO: Display the homepage (except if action to do)
HOME_TODO_EXPAND_FORCE: Display the homepage and expand the actions to do
HOME_TODO_EXPAND: Display the homepage and expand the actions to do or the next action
HOME_TODO_EXPAND_EXCEPT_TOASSIGN: Display the homepage and expand the actions to do (except if action to assign)
HOME_TODO_EXPAND_EXCEPT_TODO: Display the homepage and expand the actions to do (except if action to do)
PortalActivityOnCompleteRedirectToView
When an action launched from a view is completed, return to the view
Default: N
PortalActivityCompleteInBackground
Specifies if the action completion is to be processed in the background (threading)
Default: N
PortalFrameSetHeight
Height of banner (in pixels) displayed at the top of the User Portal
Default: 0,68,*,0
Parameter
Description & values
ReportsChartServiceUrl
Default: Not set
ReportsChartTemplatePath
Default: Not set
ReportsChartTemplateExtension
Default: Not set
ReportsExportFormat
Statistics reports export format
CSV: Comma-separated values (default)
TEXT_UNICODE: Unicode text (tab separator)
ReportsTopUsersNumber
Number of users displayed in statistics reports
Default: 10
Parameter
Description & values
RemoteApprovalEnabled
Enable Remote Approval
Default: N
RemoteApprovalRefreshInterval
Refresh interval for Remote Approval email in milliseconds
Default: 180000 (3 minutes)
RemoteApprovalLogTraceLevel
Log file trace level
0: Disabled
1: General messages
2: Error messages
3: General and error messages (default)
4: Full details for debugging (including Event Viewer)
RemoteApprovalLifeSpan
Remote Approval temporary log file life span in days
Default: 0
RemoteApprovalEnableSubjectLineValidation
Enable use of action reference code in subject line for validation
Default: Y
Parameter
Description & values
GraphqlMaxPageSize
Maximum page size for page number based pagination
Default: 100
GraphqlMaxBatchSize
Default: 1000
GraphqlDefaultPageNumber
Default page number for page number based pagination
Default: 1
GraphqlDefaultPageSize
Default page size for page number based pagination
Default: 30
GraphqlGraphiqlEnabled
Enable GraphiQL
Default: N
Parameter
Description & values
HooksDebugEnabled
Enable debug mode
Default: N
HooksOperationTimeout
Operation execution timeout in milliseconds
Default: 30000 (30 seconds)
HooksMaxInputFileSize
Maximum file size limit in kilobytes for FILE type parameter URLs
Default: 10240 (10 MB)
HooksMaxInputFileContentSize
Maximum content size limit in kilobytes of FILE type parameters encoded in base64
Default: 0
HooksMaxInputFileDownloadTimeout
Timeout in milliseconds
Default: 100000 (100 seconds)
Parameter
Description & values
ApplicationSecurityAuthProvider
Name of the identity provider
adfs: AD FS
azure-v1: Microsoft Entra ID
auth0: Auth0
okta: Okta
ms-identity-v2: Microsoft Identity Platform v2.0
gardian: Gardian
Default: Not set
ApplicationSecurityAuthSessionTokenSigningSecret
Session token signing key
Default: Not set
ApplicationSecurityAuthClientId
Code that uniquely identifies the WorkflowGen web application
Default: Not set
ApplicationSecurityAuthClientSecret
Client secret generated by the identity provider
Default: Not set
ApplicationSecurityAuthMetadataUrl
Endpoint provided by the identity provider that supports the OpenID Connect Discovery standard
Default: Not set
Parameter
Description & values
ApplicationSecurityAuthLogoutUrl
Auth0 logout URL
Default: Not set
Parameter
Description & values
AssembliesWebServiceLocation
Specifies the URL of a web service used to retrieve the latest version information for WorkflowGen assemblies
Default: Not set
ProcessesRuntimeWebServiceAllowedUsers
Usernames (separated by commas) of users authorized to launch a process on behalf of another user
Default: wfgen_admin
ValidationSettings:UnobtrusiveValidationMode
Unobtrusive validation behavior
Default:None (required)
Parameter
Description & values
ServiceName
Name of the workflow engine service Default: WorkflowGenEngineService
WebConfigPath
web.config file path inside the WorkflowGen website
Default: C:\inetpub\wwwroot\wfgen\web.config
DatabaseConnectionRetry
Number of database reconnection attempts
Default: 3
DatabaseConnectionRetryInterval
Time interval between each database reconnection
Default: 30000
Parameter
Description & values
ServiceName
Name of the WorkflowGen Directory Synchronization service
Default: WorkflowGenDirSyncService
WebConfigPath
web.config file path inside the WorkflowGen website
Default: C:\inetpub\wwwroot\wfgen\web.config
DatabaseConnectionRetry
Number of database reconnection attempts
Default: 3
DatabaseConnectionRetryInterval
Time interval between each database reconnection
Default: 30000
AdministrationRestrictNamesToAnsi
ApplicationWebFormsPath
ApplicationSmtpPort
ApplicationSecurityPasswordSymmetricEncryptionMode
DirectorySynchronizationStartHour
EngineSpecialDaysOff
EngineNotificationMaxNotifiedUser
EngineServiceTimeoutSystemActionFrequency
XmlToDatabaseEnableTrace
PortalCustomHeaderUrl
ReportsTopParticipantsNumber
RemoteApprovalQuickApprovalMode
GraphqlLoadersCacheEnabled
HooksInputFileAllowedFolders
ApplicationSecurityAuthCheckSessionUrl
3: Wednesday
4: Thursday
5: Friday
6: Saturday
3: Debug
3: Debug
3: Debug
3: Debug
3: Debug
3: Debug
3: Debug
3: Debug
3: Debug
2: Display a link for the My actions to do section only4: Display a link for the Team to-do list section only
8: Display a link for the Actions to assign section only
16: Display a link for the My requests closed since my last visit section only
32: Display a link for the Follow-up of requests in progress section only
64: Display a link for the Follow-up of actions in progress section only
127: Display a link for all sections (disables all counters)
EXCHANGE2010: Exchange 2010 and later (versions 2013, 2016, and 2019 are supported)
EXCHANGE_EWS_OAUTH2: Exchange Online: Modern Authentication